Transfer Photos from iPhone to Computer: 6 Free Ways 2026
This article cover 6 methods of how to transfer photos from iPhone to computer. You can employ a professional transfer tool, AutoPlay, Windows Explorer, Photos App, and iCloud, airdrop to complete this operation.
By Kathy / Updated on May 14, 2026
Why can't I transfer Photos from iPhone to computer?
I prefer physical copies of my photos on a backup drive(s) that I can move around, but it seems practically impossible to transfer them via Windows. I’d like to be able to backup everything from my iPhone. I’m slowly making some progress, but the constant disconnecting, and occasional rebooting, make the process extremely slow and frustrating at best.
Are there working tools (emphasis on “working”) that do a better job than file manager for Windows?
- Question from Reddit
We take photos every day because of the amazing shooting technology. Once you have saved lots of photos on your iPhone, to back up your important pictures, get more available iPhone storage or view and edit photos on a larger screen, you may need to export photos from iPhone to PC.
Is there any handy tool to help you easily finish the process? Of course, keep on reading and you can make it right now. And Method 1 might be the most useful & free way.
Method 1. Fastest free way to transfer photos/videos from iPhone to PC with USB
If you are using a Windows computer, FoneBackup can be the best tool to transfer photos. With its powerful feature, you can easily transfer images from iPhone to PC without losing quality.
· You can transfer all or part of iPhone photos/videos to PC as you like.
· With the fast transfer speed, you can move 200+ images in 4 seconds.
· You can change the storage location to save photos anywhere you need, including a PC, external hard drive, HDD/SSD, etc.
· FoneBackup's great compatibility can support various iPhone models and iOS versions, including iPhone 16 and iOS 18.
Now you can hit the download button to install this tool. Connect your iPhone with your PC and follow the guidance below to finish the process on Windows 11/10/8/7 efficiently.
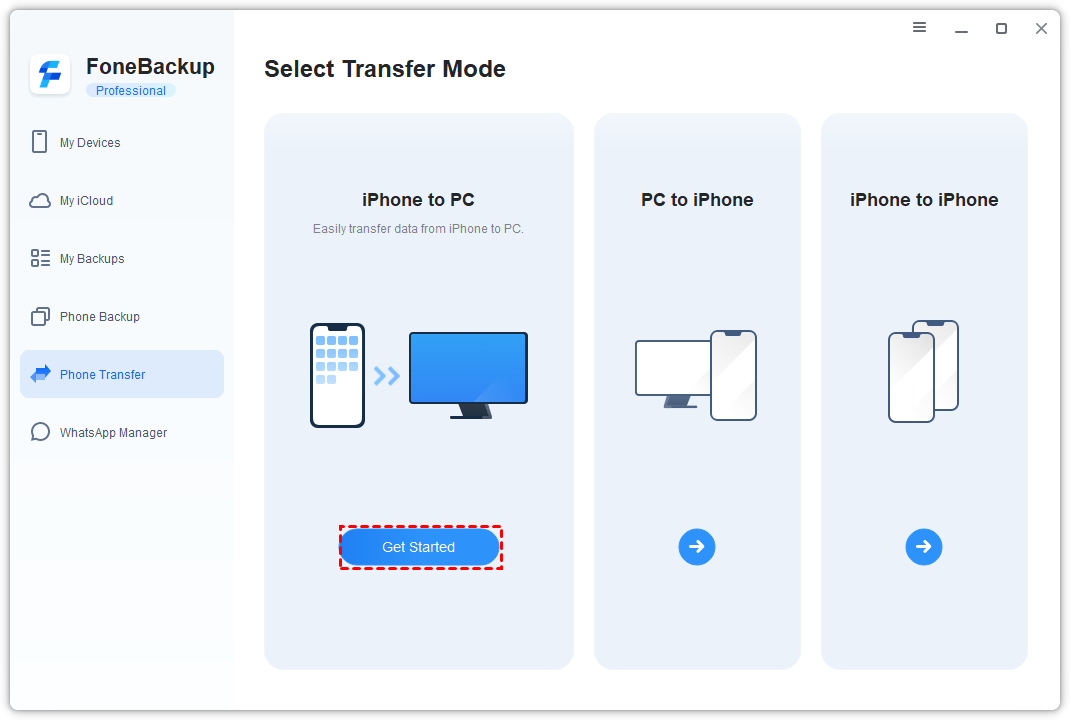
Step 1. Launch FoneBackup > Click the Phone Transfer option on the left pane. Move the cursor to iPhone to PC. Click the Get Started button.
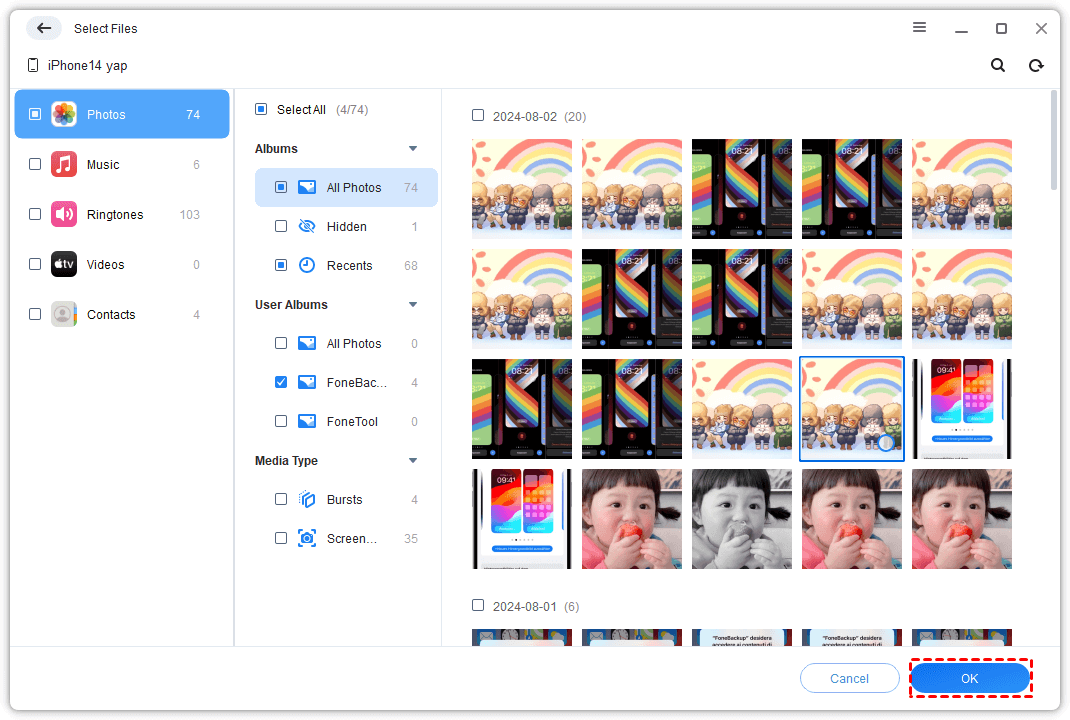
Step 2. Click "+" icon to select the photos you want to transfer.

Step 3. Select the pictures or videos and click OK to continue.
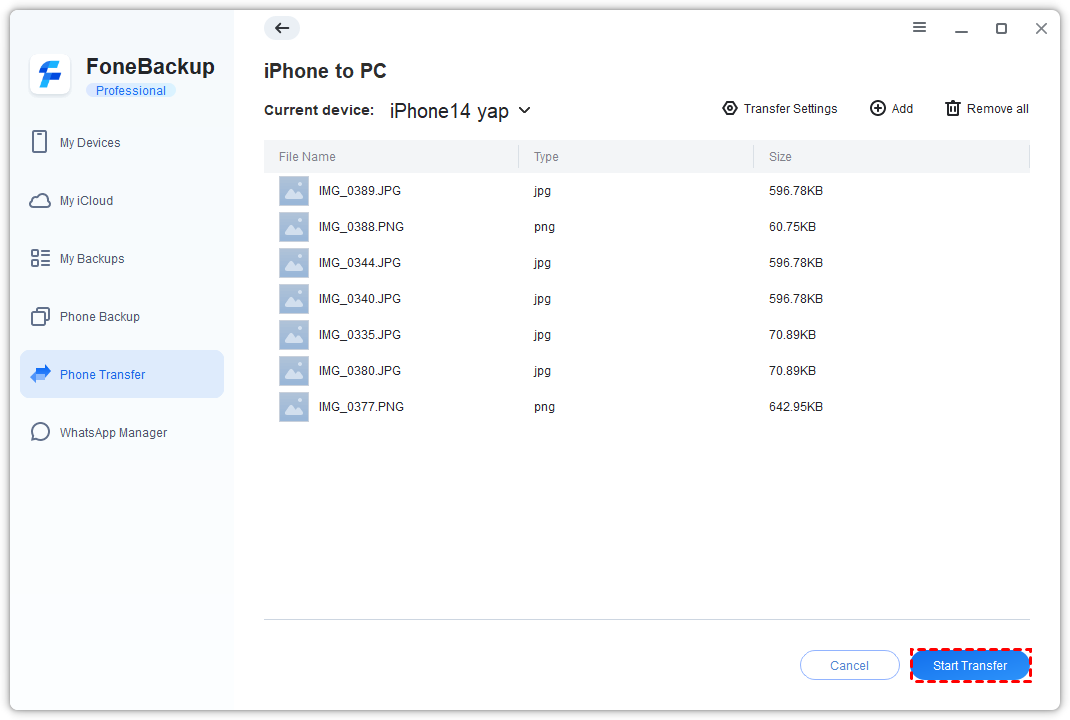
Step 4. You can choose a location to save the selected images from the Transfer Settings option. Then click Start Transfer to transfer photos.
-
How to transfer photos from iPhone to iPhone? Just go to this transfer photos from computer to iPhone guide and use the PC to iPhone feature to move these pictures to your another iPhone.
-
To sync photos in iOS devices to PC with iTunes , go to this transfer photos from iPhone to PC using iTunes guide to get detailed steps.
Method 2. Export Photos from iPhone to PC via AutoPlay
Step 1. Connect your iPhone to computer via USB cable, then click Trust and type the password if you are asked.
Step 2. Then, the AutoPlay dialog box will pop up and click Import pictures and videos using Windows.

Step 3. Click the Import Settings link, select the folder in Camera Roll’s photos by clicking Browse and click OK to exit.
Step 4. Set up settings for Cameras and Portable Devices in the following. You can choose to add a description for your pictures or not.
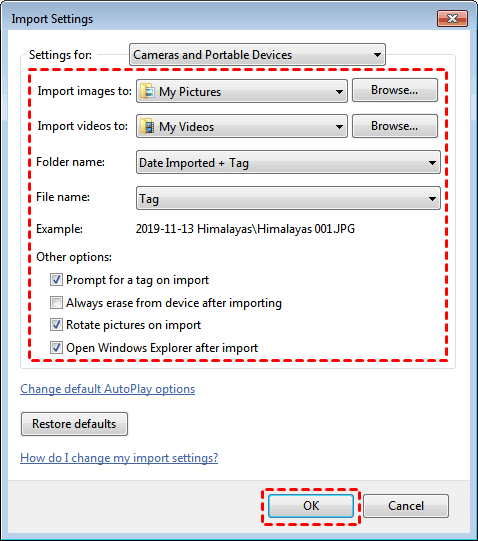
Step 5. Type description in the Tag these pictures (optional) box and click Import. After that, just wait for the final result.
Method 3. Copy Photos from iPhone to PC with File Explorer or Windows Explorer
Windows Explorer or File Explorer is a Windows app to access and mange files. When you connect your iPhone to Windows, you can also view your iPhone photos with this tool, then copy your photos to your PC local storage.
Step 1. Connect your iPhone and unlock it. Then, click Trust to allow your computer to access your photos.
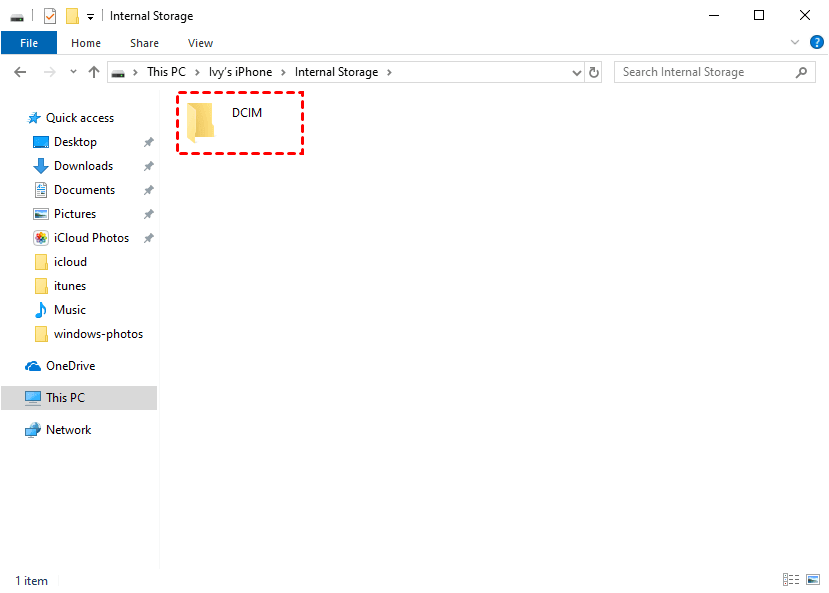
Step 2. Go to Computer or This PC, and you see a new device named xxx iPhone.
Step 3. Then, double-click the iPhone and open Internal Storage> DCIM folder, then preview your photos here and transfer specific photos from iPhone to computer via Copy and Paste.
-
DCIM folder is the Camera Roll folder and it’s the only thing you can see in Windows 7/8/10/11. If you can't find photos in this folder, you can refer to this fix iPhone DCIM Folder missing photos on Windows post to find a solution.
Method 4. How to save photos from iPhone to computer with Windows Photos
Windows Photos is a built-in tool in Windows 10, which allows you to import photos from iPhone 7/8/s/xs/xr/11 to PC via a folder or USB device. Just see below and learn the detailed steps.
1. Connect your phone and unlock it. Then click Trust and type the password if you are asked to Trust this computer.
2. Click Import and select From A USB device. After that, it will automatically detect your photos on the iPhone, you just need to wait for a few minutes.

-
If the Windows Photos does not pop up automatically, you can click Start and select it from the menu.
-
If you can't transfer photos from iPhone to PC with this way, you can turn to Method 1 to finish the transfer efficiently, or go to this fix import photos from iPhone to PC something went wrong guide to get solutions.
3. Select the photos you don’t want to import because all the new photos will be checked by default. Then, click Import Selected. After the operation is 100% completed, you can see it in your Pictures folder.
Method 5. Import photos and videos from iPhone to PC/Mac wirelessly
If your iCloud storage is enough, follow the steps, you will know how to transfer photos from iPhone to computer with iCloud.
Part 1. Transfer files from iPhone to laptop/desktop (For Windows)
Before the process, you need to open your iPhone and go to Settings > iCloud's profile> iCloud, then turn on the iCloud Photos or iCloud Photo Library. It depends on the device you are using.
Now you can download photos from iCloud to your PC, and here we offer 2 ways for you to make it. If you have multiple pictures need to be downloaded, you can choose Option 2.
Option 1. Download iPhone photos from iCloud to PC via the official client
Step 1. Download the iCloud for Windows app and install it on your computer. Then sign in iCloud with the same Apple ID on your iPhone. Type verification code if you are asked.
Step 2. Tick the checkbox before Photos and select Options at its right side.
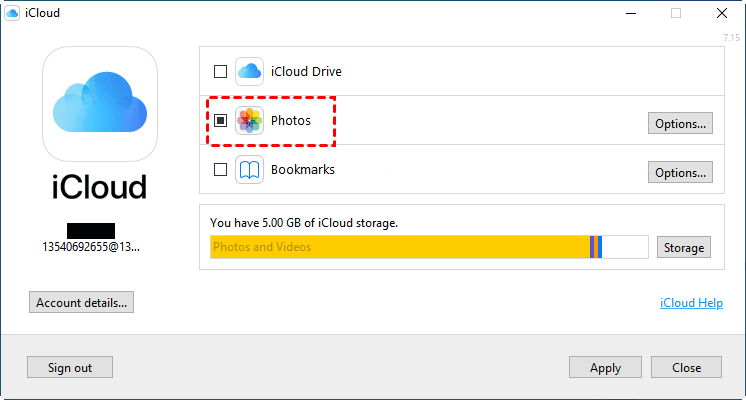
Step 4. Then select Download new photos and videos to my PC and click Apply and Done.

To view the photos downloaded from iCloud, you can go to This PC or Computer, double-click the iCloud photos and Downloads at the right side.
Option 2. Get iCloud photos from PC via the professional iCloud manager
If you need a professional tool to help you easily get photo from iCloud to PC, FoneBackup will be your best choice.
· FoneBackup uses two-factor authentication to protect your iCloud data which is same as the encryption used by Apple.
· You can efficiently download 1000+ iCloud photos to PC within 20 minutes.
· You can easily sync iCloud photos, videos, notes, etc. from one account to another in one click.
Now you can download FoneBackup on your Windows PC and learn from the steps below to get how to accomplish the tasks in a few click.
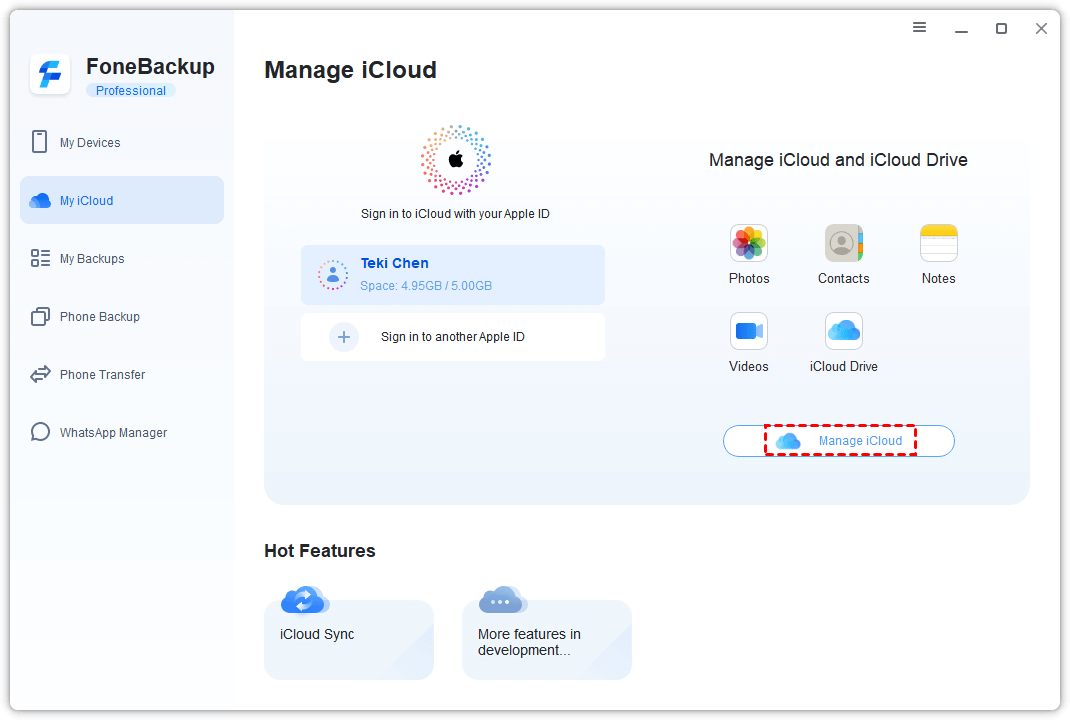
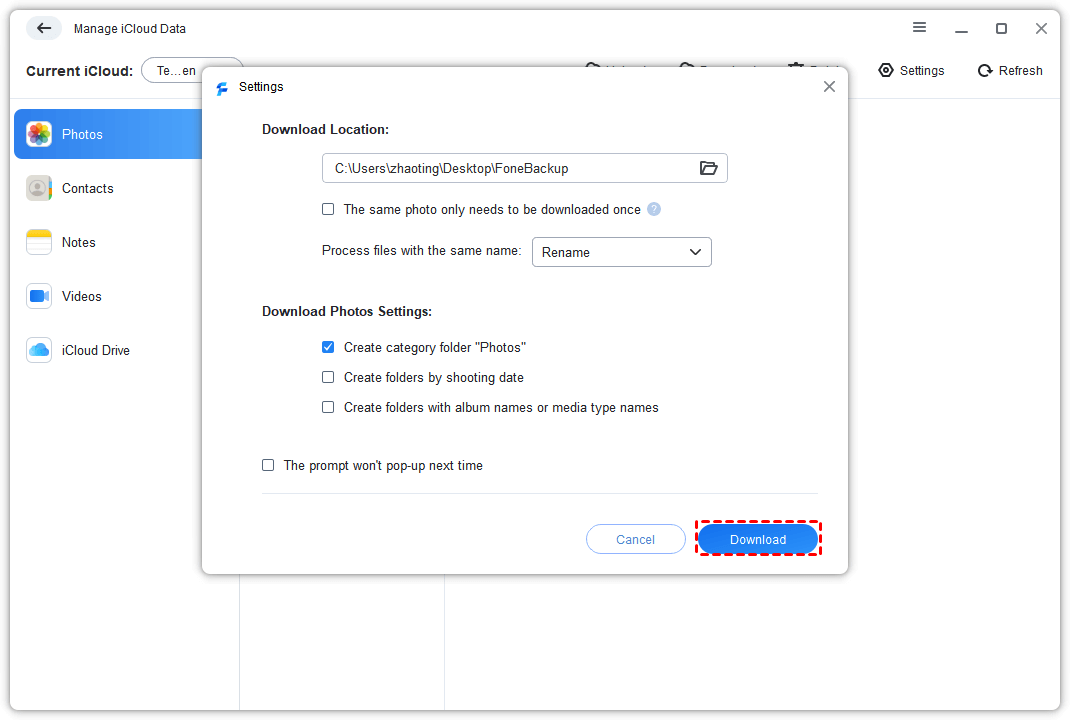
Step 1. Launch FoneBackup > Go to My iCloud > Log in with your Apple ID > Tap on Manage iCloud to continue. (If you need to sync iCloud/iCloud Drive data from one account to another, you can choose iCloud Sync to make it.)
Step 2. Go to the Photos or Videos option > Click the data you need and tap on the Download button.
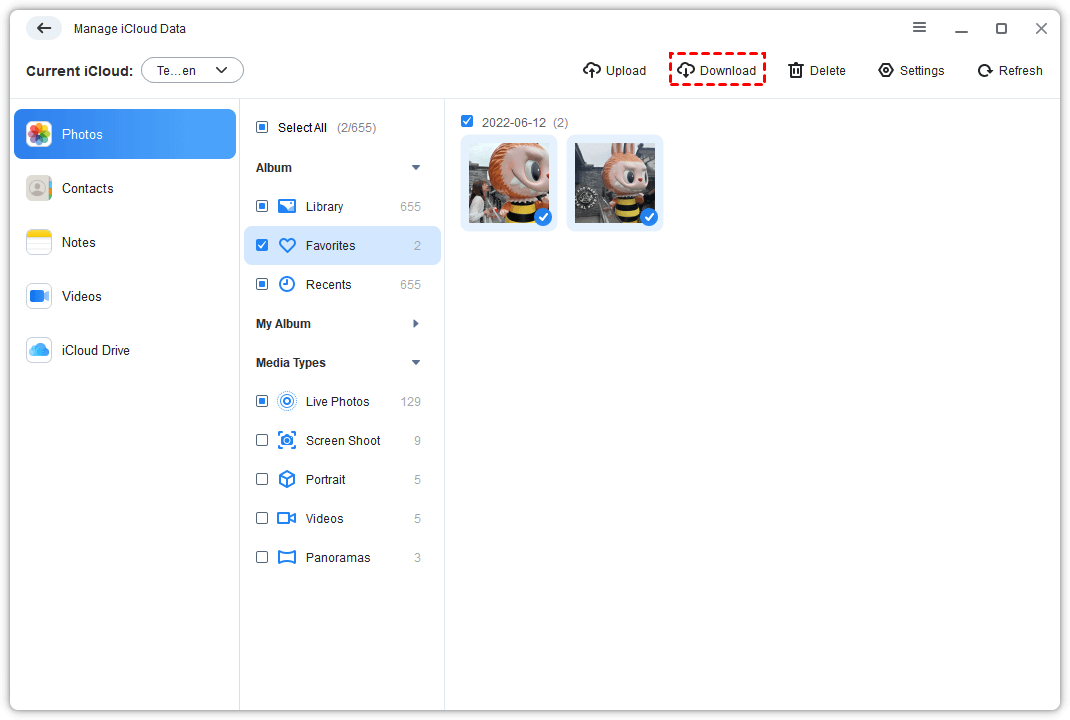
Step 3. Change the download settings from the pop-up window > Click Download to start.
Part 2. Transfer photos from iPhone to Mac wirelessly
Step 1. Go to Settings > iCloud's profile> iCloud to enable your iCloud Photos.
Step 2. Wait for your photos to sync to your iCloud storage. Then open the Photos app on your Mac. Make sure you have a Wi-Fi or internet connection. After a while, your photos will be added to your Mac.
Method 6. Airdrop photos from iPhone to Mac
Airdrop can work on transferring several files and pictures between Apple devices. It is another way to transfer photos from iPhone Mac computer without USB cable. But you should know that it isn't applicable for copying a large number of items to computer.
Step 1. Make sure your Wi-Fi and BlueTooth are enabled on your both iPhone and Computer.
Step 2. Go to your photos app. Choose the photos you want to transfer. Tap the Share icon.
![]()
Step 3. Choose the Airdrop and choose your Macbook. Then the selected will be sent to your Macbook.
Final Words
How to transfer photos from iPhone to computer is not a problem anymore. Here are 6 commonly used methods prepared for you and applied to all iPhone models. Among these methods, FoneBackup is a top choice for you. With this transfer app, you can also learn how to transfer photos from iPhone to USB with ease.
By contrast, the first one is the fastest and can help you transfer photos from iPhone to computer without losing quality. It is a reliable and powerful transfer tool.