Fixed | System Image Restore Failed 0x80042412 in Windows 7/8/10
Failed to restore Windows 7/8/10 system image with error 0x80042412 and the message “no disk can be found”? This often occurs when restoring system image to another hard drive or computer. In this post, I’ll provide possible causes and corresponding solution.
By Delia Updated on August 29, 2024
Cases: System Image Restore Failed with Error 0x80042412
...I'm trying to install a Windows 7 x64 system image to a new computer. When I attempt to restore the image using the system repair disk, the backup is found, the intended hard drive partition is found, but the restore fails with 0x80042412.
...I find it difficult to understand why System Recovery Image failure 0x80042412 still in Windows 10, I have seen this with Windows 7 and Windows 8 as well...System image was successfully created, made bootable repair disc, but it errors out every single time.
Such questions are nothing new in related forums, and the error 0x80042412 allegedly occurred in Windows 7, Windows 8 and Windows 10. As described in the cases, many users were stuck in the last step of restoring system image, and the error message was like: No disk that can be used for recovering the system disk can be found. Try the following...
How does this happen? Why Windows 7 or Windows 10 system image restore failed with code 0x80042412? Keep reading and fix this problem with following suggestions.

-
How to Fix Windows 7/8/10 System Image Failed with 0x80042412?
-
Restore System Image without Error even in Dissimilar Hardware🔥
How to Fix Windows 7/8/10 System Image Failed with 0x80042412?
Throughout these failed cases, the “no disk can be found” issue often occurs when the system image is restored to another hard drive or another computer, that is, when a bare metal recovery is performed on dissimilar hardware.
Under the circumstances, error 0x80042412 of restoring system image is very likely caused by following factors, and the corresponding solutions are also listed below.
1. The target disk is smaller than the source disk
Windows system image can remember the partition size of the source disk, and the error 0x80042412 sometimes indicates the partition you are restoring to is smaller than the partition included in the system image.
How to fix it:
To complete the process successfully, you could shrink the source partition and expand the destination partition in Disk Management, and therefore ensure the destination partition equal to or larger than the backed up partition.
☛ Search for "diskmgmt.msc" in Windows and "Run as administrator".
☛ Find the partition you want to resize, right-click it and select "Shrink Volume" or "Expand Volume".
Tips: To expand a specific partition, the unallocated space must be on its right side.
2. The boot modes/partition styles are incompatible
Only a target disk with the same boot mode (BIOS/UEFI) and partition style (MBR/GPT) with the source disk can receive the system image. For example, if one of your disk is formatted with BIOS/MBR partition table and another with UEFI/GPT partition table, you can’t complete the system image recovery directly.
How to fix it:
To put it simply, you need to convert the source disk and source disk to the same partition style. Usually you can do it in Disk Management, but if you want to convert the target disk from boot, try using DiskPart.
☛ Choose “Command Prompt” in Windows 7 Recovery Options or Windows 8/10 Advanced Options.
☛ Type following commands, press Enter key after finishing each line.
diskpart (if the disk does not contain any partitions or volumes, jump to clean)
list disk (displays a list of disks and information about them)
select disk (disknumber)
clean (this command will delete all partitions or volumes on the disk)
convert gpt (or mbr)
Tips:
-
You can only convert a disk from GPT to MBR or vice versa when it’s empty and contains no volumes. So please backup your important files at first.
-
Once you’ve converted the partition style, you should access the motherboard's firmware to switch boot mode as well. Press the manufacturer’s key (F1, F2, F10, F12, ESC, etc.) during startup to enter the Boot menu, and make sure to enable the corresponding boot option (legacy BIOS/MBR and UEFI/GPT). Then save the changes and exit.

3. The target disk hasn’t been formatted with NTFS
Each operating system has a certain way to manage disks, and only formatted disk structure can be recognized normally. Therefore, you should always do formatting before using a disk to install OS and store the data.
How to fix it:
You could use DiskPart to format NTFS in Command Prompt from boot.
☛ Choose “Command Prompt” in Windows 7 Recovery Options or Windows 8/10 Advanced Options.
☛ Type following commands, press Enter key after finishing each line.
diskpart
list disk
select disk 0
clean
create partition primary size=100
format fs=ntfs quick
active
create partition primary
format quick fs=ntfs
Optionally, you could format the destination partition only after cleaning:
create partition primary
select partition 1
active
format fs=ntfs quick
assign letter=x
Tips:
-
“Clean” will erase all the existing drive partitioning.
-
“Active” command is only used on a fixed MBR disk.
-
You can assign any letter you want to the destination partition.

4. The target disk is corrupted
You may also fail to restore system image with 0x80042412 in Windows 10/8/7 because of disk corruption.
How to fix it:
You could use command line to detect target disk and system file corruption from boot.
☛ Choose “Command Prompt” in Windows 7 Recovery Options or Windows 8/10 Recovery Environment.
☛ Run “sfc /scannow” to scan system file, and replace corrupted files.
☛ Run “CHKDSK C: /f /r” to fix disk errors, locate bad sectors and recovers readable information.

Restore System Image without Error even in Dissimilar Hardware
If you fail to restore system image with error 0x80042412 and want to avoid any similar system image failures, the simplest method is to find a reliable tool supporting dissimilar hardware restore. Thus you don’t need to take complicated steps troubleshooting the problem every single time.
AOMEI Backupper, the effective backup & restore software enables you to create system image in an easier and faster way compared to built-in Backup and Restore. With it, you can schedule automatic system backup in Windows 11/10/8.1/8/7, and perform system restore anytime to bring it back to an earlier error-free state.
In the completely free Standard Edition, you could enjoy most of the features including file/partition/disk/system backup and restore, which is more than enough for daily data protection and system restore.
And in the advanced Professional Edition, you are allowed to restore system image to dissimilar hardware, or even clone OS to another hard drive directly without restoration.
Here’s an example of dissimilar hardware restore:
Step 1. Download AOMEI Backupper Professional and install it following the wizard.
Step 2. Go to System > System Backup, create a system image to removable devices or network location.

Step 3. If the target hard drive has no system installed, you could create a bootable drive and use it to boot the computer into WinPE. Then the program will pops out automatically.

Step 4. Restore the system image you created before.
◆ Go to Restore tab and choose Select Image File to locate the system image.
If it’s saved on a removable device, connect it first. If it’s on a network location, click Share/NAS on the popping out window and then Add Share or NAS devices to specify the path.

◆ Choose Restore this system backup and hit Next.
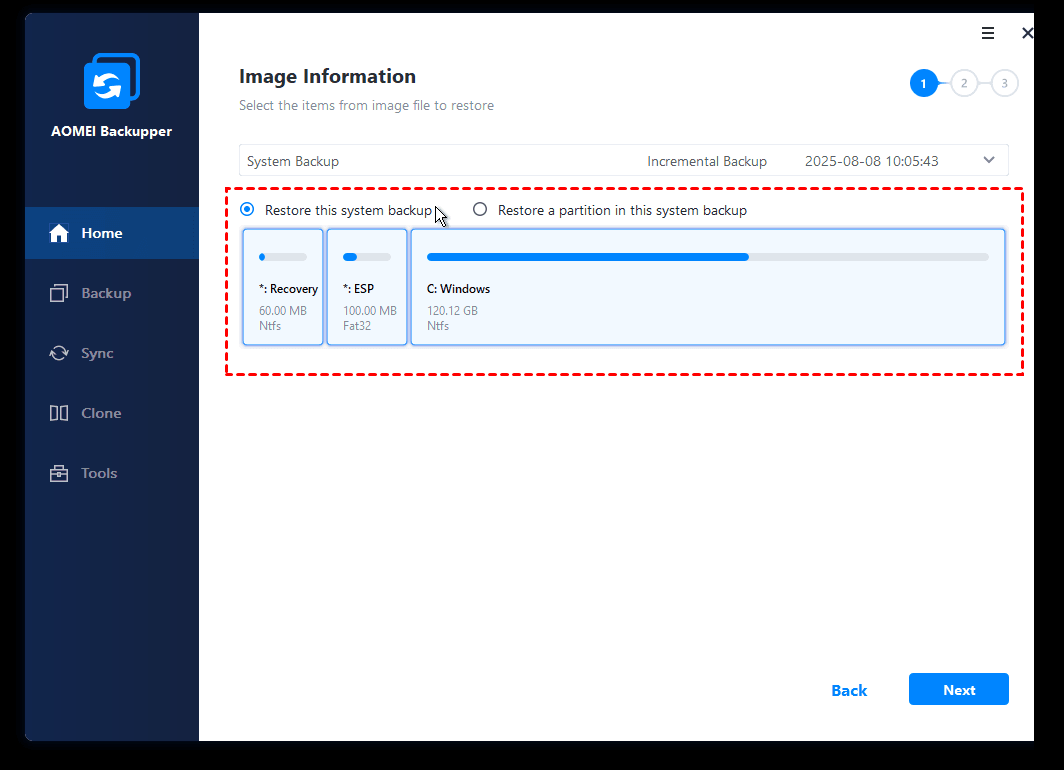
◆ Select the new hard drive as the restoration destination and click Next.
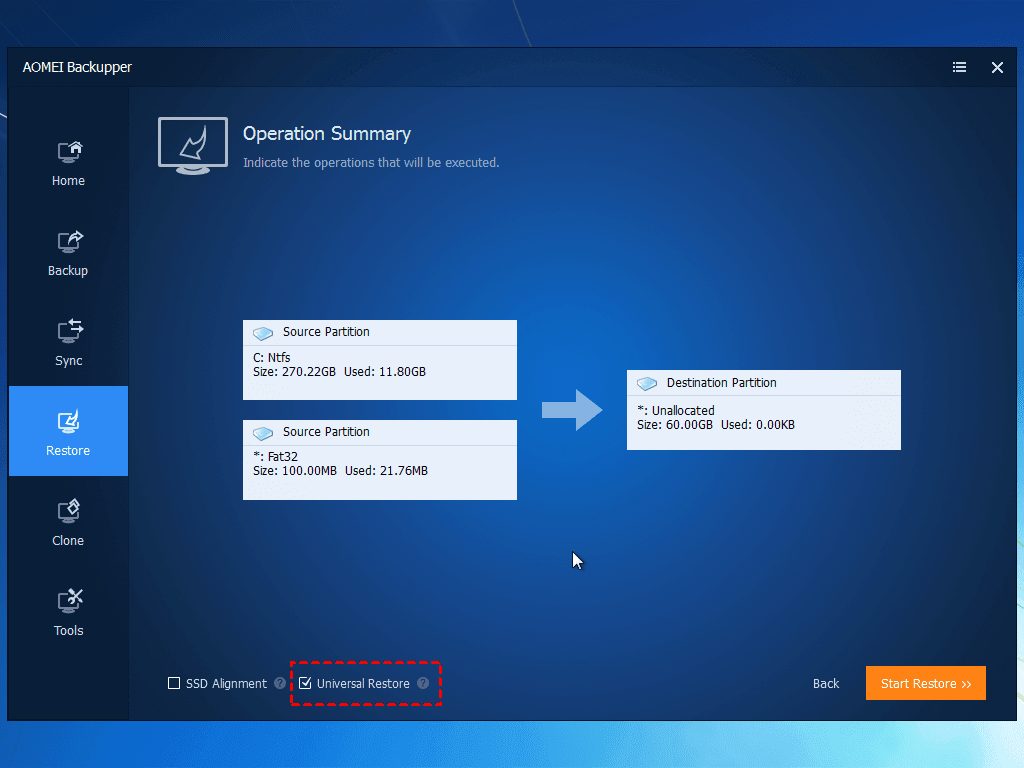
◆ Confirm the operation and tick Universal Restore, then Start Restore.
If your target hard drive is an SSD, you could also tick the SSD Alignment to accelerate its reading and writing.
Conclusion
To fix Windows 7 system image restore failed with error 0x80042412, you could try above solutions to convert partition style, format disk with NTFS, etc. But the easiest way is to use an effective alternative supporting both native restore and dissimilar hardware restore.
With AOMEI Backupper, you are not only able to create system image on schedule and restore it when necessary, but also allowed to clone OS to another hard drive, or even clone larger HDD to small SSD. Moreover, if you are trying to bare metal restore Windows Server to different hardware, there’s also Server edition can help you.

