


3 Types of Virtual Switches | VMnet0, VMnet8, VMnet1 in VMware
As you can create multiple VMs on a physical machine, do you know how they connect to the Internet? In this article, I will introduce the 3 types of VMnet in VMware Workstation.
By Crystal / Updated on July 15, 2022
What is VMnet in VMware
To connect your VMware Workstation VMs to the Internet, you may need to understand VMnet first.
VMnet, or virtual networks, can also be referred as virtual switches. As an important part of the virtual networking components, a virtual switch is used to connect other networking components together, including virtual network adapters, the virtual DHCP server, and the NAT device, just like a physical switch.
You can either use a default VMnet to connect your VM to the Internet, or configure a custom network manually. In this article, I will introduce the 3 default VMware Workstation VMnet, and the steps of how to configure a custom network.

What are the 3 default VMnet in VMware Workstation
There are 3 default types of virtual networks (VMnet):
- VMnet0 - Bridged
- VMnet8 - NAT
- VMnet1 – Host-only
I will briefly introduce them in this section. You can compare the differences between VMnet0, VMnet8, VMnet1, for example, bridge vs NAT in VMware, and take the default network configuration you need to connect your VM to the host computer.
Which mode is VMware VMnet0 in by default
VMware VMnet0 is one of the default virtual networking that is set to use auto-bridging mode and bridge to all active network adapters on the host system.
The bridged mode is used by default when you create and install a VM, and is very convenient when you only need to configure one VM connected to a physical host, as there is no need to set up the network manually.
The DHCP server will automatically recognize the VM and assign it an IP address on the same subnet as the host, and is fully visible on that subnet. And you can also configure it manually if you want.
Which mode is VMware VMnet8 in by default
VMware VMnet8 uses NAT virtual network by default, which means the VM in VMnet8 is connected via network address translation (NAT) to the host network adaptor, make your VM looks like it’s behind a NAT router. It is the simplest networking method, and mainly used in multiple VMs environments such as hadoop cluster structures or distributed services.
Which mode is VMware VMnet1 in by default
VMware VMnet1 is uses host-only mode to build an isolated network environment, which means the VMs can only access the addresses within the network segment specified in the host-only mode, forming internal communication with the host, and cannot access the external networks.
How to modify the network connection in VMware Workstation
Now you have known what is virtual network, and what the 3 default VMnet are. In this part, I will introduce how to put them into use - how to connect your VM to the Internet.
How to change the network connection mode in VMware Workstation
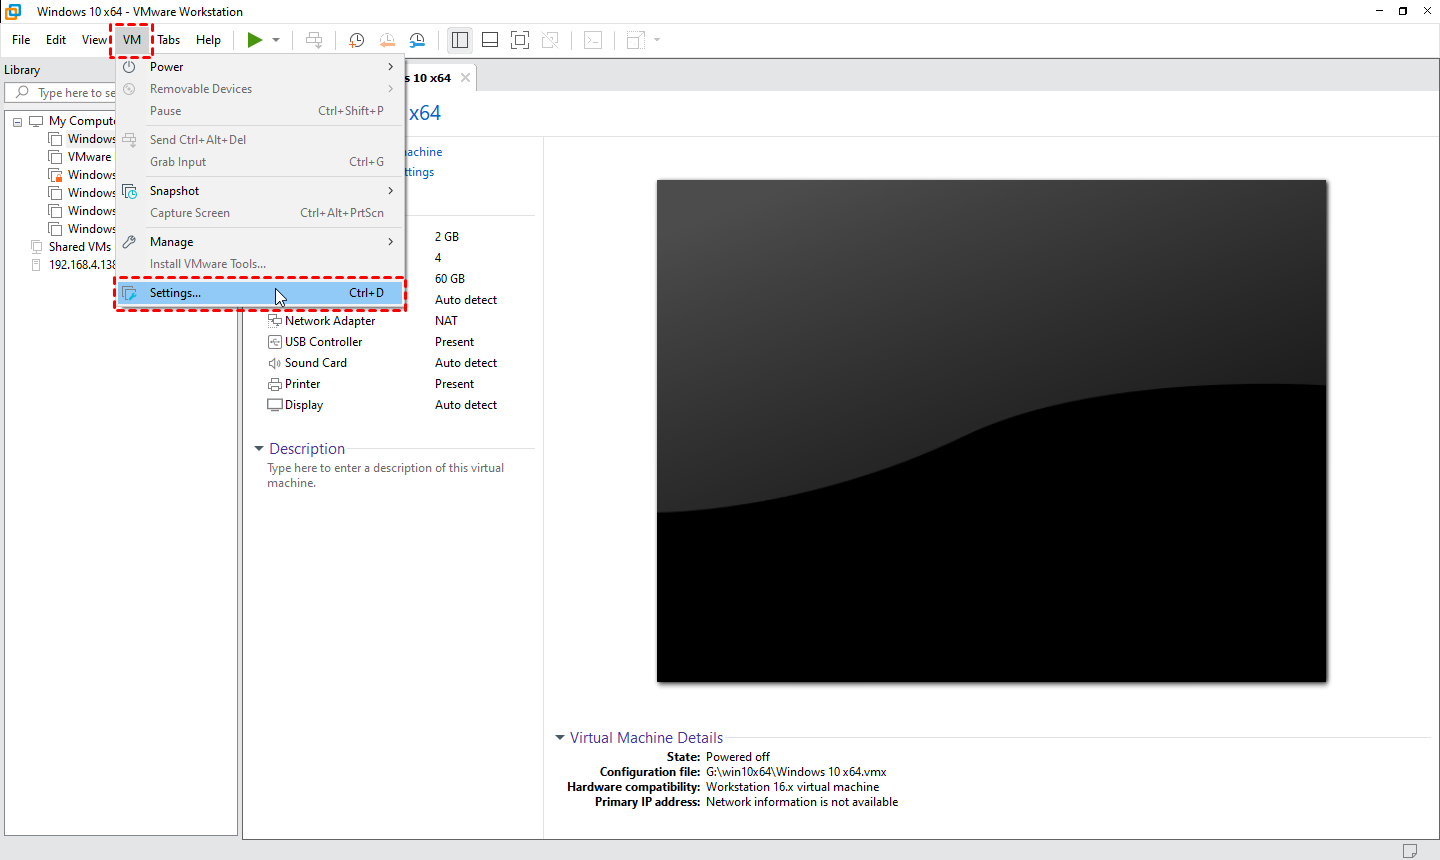
1. Launch VMware Workstation, select the target VM and click VM > Settings on the toolbar.
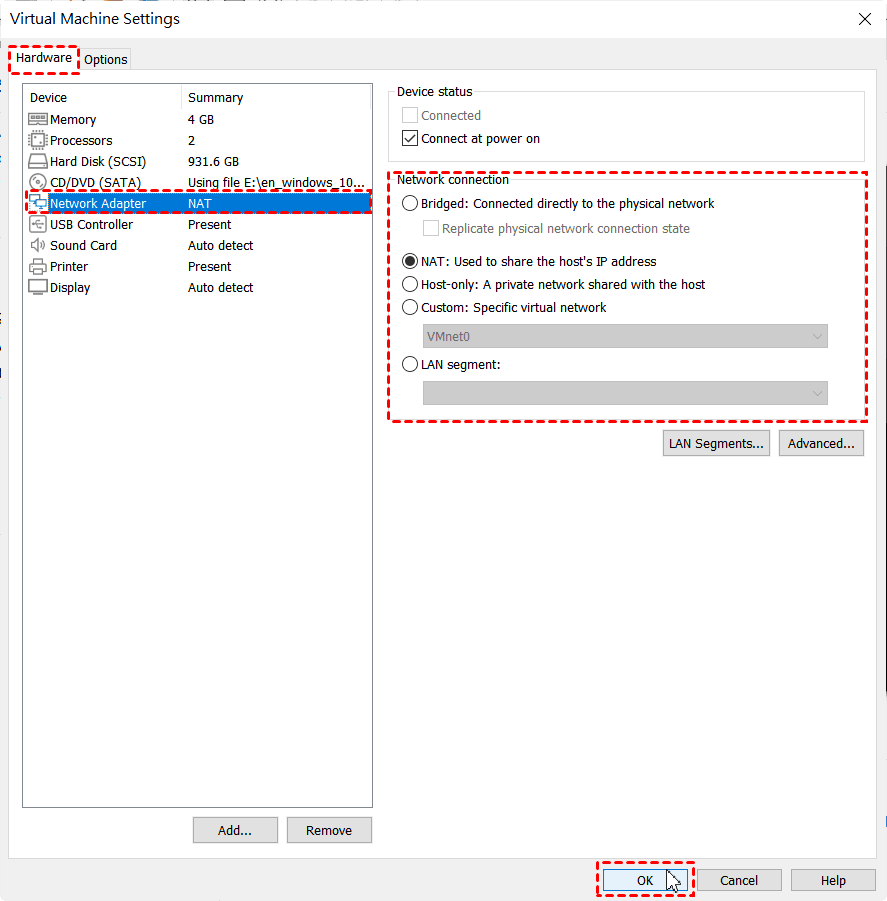
2. Navigate to Hardware > Network Adapter from the left inventory, select the type of Network connection you want. Click OK to save.
How to create a network adapter in VMware Workstation
1. Launch VMware Workstation, select the target VM and click VM > Settings on the toolbar.
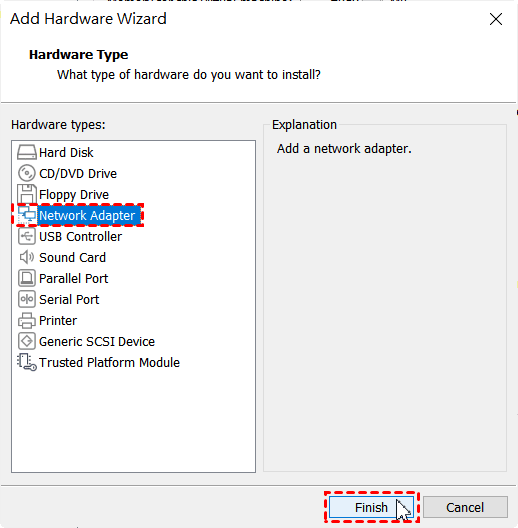
2. Click Add button at the bottom of the left inventory, and select Network Adapter in the pop-up wizard, click Finish to continue.
As the wizard closed, you can see the newly created Network Adapter in the left inventory.
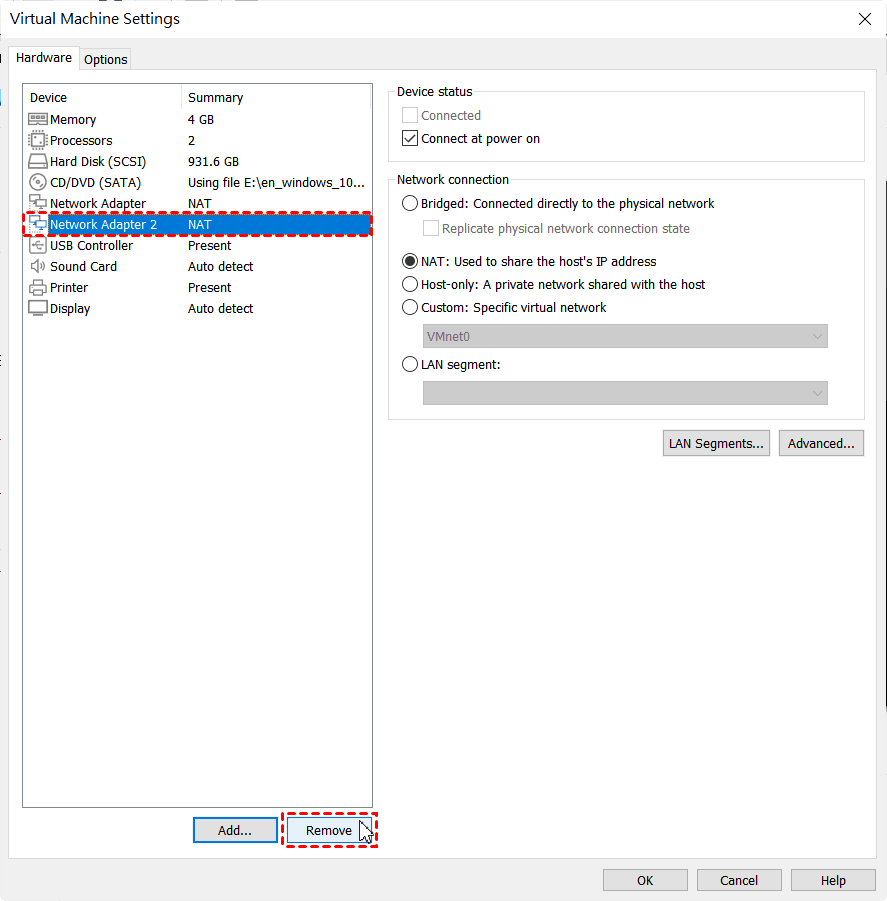
How to remove a network adapter in VMware Workstation
1. Launch VMware Workstation, select the target VM and click VM > Settings on the toolbar.
2. Select the Network Adapter you want to remove and click Remove button at the bottom of the left inventory.
How to configure a custom network
Taking the default network configuration and connect VMs to the host via NAT or bridged mode is sufficient for most VMware Workstation users. However, if you have more requirements, you can also create a private custom network with more complex configurations in VMware Workstation by using the Virtual Network Editor.
Here are the general steps to set VMware NAT network.
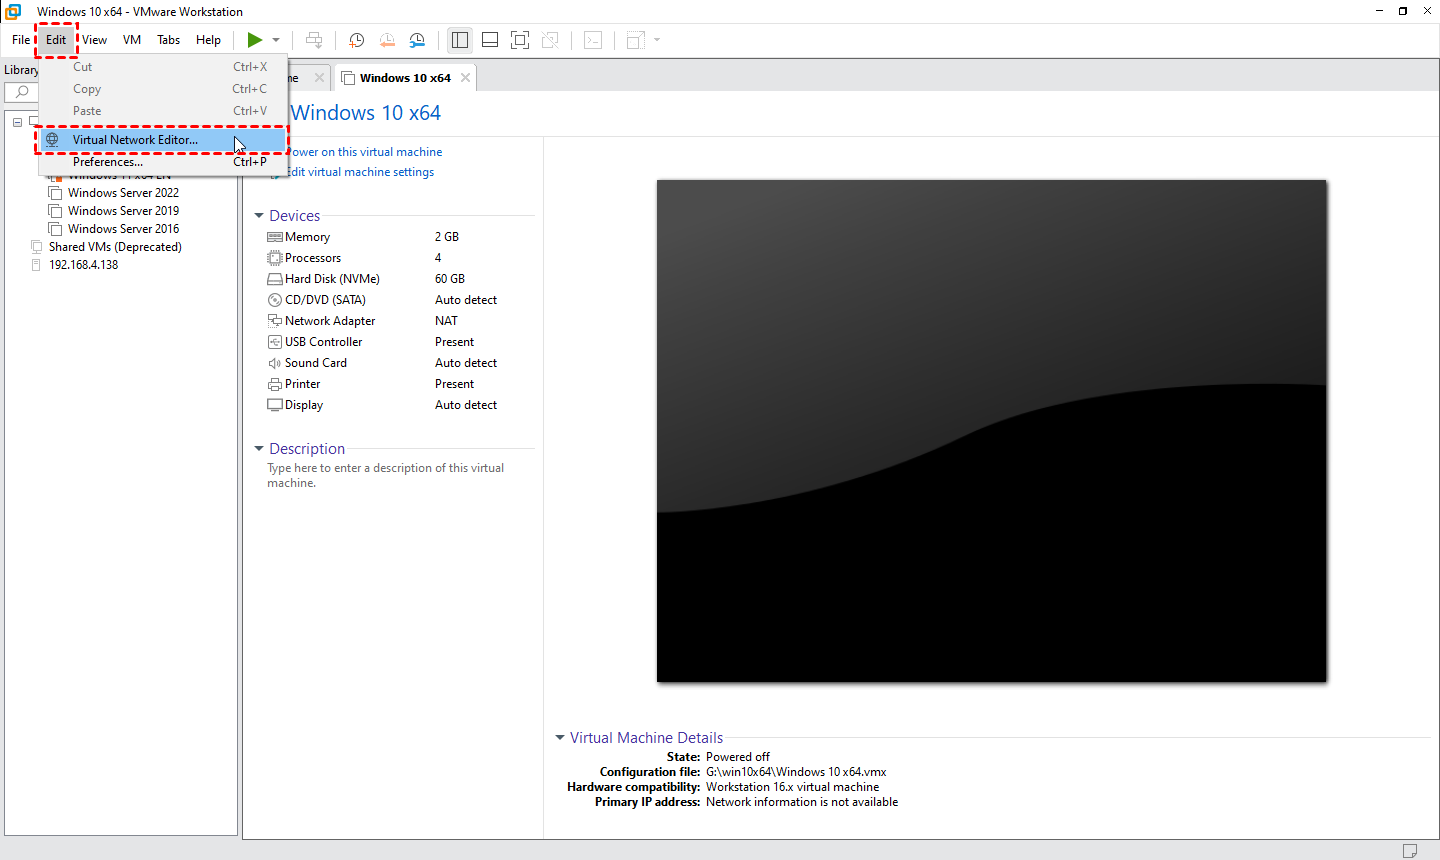
1. Launch VMware Workstation, click Edit > Virtual Network Editor… on the toolbar.
2. Click Add Network… and select a VMnet number. Click OK to add.
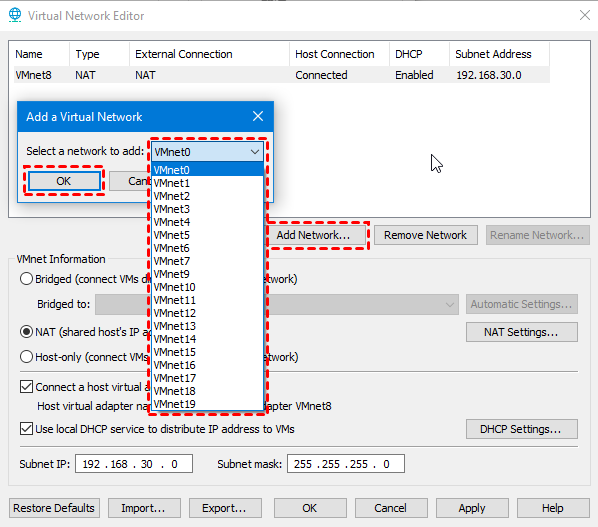
3. Configure the newly created VMnet to Host-only, Bridged, or NAT mode.
Note: Only one network can be set to NAT.
✦ Modify DCHP Settings
Check Use local DHCP service to distribute IP address to VMs option, and click DCHP Settings to modify the IP address manually. Click OK to save.
Note: It is not recommended to modify the subnet mask, since some virtual network services may not work with the custom subnet mask at the same time.

✦ Modify Bridged Settings
Check Bridged (connect VMs directly to the external network) option and select an adapter to Bridged to.
✦ Modify NAT Settings
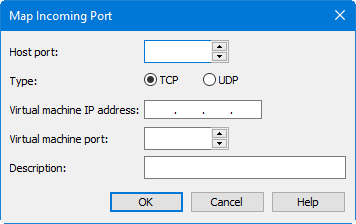
Click NAT Settings to open a wizard, modify the Gateway IP manually and click Add button.

Provide Host port, Type, Virtual machine IP address, and Virtual machine port, click OK to save.
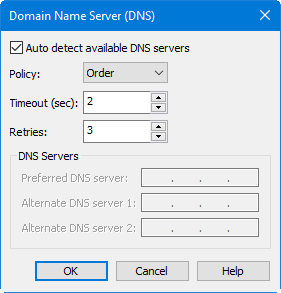
Click DNS Settings and NetBIOS Settings button and configure them respectively, click OK to save.
Note: NetBIOS Settings is limited to Windows hosts.
How to solve the issue that VM cannot connect to the Internet
Users may encounter problems when configuring VMware Workstation VMnet, for example, the VM cannot connect to the Internet even when the network adapter is set correctly.
Here I summarized 3 effective methods to solve this issue.
- Restart VMware DHCP Service
- Restore defaults on VMware Network Editor
- Reinstall VMware Workstation
Restart VMware DHCP Service
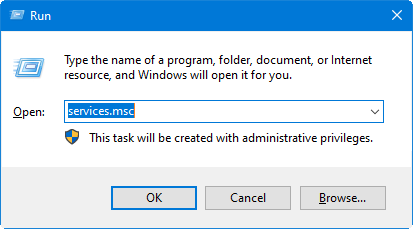
1. Open Windows Services by press Win + R and type services.msc.
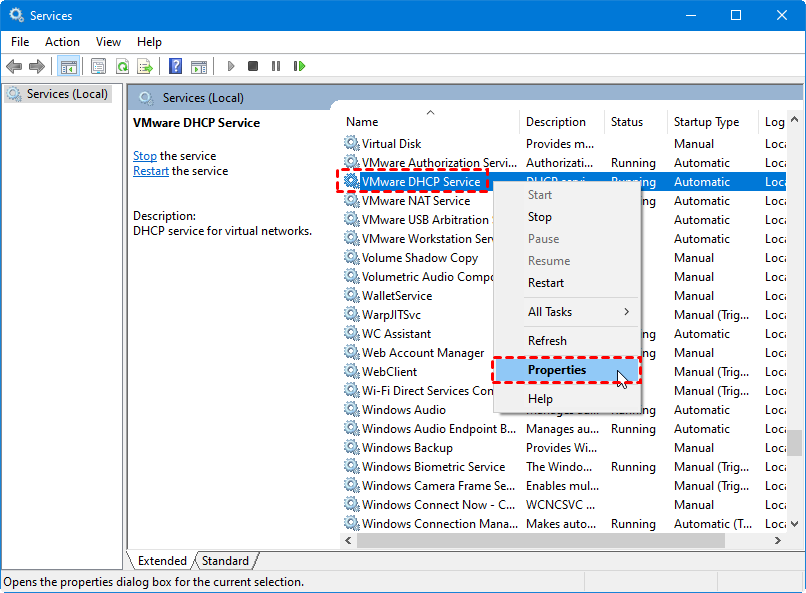
2. Check if VMware DHCP Service is running properly. If not, right-click on it and select Properties.
3. Change Startup type into Automatic, and click Start button under Service status, click OK to save.
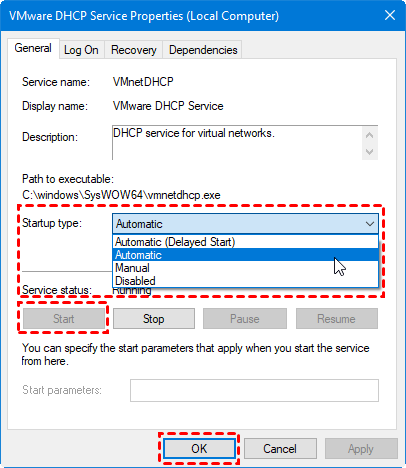
Note: If restarting the VMware DHCP Service does not work, try restarting the VMware NAT Service in the same way.
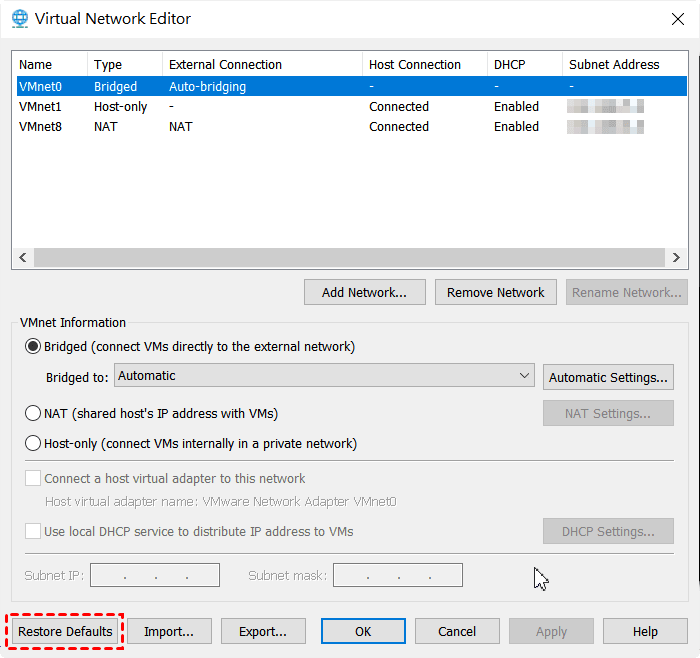
Restore defaults on VMware Network Editor
1. Launch VMware Workstation, click Edit > Virtual Network Editor… on the toolbar.
2. Click Restore Defaults button at the left bottom corner.
Summary
If you want to connect your VM to the Internet, you may need to configure virtual networks (VMware VMnet) according to your needs. In this article, I introduced what are the 3 default VMnet in VMware, and how to configure a custom network. In addition, I summarized 3 ways to solve the issue that VM cannot connect to the Internet.
In addition to this, you may also want to learn how to backup VMware Workstion to protect your virtual machines and the important data on them.

