


How to Add and Enable TPM 2.0 to PC or VMware VM | Guide
In order to upgrade to Windows 11 or offer better security to computer, you need to enable TPM module in your Windows operating system. This article provides a detailed description of Trusted Platform Module.
By Crystal / Updated on October 17, 2023
Overview for TPM module
Before the launch of Windows 11, most people were probably not aware of the TPM feature. For those who want to install Windows 11 operating system and have checked the system requirements, they may ask “what is TPM 2.0, and how to add tpm module to my PC?”
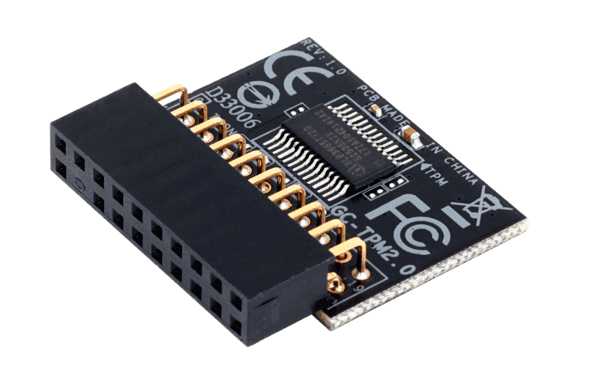
TPM is short for Trusted Platform Module, and 2.0 refers to the version. It is a chip attached to your motherboard designed to enhance PC security, which can be regarded as a secure encryption processor, because it has the role of managing and storing keys.
The TPM module has been given more functionality in Windows 11. It can now be used not only to speed up facial recognition, fingerprint recognition, disk encryption, but also to defend against the current ransomware epidemic and even sophisticated hacking attacks.
In this article, I will introduce how to check and enable TPM, how to add TPM module to your motherboard, or how to bypass it for Windows 11 installation.
Can you add TPM 2.0 to your PC?
Microsoft has required manufacturers to include TPM 2.0 to all new devices since July 28, 2016. With this time point as the boundary, there are several different scenarios. You can make your own cross-reference first:
- If your computer was manufactured after 2016, it probably have a TPM 2.0 chip installed, but may be disabled by default. Then you will need to enable it on your computer;
- If your computer was manufactured after 2016, but does not have a TPM chip. You can purchase one and install it on the motherboard;
- If your computer was manufactured before 2016, but has a lower version of the TPM chip installed (TPM 1.2), you can try a firmware upgrade;
- If your computer was manufactured before 2016 and does not support the TPM chip, then you have no choice but to upgrade your computer to a more modern version.
Must-step: Check TPM status on your computer
Before adding TPM to your computer, you should check some information first. It's possible that your motherboard already has a TPM module which is not enabled, or it is still the earlier version - TPM 1.2.
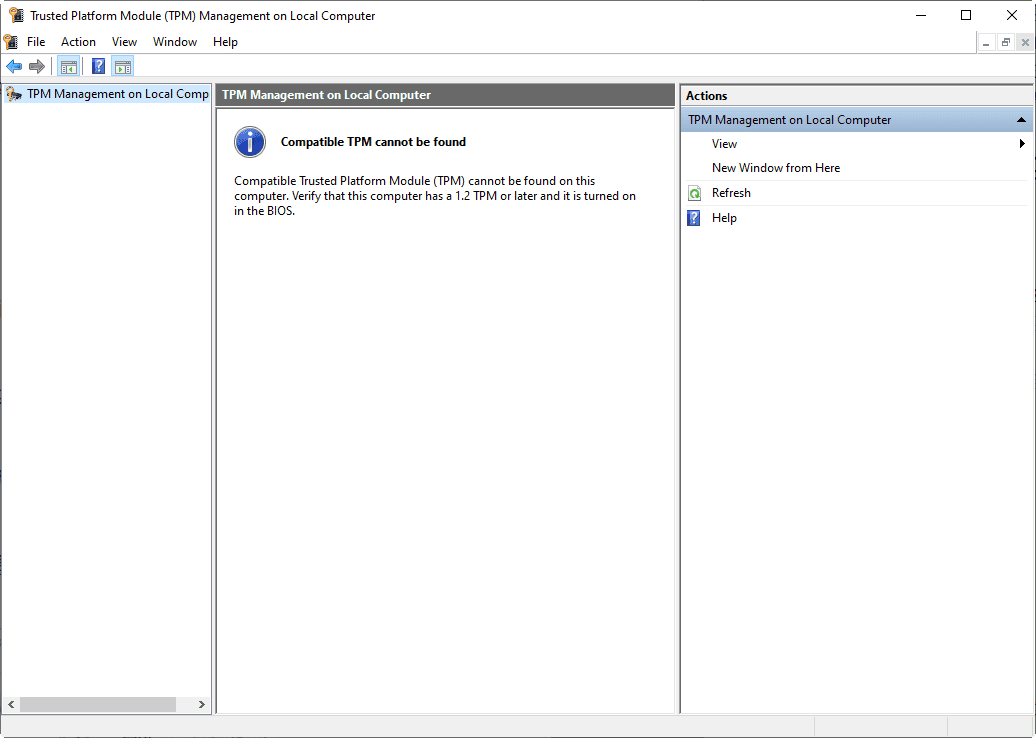
1. Press Win + R to launch the Run window, type “tpm.msc”, and click OK.
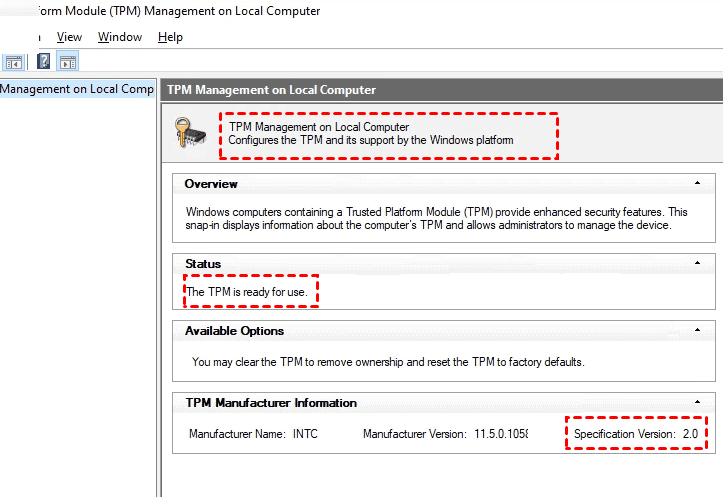
2. In the Trusted Platform Module on Local Computer (TPM) Management, you can see the relevant information:
- If the TPM Management on Local Computer section shows “Compatible TPM cannot be found”, it means your computer does not have a TPM module, you still need to add it to the motherboard.
- If it reads “Configures the TPM and its support by the Windows platform”, and the status reads “The TPM is ready for use”, it means your computer already has a TPM module. And you can further check the TPM version in TPM Manufacturer Information -> Specification Version, if the value is "2.0", then your computer has TPM 2.0 which is required by Windows 11 upgrade.
How to add TPM module to the motherboard
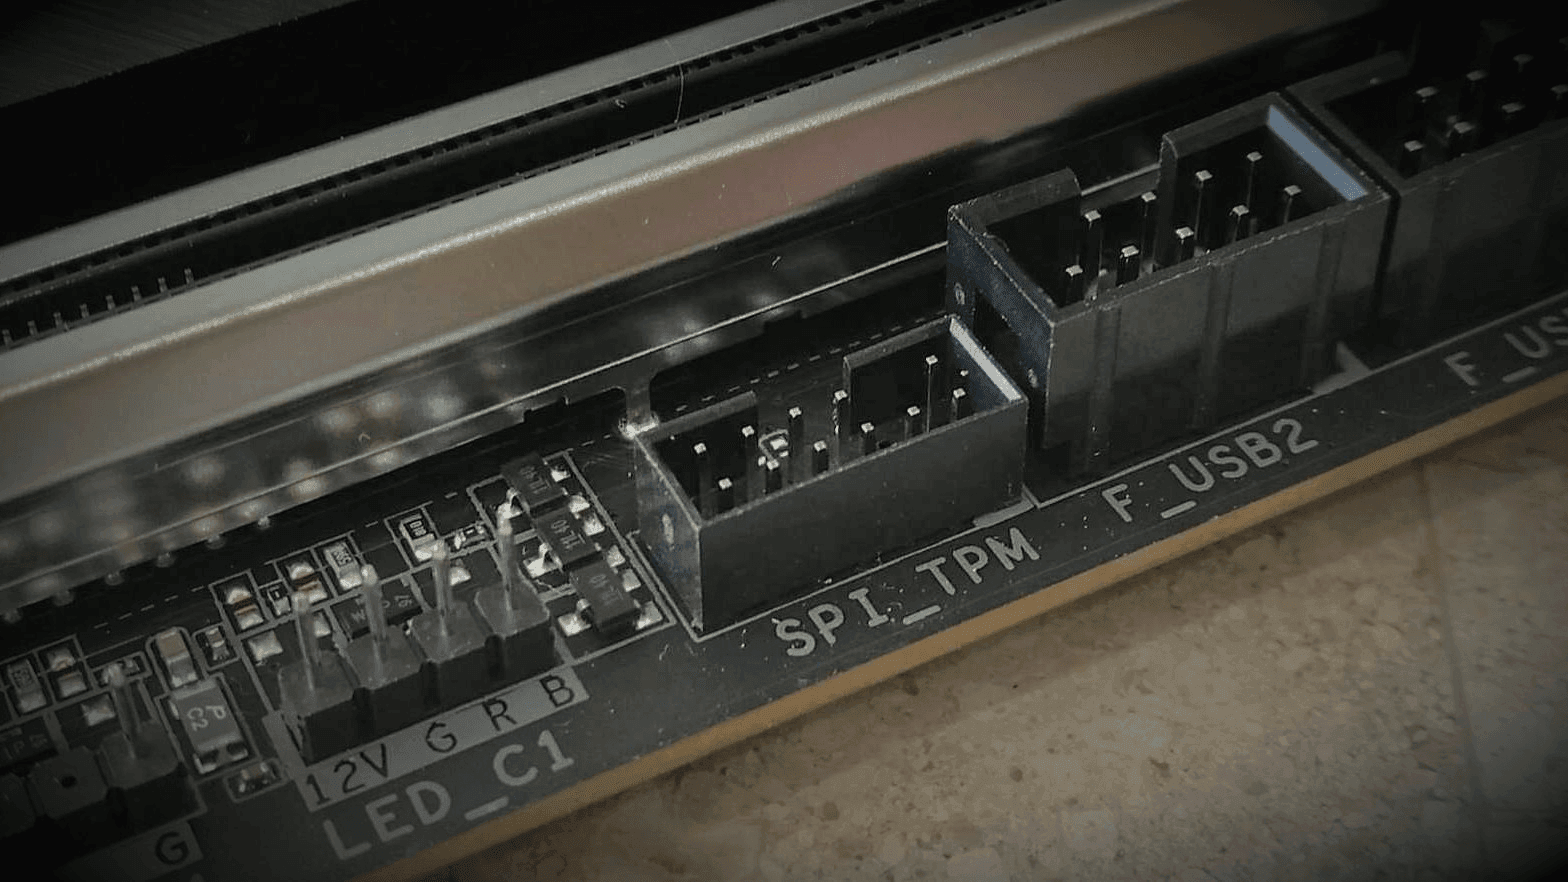
If you have a certain level of computer knowledge, you can open your PC and check your motherboard for an empty TPM header, which has about 14-20 pins, usually with one pin blocked to prevent incorrect installation of the module. The TPM module you choose should have the same number of pins as the TPM header on the motherboard.
You can also check your manual to find the header usually labeled "TPM" or "SPI_TPM", and be sure to purchase the correct module to match your motherboard make and model. If you are still unsure, check the manufacturer's website for more technical details, or contact customer support directly.
After the PC is turned off and safely disconnected from power, follow the manufacturer's instructions to safely install the TPM into the motherboard.
How to enable TPM module on your computer
If you computer already has TPM module (or you have added it successfully), it is very likely that you still cannot use it right away, because the TPM module is disabled by default. To enable it, you can try the following 2 ways.
Way 1. How to enable TPM 2.0 in Windows 10 Settings
If you want to enable TPM, these settings are managed via the UEFI BIOS (PC firmware) and vary based on your device. In the following, I will introduce how to add TPM module based on Windows 10.
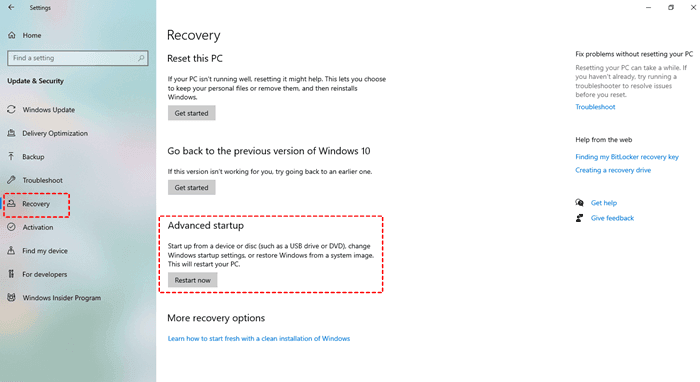
1. Open Settings >> Update & Security >> Recovery >> Restart now.
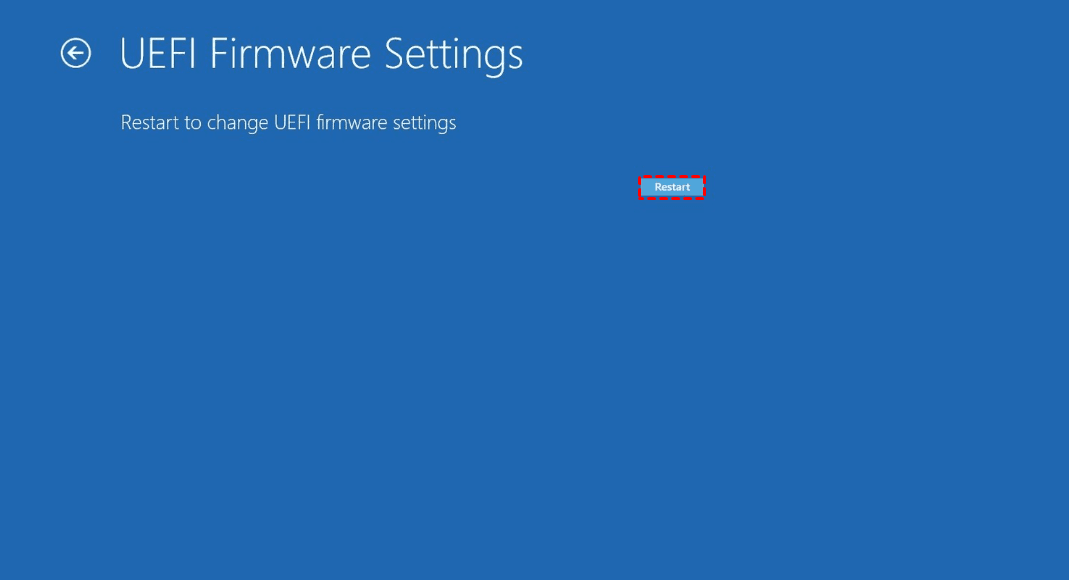
2. Click Troubleshoot >> Advanced options >> UEFI Firmware Settings >> Restart.
✎If you have an older BIOS, this UEFI Firmware Settings option will not be available, please use the boot key to enter setup.
After you finish the steps, the device will restart and boot into the UEFI firmware which allows you to change advanced settings, such as to disable or enable secure boot, change boot order, set up a hardware RAID array, enable virtualization, and other settings depending on the motherboard support.
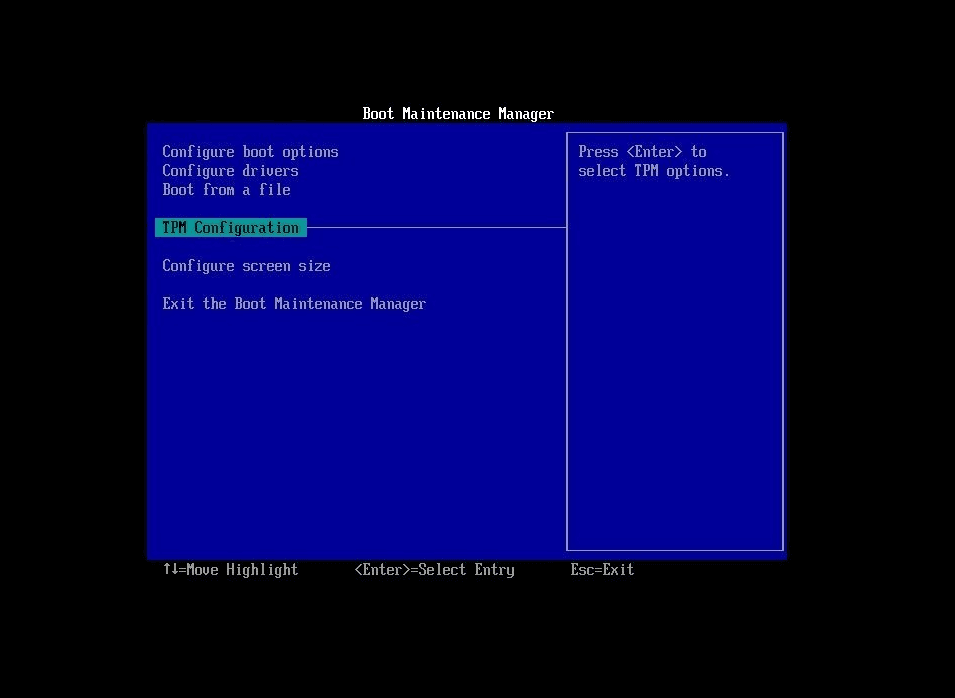
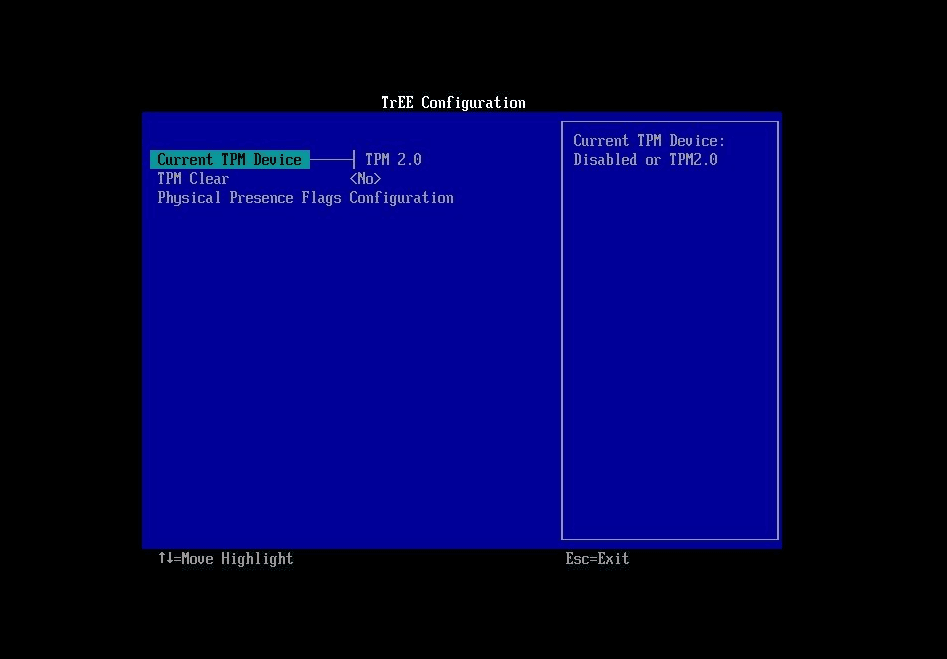
3. The system will reboot and load into BIOS. Select Security settings.
✎It’s recommended to call your manufacturer to find the security settings since the UEFI settings are different per manufacturer.
4. Select Trusted Platform Module (TPM) option and press Enter.
5. Select Enabled, and press Enter.
6. Save the settings and exit the UEFI settings.
Restart the computer, you can check the TPM status again to see if it's enabled now.
Way 2. How to install TPM module via boot key
If you don’t have UEFI Firmware Settings option, there is another way to enable TPM module through boot key.
How to add TPM module through boot key:
1. Please click Power button, then select restart your computer.
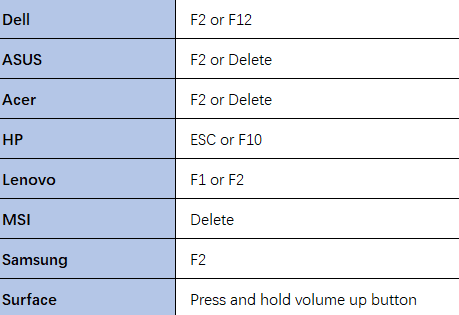
2. When it boots up, you might have seen a manufacturer logo on the screen and a line of text at the bottom. On the splash screen, you need to quickly press the required key to enter setup or system configuration. The required keys are depended on what kind of computer you have. Typically, press the Esc, Delete, or one of the Function keys (F1, F2, F10, etc.).
3. Access to security settings, then locate TPM (name may vary) and press Enter. On AMD systems, it appears as fTPM.
4. Enable TPM.
Try the above steps and you should be able to install TPM properly.
Added: Can you upgrade TPM 1.2 to TPM 2.0?
Can you upgrade TPM 1.2 to 2.0 directly? This actually depends on your computer vendor's TPM update policy, and you can find help on their official website.
For example, if you are using Dell computer, you can search for the product model in Dell Product Support page to find and download the Dell TPM 2.0 Firmware Update Utility.
But before that, you should make sure your computer's motherboard supports TPM 2.0, otherwise you cannot upgrade it, and the only way is to replace the motherboard first.
How to add TPM module on VMware ESXi to install Windows 11 VMs
ESXi hosts can use the Trusted Platform Module (TPM) chip, which is a secure cryptographic processor that enhances host security by providing hardware-rooted trust assurance.
TPM 2.0 chip attests to an ESXi host's identity. Host attestation is the process of authenticating and attesting to the state of the host's software at a given point in time.
To use the TPM 2.0 chip, your vCenter Server environment must meet these requirements
- vCenter Server 6.7 or later
- ESXi 6.7 host or higher with TPM 2.0 chip installed and enabled in UEFI
- UEFI secure boot enabled
Ensure that TPM is configured in the BIOS of the ESXi host to use the SHA-256 hashing algorithm and the TIS/FIFO (first-in-first-out) interface instead of the CRB (command response buffer). For information on setting these required BIOS options, refer to the vendor's documentation.
When you boot an ESXi host with a TPM 2.0 chip installed, vCenter Server monitors the authentication status of the host. vSphere Client displays the hardware trust status under Security in the Summary tab of vCenter Server and issues the following alerts.
Green - Normal status, indicating full trust.
Red - Authentication failed.
For details, you can check this VMware vSphere Blog.
![]()
✎With the Virtual Trusted Platform Module (vTPM) feature, you can also add a TPM 2.0 virtual cryptoprocessor to a virtual machine.
A vTPM performs the same functions as a TPM, but it performs cryptographic coprocessor capabilities in software. A vTPM uses the .nvram file, which is encrypted using virtual machine encryption, as its secure storage.
A vTPM acts as any other virtual device. You can add a vTPM to a virtual machine in the same way you add virtual CPUs, memory, disk controllers, or network controllers. A vTPM does not require a hardware Trusted Platform Module chip.
How to install Windows 11 in virtual machine without TPM
For those who want to try Windows 11 and cannot enable TPM using the above method, you can refer to this section.
When installing Windows 11 without TPM, it will show “This PC can’t run Windows 11”. Press and hold "Shift + F10" to open CMD. Then type the following command and press Enter.
REG ADD HKLM\SYSTEM\Setup\LabConfig /v BypassTPMCheck /t REG_DWORD /d 1
The command line is used to disable the Windows 11 installer's checking of TPM.
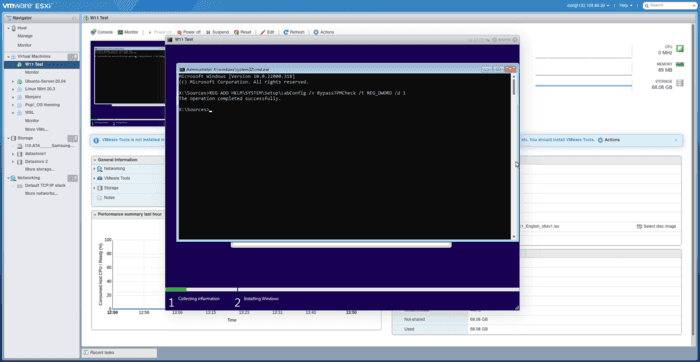
Return to the installation screen and install Windows 11 on virtual machine, you will find that the Windows 11 installation can continue successfully. If your virtual machine still does not support Windows 11, you can reopen CMD and enter this command again until the Windows 11 installation can proceed without any problems.
Free backup solution for virtual and physical machines
Frequent pop-ups, unexpected software installation, inexplicable deletion of computer data and hacker attacks bring risk to your business. In addition to install TPM, enterprises need to pay special attention to how to protect data security.
If you’ve never been in to BIOS and warned during changing the settings, these operations may threaten your data security or computer functions. If you are unsure and feel unsafe to make big changes, always backup your virtual and physical machines.
1 - AOMEI Cyber Backup to protect your business data centrally
To meet the enterprise backup requirements, I'd use AOMEI Cyber Backup, the free backup solution to create a powerful backup task for virtual and physical machines. With this software, you can benefit from the following features.
Auto Backup: schedule backups to protect your virtual and physical machines flexibly.
Centralized Management: backup and manage multiple backup task from a central console with a few clicks.
Supports Multiple Platforms: perform VMware, Hyper-V, Microsoft SQL and Windows PC and Server.
Complete Image-based Backup: quickly backup and restore entire machine to normal state, reducing business downtime.
Click the button below to download and enjoy the perpetual free edition:
Easily protect your multiple virtual machines from a central console (step-by-step):
Step 1. Install AOMEI Cyber Backup, then add and bind your Hyper-V, vCenter or Standalone ESXi hosts. Next, I will take VMware ESXi backup as an example.

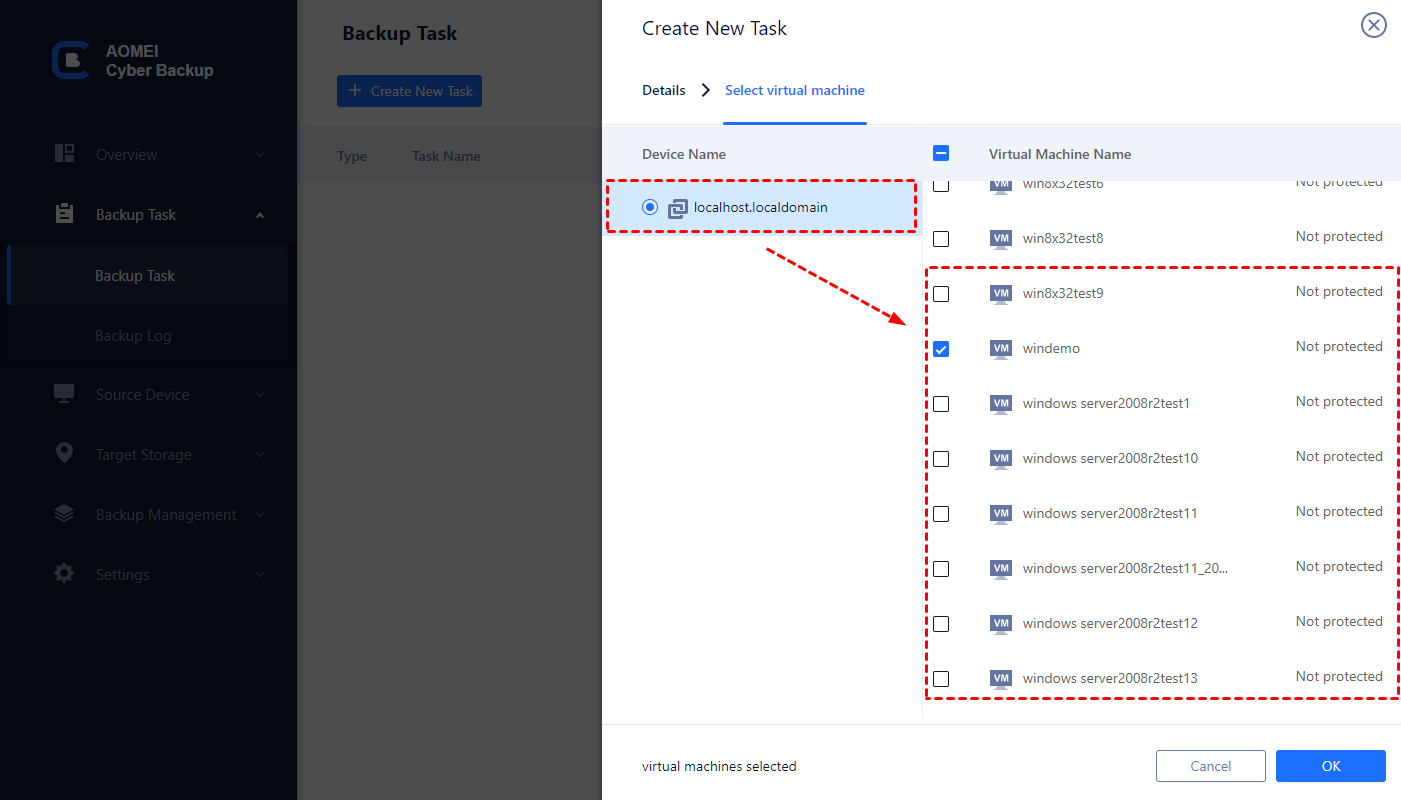
Step 2. Create Backup Task: click Backup Task >> Create New Task to create a secure backup task.
- In Device Name, select your device and virtual machines to offer protection simultaneously.
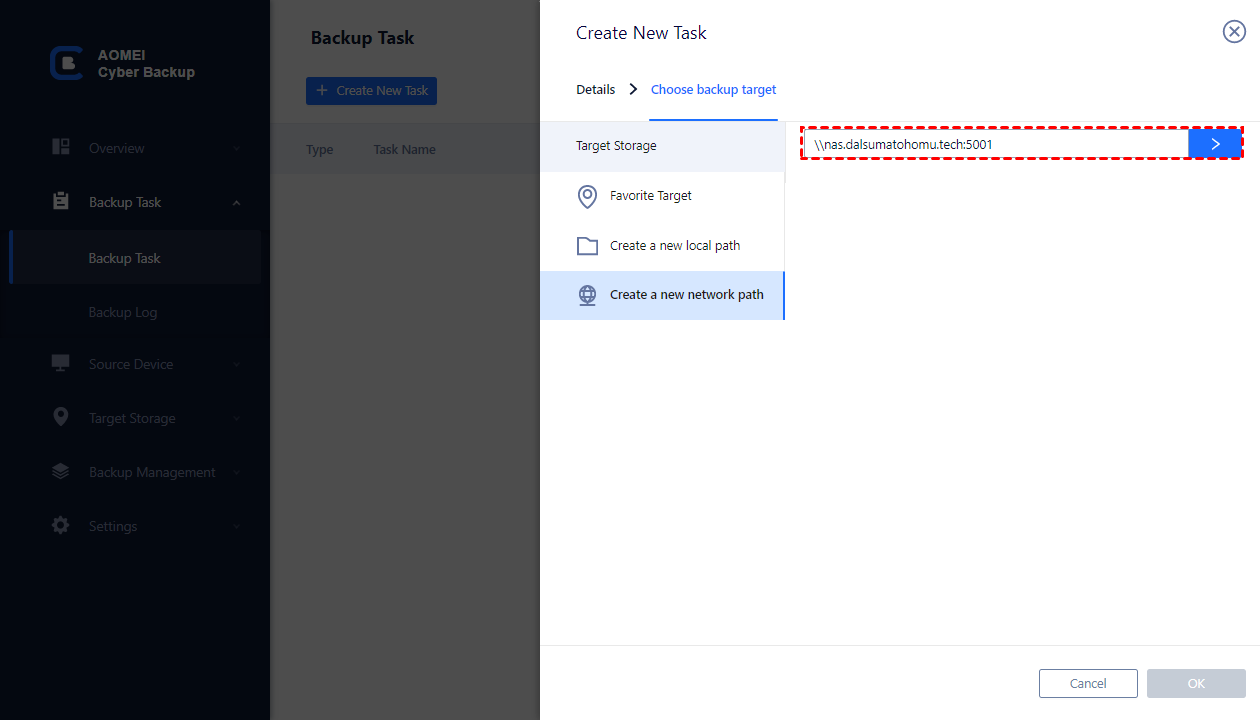
- In Target, select local path or network path to store VM backup files.
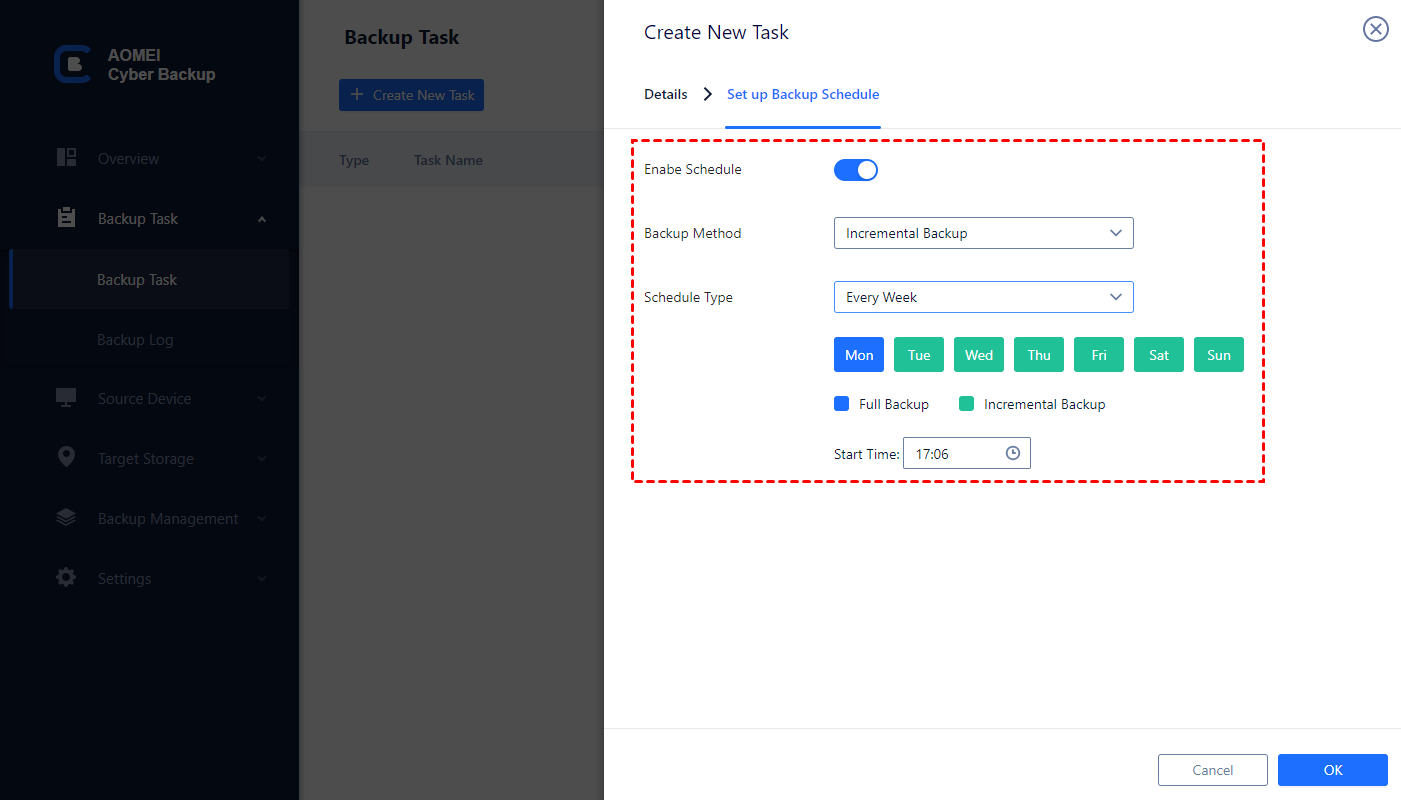
- In Schedule, set up an automatic backup plan with flexible backup strategies.
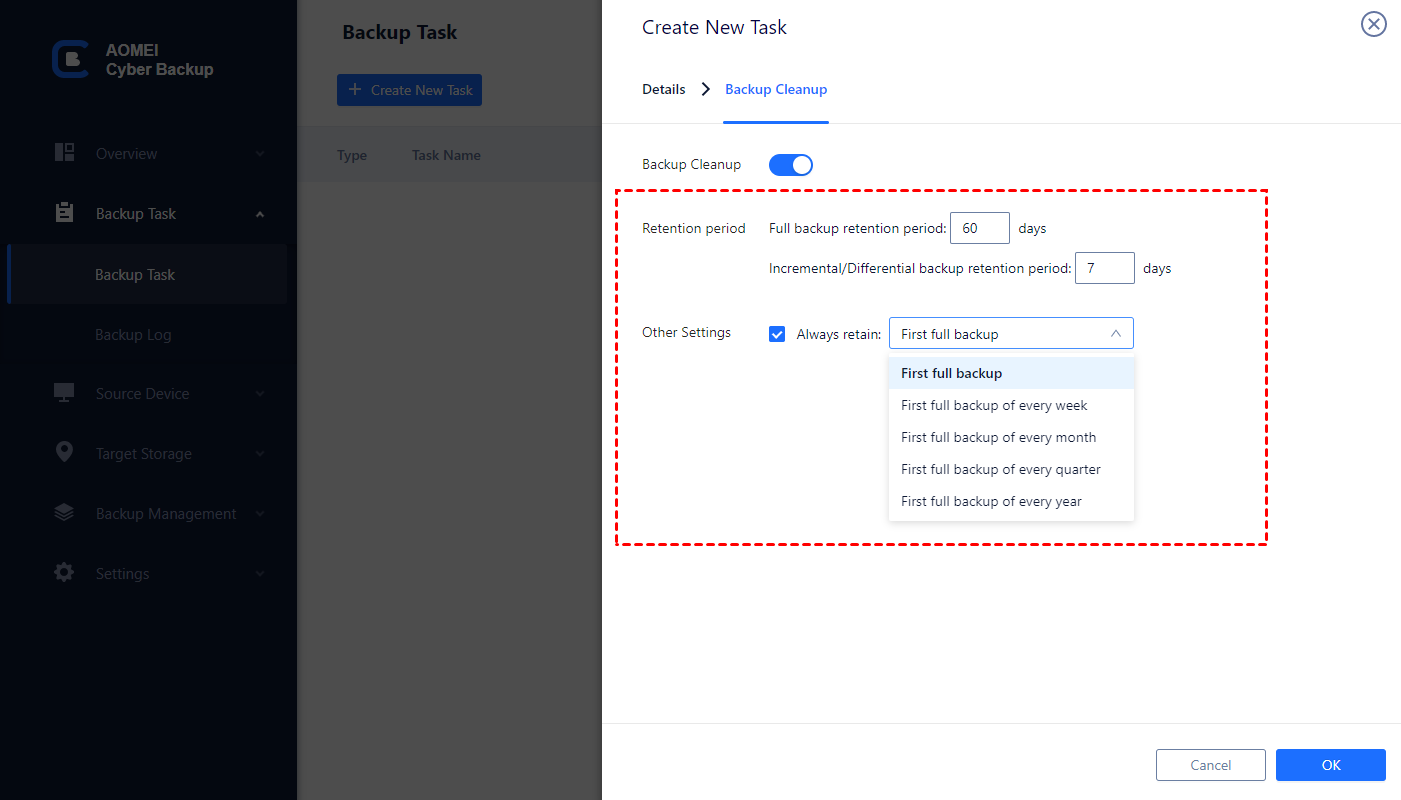
To use advanced features, you can upgrade to Premium Edition to enjoy Backup Cleanup used to specify retention policy to delete old backup files automatically.
With simple clicks, AOMEI Cyber Backup protects your virtual machines forever and assists your business development.
2 - AOMEI Backupper safeguard your physical servers
To create a reliable backup for your physical machines, you could try AOMEI Backupper for a system, disk, file and partition backup.
Step 1. Launch this software, click Backup and Disk Backup. Also, you can backup system, partition or personal data of your virtual machine.

Step 2. Click Add Disk to select the disk you want to backup.

Step 3. Select a destination to save the backup image.
>> To backup to a physical computer or other computers, please click the inverted triangle button  and Select a network location, then pitch on Add Network Location and type required info, including IP address, username and password. Then, select a shared folder as destination path.
>> To backup to external hard drive, please click where the arrow point and click This PC to find your disk.

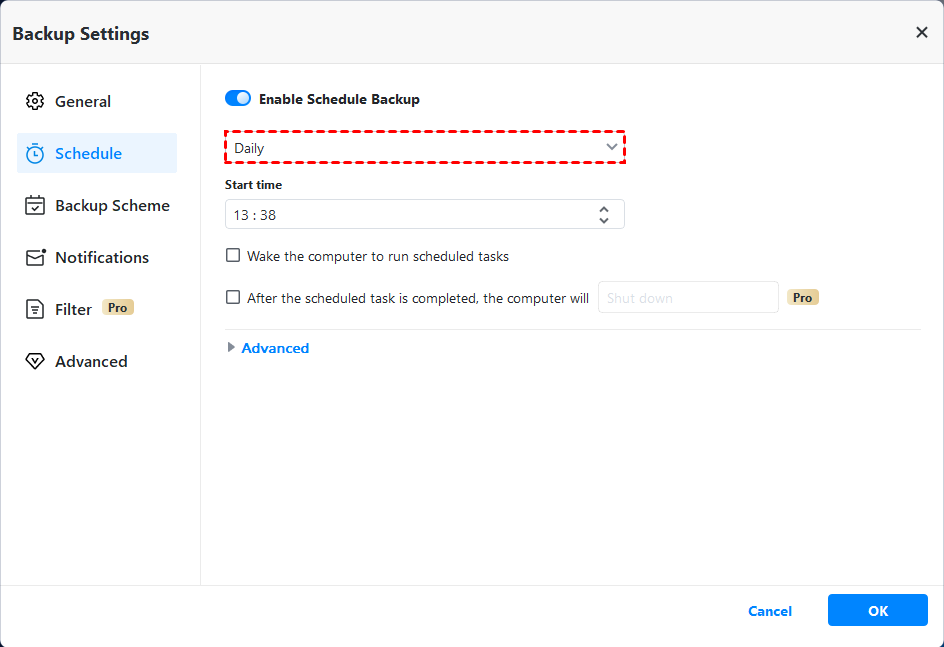
Step 4. Click Schedule to set automatic backup per day, week, or month. Then, run the backup task by clicking Start Backup.
Summary
This article introduces how to add TPM module in Windows to improves the security of your computer.
Whether you are upgrading your system or changing settings, please remember: back up your data before making any big changes, which avoids serious business losses from system or human errors.

