How to Create Portable Windows 11 on a USB Drive
Windows 11 to go USB and cloning both are great ways to help you create portable Windows 11 on a USB flash drive and then boot from it without any obstacle.
By Ivy Updated on June 16, 2025
Two Tested Methods for Portable Windows 11
Cloning and Win2Go are two of the easiest ways to create a portable version of Windows 11. In this article, I will introduce the second method mainly with Rufus, so I will use it as an example below to show you the differences between the two methods.

Select a preference and follow the steps in the next section.
|
Method |
||
|
Description |
Clones your entire disk to a USB drive using disk cloning software |
Installs Windows 11 onto a USB drive using a bootable media creator |
|
Required Tools |
- Cloning software AOMEI Backupper - USB drive (16GB–512GB) |
- Rufus - Windows 11 ISO - 64GB+ USB drive (preferably fast) |
|
Setup Process |
No setup needed post-clone; an exact replica of the original system |
Similar to a clean Windows install; requires personalization and setup on first boot |
|
Usage Notes |
Works like a normal Windows system |
Must reset PIN every time on a new PC; some features may not work on incompatible hardware |
|
Boot Method |
Set USB as first boot device in BIOS |
Set USB as first boot device in BIOS |
|
Best For |
Users seeking a plug-and-play, exact copy of their current Windows environment |
Advanced users who want a clean, install-like portable Windows |
How to Portable Install Windows 11 on a USB Drive
Here I’ll show you two easy methods of portable install Windows 11, and two of them are worth trying. If you don’t want to repeatedly reset the PIN on different PCs, try Disk or System Clone. And it will include the operating system, your settings, installed programs, personal data, etc.
Way 1: Perform Windows 11 to Go USB with Disk Clone
This method requires reliable disk cloning software, AOMEI Backupper Professional is a great choice, since it is fully compatible with Windows 11 and can handle the cloning process very well. Below are some key features related to cloning:
- System/Disk/Partition Clone: It will duplicate exactly the same copy of your system, disk or selected partition. The previous two options will include all the boot files required to start Windows 11.
- Intelligent/Sector by Sector Clone: Both are cloning methods in this software and the first one is default. It clones only used sectors, which makes it easy to clone large drive to smaller drive.
To get started, please download this portable cloning software for Windows 11. For server users, try AOMEI Backupper Server.
Step 1. Install and open AOMEI Backupper Professional, click Clone and Disk Clone subsequently.

Notes:
- The Clone feature can only be demonstrated in the trial version. To directly create a portable version of Windows 11 and boot from it, you could consider upgrading the trial version.
- If your USB drive is smaller than Windows 11 hard drive, you can choose to clone OS only with the System Clone feature. It will automatically select OS and other required boot files, and it's much easier.
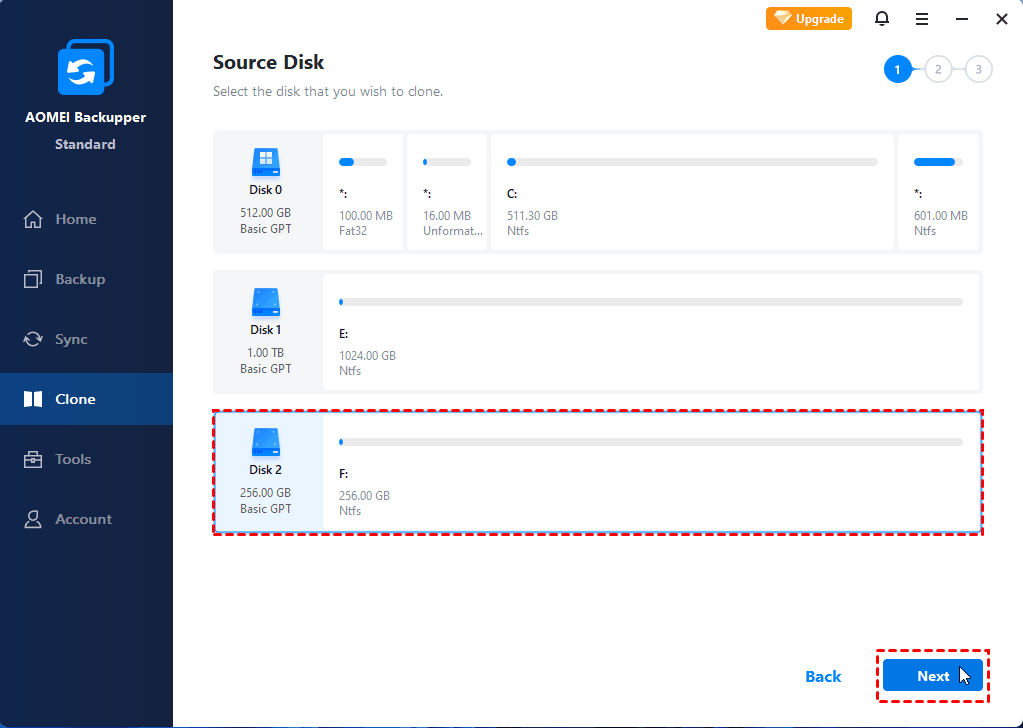
Step 2. Select the disk in Windows 11 as the source disk and then the USB drive as the destination disk. Click Next in order after selecting disk.
Step 3. Confirm you select the right disk and click Start Clone to create a PC portable Windows 11.
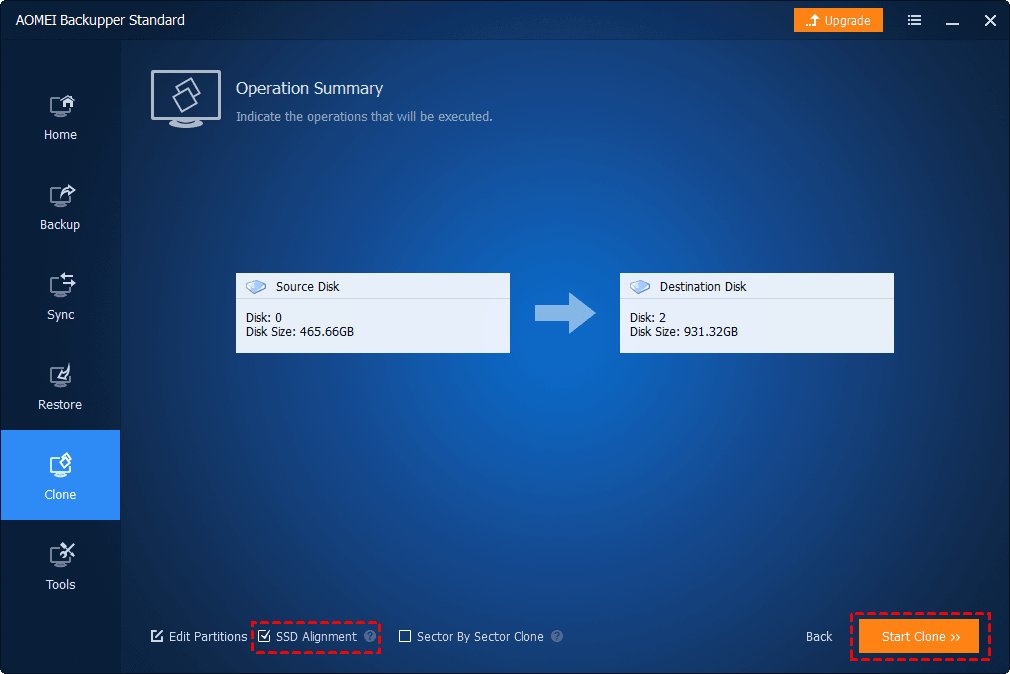
Notes:
- Edit Partitions: It helps to clone and resize hard drive, especially useful when cloning disk to larger disk. It also works well in cloning MBR disk to GPT and vice versa.
- SSD Alignment: It is used to clone hard drive to SSD and align sectors between HDDs and SSDs to maintain the SSD's high performance.
- Sector by sector clone: It clones all sectors from one hard drive to another one, whether used or not. The biggest usage is to clone encrypted disk in Windows 11. So, if that's not the case, don't check It.
Way 2: Run Windows 11 to go with Rufus
To run Windows 11 on a USB drive with Rufus, you need the following items:
- Prepare a blank 64GB or larger USB stick and insert it into your PC. The performance of portable Windows 11 depends on the speed of the selected USB.
- Download the latest version of Rufus.
Then, follow the steps below to perform Windows 11 to go with Rufus.
Step 1. Search and open Rufus. Then, you will see 3 main sections that are at the core of creating a portable version of windows 11. First, select your USB drive under Device.
Step 2. Confirm the Boot selection shows “Disk or ISO image” and click on Download.
Step 3. Then, in the pop-up window, select the following items and save ISO image to the Downloads folder. Remember to click the Continue and Download button at the lower location.
- ISO image version - Windows 11
- The latest release version, 21H2, for example
- Windows 11 edition -Windows 11 Home/Pro
- Language - English
- Architecture - x64
Note: If you download Windows 11 ISO file from Microsoft, you will see Select in this step. Click it and select the Windows 11 ISO. You also need to set some image options.
Step 4. Wait until the download process completes. Go to the Image option and select Windows To Go. It will directly install Windows 11 on a USB drive.
Step 5. Confirm you select the right drive and click Start to create a portable Windows 11 on a USB Drive.
Note: You can only change the Volume label under the Format options. All the other options are NOT changeable.
How to Run Windows 11 on a USB drive
To ensure this portable Windows 11 works well, you need to double check that it is bootable. Remove the created USB after the creating process completes and boot from it with the following steps.
Step 1. Insert this portable Windows 11 USB into the machine you want to boot from and power it up.
Step 2. Press the key to access BIOS when you see it. Usually, it’s at the lower right corner and the key can be F10, ESC, F1, F2, etc. It may be different on different PCs.
Step 3. After accessing the BIOS window, go to the Boot section and move your USB drive to the first option.
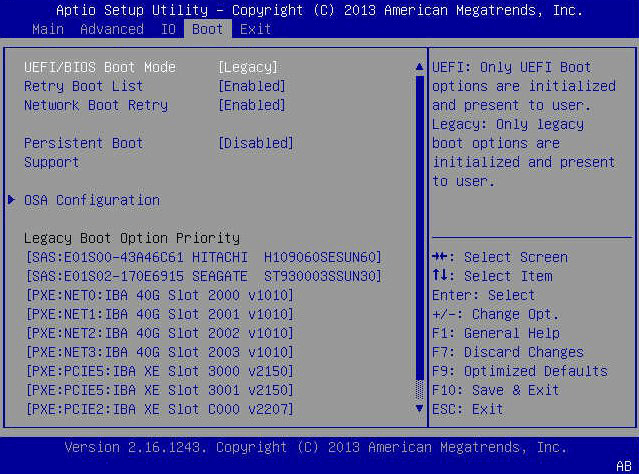
Step 4. Press F10 to save changes and boot from it. If the boot mode of the USB disk type is different from this machine, you need to change it too.
Step 5 (optional). If the USB drive you boot is created by Rufus, you still need to set preferences just as clean install and reset the PIN.
On the login screen, click Setup my PIN and input your Microsoft account. It requires verification, just input it and create a new Pin to access this portable Windows 11.
Bonus: Why Create Portable Windows 11?
Portable Windows 11 (also called Win2Go) is to install Windows 11 with OS, programs, data etc on a USB drive and then you can boot from it on any computer. Everything is the same as the operating system you run. Thus, many users like you may want to create a portable version of Windows 11. Below are the three main reasons for it:
- Try Windows 11 without Messing Your System.
- Take Your OS and programs between computers.
- Run Windows games on Mac well.
FAQs about Portable Windows 11
1. Can I run Windows 11 on a USB drive?
Yes, you can install Windows 11 on a USB drive and run from it as long as it has enough space. The two easiest methods are to use Windows To Go and Disk or System Clone.
2. Can I install Windows 11 on a portable SSD?
3. Is Windows 11 still free?
Yes, Windows 11 is still free for users upgrading from a genuine and activated copy of Windows 10. However, if you're installing Windows 11 on a new device without an existing Windows license, you’ll need to purchase a valid product key. Keep in mind that minimum Windows 11 system requirements must be met, including TPM 2.0 and Secure Boot support, for the upgrade to work properly.
Summary
Cloning and Windows 11 to go Rufus both are excellent methods to create portable Windows 11 on a USB drive. However, you need to know that the USB created by Rufus requires you to reset your PIN on different PCs.
If you don’t want to do this from time to time, try Disk Clone or System Clone. It will save much trouble for you. And this method still helps you move files from one SSD to another and move Windows 11 to a new computer.
In addition, if you want to create multiple portable Windows 11, you can create a portable version of this software with its advanced edition and run it without installing again. Then, follow the cloning steps above.

