Clonezilla Disk to Disk Clone: Step-by-Step Guide for Windows
Learn how to use Clonezilla's disk-to-disk clone feature for Windows 11, 10, 8, and 7. Follow this step-by-step guide to clone drives of different sizes effortlessly.
By Lily Updated on September 2, 2025
Now you are planning to replace your old hard drive for better performance. To make it, Clonezilla is a good choice that can help you clone your entire drive to the new drive directly. It just makes use of these used blocks to save and restore files which increases the clone efficiency.

Part 1. How to clone disk to disk with Clonezilla
Here in this part, you will know how to use Clonezilla disk to disk clone feature. Please make sure the destination partition must be equal or larger than the source one.
Step 1. Prepare Clonezilla live.
Go to Clonezilla download page to get Clonezilla live. Here we put Clonezilla live on the new hard drive and use it to boot Clonezilla. Please make sure there’s a bootable partition on your hard drive to boot it. Or you can put Clonezilla live in bootable CD or USB.
Step 2. Boot the Clonezilla.
Insert the new hard drive that is bootable with Clonezilla live to your computer and boot Clonezilla live.
Step 3. Choose “ToRAM” option in the boot menu.
Select “Other modes of Clonezilla live” in boot menu. The choose “Clonezilla live (TO RAM, Boot media can be removed later)”. In this way, all the Clonezilla live file on SSD will be copied to RAM, so the partition of SSD can be released.
Step 4. Select language.
Step 5. Choose keyboard layout.
Step 6. Choose “Start Clonezilla”.
Select “Start Clonezilla” > “device-device work directly from a disk or partition to a disk or partition” > “Beginner mode: Accept the default options”.

Step 7. Choose “Disk-to-local-disk”.
Step 8. Select source disk.
Step 9. Select target disk.
You can choose to check the source file system, or you can just choose to “Skip checking/repairing source file system”.
Step 10. Start cloning.
Clonezilla will ask confirmation several times like asking about cloning boot loader to target disk, and asks confirmation about cloning data from source disk.
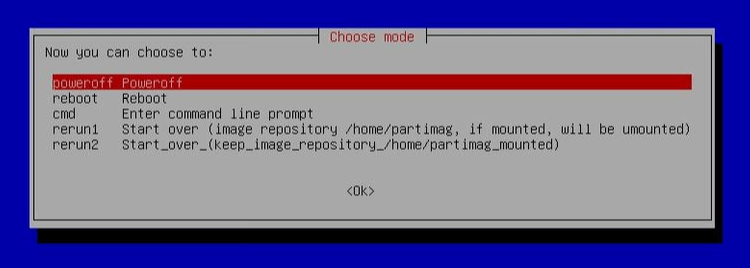
Step 11. Disk is cloning.
Select “Poweroff” and then your machine will be halted. And your new hard drive is ready to be used.
As you can see, the whole process is kind of complicated also time-consuming, especially for the newbie. Cloning disk with Clonezilla needs lots of steps which may make you confused. And it cannot help you clone larger drive to smaller drive.
Fortunately, there’s one easy-to-use Clonezilla alternative which can help you finish the job without effort. Just keep reading to get it.
Part 2. Clonezilla alternative - clone hard drive of different sizes easily
AOMEI Backupper Standard is a versatile free backup, clone, sync, and recovery tool for Windows users, compatible with Windows 11/10/8/7. Its Disk Clone feature makes cloning hard drives effortless, offering superior performance compared to tools like Clonezilla.
Whether you need to clone a larger drive to a smaller drive (e.g.,500GB HDD to 250GB SSD) or clone a smaller drive to a larger drive, AOMEI Backupper delivers reliable results.

-
Flexible Cloning Options: Clones entire disks or specific partitions to suit your needs.
-
Bad Sector Ignorance: Ensures successful cloning by skipping bad sectors.
-
Efficient Space Usage: Clones only used sectors, allowing you to clone to a smaller drive if space permits.
-
User-Friendly Interface: Unlike Clonezilla’s text-based interface, AOMEI Backupper offers an intuitive GUI for seamless operation.
Download and install AOMEI Backupper on your PC now! Then follow the steps below to clone one disk to another disk easily:
Step 1. Launch AOMEI Backupper. Click Clone and then choose Disk Clone.
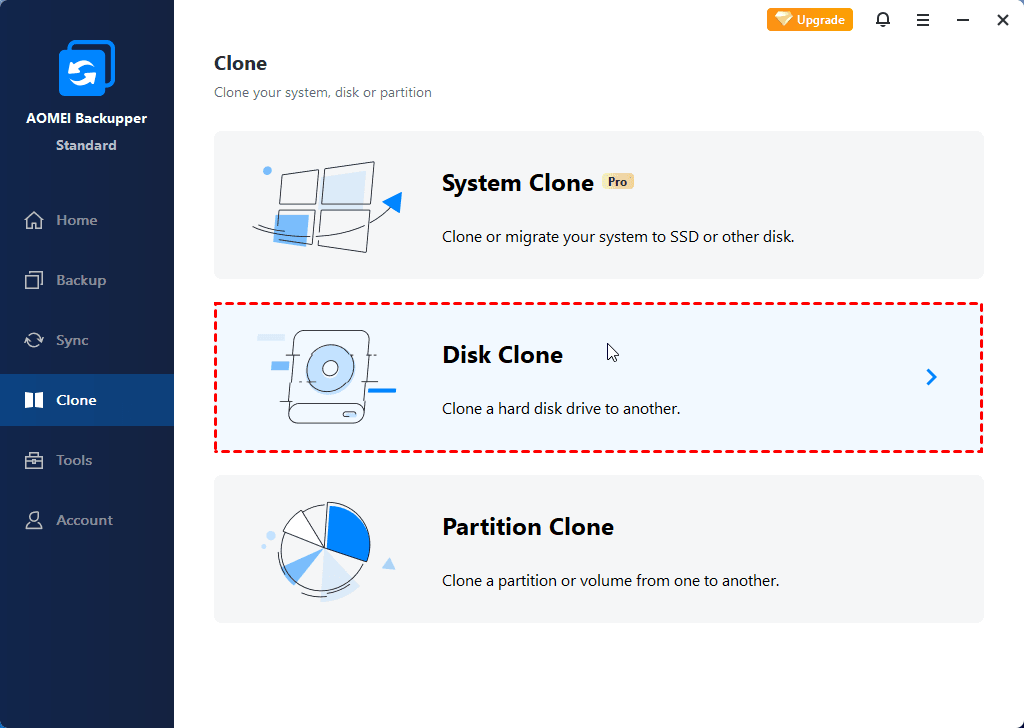
● The free version of AOMEI Backupper only supports cloning data disks. To clone disks with OS installed, please upgrade to AOMEI Backupper Professional.
● If you only want to copy OS to new drive, please use System Clone in AOMEI Backupper Professional.
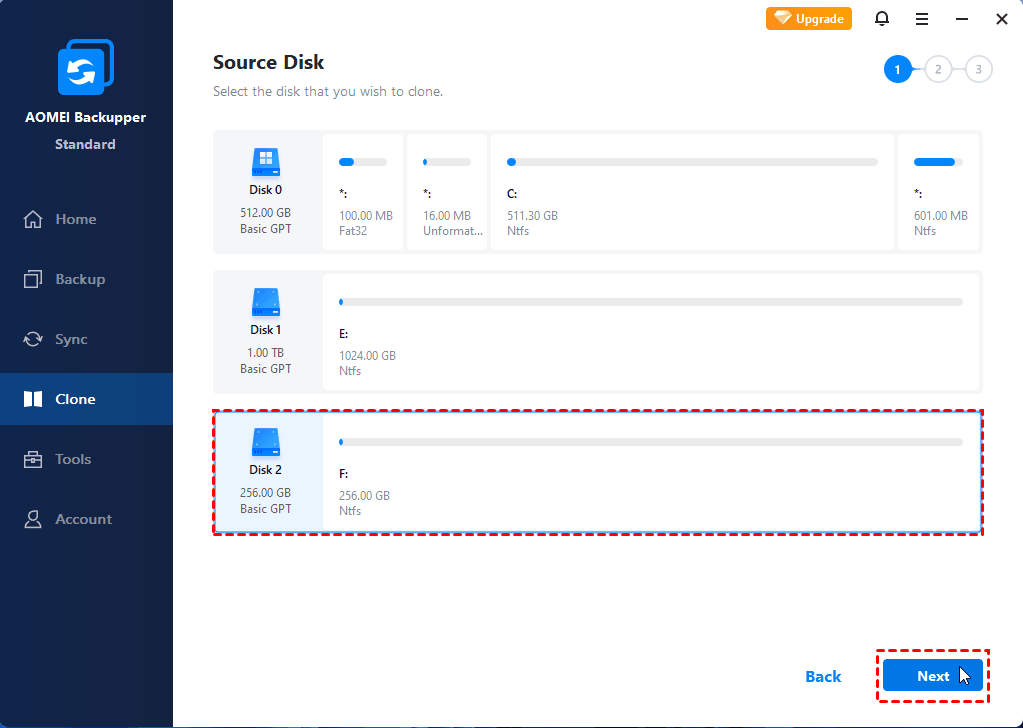
Step 2. Select the source disk and click Next.
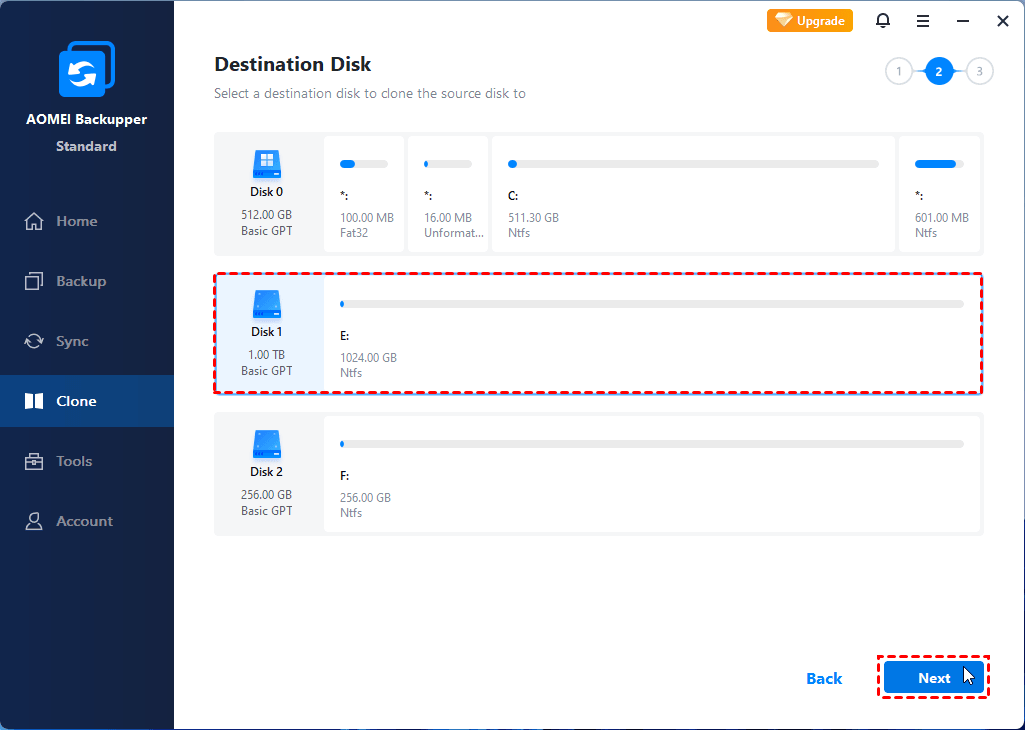
Step 3. Select your new hard drive as the destination to clone the source drive to. Then click Next to continue.
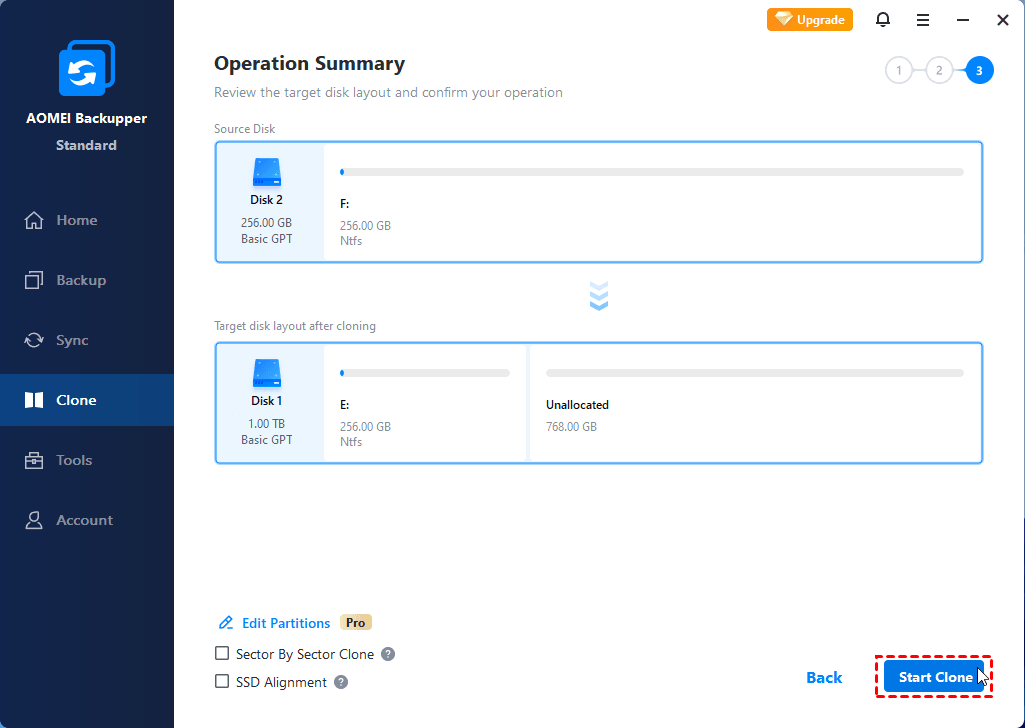
Step 4. Check the operation summary and click Start Clone. If you are cloning hard drive to an SSD, check "SSD Alignment" to improve the speed of reading and writing as well as prolong the service life of SSD.
Notes:
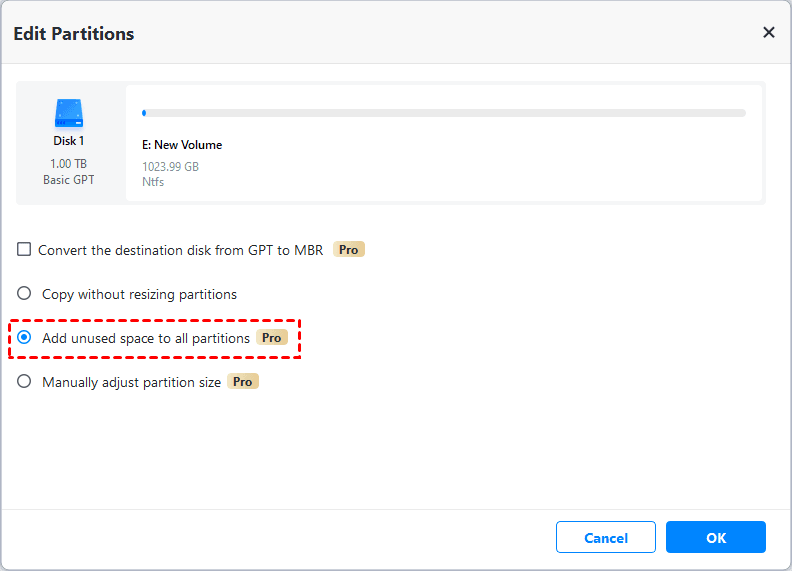
👉 "Edit partitions" allows you to resize partitions on the larger destination disk and convert disk types if necessary. It's available in Professional edition.
- Copy without resizing partitions: It will not resize the partition size.
- Add unused space to all partitions: It will reallocate the unallocated space to each partition of the target disk, appropriate for the disk size.
- Manually adjust partition size: It allows you to extend unallocated space to any partition on the destination disk you want.
- Convert the destination disk from MBR/GPT to GPT/MBR: It helps to convert the partition style of the destination disk if it is different from the source disk.
👉 Select "Sector by sector clone" if you want to clone every sector whether it is used or not, even if it’s a blank sector or a logically bad sector.
Extended reading: Learn more about Clonezilla
Clonezilla is an open-source cloning and imaging software that has three available types, including Clonezilla live, Clonezilla lite server and Clonezilla SE. Clonezilla live supports single machine backup and restore, while Clonezilla lite server or SE is for massive deployment.
The tool supports various system including Linux, Mac OS, Windows, FreeBSD, NetBSD, OpenBSD, and more. Users can use Clonezilla for system backup, full drive clone, system deploy, etc.
But since Clonezilla does not have a user-friendly GUI, some users may feel difficult to use it. In addition, there are some limitations you should know:
-
The destination partition must be equal or larger than the source one. In other words, Clonezilla cannot help you clone larger drive to smaller drive. This may disappoint users who tend to clone to a different size disk.
-
Many users have reported the Clonezilla failed to clone issue. Where there’s a bad sector on your disk, there’s a high probability that you will encounter this problem. A bad sector is a tiny cluster of storage space that cannot be used to read or write data, so likely Clonezilla fails due to the bad sector.
FAQs about Clonezilla disk to disk cloning
1. Can Clonezilla clone one disk directly to another?
2. Does Clonezilla support SSDs and NVMe drives?
3. Is SSD alignment handled by Clonezilla?
4. Can I use Clonezilla to clone a Windows disk?
Conclusion
Now you know how to use Clonezilla disk to disk clone feature. Compared to Clonezilla, AOMEI Backupper is a better choice when it comes to cloning hard drive. It can help you easily clone larger hard drive to smaller hard drive.
Besides, it is more than an alternative to Clonezilla. It is also regarded as an extraordinary free backup and restore software. It offers various options to keep your data safe, and you can restore computer to an earlier date when you need. Why not give it a shot?

