How to Clone a GPT Disk via Clonezilla Step by Step
Clonezilla is a free disk cloning and imaging program. Learn how to clone a GPT disk via Clonezilla step by step from this page. You can also get an easier way to do GPT disk clone in Windows here.
By Lily Updated on March 19, 2025
Why Clone GPT disk via Clonezilla?
Nowadays, many modern computers come with GPT disks. You may want to clone a GPT disk either to upgrade to a larger hard drive or to prepare an identical disk for emergency use. Clonezilla, a free disk cloning and imaging program, can help you a lot in this situation.

It supports various file systems including ext2, ext3, ext4 in Linux, FAT16, FAT32, NTFS in Windows, and HFS+ in Mac, etc. For these file systems, only used blocks in partition are saved and restored by "Partclone" in Clonezilla.
For unsupported file system, sector-by-sector clone is done by "dd" in Clonezilla. Both MBR and GPT partition formats of hard drive are supported. Learn how to use Clonezilla to clone a GPT disk in detail below.
The operation of using Clonezilla to clone a GPT disk is complicated, especially for computer novices. For easy disk clone, try AOMEI Backupper.
How to clone a GPT disk via Clonezilla live
There are three types of Clonezilla available: Clonezilla live, Clonezilla lite server and Clonezilla SE (server edition). Clonezilla live is suitable for single machine backup and restore while Clonezilla lite server or SE is for massive deployment. We choose Clonezilla live here. Follow the instructions below to perform Clonezilla UEFI disk clone:
1. Download Clonezilla and prepare boot media.
Choose different download files based on your needs. For example, select “zip” to install Clonezilla to a USB stick, and select “iso” to burn it to a DVD. If you download the “zip” file, learn how to make a bootable Clonezilla live USB flash drive here.
2. Prepare target drive and boot Clonezilla.
• Connect the target drive to your machine, making sure it is equal to or larger than the internal hard drive. Backup files on the target drive in advance because they will be overwritten during the cloning process.
• Insert your Clonezilla Live USB or DVD and boot your computer from it. When Clonezilla first loads, press Enter to accept the default settings.
3. Start the wizard.
Select your language from the list. Then, select Don't touch keymap and Start Clonezilla.
4. Select mode.
Select device-device to directly clone the partitions of one drive to another. Then, choose Beginner mode to accept the default options.
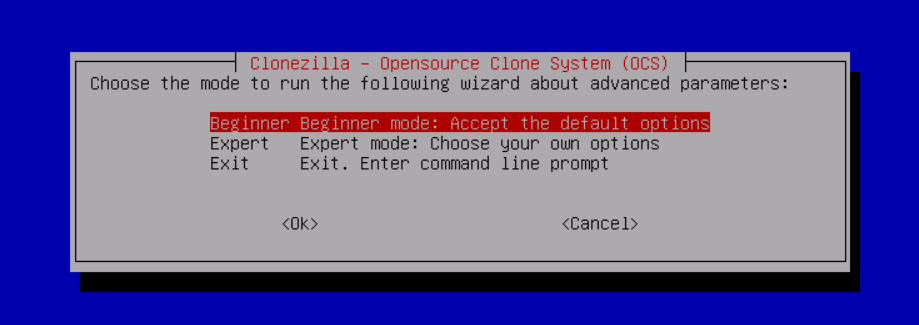
Note: By default, Clonezilla will clone the “same” size of source disk to target disk. Therefore, there would be unallocated space left on the target disk if you are cloning a smaller drive to a larger drive. To make full use of the target disk size, you can enter Expert mode and choose option -k1.
5. Choose the "disk_to_local_disk" cloning method.
6. Select the source GPT disk and the target disk successively.
• Do not choose the wrong disk, since all the data on the target disk will be overwritten
• Select if the source file system need to be checked or not before cloning. The default option is to skip this step.
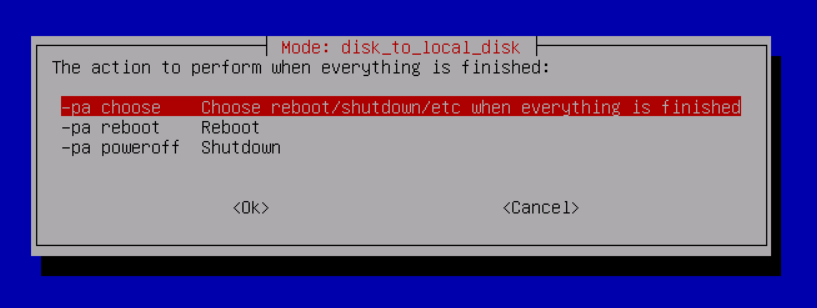
7. Select what to do after cloning.
The default option is Choose reboot/shutdown/etc when everything is finished. You can also choose directly reboot or shutdown once the copy process is complete.
8. Confirm operations.
• Clonezilla will display a warning that any data already on the target drive will be deleted during the cloning process. Type “Y” and press Enter to proceed.
• Clonezilla will now ask you if you want to clone the local disk's boot loader. If you want to make an exact copy of the drive, type “Y” and press Enter.
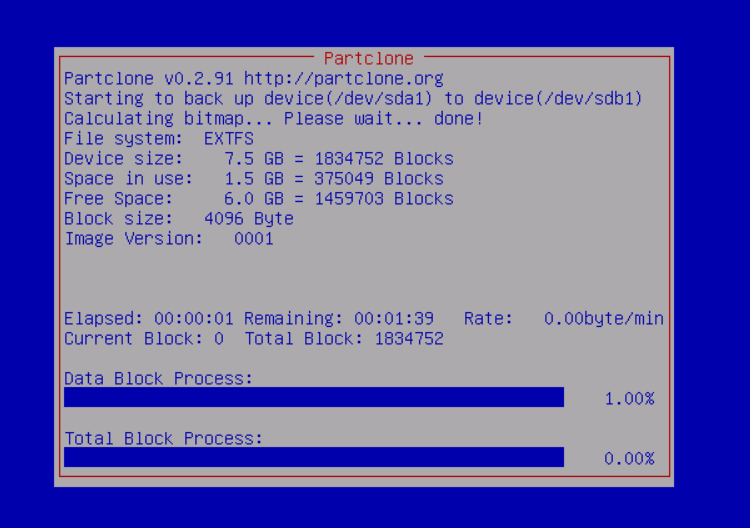
9. Start cloning.
Clonezilla will create partition table on the destination disk and Partclone will launch automatically to clone the data from source disk to target disk.
10. Disk is cloned.
• Clonezilla will either prompt you to shut down or restart or do it automatically depending on the settings you chose in the previous step.
• Remove your Clonezilla Live USB or DVD. Replace the old GPT disk with new disk. If the new disk is also a GPT disk, you can boot from it directly. If the new disk is an MBR disk, you should change boot mode from UEFI to Legacy to boot from it.
As you can see, the whole process of Clonezilla GPT disk cloning is really complicated. Also you can be disappointed by Clonezilla’s limitations—the target drive must be at least as large as the source drive; the disk/partition to be imaged/cloned has to be unmounted; there’s no GUI operations….Luckily, you can turn to Clonezilla alternative to make GPT disk clone simpler.
An easier way to clone a GPT disk in Windows
Here I’d like to recommend the best Clonezilla alternative—AOMEI Backupper to you. It breaks the limitations of Clonezilla.
✧ With the Disk Clone feature in AOMEI Backupper, you are able to clone SSD to larger SSD and clone large HDD to smaller SSD as you like.
✧ It supports cloning system or non-system disks MBR to MBR, GPT to GPT, MBR to GPT and GPT to MBR.
✧It supports clonig all kinds of HDDs and SSDs, regardless of disk size, interface and its brands, migrate Windows 10 to M.2 SSD, for example.
✧ With the intuitive interface of AOMEI Backupper, all you need to do for GPT/MBR disk clone are a few clicks.
What’s more, the cloning process will run in the background, so you can use the computer for other things during the process. The only limitation of AOMEI Backupper compared to Clonezilla is that it only supports Windows operating systems, no Mac OS. Follow the steps below to clone a GPT disk to a larger GPT disk with AOMEI Backupper:
Step 1. Connect the target GPT disk to your PC and make sure it is recognized by Windows. As the destination disk will be overwritten in the cloning process, backup important files beforehand.
Step 2. Download, install and run AOMEI Backupper. Then, go to Clone > Disk Clone.

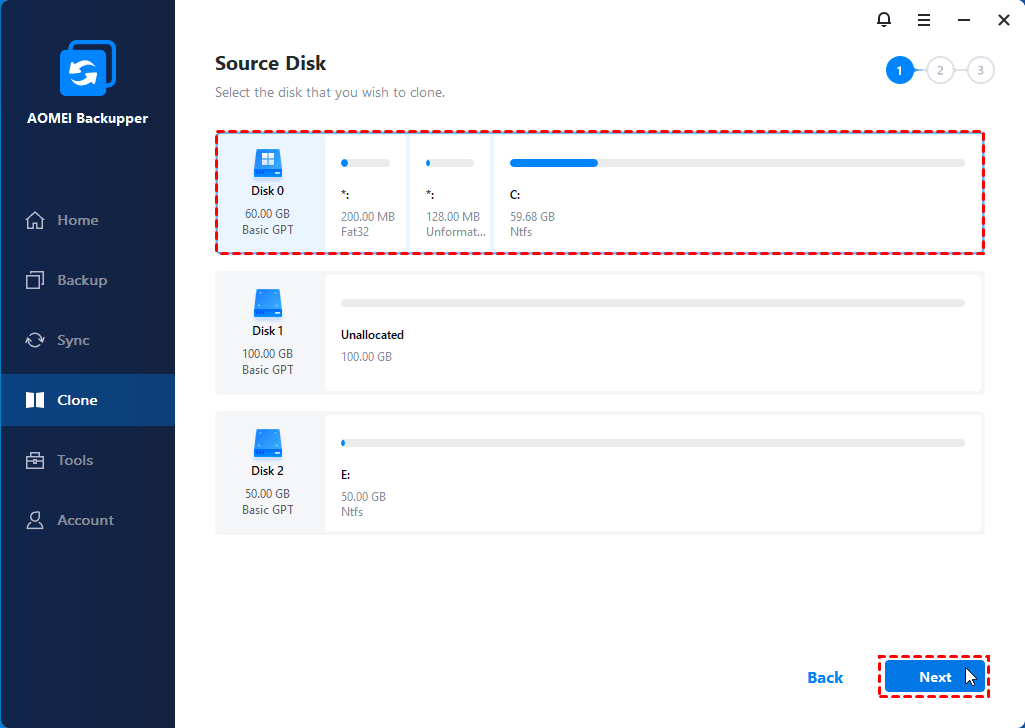
Step 3. Select the current GPT disk as the source disk and click Next.
Step 4. Select the newly connected GPT disk as the destination disk and click Next.

Step 5. Tick SSD Alignment to optimize SSD performance if you are cloning to an SSD. Confirm the operation and click Start Clone.

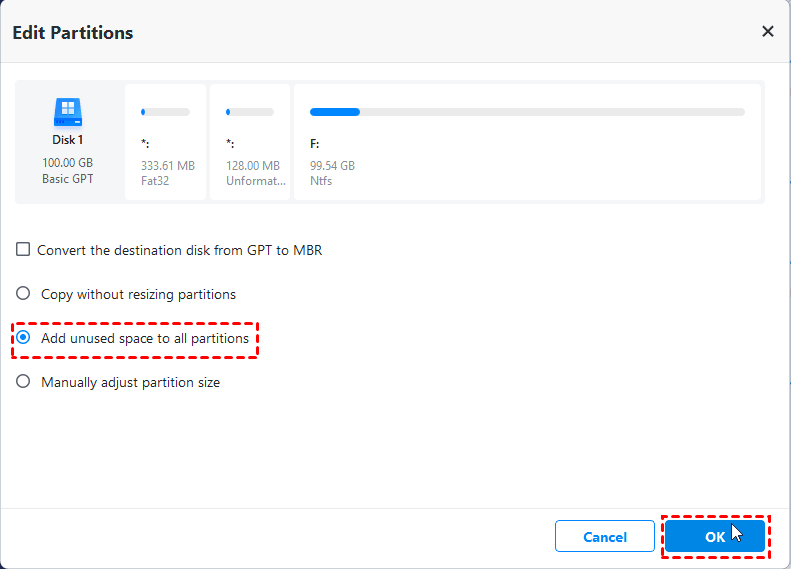
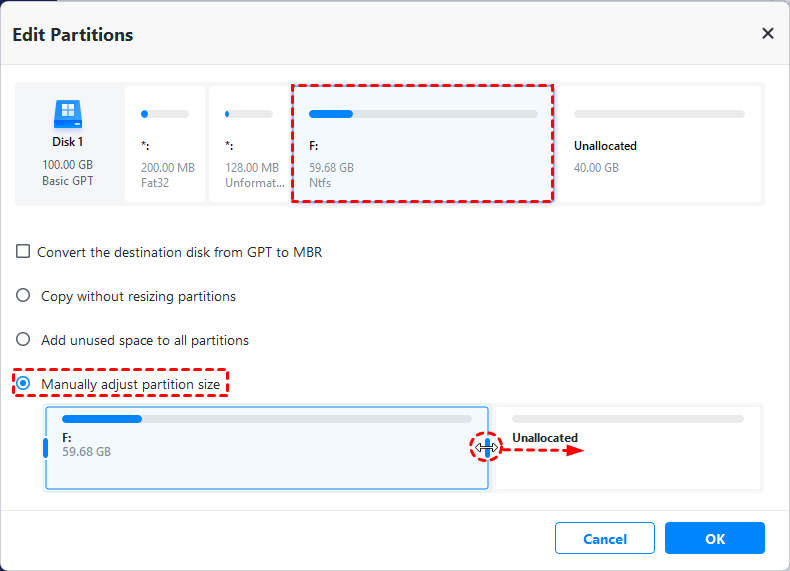
Also, you can use Sector by sector clone to keep the old partition layout or Edit Partitions to adjust the partition size on the destination disk. And the later one is more practical, since it resolves two potential issues during the cloning process.
#1: The cloned drive not show full capacity.
By default, all the cloning software makes an exact copy of source disk unless you change the partition size while cloning. To prevent this from the beginning, try the following 2 options.
👉 Add unused space to all partitions: It will reallocate the unallocated space to each partition of the target disk, appropriate for the disk size.
👉 Manually adjust partition size: It allows you to extend unallocated space to any partition on the destination disk you want.
#2: The cloned drive not bootable after cloning.
One of the biggest reason is the destination and source disks have different partition styles and you don't convert them to the same before cloning. In this situation, you can simply check the option Convert the destination disk from MBR to GPT.

Wrapping things up
Now you know how to clone a GPT disk via Clonezilla step by step. However, the whole process is really complicated, especially for those who are not too tech-savvy. You may prefer AOMEI Backupper for its easy installation and easy steps.
Besides the cloning feature, AOMEI Backupper is powerful backup and restore software. You can use it as an alternative when Windows backup freezes at 97%. Go for it right now!

