(Fixed) Clonezilla Failed to Clone Due to Bad Sectors or Disk Size
It's recommended to use advanced parameters in the export mode to fix Clonezilla failed to clone due to bad sectors or disk size. If it doesn't work, you can try an easier alternative.
By Delia Updated on August 28, 2025
Clonezilla overview - open source cloning and imaging program
Clonezilla is a free and open source hard drive cloning and imaging program. It is available in two editions Clonezilla live, which allows you to create a bootable CD/USB disk that you can boot the computers running various system (including Linux, Mac OS, Windows, FreeBSD, NetBSD, OpenBSD, and more), and Clonezilla Server, which allows you to clone many computers over network concurrently.

Many users have tried to use Clonezilla to clone hard drive. Some of them complete the process without a scratch while the others end up with an error. Clonezilla failed to clone for many reasons, such as, the disk is too small, bad sectors or failed to find this partition in this system. Is there any way to fix it or troubleshoot?
Cause and solution: Clonezilla failed to clone error
As mentioned earlier, Clonezilla clone hard drive failed may caused by many reasons. Here we will introduce 2 main causes and corresponding solutions below. And you will learn a stepwise guide in the next part.
Optionally, if you have no time for troubleshooting, you can pick another tool that supports cloning larger to smaller disk, or cloning hard drive with bad sectors.
Alternative: More fault-tolerant cloning tool
Clone disks of different sizes, or disks with bad sectors intelligently. Click-based interface to help you transfer data or OS with ease.
Case 1. Clonezilla fails to clone due to bad sectors
Bad sectors are often the cause to cloning failure. A bad sector is a tiny cluster of storage space that cannot be used to read or write data, so likely Clonezilla failed due to bad sectors.
You can try the following command to check and fix bad sectors: sudo e2fsck -f /dev/sdxy (“x” represents the drive letter and “y” the partition number). Note that the partition to be checked has to remain unmounted.
If you want to check Windows partitions (usually NTFS and FAT32 formatted), use the following: chkdsk /f.
However, if the bad sectors cannot be fixed, you can enable the advanced parameters -rescue to skip bad sectors. Then you can transfer the data that can be read and accessed from one hard drive to another.
Case 2. Clonezilla fails to clone due to disk size
If you are trying to clone a large disk to a small disk, which means some block has to be dropped in the cloning process, Clonezilla wouldn’t know which blocks to drop.
Therefore, clone hard drive failed with Clonezilla, saying "clonezilla failed to create a partition table on this disk is this disk too small". Also, you may receive the error "Clonezilla failed to find this partition in the system".
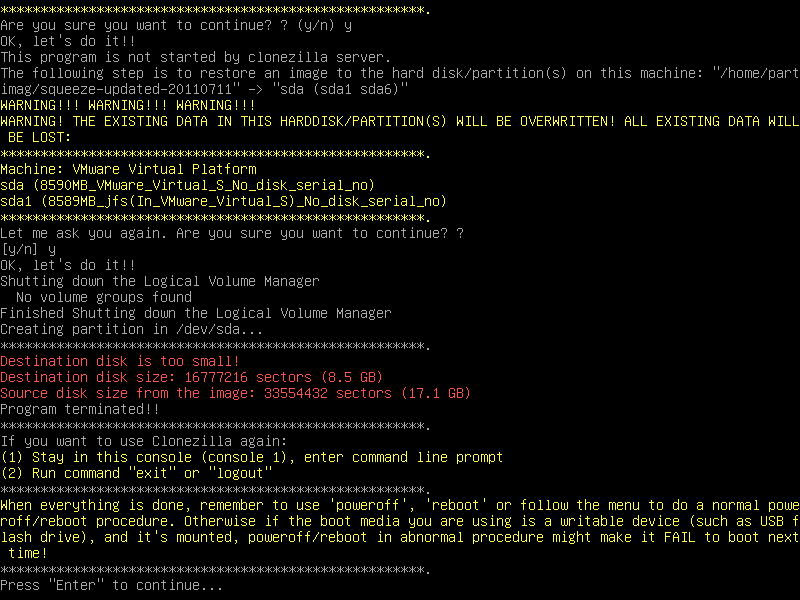
To work this around, you can either shrink the source partition(s) or use a same size or larger size hard drive as destination disk.
If you really want to clone larger disk to smaller disk via Clonezilla, you can check the option "-icds" parameter to skip checking the destination disk size before creating partition table in the advanced parameters.
Then, let's see how to use clonezilla to skip bad sectors or disk size in the next part.
Steps to fix Clonezilla failed to clone due to bad sectors or disk size
Here's a step-by-step guide to help you fix the cloning error of Clonezilla:
Step 1. Download and install Clonezilla, then create a live USB to boot your computer. Then, set the USB drive as the first boot option in BIOS and boot from it. You will be asked to press a key to enter BIOS, it may be different, including F2, ESC, F11, etc.
Step 2. In the boot menu, choose the option "Clonizella live (Default settings, VGA 800x600)". Then, select "language" > "keyboard congiguration" > "Start _Clonezilla Start Clonezilla" and hit "OK" after each option.

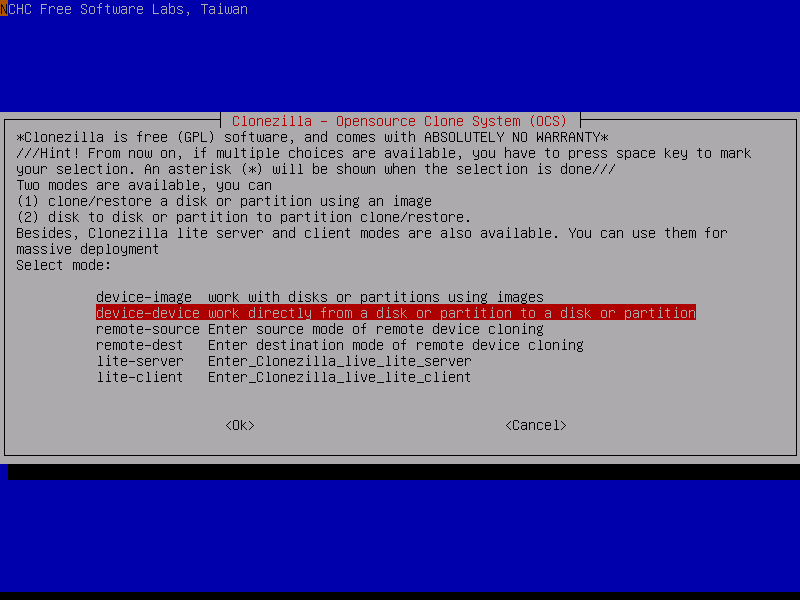
Step 3. Select "device-device work directly from a disk or partition to a disk or partition". Then hit "OK".
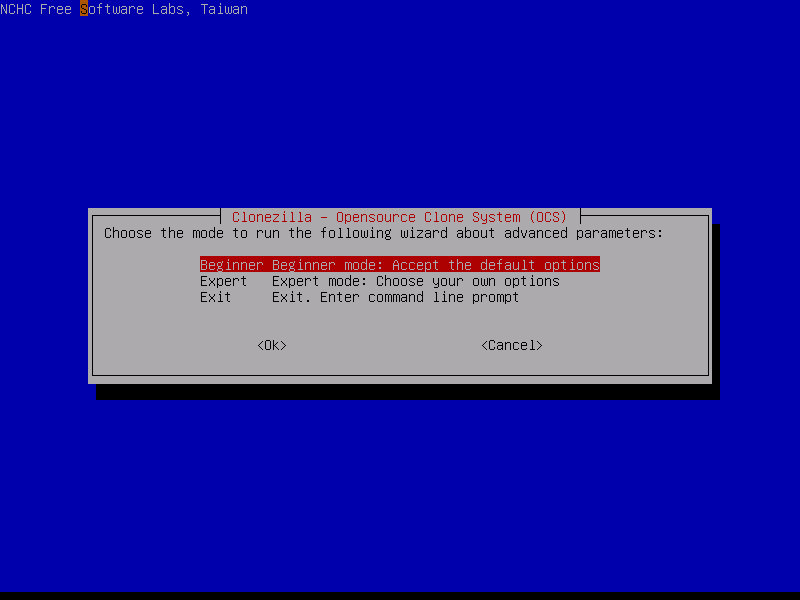
Step 4. Select "Export mode: Choose your own options" so as to use the advanced paramether "-rescue". Then hit "OK".
Step 5. Select "disk_to_local_disk" to clone system disk. Then, click "Next".
Step 6. Select source disk and destination disk in order. Then, click "OK" later. Note the destination disk will be overwritten, please backup files on the destination disk first.
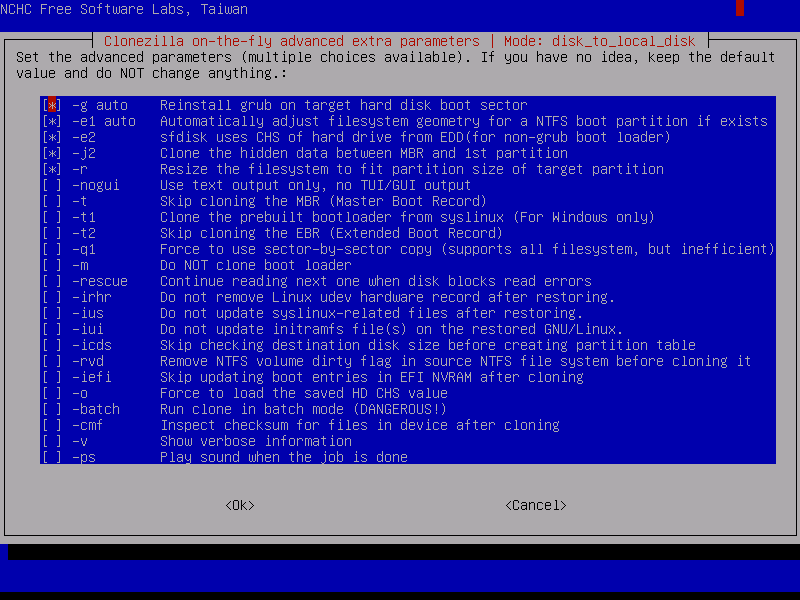
Step 7. Select "-rescue" so as to continue reading next one when disk blocks read errors. If your problem is caused by disk size, select "-icds " instead of "-rescue" to skip checking destination disk size before creating partition table. Then, hit "OK".
Step 8. Select "-sfsck" to skip checking/repairing source file system and click "OK".
Step 9. Select "Use the partition table from the source disk" and click "OK" to start clone hard drive. Type "y" to confirm you want to perfom this operation if you are asked.
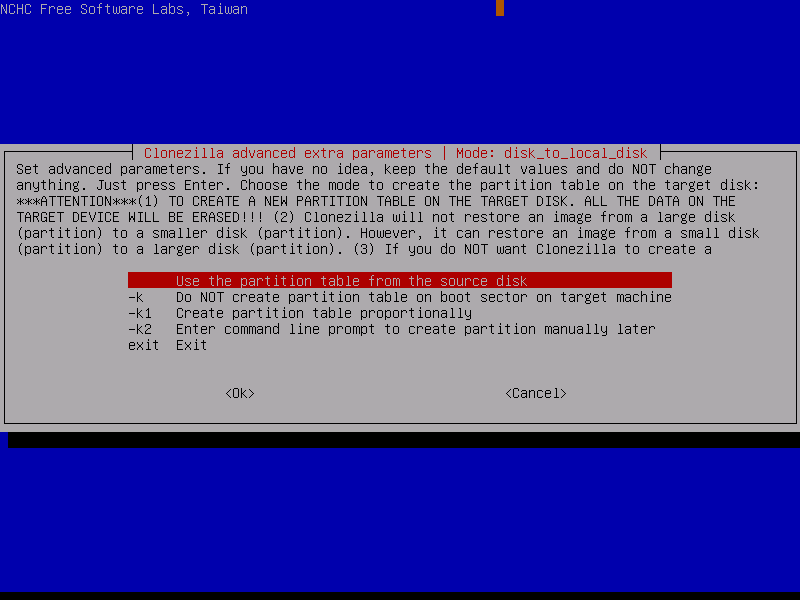
✍Note: If the target disk is larger, you can use the advanced parameters "-k1" to create partition table proportionally, and enable "-r" to resize the filesystem to fit partition size of target partition. Because Clonezilla will clone the "same' size of source disk to target disk and the rest of disk space on the target disk will be unallocated.
Step 10. Wait until the cloning process completes, select "-p poweroff" to shutdown your computer. Click "Ok" to execute.
This works in most cases, but still some users say the problem "failed to find this partition in this system" still exist. In this case, you can try "dd if=/dev/zero of=/dev/hda bs=512 count=1" to write zeros to hard drive or the first partition. Please replace /dev/hda in your own case.
Also, if you still cannot clone hard drive with Clonezilla, you can try another disk cloning software to avoid such problems, it's AOMEI Backupper Professional.
Easier way to clone larger disk to smaller disk or with bad sectors
AOMEI Backupper Professional is a marvelous hard drive cloning software for Windows 11/10/8.1/8/7.
▪ It completely supports cloning large disk to small disk as long as all the data on the source disk can fit on the smaller one. With the "intelligent clone" feature, it will only copy used sectors and ignore unused sectors or logcially bad sectors while cloning or backing up.
▪ It contains different cloning options, allowing you to clone operating system, selected partitions, or entire HDD/SSD with or without Windows installed.
▪ If you’re worried that Windows will fail to boot due to system errors, you can also create a bootable USB or CD/DVD with AOMEI Backupper to clone hard disk in WinPE.
If you don't have extra drive, you can directly add a recovery environment entry with it. Note the destination disk will be overwritten finally, please backup files on it in advance.
Video Tutorial: clone larger drive to smaller drive
Step-by-step to clone hard drive with AOMEI Backupper
Step 1. Download and Install this software, and open it to configure a cloning process.
Step 2. Click “Disk Clone” under the Clone tab. If you want to clone one partition or more, click “Partition Clone” instead.

✍Note: This migration tool supports cloning system disk from MBR to MBR, clone GPT system disk to MBR, migrate MBR system disk to GPT, or move GPT system disk to GPT.
Step 3. Select the source disk by clicking on the disk you want to clone, and click "Next" to continue. In the next screen, click on the destination disk receiving the data, and then click “Next”.

Step 4. If you are cloning hard drive to an SSD, check the option “SSD Alignment”. Then click “Start Clone” to start the cloning process.

This software supports not only cloning larger drive to smaller drive, but also cloning disk to larger disk. Thus, no matter what your situation, you can use it to clone hard drive with secure boot.
Besides disk cloning, AOMEI Backupper is also an extraordinary backup and restore software, you can use it to backup any items per your needs, such as files or folders, system, partition, disk. In the event of a disaster, you can restore image to new hard drive to get your data back. For computer with different hardware, you can use the “Universal Restore” feature to ensure your computer can boot successfully.
💬Tips:
- If you want to get the best performance of SSD disk, it's suggested to clone Windows 10 to NVMe SSD. Because it has the fastest transfer speed.
- If your target disk is larger or equal-sized compared to the source hard drive, you can use "Sector By Sector Clone" feature to clone all sectors on the original disk indiscriminately.
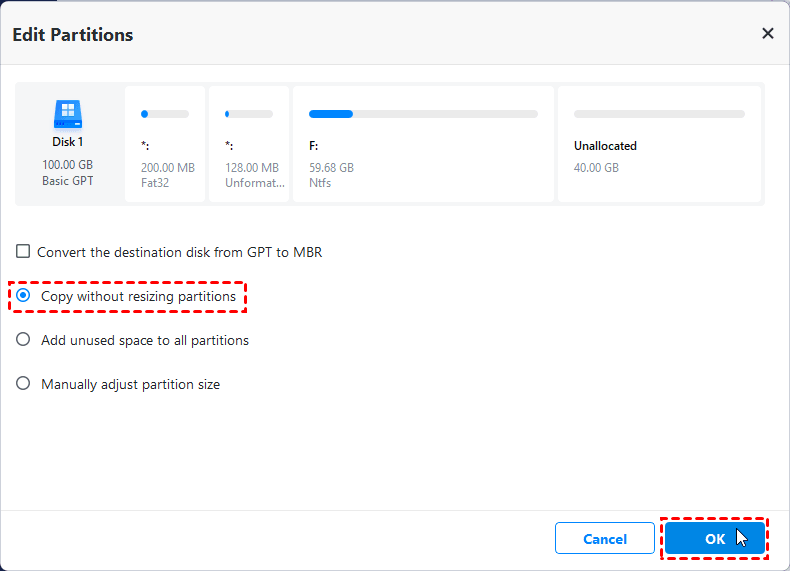
- If you are cloning to a larger disk, it's suggested to adjust the partition size of destination disk with the "Edit Partitions" feature. It will help you allocate unused space and make the best use of the disk capacity.
Conclusion
Cloning larger drive to smaller drive with Clonezilla is always problematic, you may receive Clonezilla failed to clone error, like "Clonezilla failed to create a partition table on this disk is this disk too small". It's suggested to use "-icds" parameter in the export mode to skip checking disk size of destination disk, but it may not work every time.
To avoid such problem and wasting time solving this error, you can use Clonezilla alternative - AOMEI Backupper Professional. It is capable of ignoring bad sectors and cloning only the used sectors to destination disk in simple steps, no extra effort required. Also, it helps you clone Windows 10 to new hard drive, transfer system image to new hard drive, clone NVMe SSD, etc.

