How to Do Complete PC Backup in Windows 11/10/8/7 [Free]
How to create a complete PC backup in Windows 10/8/7? Well, there are several free ways you can try to back up the entire Windows computer. The last one is the most flexible and fast.
By Delia Updated on October 29, 2024
What does complete PC backup refer to
What is a complete PC backup? Literally, it refers to completely backing up your hard drive, including operating system, programs, settings and personal files, which are basically everything on your computer. Thus when serious problem happens, you can easily restore the entire computer to an earlier state.
Back in the era of Windows Vista, Complete PC Backup was a built-in utility of Business, Enterprise, and Ultimate editions. It disappeared from later OS, so to make a complete computer backup in Windows 11/10/8/7, you must find an alternative to create a full computer image.

How to perform complete PC Backup in Windows 11/10/8/7
The absence of Complete PC backup feature doesn’t mean you cannot find similar tools in Windows OS. For example, there’s a creating system image feature in Backup and Restore of Windows 7, which is also integrated in Windows 8 and Windows 10/11.
In addition to this, WBAdmin is another way to create system image. With it, you can back up the PC through command lines.
If neither approach satisfies you, there’s a freeware allowing you to back up the entire computer for free.
Now I will introduce the three methods in detail.
Method 1. Create a full PC backup with Windows Backup and Restore
Backup and Restore was first integrated in Windows 7 and being adopted in Windows 8, Windows 10 and even Windows 11. In recent OS, it's under the name of Backup and Restore (Windows 7). The interface and operation haven’t changed much.
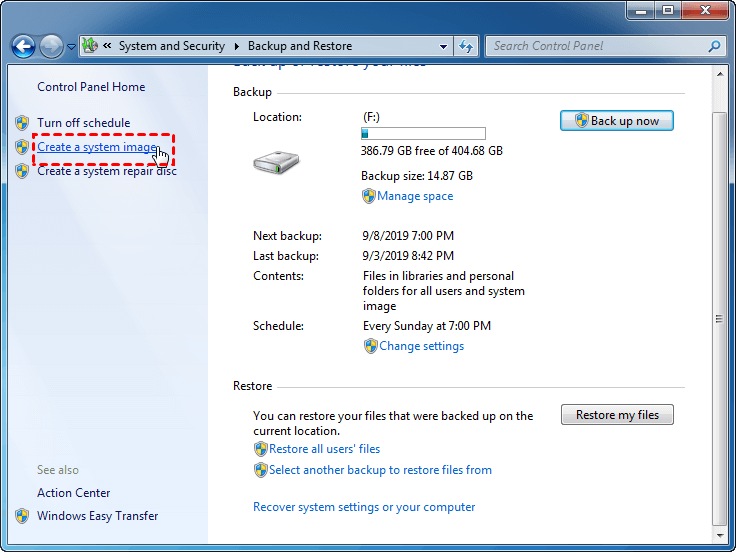
In this utility, you can find the option Create a system image at the top-left corner.
System image here refers to a copy of the required drives for Windows to run, and can also include additional drives. Therefore, you can use it to back up your complete hard drive, and restore your PC when needed.
This is the most common way to back up a Windows computer, but you also have to be prepared for situations where it might not work due to a variety of reasons, or take too long to create a system image.
The steps to use it are roughly same in Windows 10/8/7, here’s a quick guide.
How to perform complete PC backup with system image:
1. To get access to Backup and Restore, the fastest way is to search it in Start menu or search box (depends on your OS). You can also locate it in Control Console.
2. Click Create a system image on the left pane.
3. Choose the destination for the image. It’s not recommended to store the image file on your system drive. Instead, you can backup it to external hard drive, USB drive, DVD, network location, etc. Then click Next.
Note: the destination disk must be formatted to NTFS.
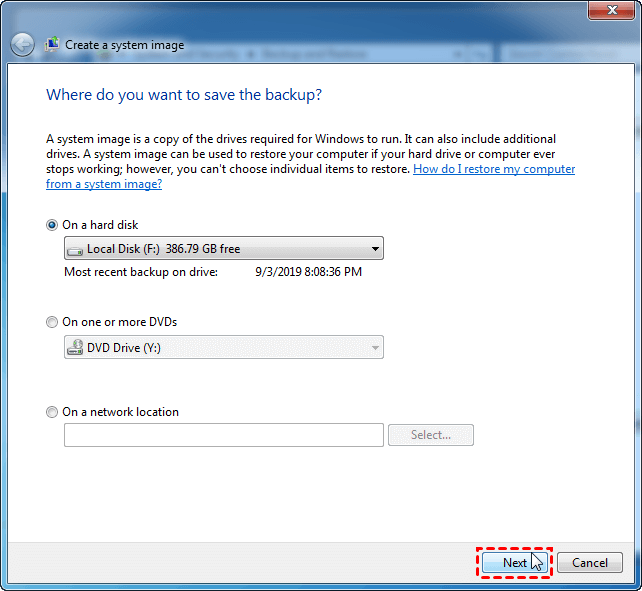
4. Choose which drives you want to include in the backup, thus you can achieve the goal of creating a complete PC backup. Click Next to continue.
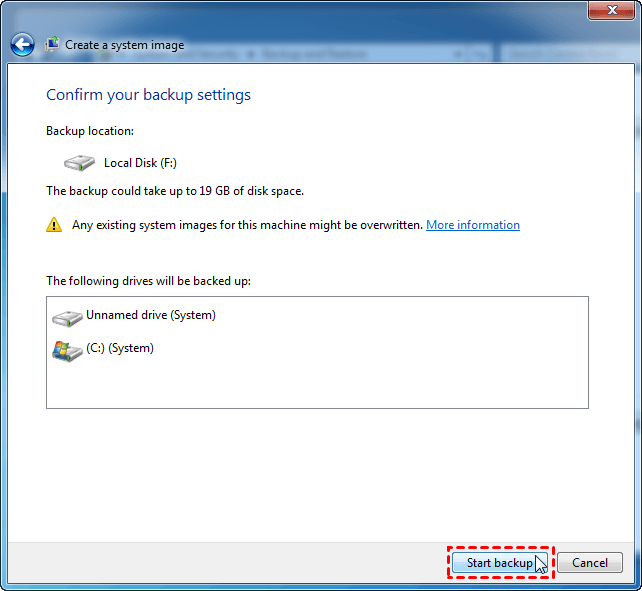
5. Confirm the settings and click Start backup to create the system image.
How to restore the system image in Windows:
-
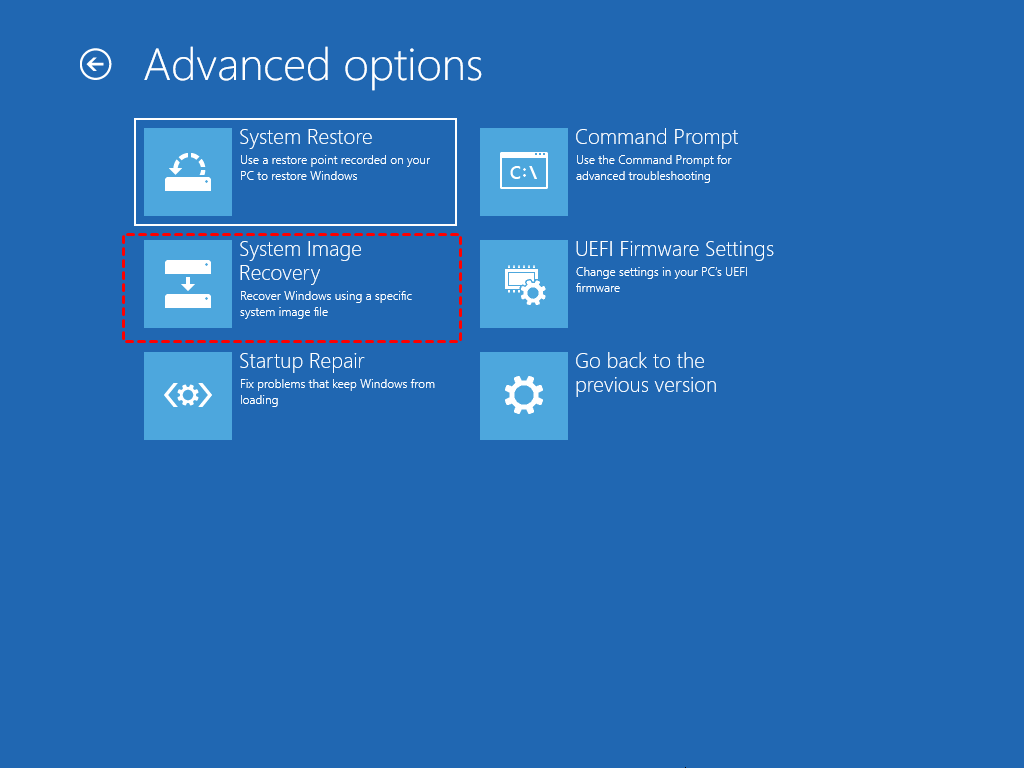
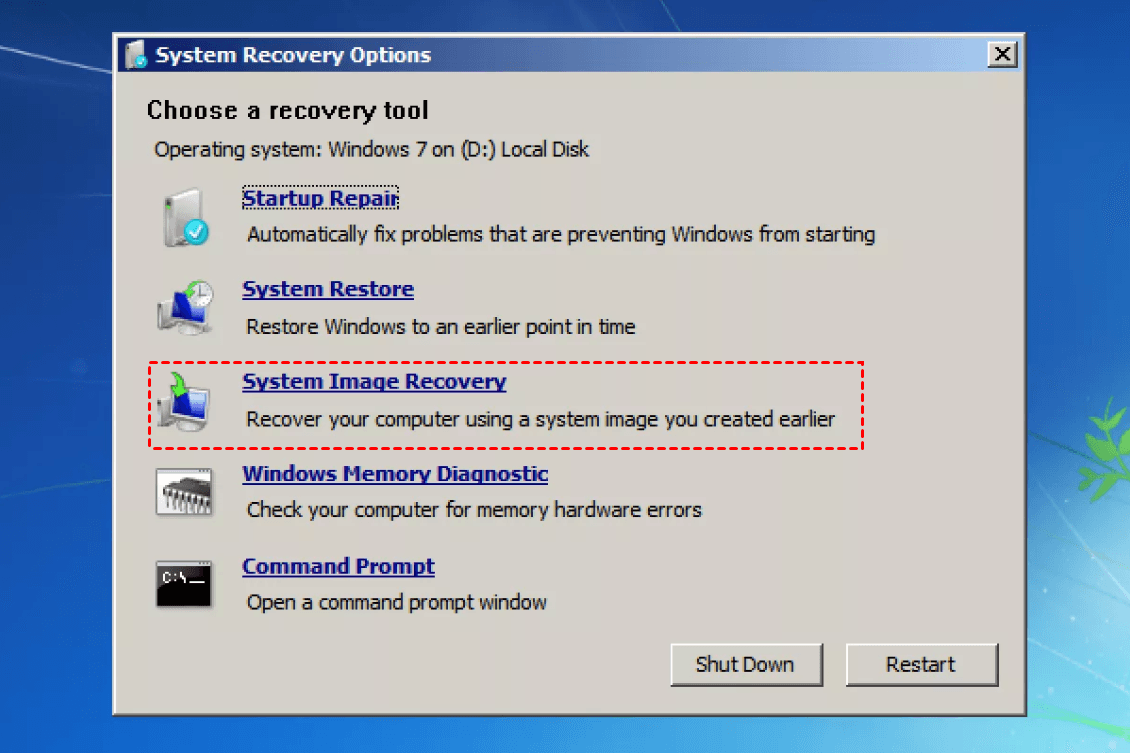
In Windows 11/10/8.1/8: insert the installation disc or recovery drive, then select your language and region in Windows Setup, click Next > Repair your computer to enter Windows recovery environment; or you can power off the PC, power it on and power it off again when Windows has started. Once more, power it on and off. On the third-time boot, you shall enter WinRE. Then choose Troubleshoot > Advanced options > System Image Recovery.

-
In Windows 7: when Windows logo appears during startup, press F8 to enter advanced boot options and click Repair your computer. If you can’t find the option, then you should insert the installation disc. After that, choose System Image Recovery in recovery options. The detailed steps are listed in How to Use Windows 7 System Image Recovery.
Related tips:
-
You can also create a repair disc of Windows in case of system failures.
-
For conventional files and folders backup, you can directly use Set up backup in Backup and Restore (Windows 7).
Method 2. Use WBAdmin command lines to create complete PC backup
WBAdmin allows you to backup and restore your OS, partitions, files, folders, etc. It’s not as complicated as it looks, you just need to learn some basic commands.
Another thing worth mentioning - WBAdmin is one of the few utilities can be used to backup files in Safe Mode. Thus when you fail to boot Windows properly, you can backup some important files in this way before reinstallation,
But WBAdmin command line also has some restrictions. For example, you can only backup partitions formatted with NTFS; you can’t backup to critical volumes; you can only keep one scheduled backup and one image file, unless you change its name every time...
If these flaws won’t bother you, then just give it a shot.
How to backup your PC with Windows WBAdmin:
1. Search Command Prompt in Windows, right-click it and choose Run as administrator.
Alternatively, you can use Windows PowerShell which is a more powerful command-line shell and scripting language. Because many Command Prompt commands also work in PowerShell environment.
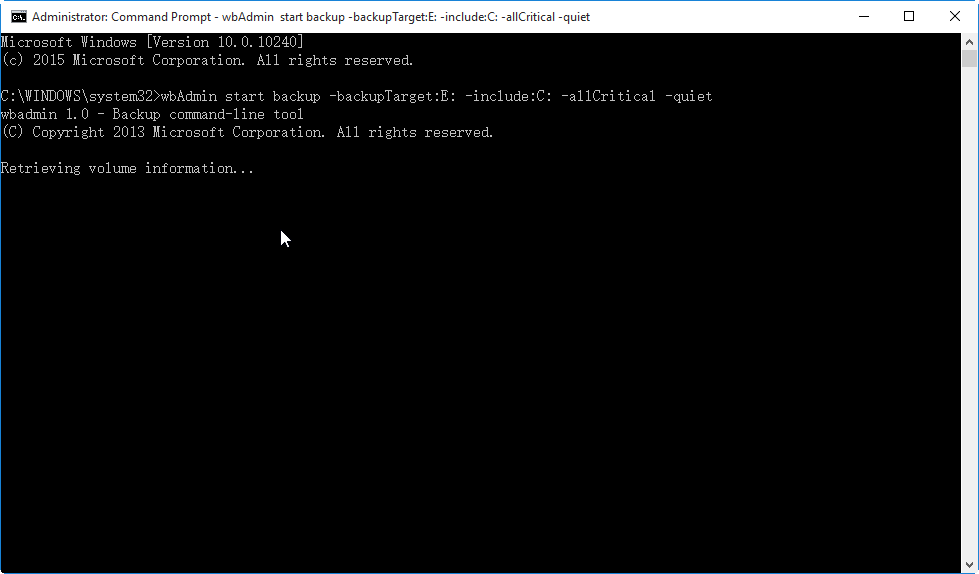
2. Enter the backup command and press Enter to implement it.
The basic syntax is like: wbAdmin start backup -backupTarget:E: -include:C: -allCritical -quiet
E: behind -backupTarget refers to the destination drive. If you insert an external hard drive F: as the destination, then replace E with F. If you want to include more drives in the backup, use comma to separate them.
For example: wbAdmin start backup -backupTarget:F: -include:C:,D:,E: -allCritical –quiet
This command will backup C, D, E drives to F drive. In this way you can easily fulfill a complete PC backup.
There some other available parameters allowing you to further customize the backup, click here to learn them and then adjust the command according to your needs.
3. To restore from a full backup created with WBAdmin, just use system image recovery from boot, which I’ve introduced how at the end of Method 1.
Method 3. Free alternative to quickly and completely backup the PC
A complete PC backup can take a lot of time and storage space. There’s no need to do it very often unless you have specific needs. So in my opinion, the best option for backup and restore is an easy-to-use tool including different backup modes and plans, allowing you to backup files, volumes, OS, hard drive, etc. with great speed and high success rate.
The freeware AOMEI Backupper Standard is an example. Its backup function is subdivided into File Backup, Partition Backup, System Backup and Disk Backup.
- For a complete PC backup in the literal sense, you can run Disk Backup to achieve it since all the data stored on the hard drive will be backed up, including the system and your personal files, programs, etc.
- Meanwhile, you can use System Backup to back up Windows operation system including system files, boot files and data on system partitions.
- Considering it’s time consuming and space occupying to run full backup every time, if you want to keep an existing backup task up to date, you can perform it in incremental or differential mode.
Optionally, you can set up a schedule to do automatic backup. It is running in incremental mode by default, which can also be changed if necessary.
Here take Disk Backup as an example, you can complete it within several simple clicks.
How to do complete PC backup in Windows 11/10/8/7 with freeware:
1. Choose Backup on the left pane of this tool, choose Disk Backup to back up hard disk to an image file.

2. Click Add Disk to select the disk you want to backup, and hit Add. You can even add multiple disks in this way.

3. Select a destination with sufficient space. You can back up the PC to external hard drive, USB, cloud drive, NAS, etc.

4. Customize the backup with the 3 options at the bottom. Then click Start Backup to create the image of your disk.
-
Options: here you can find some auxiliary functions like image compression, splitting, encryption, etc. You can manage these settings according to your needs. For example, if you have limited storage space, you can choose a higher compression level to get a smaller image file, but it will also take longer to backup.
-
Schedule Backup: it enables you to set up automatic backup on basis of Daily, Weekly, Monthly, or Event triggers, USB plug in. The last two are available in Professional and higher editions.
-
Backup Scheme: delete older backups automatically and save your storage space. It's available in advanced editions.

5. To restore the backup image, you can expand the menu of the backup task in Home tab, or navigate to Restore tab and locate the image to perform recovery.

Related tips:
-
Restore system image to another computer: with AOMEI Backupper, you are allowed to back up the system and restore it to another PC. But in order to boot the destination computer successfully after recovery, you should tick Universal Restore, which is specially designed for dissimilar hardware restore and supported by advanced editions.
-
If your purpose of creating complete PC backup is to migrate data to a new SSD or even new computer, it’s easier to use Disk Clone rather than backup, because you can directly use the cloned data without the process of restoring.
Supplement: Other Windows PC backup means you may concern
In addition to above methods, Windows provides some other utilities to backup and restore important data, but they are not for complete computer backup.
▶ Restore Point
In Windows 10, you can create a restore point when system changes are detected. It’s actually not a true sense of backup, but a snapshot of your system configuration and settings in the Windows Registry. It’s designed to restore the computer to an earlier point so that you can fix system problems without losing data.
▶ File History
This feature applies to Windows 8.1 and higher editions. It’s normally used to back up files to another drive. Once file history is enabled, it will backup files from Windows libraries, desktop, contacts, and favorites at the default frequency. And when you enter the backup folder, you can click File History to view and restore all file versions.
Conclusion
Complete PC Backup was once a built-in feature of Windows Vista. Now in Windows 10/8/7, if you still want to completely backup the entire computer, an alternative way is required.
There are several feasible approaches like creating system image in Backup and Restore, using WBAdmin, or performing Disk Backup in AOMEI Backupper. With the last tool, you can enjoy not only flexible backup and restore plans, but also utility tools such as creating a bootable disc or USB to save your crashed computer.

