How to Create a System Restore Point in Windows 10 Easily? [2 Ways]
Making a complete system restore point is the best way to protect yourself from Windows 10 crashes. Read this article and learn how to create a system restore point in Windows 10.
By Lena Updated on September 2, 2025
Is it necessary to create system restore point in Windows 10?
Windows 10 is a powerful and sophisticated system which can also go wrong for a variety of reasons, such as computer viruses, wrong operations, or improper updates. If you have tried to solve these problems yourself, you've probably heard the term System Restore Point.
It is a function used for system restore in Windows 10, as well as Windows 8, Windows 7. But different from what you might guess from the name, a restore point is not really a backup, but a snapshot of system configuration and settings in the Windows Registry.
More specifically, if you've ever created system restore poins in Windows 10 before computer failures, you can easily restore computer to an earlier point therefore fix Windows problems without losing important data.
Now let's see how this works.

How to create a system restore point in Windows 10?
The approach to create a system restore point in Windows 10/8/7 are almost the same. You can even automatically create system restore points as long as the system protection is toggled on.
However, system protection is disabled by default in Windows 10. You probably need to turn it on first. Then it will automatically create system restore points when significant changes happen, such as installing a Windows update, a program, a driver, etc.
Beyond that, if you want more powerful and flexible Windows 10/8/7 backup and restore solutions in case of system failures, there’s another free way to customize what to bakcup and when to bakcup. For example, you can schedule automatic daily/weekly/monthly backup while the built-in restore points will only be created when system changes are detected.
1. How to create a system restore point in Windows 10?
Step 1. Open the System Properties window. Two ways to do it.
-
Right-click My Computer/This PC > click Properties > click System protection on the pop-up window.
-
Type "create a restore point" in the search box and select it from the list of results > click System Protection tab.
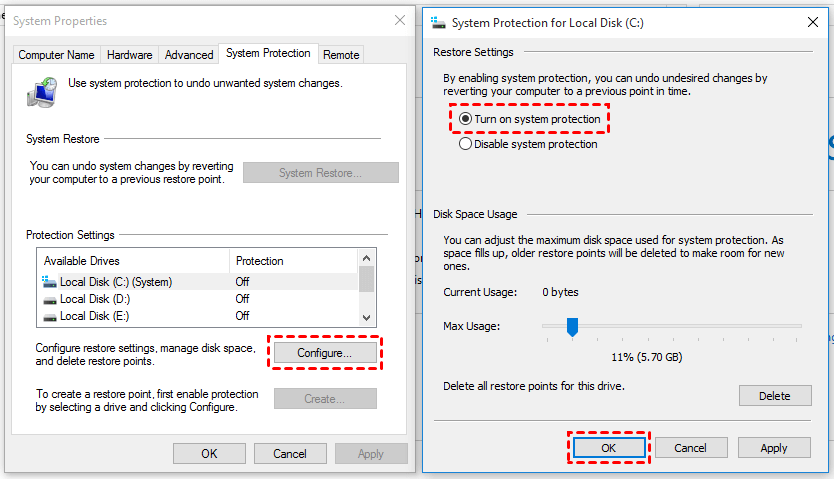
Step 2. Click Configure button > enable Turn on system protection > you can use the slider to change the amount of space it uses (5% to 10% is usually sufficient) > click OK to confirm.
Now you have turned on the System Protection, and Windows 10 will create a system restore point automatically when system changes are made.
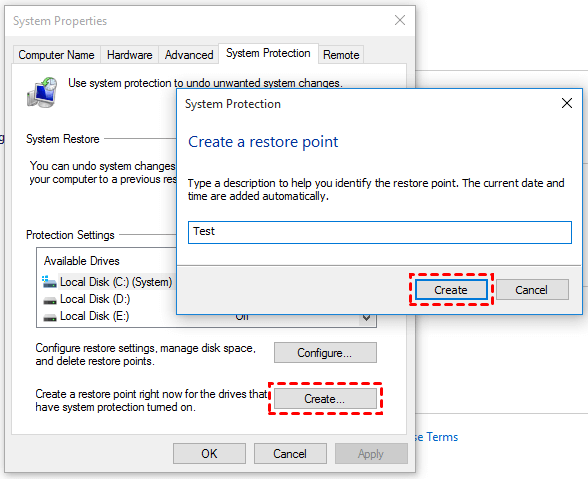
Step 3. If you want to manually create a restore point right now, you can return to the System Properties window and click Create > name the restore point and then click Create.
Note:
◆ If you have problem with using it, find solutions to fix cannot create a system restore point.
◆ You can also follow these steps to create Windows 8 restore point or Windows 7 restore point.
2. How to go back to a restore point in Windows 10?
When something goes wrong on the computer, you can always use the restore point to bring it to an earlier working status. Normally there two approaches for different situations.
Method 1. The direct way to perform the system restore
If you can still log into Windows, you can try this direct way.
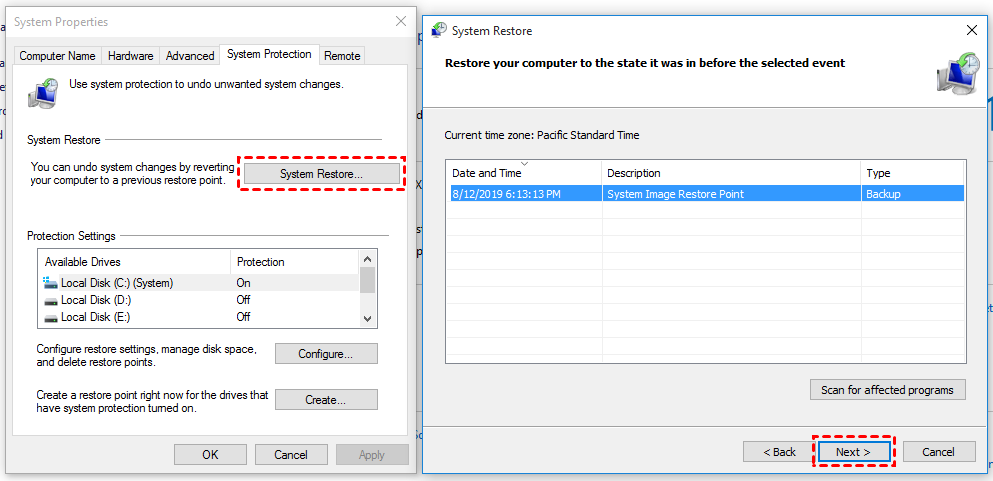
Step 1. Open System Properties window with above mentioned steps.
Step 2. Click System Restore... > click Next > select the restore point you want to go back > you can click the Scan for affected programs button to check what might change on your computer afterward > click Next and follow the wizard to complete the restore.
Method 2. Perform system restore via advanced options from boot
If you can't log into Windows properly, you can also perform System Restore from boot. Here are the steps.
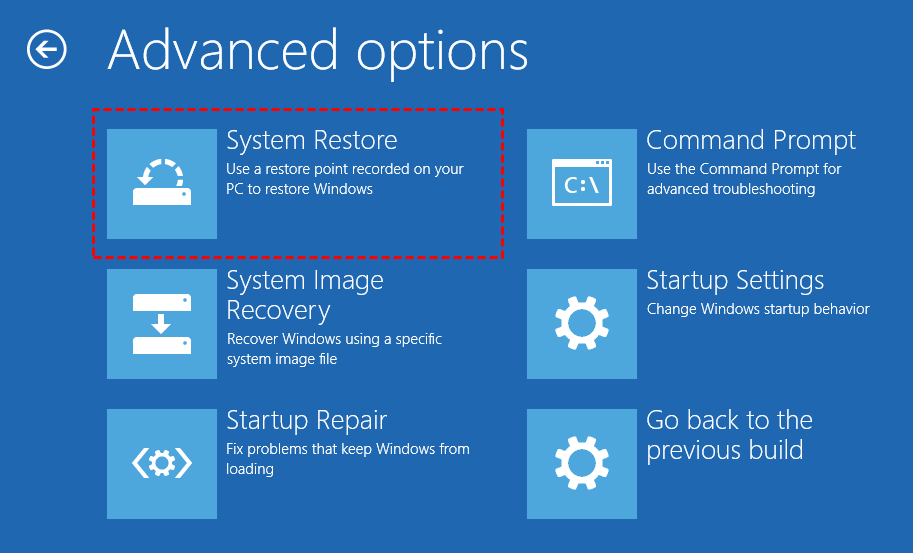
Step 1. Start your PC > press the power button as soon as the Windows logo appears > keep pressing the power button to perform a hard shut > repeat this step two more times to enter Windows recovery environment.
Step 2. Choose Advanced options when the recovery screen appears > click Troubleshoot > Advanced options > System Restore to run the restore.
Note: you can use the same way to perform System Restore in Windows 8. Windows 7 has a different interface but the process is similar, you need to enter the recovery environment and select System Restore among System Recovery Options.
3. Frequently asked questions about Windows 10 restore point
Now you've known how to create a system restore point in Windows 10 and the way to perform the restore. In addition to this, I've also listed some other things you might want to know:
How to find restore points in Windows 10?
If you want to view all the existing restore points, you can press Windows + R key together to open Run box and type "rstrui", click OK to open System Restore. Then click Next on the pop-up window and it will list all the restore points. Click Cancel to close the window if you do not want to perform a restore.
If you want to locate the system restore point files physically, well, they are actually in the System Volume Information folder under the root directory of system drive, hidden by default. So you need to display hidden files and folders at first. Click here to learn how.
How to delete restore points in Windows 10?
If you want to delete all restore points, you can go to the System Properties window where you can create a restore point and click Configure. Click Delete button to delete all restore points for this device.
If you want to delete all but the most recent restore point, you can: right-click on a local drive and select Properties > click Disk Cleanup > choose Clean up system files > go to the More Options tab > click Clean up... under System Restore and Shadow Copies section.
A better way to create Windows 10 backup image
If the system restore point isn't convenient or flexible enough for you, there's a powerful backup & restore freeware that may satisfy your demands better - AOMEI Backupper Standard. It offers comprehensive features to protect your important data at every level, and works well on Windows 10/8.1/8/7.
-
Various Backup Solutions - It can backup not only the system but also specific files, partitions, and even the entire disk.
-
Schedule Backup - It enables you to schedule automatic backup on daily/weekly/monthly/etc. basis to save your effort, and keep the data up-to-date.
-
Different Backup Modes - It allows you to make full backup as well as incremental/differential backup which can save your storage space.
-
The interface is so intuitive that even a newbie won’t feel any difficulty during the operation.
How to create system image backup with AOMEI Backupper:
Step 1. Download, install and launch AOMEI Backupper Standard.
Step 2. Go to the Backup tab and then choose System Backup. If you have other data to protect, you can also choose File Backup, Partition Backup or Disk Backup accordingly.

Step 3. The system partitions will be automatically selected as source. You just need to choose a path (local disk, external hard drive, USB flash drive or network) to save the image.

Step 4. Before starting backup, you can also Schedule an automatic backup plan, or click Options to set the compression level, enable email notification, etc.

Note: The Backup Scheme can help you automatically delete older backups, but this feature is available in advanced editions. You can upgrade to higher version to enjoy it.
Step 5. When all is done, you can find this system restore point in the Home tab. Once something undesired happens, you can use the System Restore to restore your Windows 10 to this point.
Conclusion
Now you've known how to create a system restore point in Windows 10. Besides the built-in utility, AOMEI Backupper is a pretty easy alternative to backup the system, and restore it when error occurs.
In addition to complete backup and restore features, AOMEI Backupper also provides pratical tools like creating bootable media in case the computer won't start properly, PXE boot multiple computers via network, etc. In a word, it's an all-around data protection solution for all the Windows users.