
Restore
If an unexpected error occurs (such as system crash, data loss, disk corruption, or failure), all data can be recovered from the backup using AOMEI Centralized Backupper.
1. System Restore
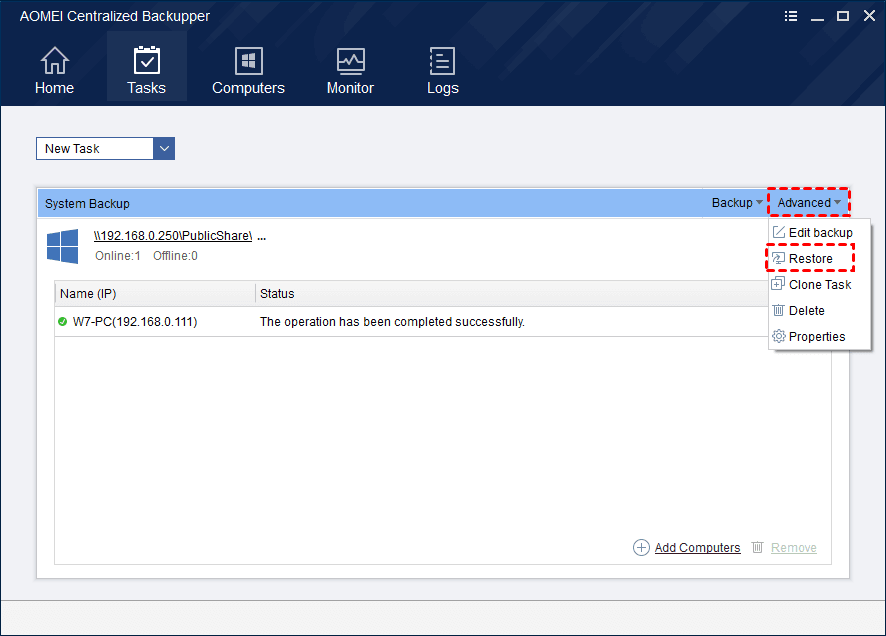
Under the “Tasks” tab, select a system backup task that you want to restore, click “Advanced”, and then select “Restore”.
On the “Select a computer to be restored” page, select a computer that needs to be restored from the list and click “Next”.

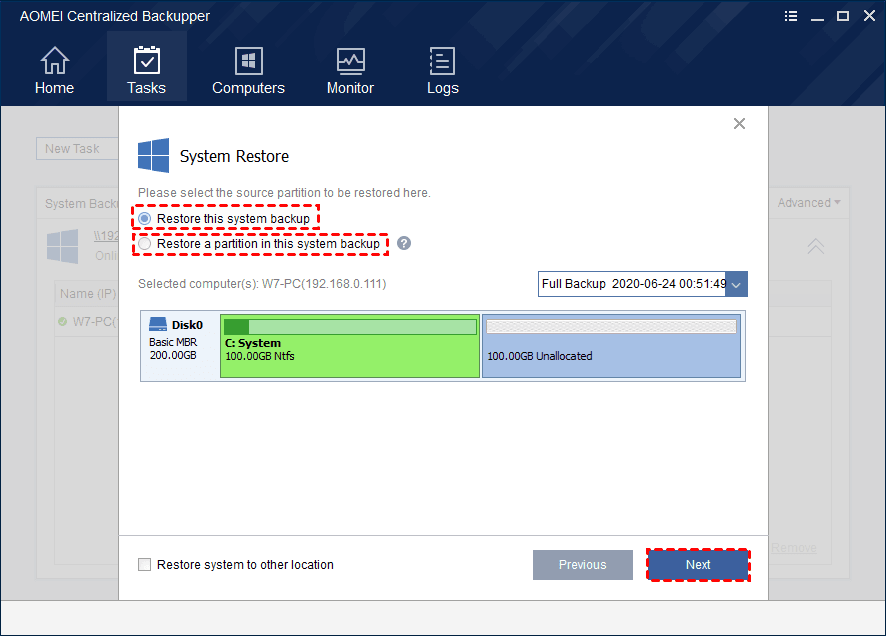
On the “Select a source partition to be restored” page, you can select “Restore this system backup”. And in the drop-down box on the right side of the page, select the backup version to be restored.
If the system image file contains multiple partitions, you can select “Restore a partition in this system backup”. In the drop-down box on the right side of the page, select the backup version to be restored. In the disk information box below, select a partition to perform restore, so only data on that partition will be restored.
After selecting the items to be restored, click “Next”.
Tips:
-
You can select “Restore system to other location” and then select another location to perform restore in the next page.
-
If you don’t check the “Restore system to other location”, the program will restore system to its original location by default.
-
This operation “Restore a partition in this system backup” can’t ensure the restored system is bootable.
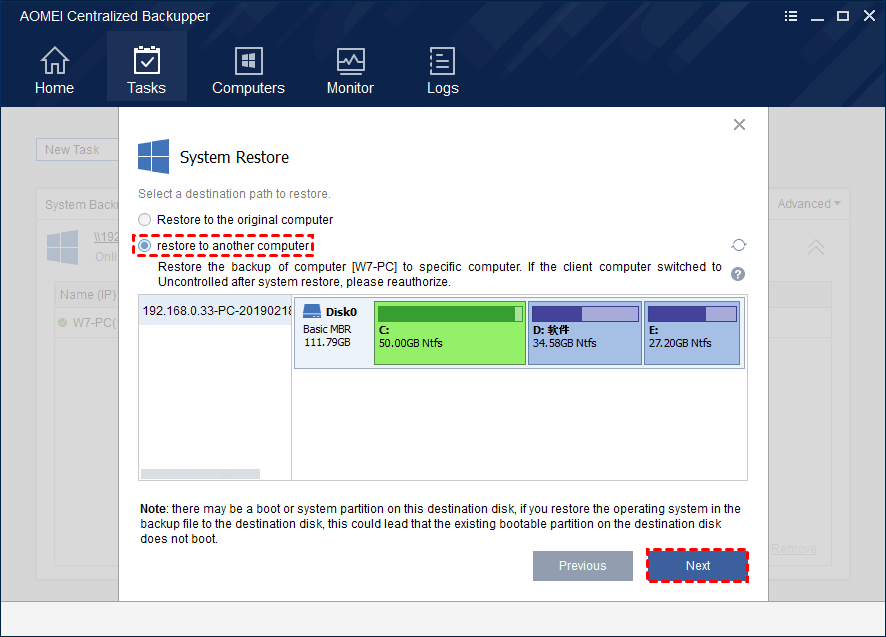
The “Select a destination for restore” page:
Selecting “Restore to the original computer” means to restore system to the computer where the backup is from. Then, select a specific partition or unallocated space as the restore destination below.
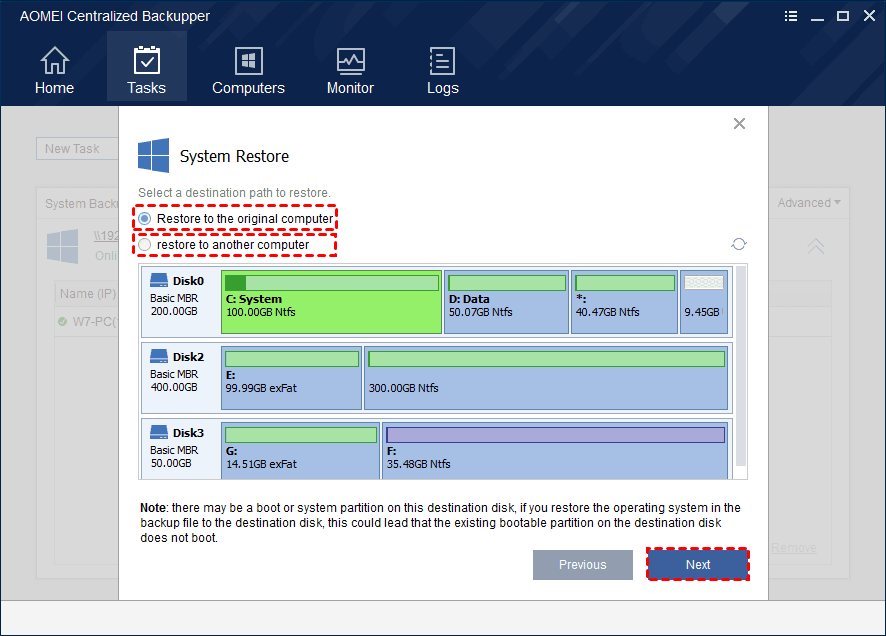
When AOMEI Centralized Backupper has controlled multiple client computers, you can select “Restore to other computers”. Then, select disk space on other client computers as the restore destination below.
After selecting the destination for restore, click “Next”.
The “Operation Summary” page of system restore:
On the “Operation Summary” page, preview the operations that will be executed and choose needed advanced settings as follows: if the destination disk is an SSD, select the “Allow partition alignment to optimize SSD” option to improve SSD performance. If you choose to restore only one system drive, there will be the “Edit Partition” option which allows you to change drive letter, partition type, and adjust partition size. If you restore the system to dissimilar hardware, it is recommended to check the “Universal Restore” option.
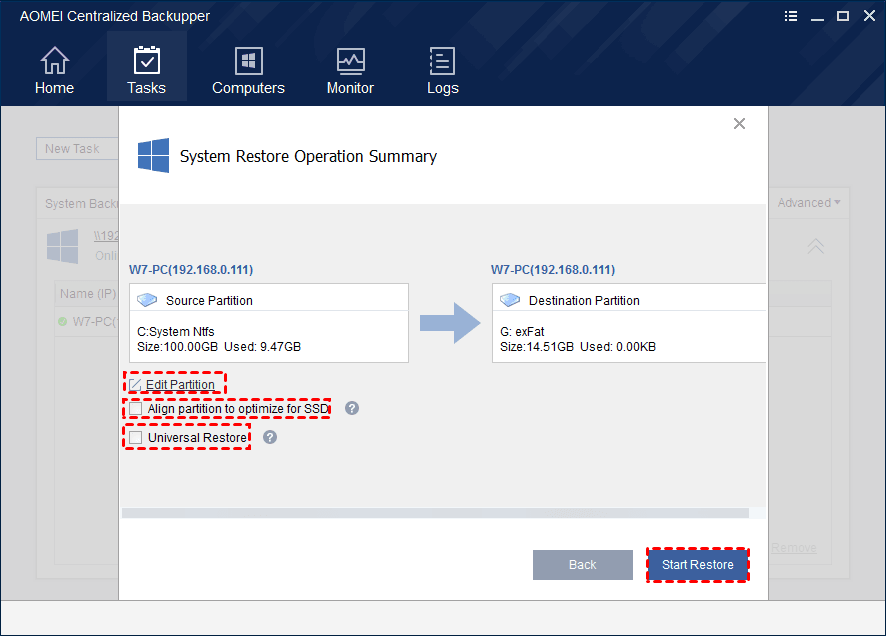
After finishing the settings, click “Start Restore” to perform the restore task.
Notes:
-
If the system is backed up periodically, a new image will be generated for each backup, so there may be multiple backup points to choose from.
-
The destination disk or partition will be completely overwritten. If the target location contains any significant data, we recommend you copy or move it to another location and then perform restore.
-
The progress of the created restore task will be displayed next to the computer that is restored in the task. Expand the list of the restored tasks to see the specific restore status.
-
When the target location of the restore task is occupied, it needs to restart to enter the WinPE to perform restore. The system will restart automatically after the restore process is finished.
2. Disk Restore
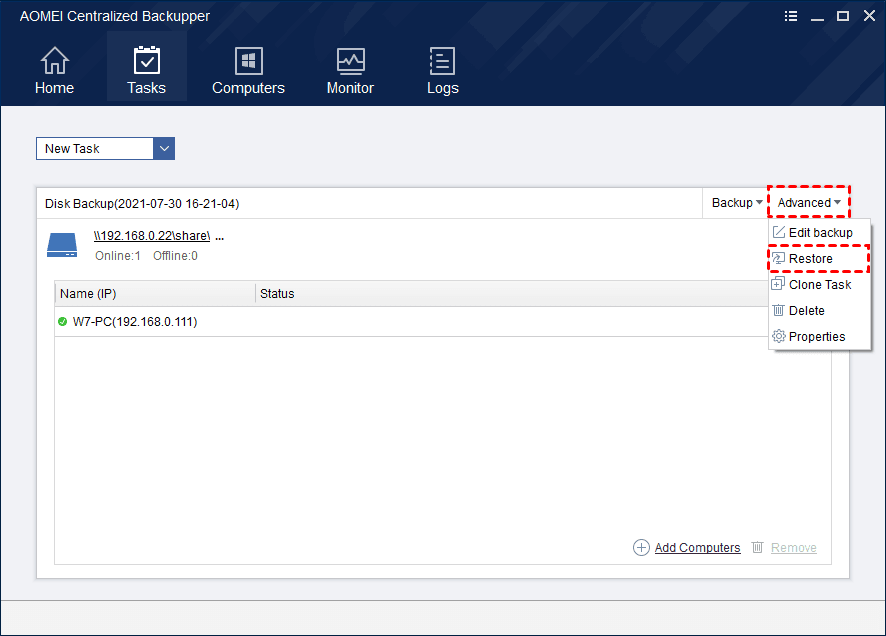
Go to the “Tasks” tab, select a disk backup task that you want to restore, click “Advanced”, and then select “Restore”. Or you can expand the list of task computers, right-click the computer you want to restore, and select “Run Restore”.
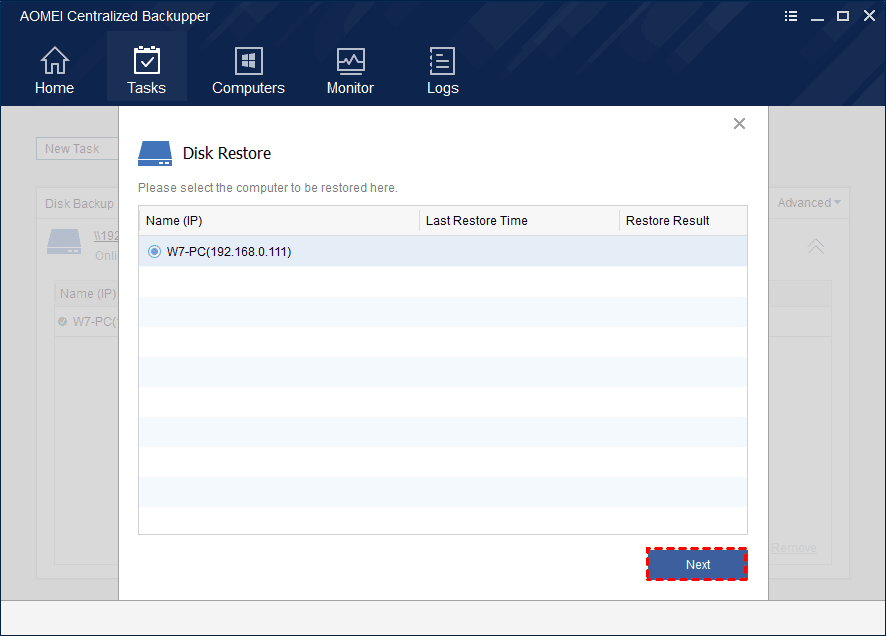
On the “Select a computer to restore” page, select a computer that needs to be restored from the list and click “Next”.
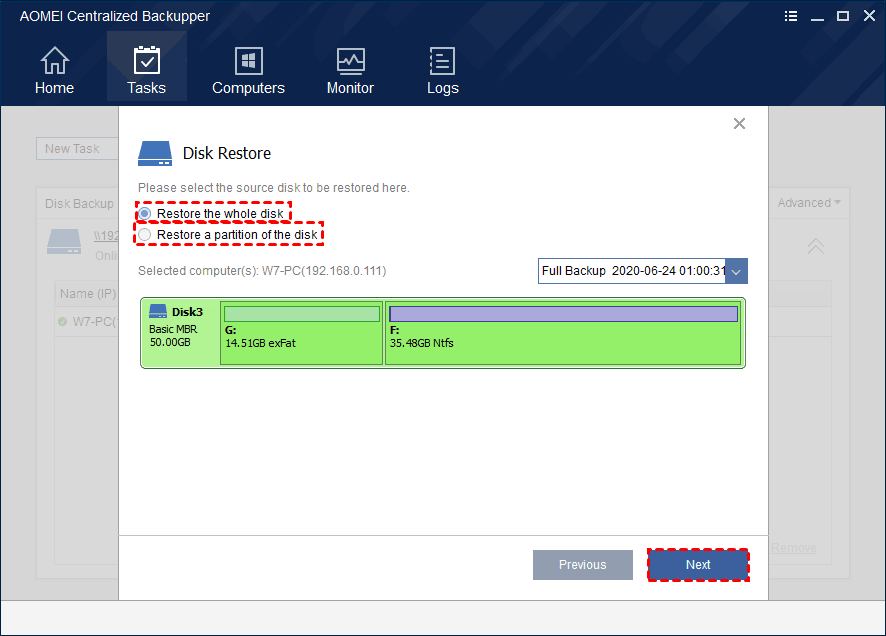
The “Select the items to restore” page:
You can select “Restore a partition in the disk”. In the drop-down box on the right side of the page, select the backup version to be restored. In the disk information box below, select a partition to perform restore, so only data on that partition will be restored.
You can also select “Restore the whole disk”. In the drop-down box on the right side of the page, select the backup version to be restored. Then, select a disk to restore from the backed up disks.
After selecting the items to be restored, click “Next”.
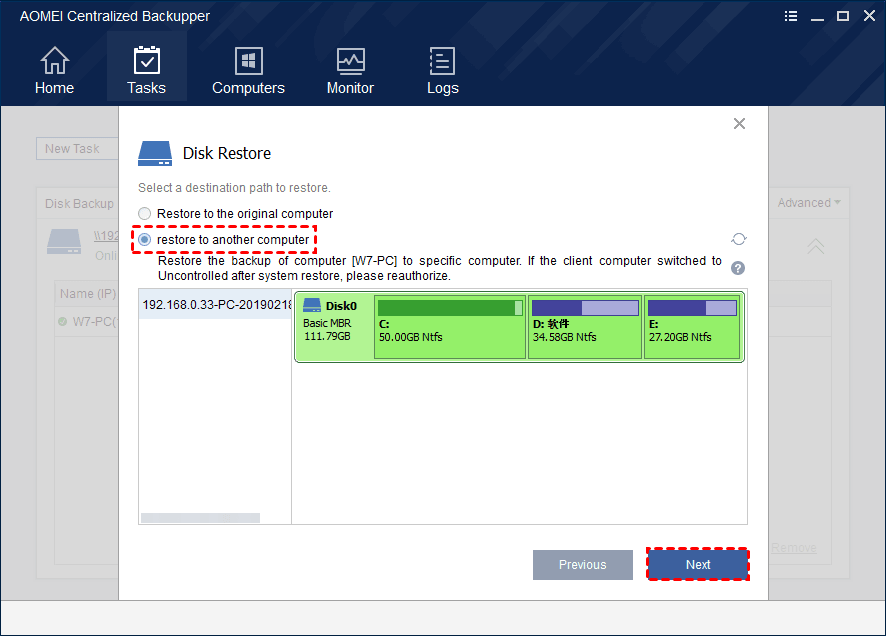
The “Select a destination for restore” page:
Selecting “Restore to the original computer” means to restore to the computer where the backup is from. Then, select a specific disk or partition on the computer as the restore destination below.
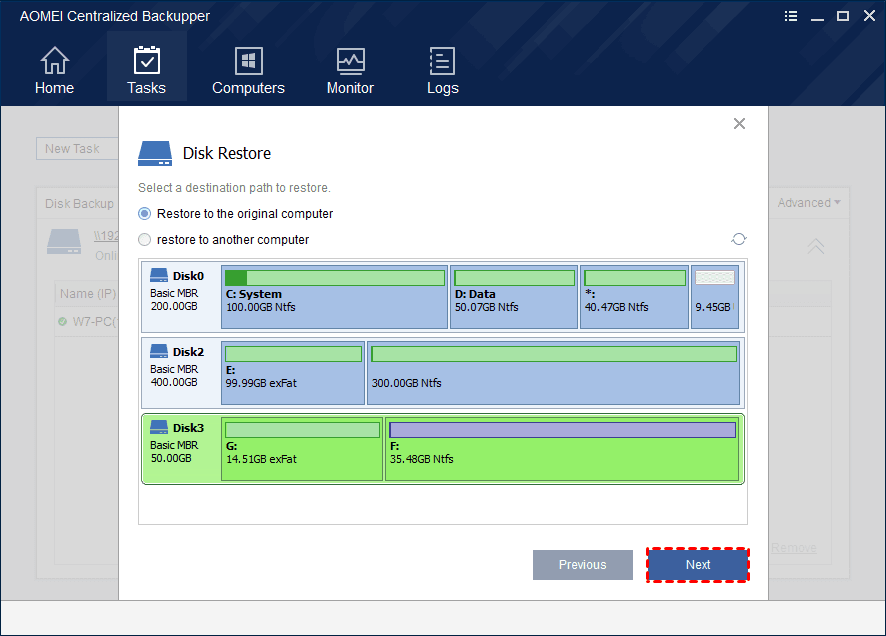
When AOMEI Centralized Backupper has controlled multiple client computers, you can select “Restore to other computers”. Then, select a specific disk or partition on other client computers as the restore destination below.
After selecting the destination for restore, click “Next”.
The “Operation Summary” page of disk restore:
On the “Operation Summary” page, preview the operations that will be executed and choose needed advanced settings as follows: if the destination disk is an SSD, select the “Allow partition alignment to optimize SSD” option to improve SSD performance. There is the “Edit Partitions” option which allows you to resize partitions on the destination disk manually or automatically. If you restore the system disk to dissimilar hardware, it is recommended to check the “Universal Restore” option.

After finishing the settings, click “Start Restore” to perform the restore task.
Notes:
-
If the disk is backed up periodically, a new image will be generated for each backup, so there may be multiple backup points to choose from.
-
The destination disk or partition will be completely overwritten. If the target location contains any significant data, we recommend you copy or move it to another location and then perform restore.
-
The progress of the created restore task will be displayed next to the computer that is restored in the task. Expand the list of the restored tasks to see the specific restore status.
-
When the target location of the restore task is occupied, it needs to restart to enter the WinPE to perform restore. The system will restart automatically after the restore process is finished.
3. Partition Restore
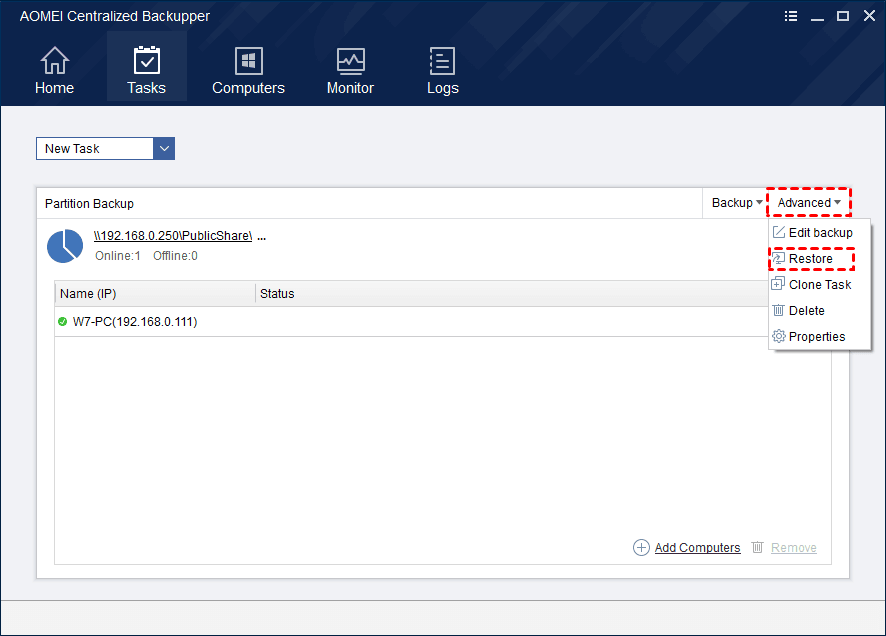
Go to the “Tasks” tab, select a partition backup task that you want to restore, click “Advanced”, and then select “Restore”. Or you can expand the list of task computers, right-click the computer you want to restore, and select “Run Restore”.
On the “Select a computer to restore” page, select a computer that needs to be restored from the list and click “Next”.

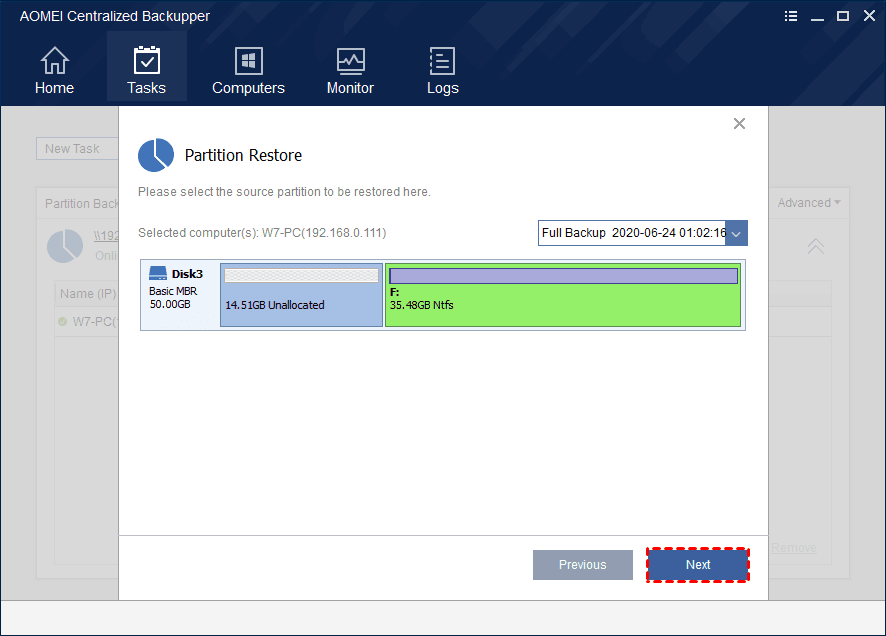
The “Select the items to restore” page:
In the drop-down box on the right side of the page, select the backup version to be restored. Then, select a partition to restore from the backed-up disk partitions. After selecting the source data from the corresponding backup version, click “Next”.
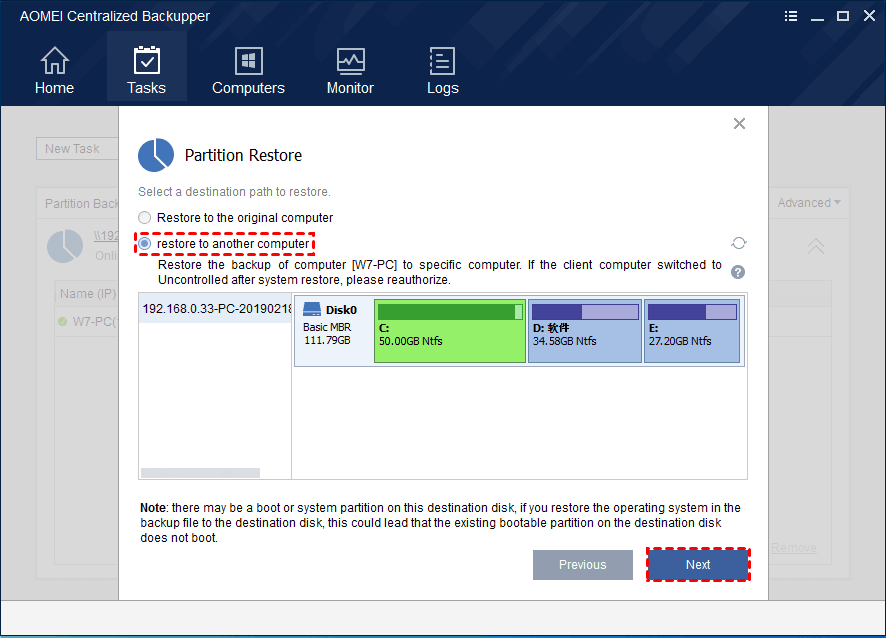
The “Select a destination for restore” page:
Selecting “Restore to the original computer” means to restore to the computer where the backup is from. Then, select a specific disk or partition as the restore destination below.
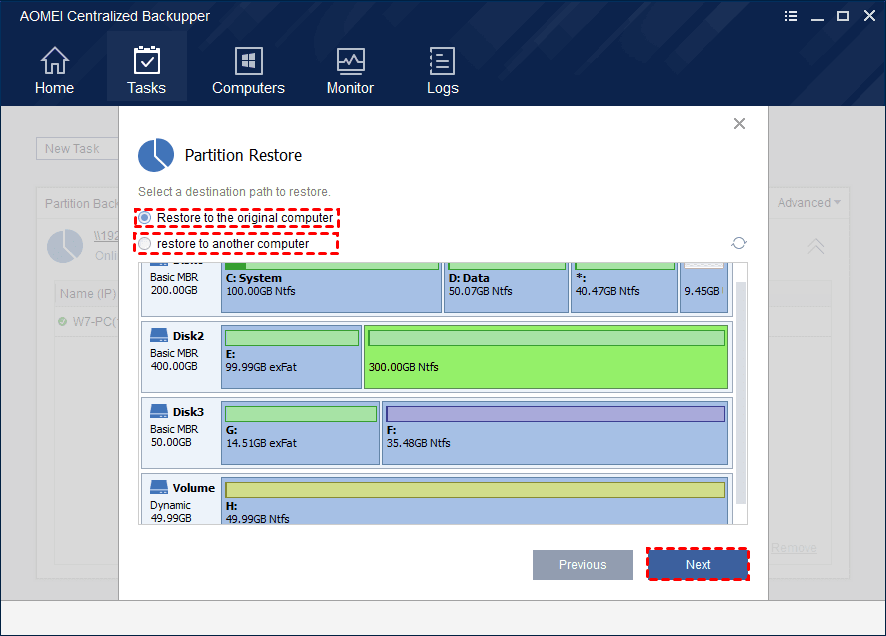
When AOMEI Centralized Backupper has controlled multiple client computers, you can select “Restore to other computers”. Then, select a specific partition on other client computers as the restore destination below.
After selecting the destination for restore, click “Next”.
The “Operation Summary” page of partition restore:
On the “Operation Summary” page, preview the operations that will be executed and choose needed advanced settings as follows: if the destination disk is an SSD, select the “Allow partition alignment to optimize SSD” option to improve SSD performance. There is the “Edit Partition” option which allows you to change drive letter, partition type, and adjust partition size.

After finishing the settings, click “Start Restore” to perform the restore task.
4. File Restore
Go to the “Tasks” tab, select a file backup task that you want to restore, click “Advanced”, and then select “Restore”. Or you can expand the list of task computers, right-click the computer you want to restore, and select “Run Restore”.

On the “Select a computer to restore” page, select a computer that needs to be restored from the list and click “Next”.

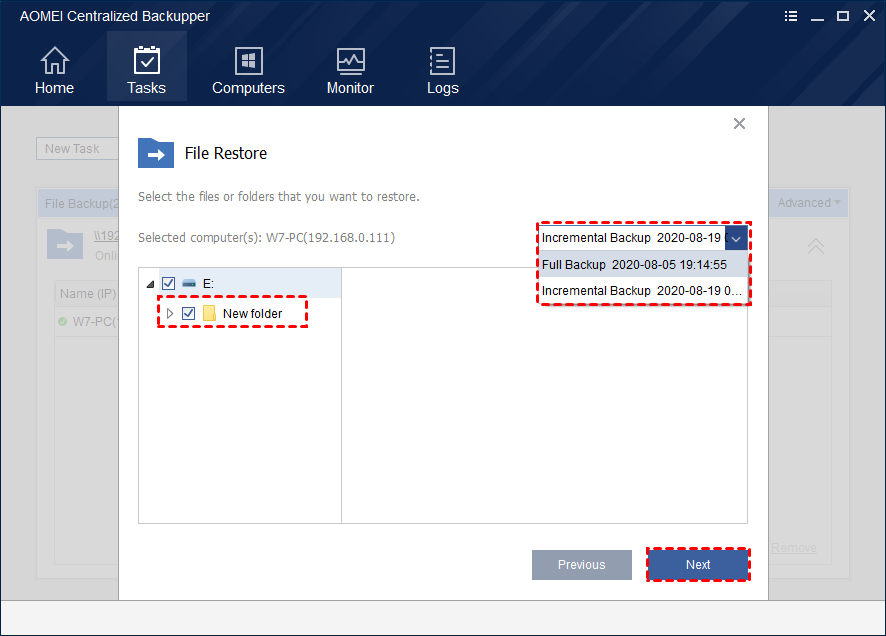
The “Select the items to restore” page:
In the drop-down box on the right side of the page, select the backup version. And then select files needed to be restored in the source back-upped files list. After selecting the source data from the corresponding backup version, click “Next”.
The “Select a destination for restore” page:
Selecting “Restore to the original location” means to restore to the source location on the source computer where the backup is from.
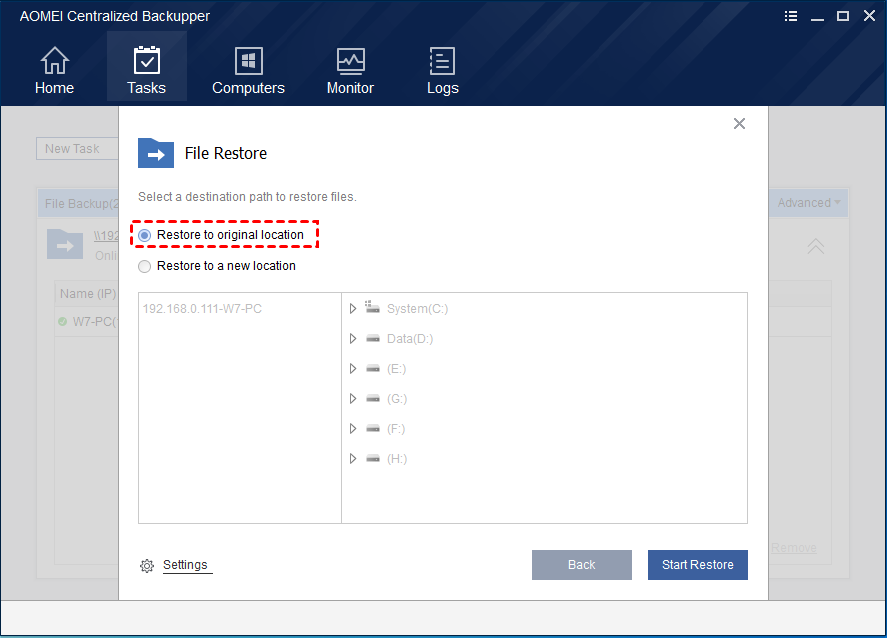
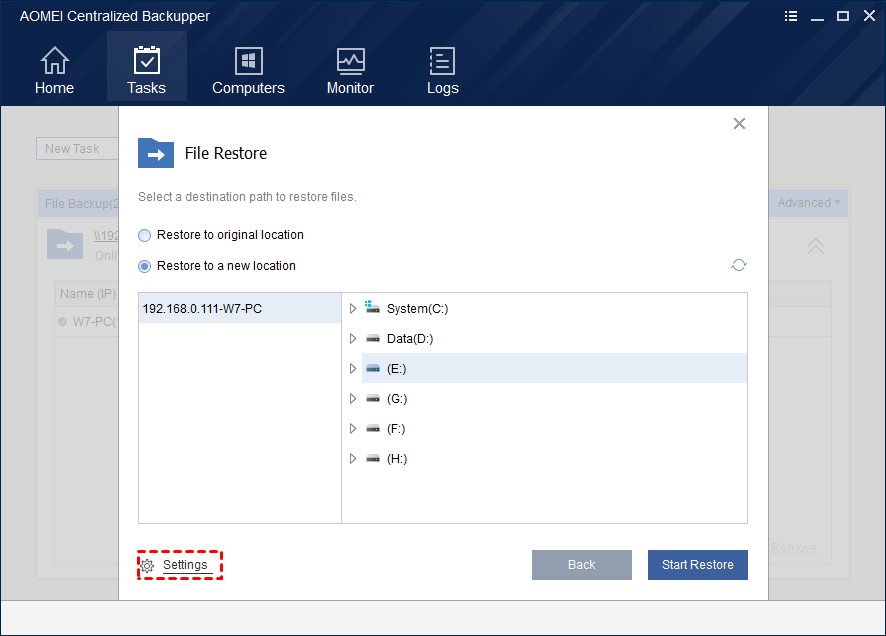
Selecting“Restore to other locations” means to restore to other computers or other locations on the source computer. Then, select a specific partition or folder on other client computers as the restore destination below.
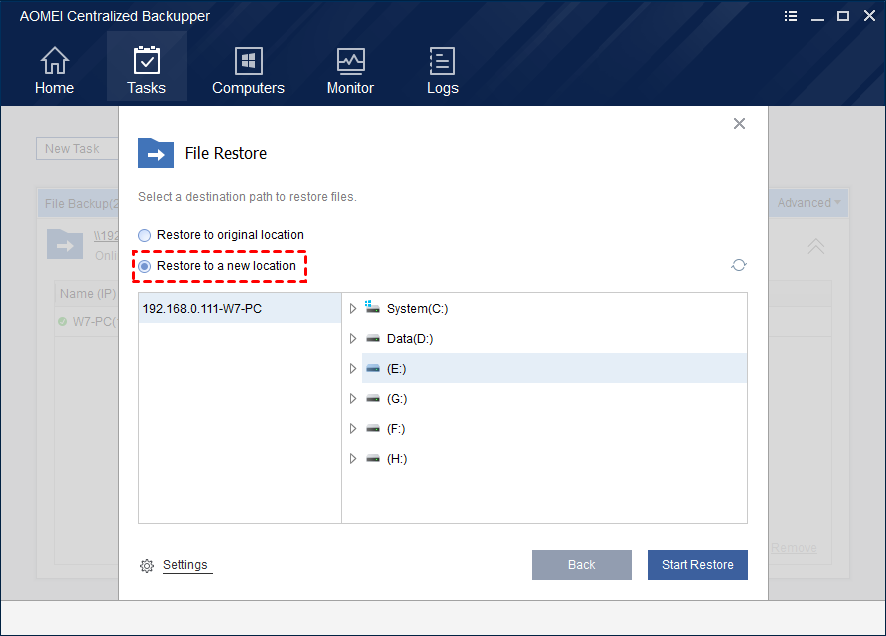
After selecting the destination for restore, click the “Settings” button in the left bottom of the interface.
“Restore NTFS permissions”: Make files and folders have the correct permissions. This setting only supports restoring to NTFS format partitions.
“Replace existing files”: The same files in the target location will be overwritten.
“Restore only files”: Only restore files in the backup.
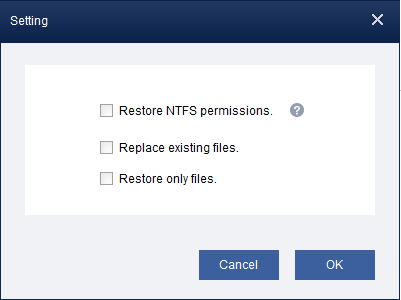
After setting, click "OK" to save the settings, and return to the restore interface. And then click the "Start Restore" button to perform the restoration task.

Notes:
-
If the partition is backed up periodically, a new image will be generated for each backup, so there may be multiple backup points to choose from.
-
The destination partition will be completely overwritten. If the target location contains any significant data, we recommend you copy or move it to another location and then perform restore.
-
The progress of the created restore task will be displayed next to the computer that is restored in the task. Expand the list of the restored tasks to see the specific restore status.
-
When the target location of the restore task is occupied, it needs to restart to enter the WinPE to perform restore. The system will restart automatically after the restore process is finished.
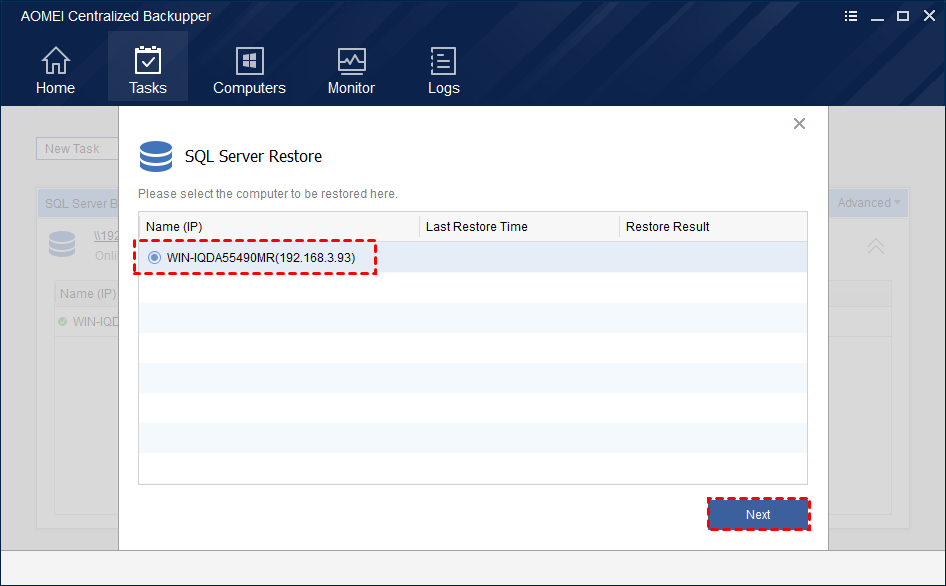
5. SQL Server Restore
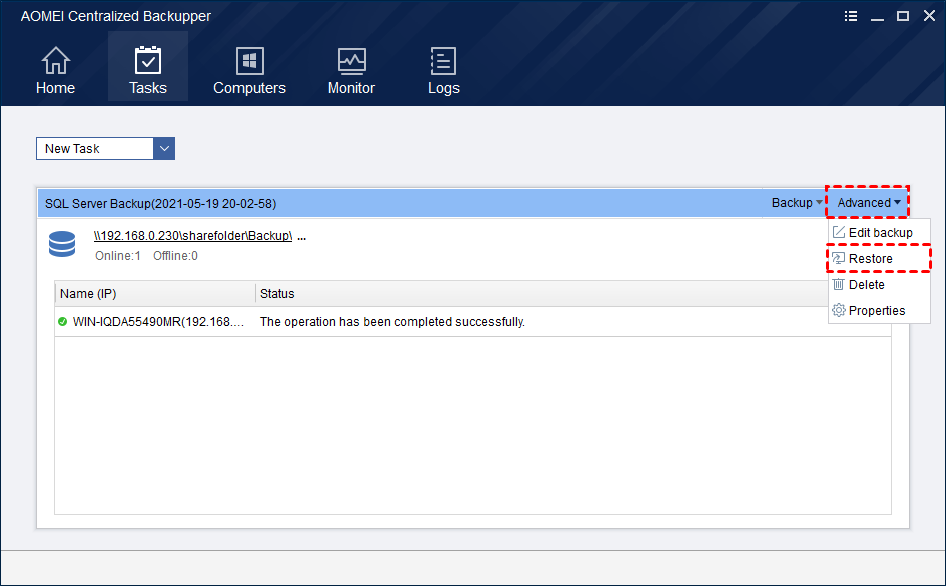
Go to the “Tasks” tab, select a SQL Server backup task that you want to restore, click “Advanced”, and then select “Restore”.
On the “Select a computer to restore” page, select a computer that needs to be restored from the list and click “Next”.
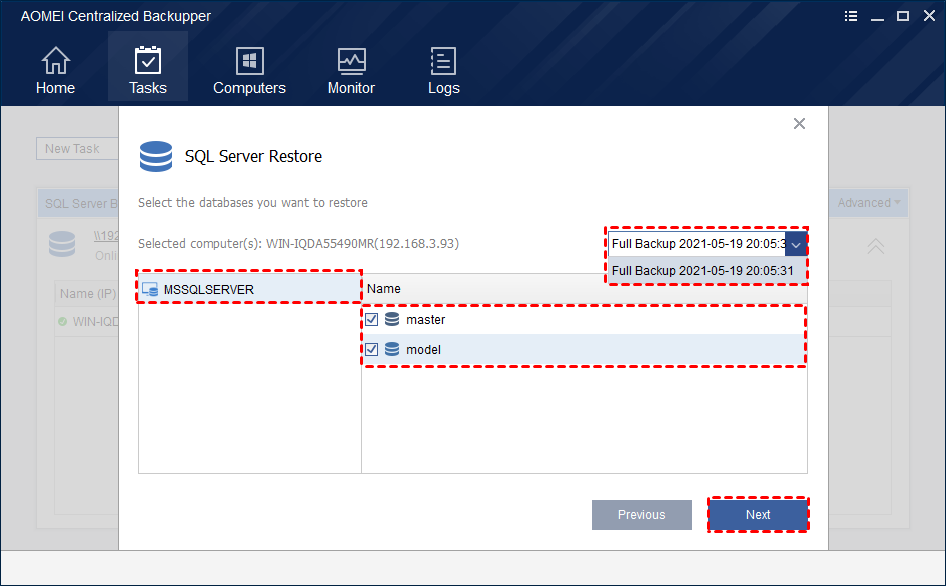
On the “Select the database to restore” page, select the backup version. And then select the database instance that needs to be restored or the database corresponding to the instance in the backup list. After selecting the source data from the corresponding backup version, click “Next”.
On the “Select a destination for restore” page, selecting “Restore to the original location” means to restore to the source instance location on the source computer where the backup is from.

Selecting “Restore to a new location” means to restore to the instance locations of other computers or other instance locations on the source computer. All online clients with SQL Server databases will be displayed below.
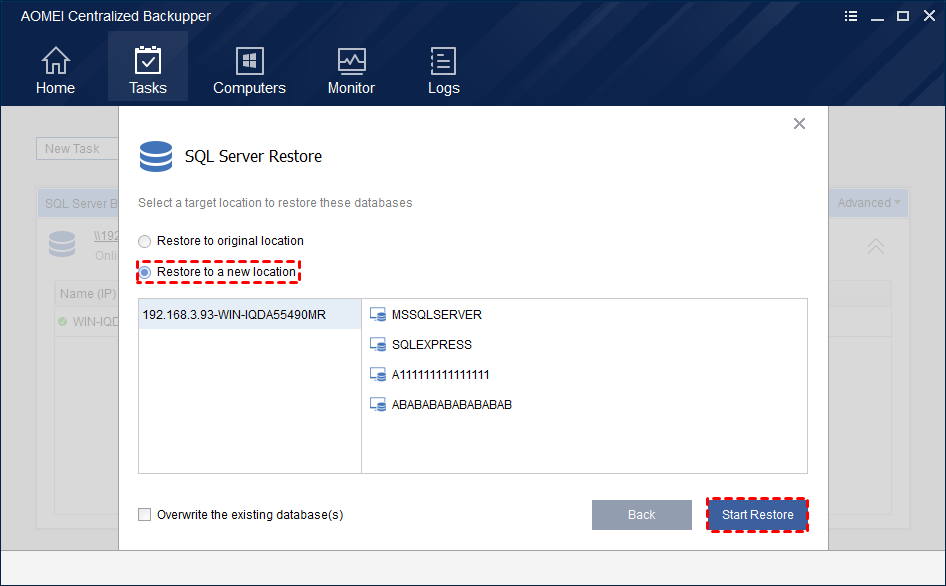
Select the specific instance corresponding to the client as the restore destination location. When the database instance cannot be connected, you need to verify your identity before you select it as the restore destination location and continue the restore operation. Click the "Start Restore" button to perform the restoration task.
Tips:
There is an option "Overwrite existing database" in the lower left of this page. After checking, if a database with the same name already exists in the restore destination, it will be overwritten.
Notes:
- Restore from a high version database to a low version database is not supported.
- If the "Overwrite existing database" option is not checked, once a database with the same name is detected in the target location during restoration, the database with the same name will be skipped.
- A new file will be generated each time the backup is executed, so there may be multiple backup time points to choose from.