Burn Windows Server 2019 ISO to USB: Quick and Easy Guide
Read this detailed post to learn step-by-step tutorial about how to burn Windows Server 2019 ISO to USB in 2 simple ways. Except that, you will know where to download Server 2019 ISO image and preparations before it. Continue to read more.
By Maggie Updated on May 30, 2024
What is Windows Server 2019 ISO?
A Windows Server 2019 ISO file is a digital copy of the Windows Server 2019 installation disc. Burning Server 2019 ISO to a USB drive allows for a convenient and portable installation method. This process is essential for setting up new servers, performing repairs, or conducting upgrades without needing a physical disc. Using a USB drive for installation is faster and more efficient than traditional methods, making it a preferred choice for IT professionals.
Why need to burn Windows Server 2019 ISO to USB?
Burning the Windows Server 2019 ISO to a USB drive is crucial for several important reasons. It allows for faster and more reliable installation compared to using traditional DVDs. Additionally, having a bootable USB drive ensures that you can easily install or repair the server even if there is no internet connection available.
◈ Troubleshoot your computer as a recovery disk. When your Windows Server 2019 computer crashes and can't boot properly, you can make a bootable USB Windows Server 2019 using ISO files.
◈ Create an installation media. If you want to upgrade your system to Server 2019 on another computer, you can burn the Server 2019 ISO file to a USB to create an installation drive.
◈ Store a portable operating system. To avoid unforeseen failures during daily use of your computer, creating a bootable Windows USB as a backup solution can save your computer in times of crisis.
How to make Windows Server bootable USB from ISO
Here are two easy media creation tools for Windows Server 2019 ISO that make copying the ISO file to a USB drive effortless. First, prepare a USB drive with at least 4GB of storage for a 32-bit operating system or 8GB for a 64-bit operating system. These tools simplify the process, ensuring you can create a bootable USB drive quickly and efficiently. Let’s get started with the steps.
Way 1. Burn Windows Server 2019 ISO to USB with Rufus
Way 2. Best media creator to burn Windows Server 2019 ISO to USB
Preparations before Burning Windows Server 2019 ISO to USB
Before proceeding with the process of burning the Windows Server 2019 ISO to a USB drive, it's essential to ensure that you have all the necessary preparations in place.
1. Check USB Compatibility: Ensure that the USB drive is compatible with your computer and has sufficient storage capacity for the ISO file.
2. Select Adequate Storage: Choose a USB drive with at least 4GB for a 32-bit operating system or 8GB for a 64-bit operating system.
3. Backup Important Data: Back up any important data stored on the USB drive, as the burning process will erase all existing data.
4. Check System Requirements: Verify that your computer meets the system requirements for Windows Server 2019 to ensure smooth installation and operation.
You should also download Windows Server 2019 ISO first before burning Windows Server 2019 ISO to USB. You can download Windows Server 2019 ISO from Microsoft’s official website.
Way 1. Burn Windows Server 2019 ISO to USB with Rufus
1. Run Rufus. It will automatically detect USB storage devices attached to your computer.
2. Then beside Disk or ISO image, click SELECT to select the Windows Server 2019 ISO file.
3. Then set the other settings according to your real needs.
4. Click Start. It will warn you of data loss. To continue click OK.
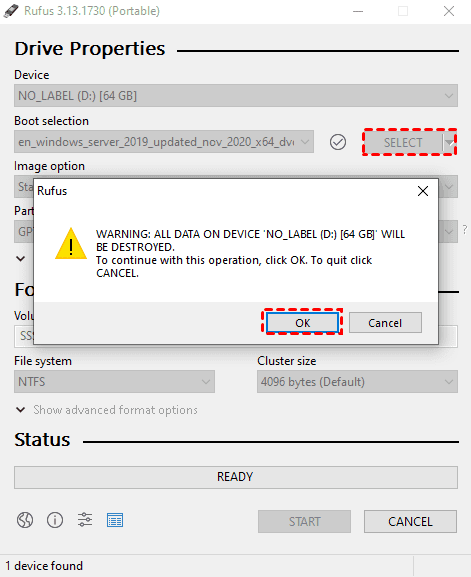
Note: Before you click OK be sure that you do not have any valuable data on the USB drive or if it has, backup files on USB. When you click OK, the drive will be formatted and all data will be erased.
5. Wait for Rufus to create your bootable USB drive from the ISO file. You will see a progress bar under the Status section while it’s made.
Way 2. Best media creator to burn Windows Server 2019 ISO to USB
To break the limitations of other media creators, here I would like to share a professional and easiest tool called the AOMEI Backupper Server. You don't need to prepare an ISO file in advance, because this software will take care of the bootable media creation process.
👣 You can choose CDs, DVDs, and USB flash drives as bootable media.
👣 It helps you create image backup for the system, disk, partition, or file. Then when something bad occurs on your PC, you can restore your PC to the previous date as soon as possible.
👣 It enables you to make bootable media in all Windows Server operating systems including Windows Server 2025/2022/2019/2016/2012/2003, etc.
Follow the illustrated steps to make a Windows Server bootable USB from ISO with AOMEI Backupper:
1. Download the free trial of the AOMEI Backupper Server and install it on your Server 2019. After it is successfully installed, you can follow the instructions below to create a Server 2019 bootable USB.
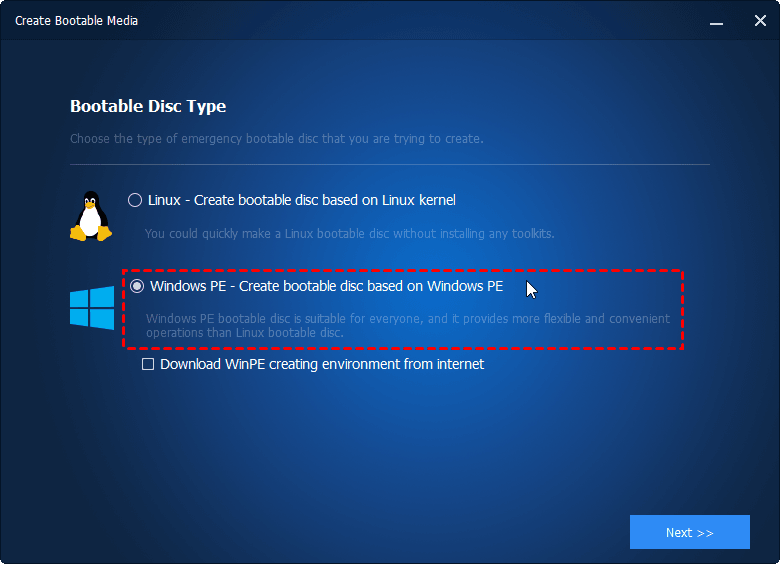
2. Launch AOMEI Backupper, click Tools, and select Create Bootable Media.

3. Choose bootable disc type and click Next. It is recommended to choose Windows PE so that you can access the full functions of AOMEI Backupper.
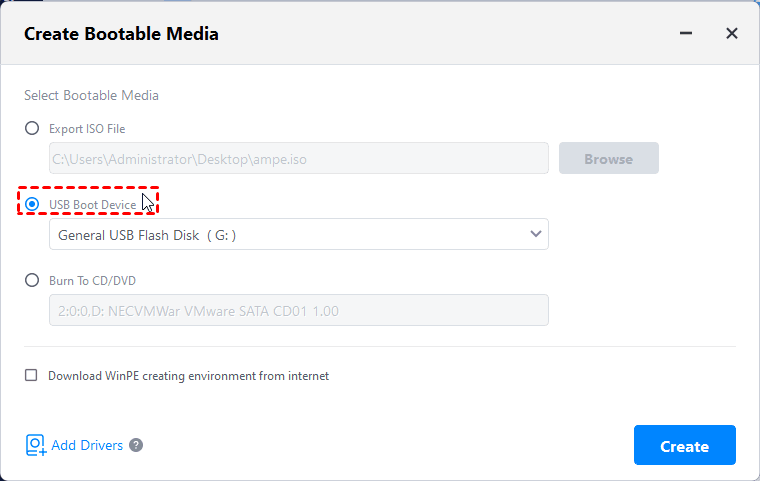
4. Select the USB Boot Device and click Next. You will receive a prompt to format your USB drive. Click Yes to start creating bootable media.
🌟 Tips:
☛ If your computer fails without any preparation, you could create the system image and bootable media on another working computer, and use them to perform Universal Restore on the faulty PC.
☛ Recovery Environment: It will directly add an entry in the recovery environment, which allows you to access AOMEI Backupper. And you don’t need a CD/DVD or USB drive.
☛ AOMEI PXE Tool: It offers you a feature named PXE boot tool, which allows you to boot a computer over the network, even without starting it.
FAQs about Windows Server 2019 ISO USB
1. Can I directly copy the ISO file to a USB drive?
No, copying the ISO file directly to a USB drive won't work. The USB drive won't recognize it when the computer boots up. You need to make the ISO file into a bootable USB drive first, or directly burn the ISO to the USB drive as a boot disk.
2. How do I install Windows Server 2019 using a USB drive?
Once you have a bootable USB drive with Windows Server 2019, installation is straightforward. Insert the bootable USB drive into your server, boot to the BIOS, and set the server to boot from the USB drive first. Follow the on-screen prompts to complete the installation process, including configuring settings as needed.
3. How large is the Windows Server 2019 ISO file?
The Windows Server 2019 ISO file can be downloaded from Microsoft. It requires a USB flash drive of at least 8 GB. While the ISO file itself consumes around 4 GB, during the burning process to the USB drive, the ISO image will be split into chunks of more than 3 GB automatically.
Bottom Line
How to burn Windows Server 2019 ISO to USB? This article introduces you to 2 easy ways to get this task done. After that, you can boot from this bootable drive and use it to troubleshoot your PC, restore the system to a new hard drive, upgrade the OS, etc.
If you are looking for a continuous data protection solution, I suggest you try AOMEI Backupper. In addition to backup and restore features, it also comes with sync feature to help you fix Windows Server 2019 slow file sharing.
For professional technicians or for businesses, it offers an advanced version - AOMEI Backupper TechPlus to help protect unlimited computers within a single computer.

