How to Restore Windows 11 to Previous Date (2 Methods)
This guide provides detailed steps for creating and using restore points to bring your system back to a stable state. It includes multiple solutions, such as using System Restore and third-party tools. Users will not only learn how to restore their systems effectively but also gain valuable insights into system recovery.
By Sebastian Updated on August 28, 2025
How do I restore my computer to an earlier date?
Restoring your computer to a previous state can help bring it back to optimal working conditions. This is often necessary when users face issues after upgrading to Windows 11, adjusting system settings, or installing problematic software, drivers, or services.
While some problems can be fixed using standard troubleshooting methods, system failures might leave the computer unusable or unable to boot. In such cases, restoring to an earlier date can be a more effective solution.
Wondering how to roll back your system to an earlier point? Here are two reliable methods to restore your Windows 11/10 PC. Continue reading if you need a quick fix.
Restore Windows 11 to the Previous Date Using System Restore
In Windows 11/10/8/7, there’s a built-in feature called “System Restore” that allows you to create backups of your system and restore them when needed. System Restore tracks major changes to your computer, creating "restore points" that capture the state of your operating system at specific times. You can use these restore points to roll your system back to a previous date if any issues arise.
To use System Restore, you need to create a restore point beforehand. First, enable System Protection on Windows 11, as it's turned off by default. Once activated, Windows will automatically generate restore points when updates or significant changes occur.
If your computer encounters issues later, you can rely on these restore points to recover your system. Continue reading for step-by-step instructions on how to perform a system restoration.
Case 1 - If Your Windows 11 is Bootable
If your system is bootable, but you want to restore it because it is not behaving as expected, try the below steps.
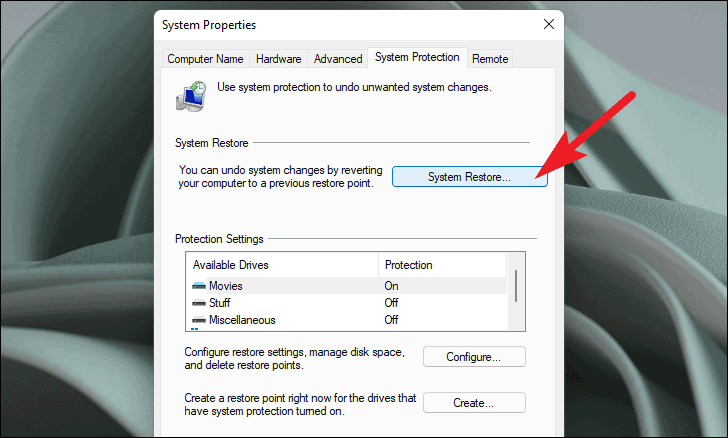
1. Open the System Properties window and click the System Restore button.
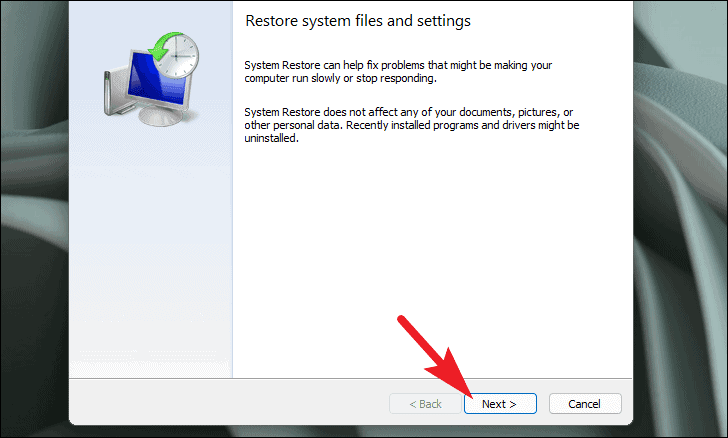
2. A new System Restore window will open on your computer. Click Next on the screen.
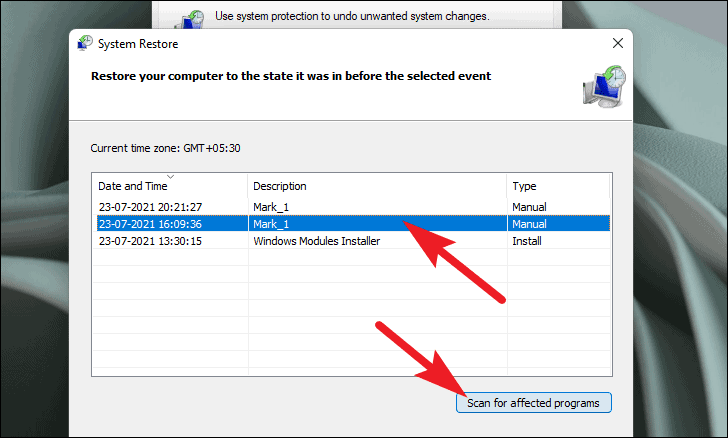
3. Then, select the restore point you created earlier and that you wish to restore. You can click here on Scan for affected programs to see which apps or programs will be affected when you restore to the selected point.
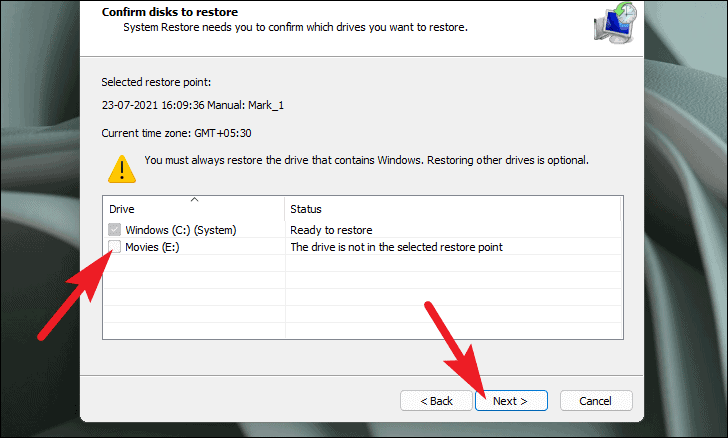
4. If you have enabled System Restore for more than one drive, you can select it by clicking the checkbox in front of the drive in the list. Please note that you must always restore the drive containing Windows.
5. After that, you will be able to see the information about the restore point from which you want to recover your computer. Read the on-screen instructions carefully and then click Finish to start the system restore process.
In this way, we complete the restore process for the bootable Windows 11 system.
Case 2 - If Your Windows 11 is not Bootable
When you cannot log on to your computer, you can access Windows Recovery Environment (WinRE) and use the system restore point you created to restore your computer. This is how to run Windows 11 system restore from boot.
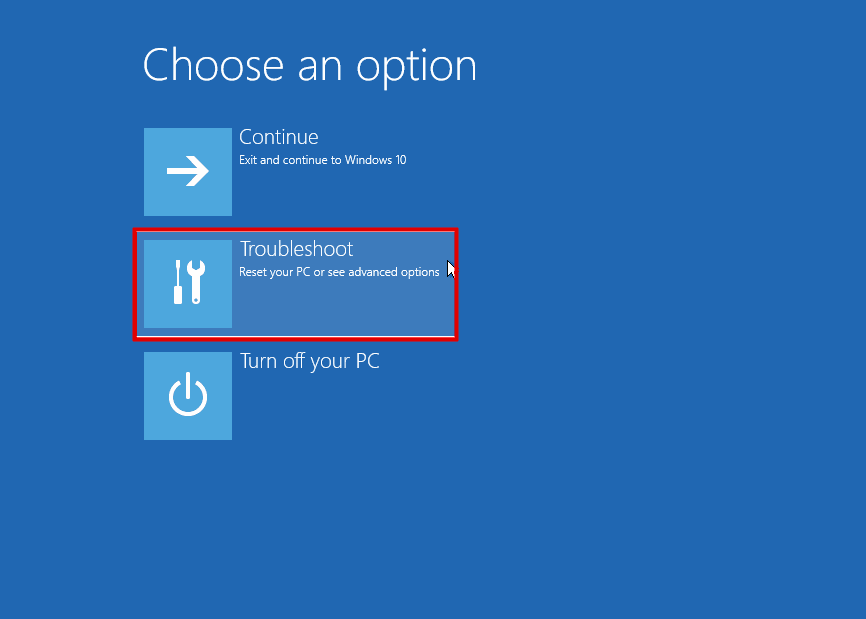
1. Start your Windows 11 machine and quickly shut it down before it reaches or is at the boot screen. Do this three times repeatedly and then you will boot into WinRE. Click on the Troubleshoot option in the recovery environment.
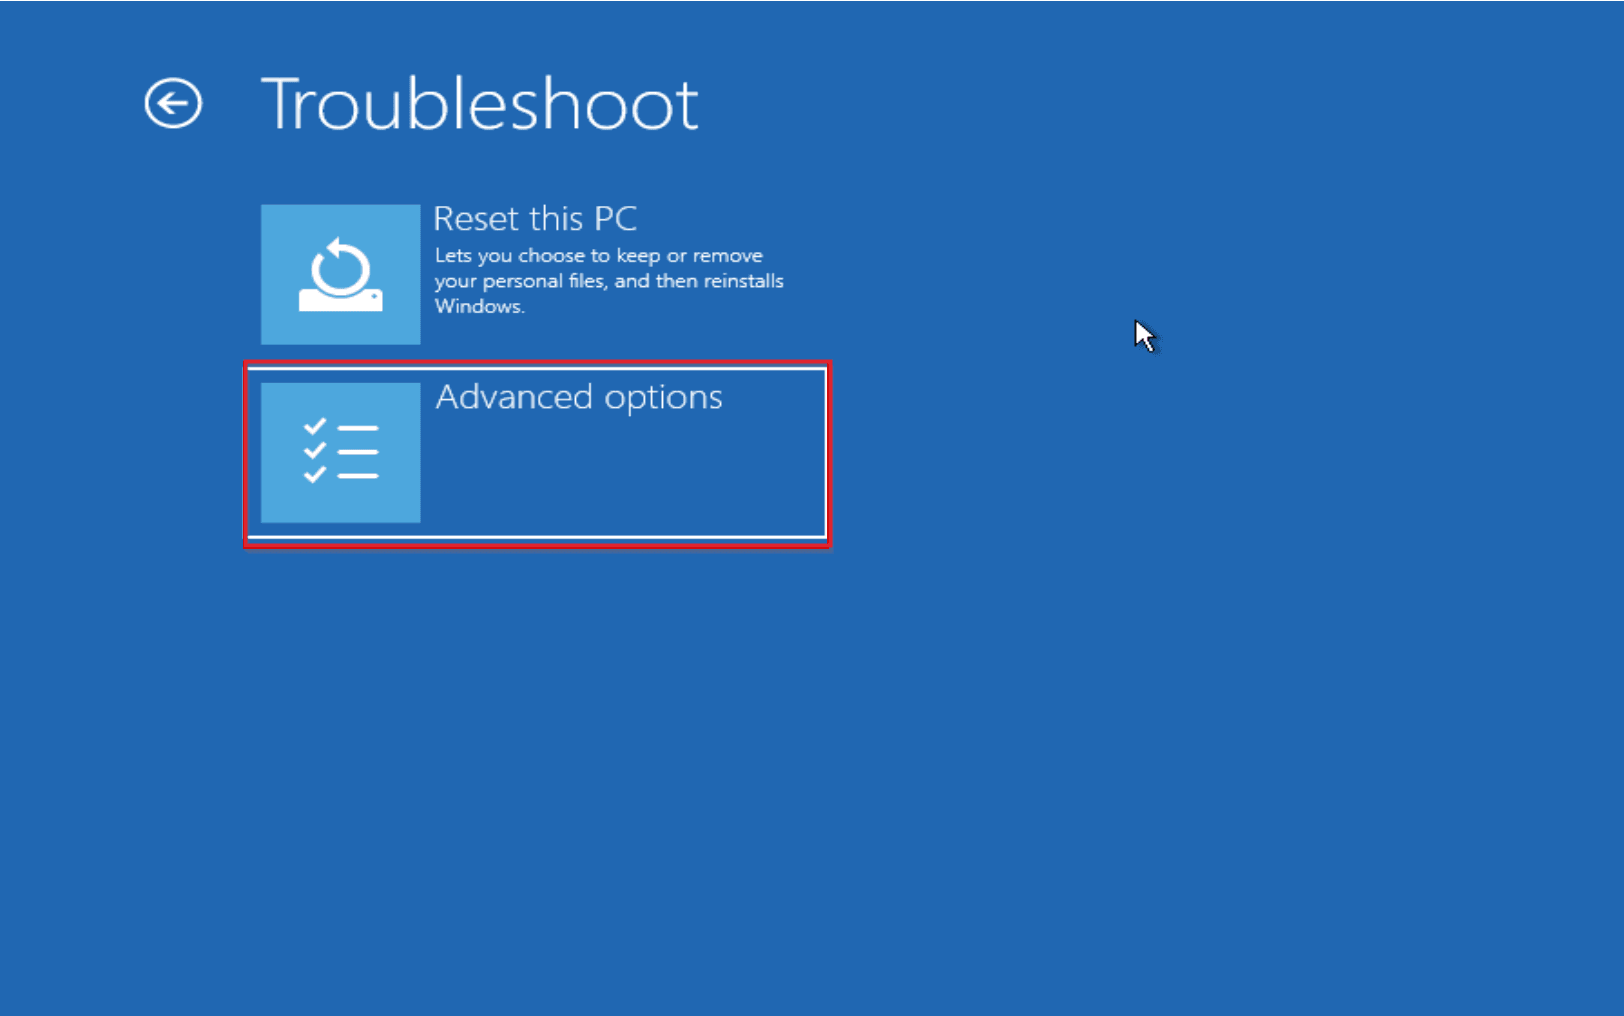
2. Moving on, click on the Advanced options from the Troubleshoot screen.
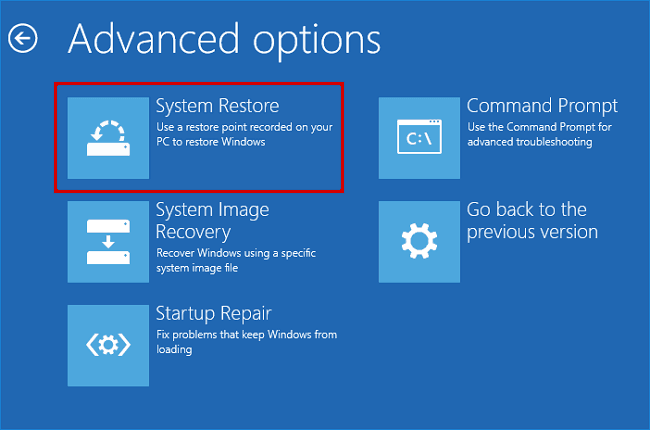
3. Next, select System Restore from the list present on the Advanced options screen.
4. Then, a System Restore window will appear on your screen. The rest of the steps are the same as step 2,3,4,5 mentioned above.
This is all about creating and using System Restore Point on Windows 11 computers. Although System Restore Point can be used to restore a system to an earlier point in time, some users have reported that they have encountered some problems using the System Restore feature on Windows 11 - they can't create a restore point on Windows 11.
Restore PC to Previous Date in Windows 11 with Best Freeware
If System Restore doesn’t work, you can turn to third-party software like AOMEI Backupper Standard, a trusted and efficient tool for system backup and recovery. This software not only helps you back up and restore your operating system but can also handle backups for partitions, disks, and individual files or folders.
To use AOMEI Backupper to restore your PC to an earlier date, you’ll first need to create a full backup of the Windows 11 system using the tool. Once the backup is made, you can easily follow the steps to restore your system whenever needed.

- Comprehensive Backup Options: Beyond just the system, you can back up disks, partitions, files, and folders based on your needs.
- Quick Restore: Easily recover your backups with just a few simple clicks.
- Rescue for Unbootable Systems: If your computer won’t start, you can create a bootable media using this tool to fix the issue.
Now let’s get the graphical instructions to restore your Windows 11 with AOMEI Backupper in case of a system crash.
Case 1: Windows 11 Can Boot
Step 1. Free download AOMEI Backupper Standard, install and run it.
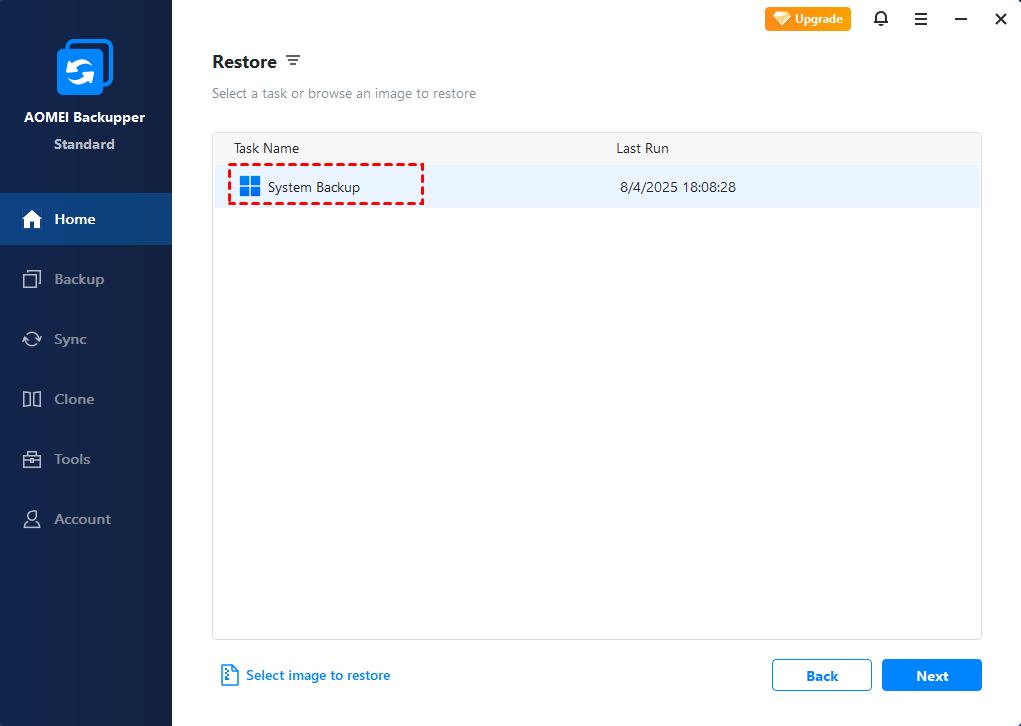
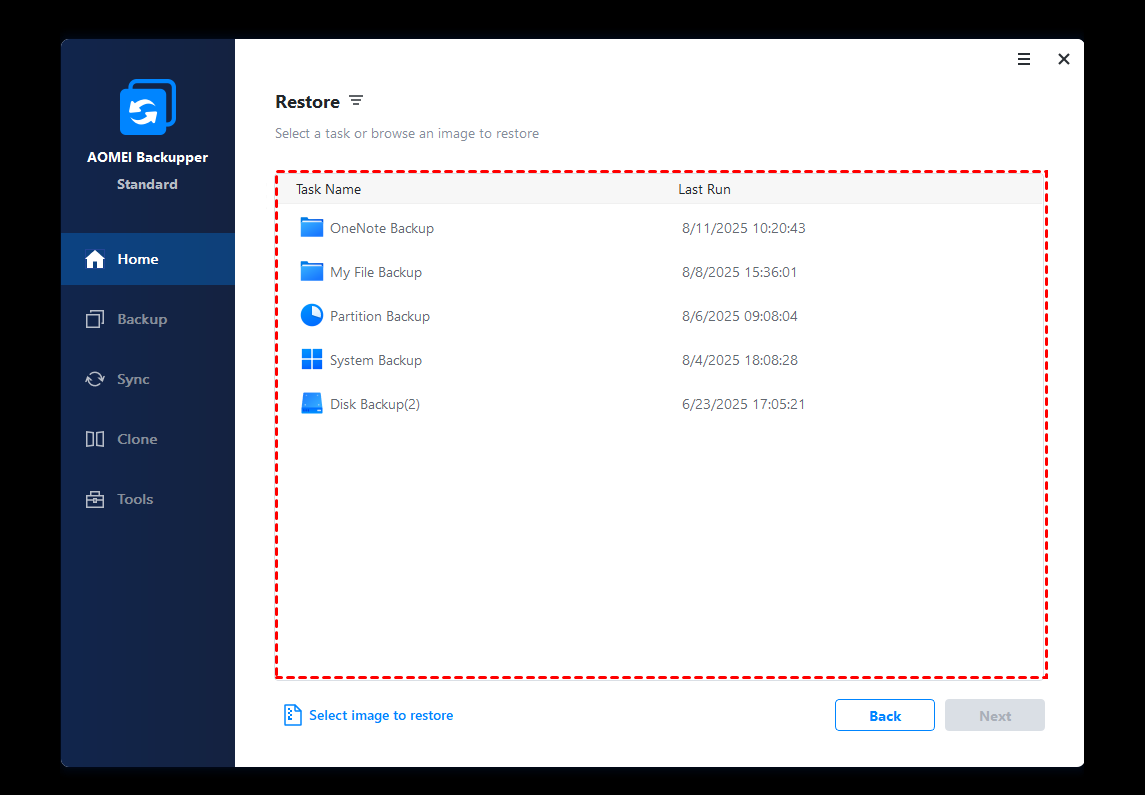
Step 2. In the main interface, click Home > Restore and choose the target backup task or click Select image to restore to find the image.
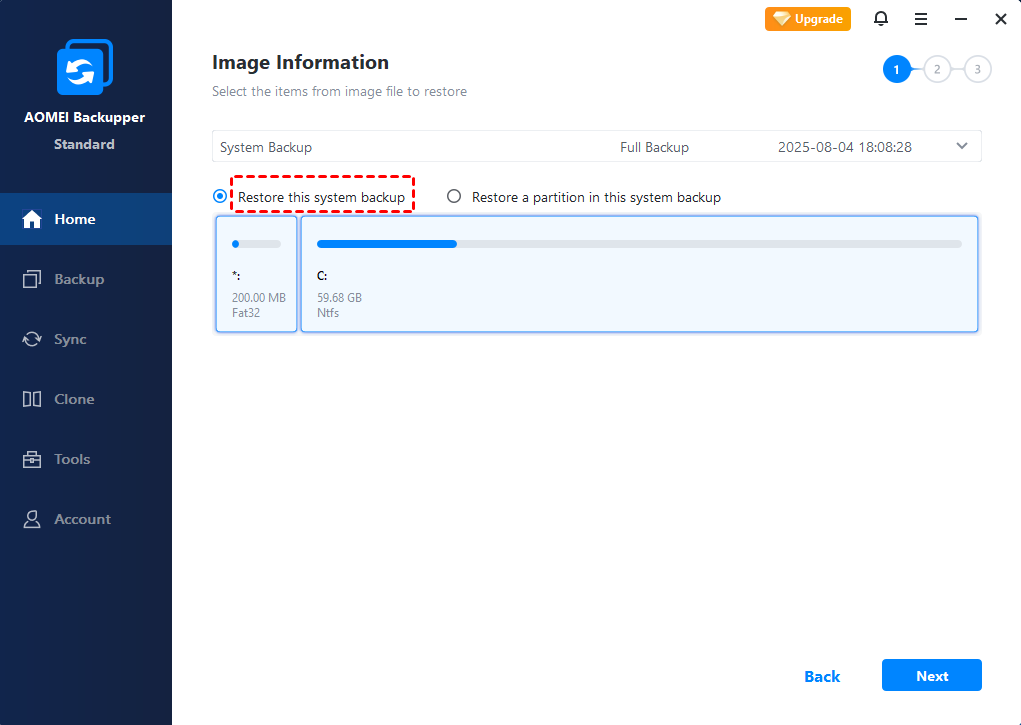
Step 3. Then, select to restore the entire backup or a part and click Next.
Normally, you need to choose a path for your restoration after this step. But if AOMEI Backupper can detect this image and you want to restore it to its original location, this software will choose the destination path for you.
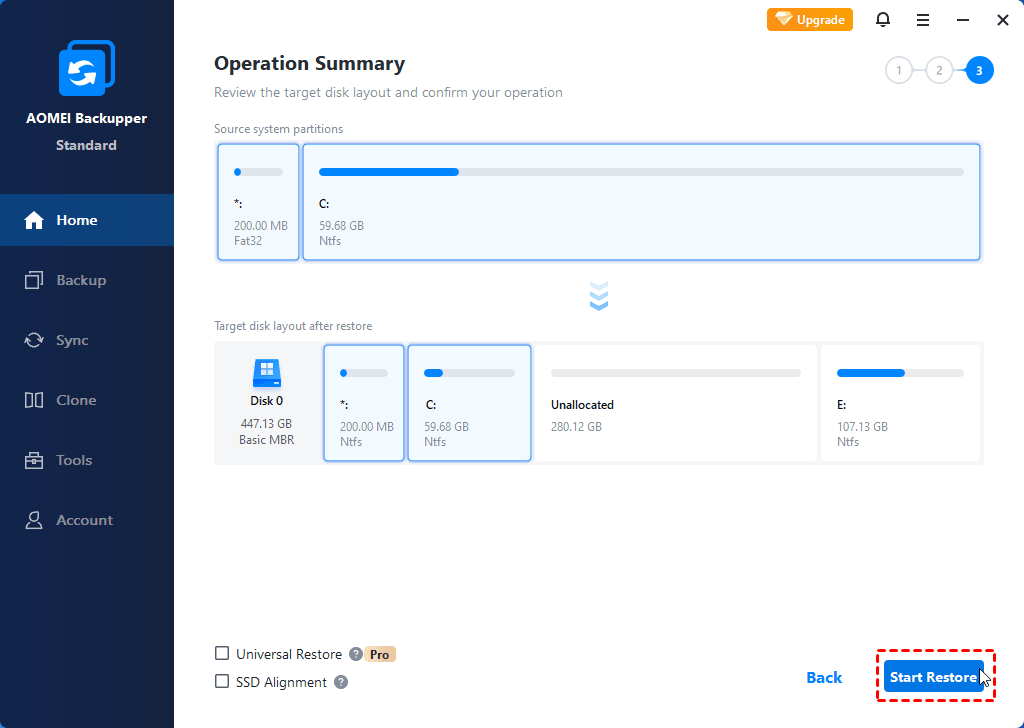
Step 5. Then, click Start Restore to execute the progress. When the progress reaches 100%, click OK to exit.
Note: If you buy a new computer, you can use the “Universal Restore” function (available in professional edition) with a bootable media to restore system files on the new computer even with dissimilar hardware configuration.
That’s how AOMEI Backupper can help you solve problems effectively.
Case 2: Windows 11 Cannot Boot
When your Windows system has crashed and cannot boot up correctly, you can create bootable media with AOMEI Backupper to boot up a failed computer.

After booting from the bootable disk you created, AOMEI Backupper will load up automatically. Follow the steps in Case 1 to finish Windows 11 system recovery process.
FAQ on restoring Windows to the previous date
1. When should I consider restoring Windows 10 to a previous date?
You might consider restoring Windows 10 to a previous date if you experience any of the following issues:
- Persistent software or system errors after recent changes or installations.
- Malware infections that have caused system instability.
- Configuration changes that have resulted in unexpected behavior.
- Significant performance degradation after updates or system modifications.
2. Will restoring Windows 10 to a previous date affect my personal files?
No, restoring Windows 10 to a previous date primarily affects system files and settings. Your personal files, such as documents, photos, and videos, will generally remain unaffected. However, it's always a good practice to back up important files regularly to prevent data loss in any unforeseen circumstances.
3. Does Windows 11 have a restore point?
Yes, Windows 11 features a System Restore feature similar to Windows 10, allowing users to create and utilize restore points to revert system settings and configurations to a previous state in case of issues or errors.
4. How do go back to a date in Windows 11?
To restore Windows 11 to a previous date:
- Open "Settings" by pressing Win + I.
- Go to "System" > "Recovery."
- Under "Advanced startup," click "Restart now."
- Choose "Troubleshoot" > "Advanced options" > "System Restore."
Follow the prompts to select a restore point and complete the process.
Explaining Key Tech Terms
System Restore A Windows feature that allows users to revert their system settings to a previous state, usually fixing software-related issues.
Safe Mode: A diagnostic startup mode in Windows that allows users to troubleshoot and fix problems by booting with only essential system programs and services.
Backup: A process of creating copies of data or system settings that can be restored in case of system failure or data loss.
3 Tips for Maintaining System Stability
-
Regularly Create Restore Points: After every significant system change, create a restore point. This ensures you have a fallback option if something goes wrong.
-
Update Drivers and Software Cautiously: Only install updates from trusted sources. Faulty drivers and software are common causes of system crashes.
-
Backup Your System Frequently: Use tools like AOMEI Backupper to create full backups of your system. In case of critical failures, this allows you to restore everything efficiently.
Summary
That’s all about how to restore Windows 11 to the previous date. After reading this article, you may know how to use the System Restore feature that comes with Windows 11 to restore your PC to its previous working state. Or you can use a more reliable third-party software - AOMEI Backupper to finish this task.
But I suggest you use the latter, for it offers you all-around backup and recovery solutions. With this freeware, you will never worry about system problems. In addition, it is also the best disk clone tool that allows you to copy VHD to a physical disk in Windows without boot issues. Download it to have a try!