4 Ways to Create Dell Windows 7 Recovery Media (Disk/USB)
Want to create a Dell recovery disk or USB drive in Windows 7? There are 4 effective ways you can try to create a Dell recovery media for system issues troubleshooting. Just keep reading and pick a method to perform.
By Clytze Updated on October 25, 2022
Overview for Dell recovery media in Windows 7
Dell recovery media is a disk or USB containing a backup of the computer original factory condition (or a favored condition) configured by Dell or an end-user. With it, you don’t need to worry about system failures in Windows 7/8/10. Even if the computer won’t start, you can use the Dell recovery disk or USB drive to access recovery tools and solve the problems.

How to create a Dell Windows 7 recovery disk or USB?
In Windows 7, there are several methods to create a Dell recovery media, like Dell OS Recovery Tool, System Repair Disc, etc. You can follow this guide to pick the approach works best for you.
-
Method 1. Create Windows 7 recovery disk in via Dell OS Recovery Tool
-
Method 2. Create Dell recovery media in Windows 7 with freeware
-
Method 3. Create Dell repair disk with Windows 7 built-in tool
-
Method 4. Create Dell recovery media with Windows 7 USB/DVD Download Tool
Method 1. Create Windows 7 recovery disk in via Dell OS Recovery Tool
You are probably searching for a direct download of Dell windows 7 recovery disk image file, but the truth is, Dell OS Recovery images are no longer downloadable. Instead, Dell provides an OS Recovery Tool to manage the creation of a recovery USB key with licensed OS version that shipped with your system based on the Service Tag.
Dell OS Recovery Tool can help you to download a customized Dell recovery image of Microsoft Windows that was preinstalled on your Dell PC. Just download and install it, then follow the steps to create Dell recovery drive in Windows 7.
Step 1. Plug in your USB drive (with at least 16GB of storage space).
Step 2. Launch Dell OS Recovery Tool, select the computer and click Next.
Using the same Dell PC, please click This Computer.
Using another working PC, please enter the Service Tag of the Dell PC under Another computer, and click Search.

Step 3. Select the operating system and click Download, wait for the download to complete.
If you only want a disk image file, just stop at this step. The dell windows 7 recovery ISO could be found in following path: C: \ProgramData\Dell\OS Recovery Tool\Downloads.
Of course, you can continue the wizard to create a recovery USB.

Step 4. Click Next, select the available USB key from the drop-down menu, then click Burn OS and wait for the process to end.
Step 5. When the process is done, you will see a summary screen.
If there are some important data on the USB drive, remember to backup it at first, otherwise all data on the destination USB drive will be erased.
Method 2. Create Dell recovery media in Windows 7 with freeware
AOMEI Backupper Standard is a free backup and restore tool which is designed for Windows 7/8/10/XP/Visa. It allows you to create a bootable media using DVD/CD or USB drive. Alternatively, you can create an ISO image file and burn it to any removable devices.
This bootable media will boot your Dell computer into Windows PE, and enables you to restore it with an earlier Windows 7 system image created with AOMEI Backupper. When your computer returns to normal, you can also use this software for daily data protection.
Using a Dell recovery disk or USB drive in Windows 7 to restore the crashed computer, you need a backup of the system in normal state. So the whole process consists of 2 parts.
Backup Dell Windows 7 OS with AOMEI Backupper:
Step 1. Download, install and launch this freeware. Click Backup and select System Backup to backup Windows OS, or choose Disk Backup to back up the hard drive to an image file. Here take System Backup as an example.

Step 2. It will automatically choose the system partitions as the source. You only need to choose another location as destination path.

Step 3. At last, click Start Backup and wait for the progress to reach 100%.
Create a Windows 7 bootable media in case Dell computer won’t boot:
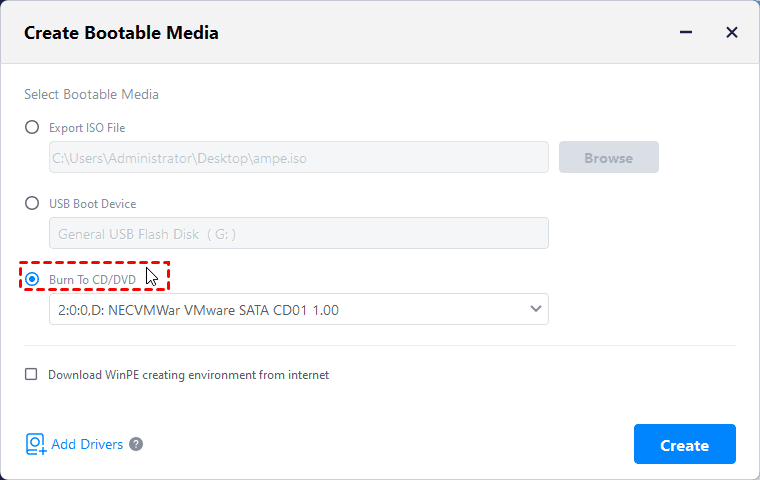
Step 1. Insert your USB or CD/DVD to the computer (the USB drive should be formatted with NTFS). Then, select Create Bootable Media under Tools tab.

Step 2. Next, choose the type of emergency bootable disc. It is recommended to choose Windows PE. Then, click Next.
The created bootable media will support booting from both legacy MBR mode and GPT/UEFI.

Step 3. Select the storage device or specify the location path where you want to export the ISO file, and then click Next to start. Wait for the process to complete and click Finish.
Thus, you can insert the Windows 7 recovery media to a faulty computer, boot it into Windows PE, then restore it to a normal state with the previously created system image.
If your Dell computer cannot boot right now, and you want to fix its problem. You can upgrade to Professinal edition, use the Universal Restore feature to perform dissimilar hardware restore. It means you could create the bootable media and system image on another working PC.
Method 3. Create Dell repair disk with Windows 7 built-in tool
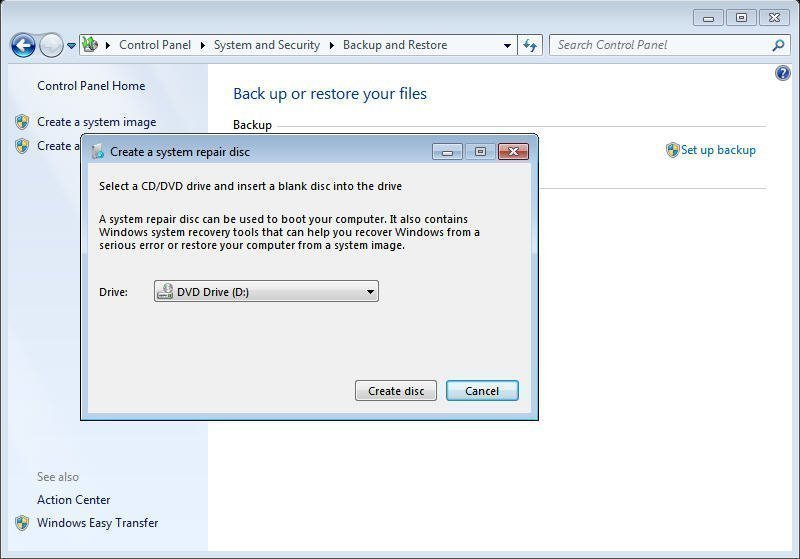
Windows 7 system repair disc enables you to access all Windows recovery options. If you have a CD or DVD, you can use this built-in feature to create Dell recovery disk for Windows 7.
Step 1. Insert the CD/DVD to the computer.
Step 2. Navigate to Start>Control Panel>System and Security>Backup and Restore. At the left column of Backup and Restore interface, click Create a system repair disc.

Step 3. In the pop-up window, select CD or DVD and click Create disc. Wait for the process to be finished.
When you need to repair your computer, you can insert the system repair disc to access Recovery Options to repair or restore Windows from boot.
Although it is easy to create a Windows 7 system repair disc using Windows built-in tool, you can only use CD/DVD as recovery media, you cannot create a system repair disc on USB.
Method 4. Create Dell recovery media with Windows 7 USB/DVD Download Tool
You can also create Dell recovery media with Windows 7 USB/DVD Download Tool. To do it, you should prepare an ISO image file, USB drive and Windows 7 USB/DVD Download Tool. Then, follow the steps below to create a recovery disk or drive for Dell in Windows 7.
Step 1. Run Windows 7 USB DVD Download Tool, click Browse button to locate the ISO of Windows 7 installation file. Then, click Next.

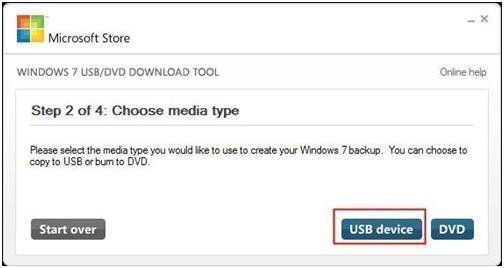
Step 2. Choose a media type. You can either choose USB device or DVD as media type. Here we take USB device as an example.
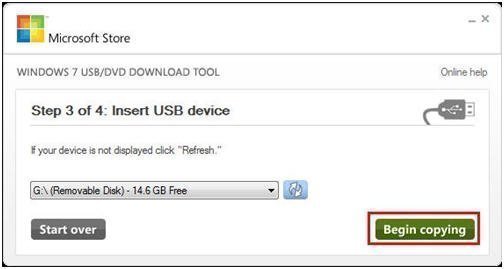
Step 3. Insert your USB drive to the working computer and select it. Then, click Begin copying.
Your USB will be overwritten during this process. It is recommended to backup important files on USB drive.
Step 4. When the process completes, you’ll get a recovery USB drive.
The same as system repair disc, if your computer runs into issues, you can boot from this USB device and access Windows Recovery Options to repair/restore your computer.
Conclusion
With these methods, you can easily create Windows 7 recovery media for your Dell computer. Whenever you encounter a system error, even if the computer won’t boot properly, you can use the Dell recovery disk or USB drive to access recovery options and troubleshoot problems.
If you prefer an easier way to create the recovery media in Windows 7, AOMEI Backupper Standard comes in handy. It’s able to create a Dell Windows recovery CD/DVD, USB drive, or a bootable ISO file if you want. And not only Windows 7, it applies to all Windows PC OS. As for Windows Server users, you can also upgrade to the specially designed Server edition.