18 Ways to Fix Kmode Exception not Handled in Windows 11
How to fix Kmode Exception not handled in Windows 11? Learn the cause of this error and 18 ways to fix it as well as an easy way to backup your system regularly to prevent all system errors.
By Clytze Updated on October 24, 2022
I am Crashing with the Blue Screen of Death Error
I've been trying to install Windows 11 since it was released. I have done everything I can imagine, uninstalled many applications, executed commands like DISM, sfc /scannow, dskchk, and updated all drivers. However, when I tried to install Windows 11 again yesterday, I still encountered the Kmode exception not handled in Windows 11. I'm really crashing, can anyone tell me the fix for this blue screen error?
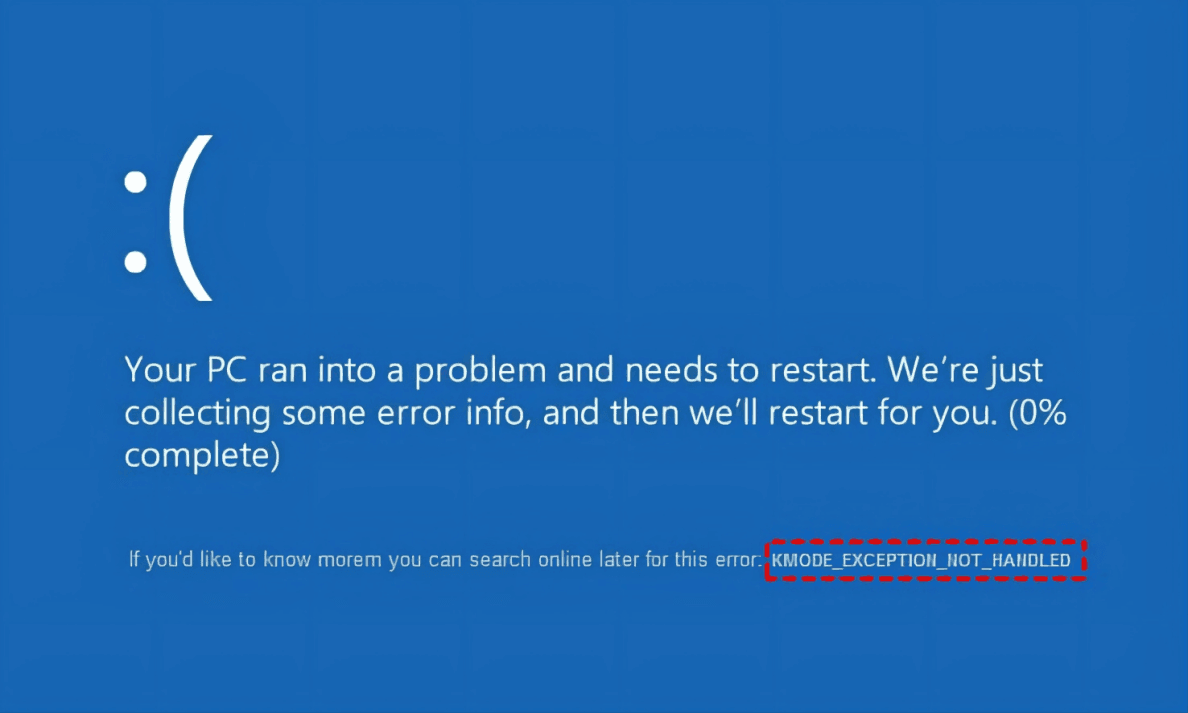
KMODE EXCEPTION NOT HANDLED is a common blue screen of death error in Windows 10 and Windows 11 that can put your computer in a reboot loop. From a large amount of user feedback results, this error is more common in Windows 10 when upgrading to Windows 11 development and preview versions, as in the case above.
Based on that, this article summarizes the corresponding fixes for you, but it should be noted that they also apply to the errors below.
- Kmode exception not handled ntfs.
- Kmode exception not handled overclock.
- Kmode exception not handled RAM.
- Kmode exception not handled USB. Kmode_exception_not_handled USB.
- Kmode exception not handled during install.
- Kmode exception not handled boot loop.
Please note that this error can occur not only on computers, but also on virtualization software such as VMware or VirtualBox. Next, you will learn about the common causes of this error.
Reasons for Kmode Exception not Handled in Windows 11
Before fixing the error, it is recommended that you understand the causes of this error, which will help you understand how to fix it. Here are the common causes of this error.
- Corrupt or missing device drivers.
- Outdated network driver.
- Memory failure.
- Third-party anti-virus software conflicts.
- BIOS version is out of date.
- External hardware conflict.
- Corrupted system files.
18 Ways to Fix Kmode Exception not Handled in Windows 11
After understanding the cause of the error, you can try the following 18 methods in turn, which will help you fix Kmode exception not handled in Windows 11. By the way, these methods can also be used to fix Kmode exception not handled in Windows 10.
Note that these methods involves reinstalling the system, which usually wastes a lot of time and effort, and may lead to data loss. Thus, it's suggested to create a backup before fixing this issue. You can choose a free backup software to help you achieve the goal, such as AOMEI Backupper Standard, which supports multiple backup methods and backup functions to meet your different needs, and it is easy to operate.
Way 1. Install Device Drivers
When device drivers are corrupt or missing, it may cause Windows 11 Kmode exception not handled error. For this, you need to install these missing drivers.
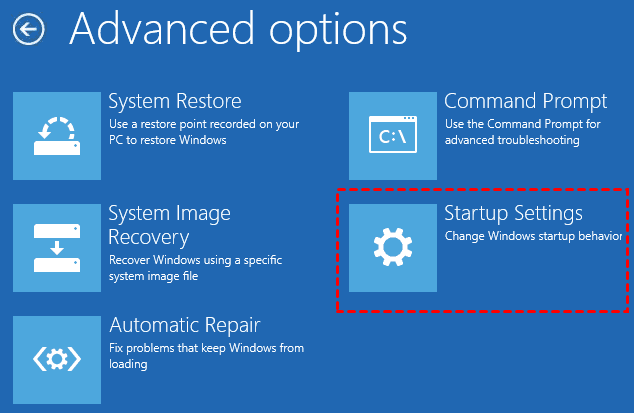
Step 1. Enter Windows Recovery Environment (Windows RE) by forcing shutdown and reboot twice.
Step 2. Click Troubleshoot > Advanced Options > Startup Settings and press F4 to enter Windows Safe Mode.
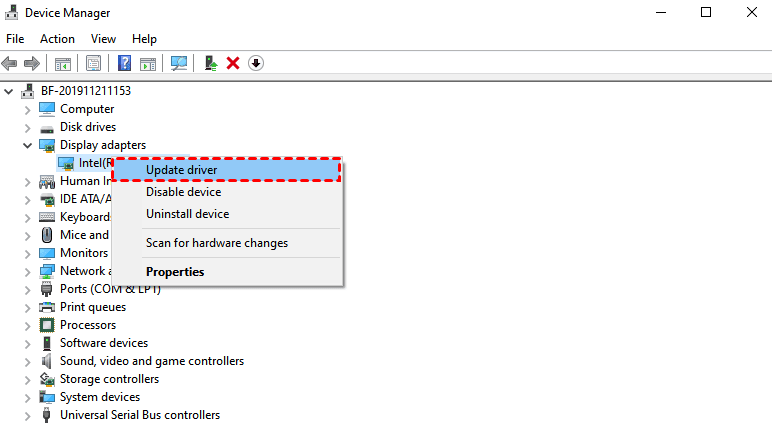
Step 3. In Safe Mode, use Windows+X to open the menu and select Device Manager.
Step 4. Find any of the unknown devices, right-click on it and select the Update Driver option in the drop-down menu.
Step 5. In the new pop-up window, select the Search automatically for updated driver software option and wait for it to automatically search and complete the update. Exit Safe Mode, restart your computer and see if the problem is fixed, if not, go to the next method.
Way 2. Update the Network Driver
The Kmode exception not handled in Windows 11 error is usually related to device drivers. Therefore, it is recommended that you update all device drivers when you encounter this problem. Note that the network interface card is a significant cause of this error, and you can update the network interface card driver before updating the other drivers in turn. The next steps take the example of updating the network interface card driver.
Step 1. Enter Windows recovery environment first, then press F4 to enter Windows safe mode.
Step 2. In safe mode, use Windows+X to open the menu and select Device Manager.
Step 3. Tap on the Network adapters and select your Ethernet in the drop-down menu.
Step 4. Right-click it and select Update Driver from the expanded menu.
Step 5. In the new pop-up window, select the Search automatically for updated driver software option and wait for it to automatically search and complete the update. Exit Safe Mode, restart your computer and see if the problem is fixed, if not, go to the next method.
Way 3. Run Windows Memory Diagnostics
Windows Memory Diagnostics is a system memory test that will help you check your computer's memory for problems. This will help to fix Kmode exception unhandled in Windows 11.
Step 1. Enter Windows Safe Mode, use Windows+R to open Run window, type mdsched.exe and click OK button.
Step 2. In the Windows Memory Diagnostic window, choose Restart now and check problems or Check for problems the next time I start my computer, the first option is recommended here.
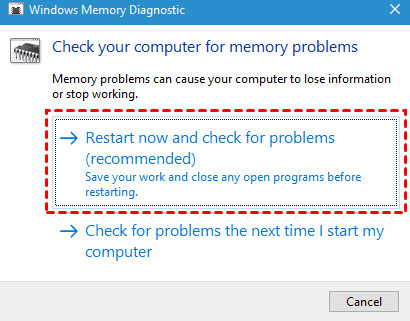
Step 3. This tool will show you if there are any hardware problems. If it shows a memory failure, remove the memory from the motherboard and replace it with a new one, and restart the computer again.
Way 4. Turn off Fast Start
Windows Fast Start allows you to turn on your computer faster, but at some times it may cause Kmode exception unhandled in Windows 11. For this reason, you need to turn off Fast Start.
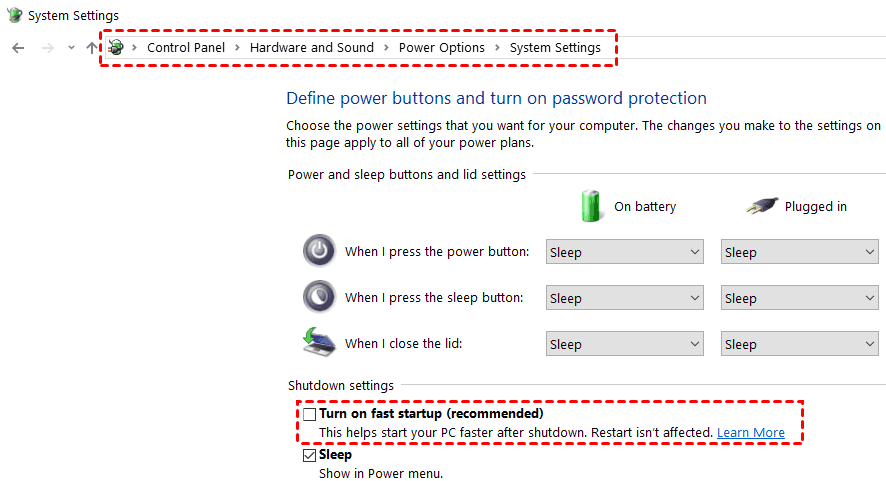
Step 1. Enter Windows Safe Mode, use Windows+R to open the Run window, type control and tap the OK button.
Step 2. In the Control Panel window, find and tap System and Security, and select Power Options.
Step 3. In the Power Options window, click the Choose what the power buttons do option in the left panel.
Step 4. Click the Change settings that are currently unavailable button, and in the Shutdown settings section, uncheck the Turn on fast startup (recommended) checkbox, and then click the Save changes button in the lower right corner.
Way 5. Disable Elan Service in Safe Mode
Step 1. Enter Safe Mode, use Windows+R to open the Run window, type msconfig and click the OK button.
Step 2. In the System Settings window, switch to the Services tab and check the Hide all Microsoft services checkbox.
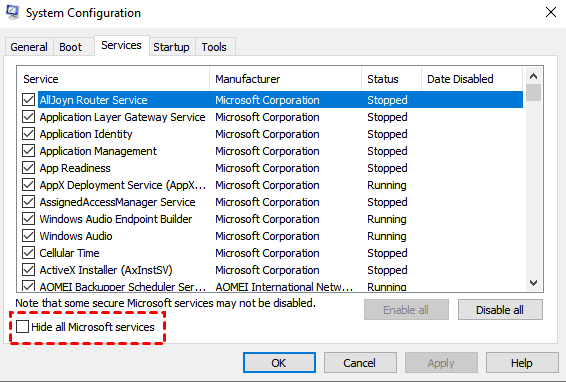
Step 3. Uncheck the Elan service from the list, and then click the Apply and OK buttons in turn to restart your computer.
Way 6. Disable TabletInputService in Safe Mode
If you cannot find the Elan service, disable the TabletInputService service in safe mode. You can also use this method if you have disabled the Elan service in the previous method.
Step 1. Enter Safe Mode, use Ctrl+Shift+Esc to open the Task Manager window, and switch to the Services tab.
Step 2. Select TabletInputService in the list, right-click it and select the Open Services option in the drop-down menu.

Step 3. In the Run window, type services.msc and click the OK button.
Step 4. Find Touch Keyboard and Handwriting Panel Service in the list of services window, double-click it to open it.
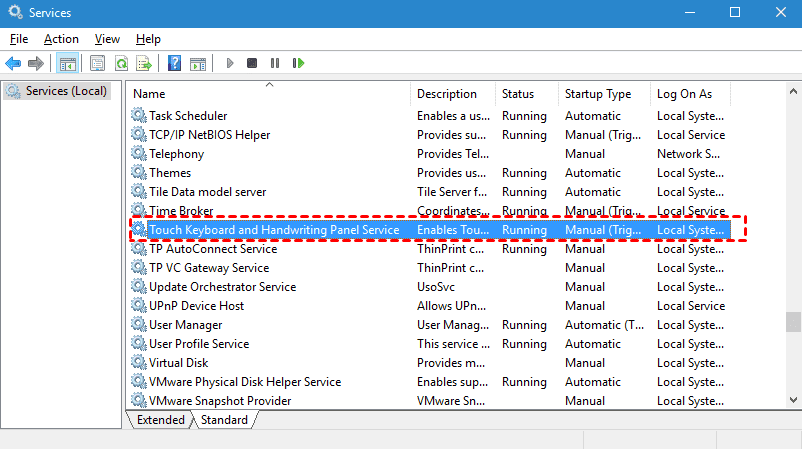
Step 5. In this service window, find Startup Type, select Disabled in the drop-down menu, and then click Apply and OK buttons in turn. Exit Safe Mode and restart your computer.
Way 7. Delete the ETD.sys Driver
Step 1. Enter the Windows recovery environment and click on the Troubleshoot option.
Step 2. In the Troubleshooting menu, click Advanced Options > Command Prompt.
Step 3. You need to enter the commands listed below in the Command Prompt window and press Enter to execute them.
- c:
- cd C:\Windows\System32\Drivers
- ren ETD.sys ETD.sys.old
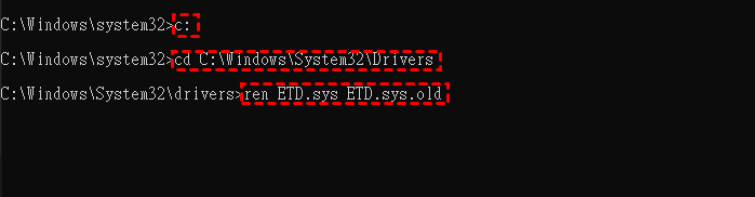
After waiting for the above commands to execute successfully, close the command prompt and restart your computer.
Way 8. Disable or Uninstall Anti-virus Software
Every new system is subject to various unexpected situations in its early phases, and Windows 11 is naturally no exception. During this process, Windows 11's kernel processes may conflict with third-party anti-virus software and cause Kmode exception unhandled errors in Windows 11. Therefore, it is recommended that you disable the third-party anti-virus software before deciding whether to uninstall it.
If you have third-party antivirus software installed on your computer, please find the appropriate icon in the notification section first, right-click on it and select Disable to see if you can fix this error. If you can fix the error successfully, it means that the third-party anti-virus software you have disabled is the culprit and it is recommended that you uninstall it from Programs and Features to prevent a similar error from occurring again.
Way 9. Remove All External Hardware
External hardware can also sometimes be the trigger for Kmode exception not handled in Windows 11, so it is recommended that you remove them.
Shut down your computer and remove all external hardware, including storage devices, keyboards, mice, headsets, etc, and turn your computer on again to see if the error is fixed. If the error is not fixed, go to the next method.
Way 10. Rename Problematic Files
Although it may seem a bit unbelievable, some users did fix the Kmode exception unhandled error in Windows 11 after renaming the problematic file, which is a worthwhile method to try anyway.
Input bdselfpr.sys (this is the specific problem file) in the search box, navigate to the appropriate path and find the file, right-click it, select Rename to bdselfpr.s__ in the expanded menu, and click on the blank area to save the changes.
Way 11. Uninstall the USB Power Program
From the results of some user feedback, some dedicated USB power programs are not compatible with the new Windows 11 and their drivers are long outdated, which will cause the Kmode exception not handled in Windows 11.
If you have such drivers installed on your computer, please uninstall them and restart your computer to see if the error still exists. If the error still exists, please go to the next method.
Way 12. Update BIOS
One of the major causes of the Kmode exception not handled in Windows 11 is that one of the base driver queues crashes in kernel mode, which is not uncommon in earlier versions of Windows 11. The good thing is that most motherboard manufacturers are also aware of this problem and have released fixes for this error one after another, but this requires you to update your BIOS version.
- Note:✎...
- BIOS entry methods, BIOS interfaces and BIOS settings vary greatly from one motherboard manufacturer to another, so it is not possible to provide you with detailed steps to do so.
Enter Safe Mode and visit your motherboard manufacturer's website to download the latest BIOS version. Then refer to the motherboard instruction manual to enter the BIOS (the method of entry varies from motherboard to motherboard, please look for the motherboard manufacturer's support) to update the version. After the BIOS update is complete, restart your computer and see if the error is successfully fixed.
Way 13. Uninstall the VPN Client
VPN allows you to be freer in your network access activities, but from the results of some users' feedback, it may also be a significant cause of the Kmode exception not handled in Windows 11.
For this reason, it is recommended that you first try uninstalling the VPN client to see if the error is fixed. If the error is not fixed, go to the next method; if the error is fixed, it means that the cause of this error is the VPN client and you have to uninstall it completely using professional software.
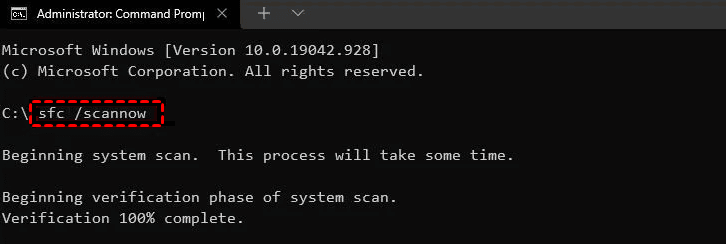
Way 14. Check Disk and Repair System Files
When a disk or system file becomes corrupted, it causes Kmode exception not handled in Windows 11. For this reason, you need to check and repair the disk with a specific command and then run the system file checker to repair the system files.
Step 1. Enter Windows Safe Mode, use Windows+S to open the search box, type cmd and select the Run as administrator option.
Step 2. In the Command Prompt window, type chkdsk /r and press Enter, then type Y and press Enter to confirm.
Step 3. After restarting your computer, follow the above steps to open the command prompt again, type sfc /scannow and press Enter, this will take you some time.
Way 15. Set CPU Voltage Manually
Very few people know that the CPU is also a major cause of the Kmode exception not handled in Windows 11. So, when you have tried the above methods and failed to fix the error, you can try to set the CPU voltage manually, which may help you fix the problem.
You should read the motherboard manual in detail before trying to set the CPU voltage manually, but a better suggestion is to seek professional help.
Way 16. Free up Disk Storage Space
The local disk C:\ contains a large number of system files and if this disk does not have enough storage space, it may cause some problems. Therefore, it is recommended that you leave enough storage space on the local disk C:\, which is also recommended by Microsoft, and this will be helpful to fix the Kmode exception not handled in Windows 11.
You need to delete any unneeded or unused files from the C drive and move videos, games, music, etc. from that drive to other drives. In addition, it is recommended that you periodically clear the cached data from that disk to save storage space.
Way 17. Uninstall Graphics Card Drivers
During the Windows 11 upgrade process, either Nvidia or AMD graphics drivers may cause the Kmode exception not handled in Windows 11. Although there is no official explanation of the exact cause, it is speculated that it may be related to the kernel file based on user feedback results. For this reason, it is recommended that you use DDU (Display Driver Uninstaller) to remove the graphics-specific drivers to fix this error.
Step 1. Enter Windows Safe Mode, download and install DDU, and double-click to open the Display Driver Uninstaller executable file.
Step 2. In the DDU window, select GPU from the drop-down menu of Select Device Type, and click Clean and restart button.
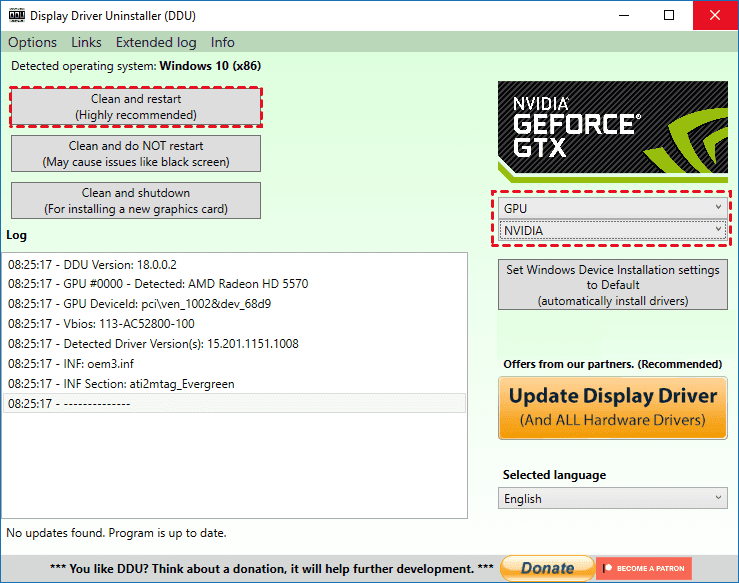
Step 3. After this process is completed, please do not install the Nvidia or AMD-specific driver again to prevent the error from recurring.
Way 18. Reinstall Windows
Reinstallation is the most effective way to fix various errors and problems and get your computer back to normal. If you have tried the above 17 methods in order and they are not working, you can choose to reinstall Windows 11 or Windows 10. The Kmode exception error usually occurs during the process of upgrading Windows 10 to Windows 11, so it is more recommended to reinstall Windows 10.
Step 1. Insert the Windows 10 installation disk and boot your computer.
Step 2. Set the language and input method>Install Now>Enter the product key (you can also skip it directly)>Select the version of Windows 10 you want to install>Accept the license terms>Select the Windows installation type, which can be customized according to your needs.
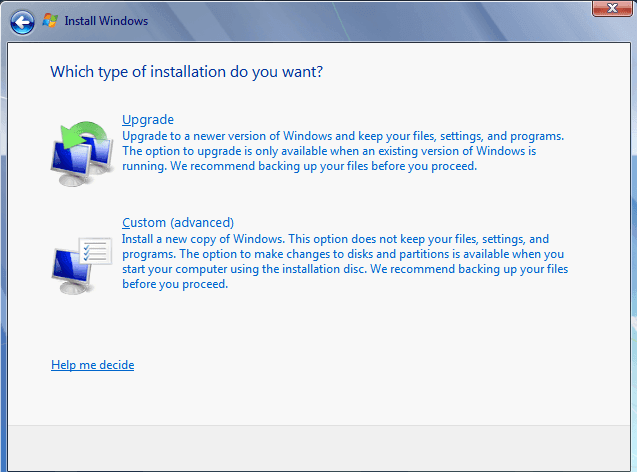
Step 3, Next, you need to select the disk you want to install Windows 10 system, tap Next, wait for the installation process to complete, and finally follow the prompts to set up and wait for Windows 10 to start, which will help fix the Kmode abnormal unprocessed boot loop error.
Backup Your System Regularly to Prevent All System Errors
It's necessary to backup system before fixing this problem, because the system reinstallation waste time and cause data loss. Besides, the operating system will easily accumulate a lot of system or disk errors after a long period of use, which is also likely to lead to blue screen crashes or system crashes.
Thus, it's suggested to make a habit of backing up your system on a regular basis, which will help to better protect it. The free backup software- AOMEI Backupper Standard can easily backup your system on regular basis to prevent all system errors.
If you encounter similar problems again, you can quickly restore the problematic system to a normal state by restoring the backup image file. It also has the advantages below.
- Multiple operating systems: AOMEI Backupper Standard works with Windows 11/10/8.1/8/7 and other system versions.
- Different destination locations: It allows you to backup your system to an external hard drive, other hard drives, USB drives and other devices for free.
- Schedule backup: You can set the fixed intervals to perform the scheduled backup, such as Daily, Weekly and Monthly.
- Incremental backup: You can enable the incremental backup method to improve backup efficiency and save storage space.
- Check Windows 11 upgrade conditions: This software provides you with a professional Windows 11 checker tool to make it easier for you to check the Windows 11 upgrade conditions.
Please note that if your system is stored in C drive, all the applications, files and personal data (photos, music, documents, etc) in C drive will be backed up along with the operating system during system backup. Then you can follow the graphic tutorial below.
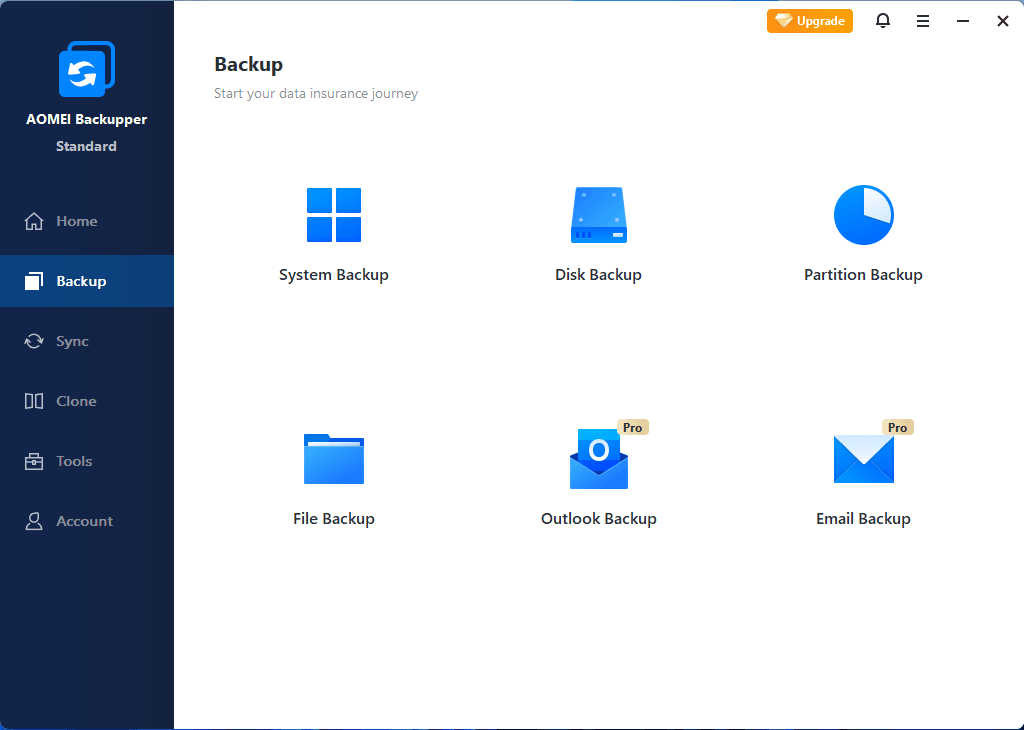
Step 1. Download AOMEI Backupper Standard, install and open it. Click Backup > System Backup.

Step 2. It will select Windows system partition and boot-related partitions automatically. Therefore, you just need to select a destination for your system image backup.

Step 3. Click Schedule Backup at the bottom. In the General tab, you can select Daily/Weekly/Monthly to backup your system regularly. After upgrading to Pro version, you can set event trigger and automatic backup system when USB is plugged in.

- Notes:✎...
- Options: Three features are included: comment, enable encrypted backups, and enable email notifications. The first feature facilitates you to better differentiate backup tasks, the second feature improves your backup security but requires an upgrade to the Pro version, and the third feature allows you to receive backup task completion in real-time.
- Backup Scheme: This allows you to change the backup method, including incremental backup, full backup and differential backup, of which incremental backup and differential backup can improve backup efficiency and save storage space, but the latter requires upgrading to the Pro version. If you upgrade to the Pro version, you can also enable the automatic clean backup feature to further save your computer storage space.
Step 4. Click Start Backup to backup your system.

In addition to system backup, AOMEI Backupper has other features that you may be interested in.
- When facing problems such as system crash or unbootable, you need to create bootable media to make sure your computer can boot safely before restoring it through the system backup image you created before.
- Once the system backup is complete, you can use the System Restore feature to quickly restore your system to its previous state, saving you more time than reinstalling it.
- You can further improve security by backing up your disk as an image file with the Disk Backup feature.
- If you upgrade to the Pro version, you can also use the System Clone feature to transfer your system to another hard drive intact and ensure that your computer boots safely.
Summary
How to fix Kmode exception not handled in Windows 11? You can try the 18 methods in the article in sequence to fix this error after understanding the causes. However, the operating system may experience a system blue screen or system crash after a long period of use, and reinstalling the system is a time-consuming and laborious solution.
Therefore, we recommend you to use AOMEI Backupper Standard to perform system backup regularly to prevent system errors such as blue screen crash and avoid data loss due to system reinstallation.
AOMEI Backupper Standard can provide free and professional system backup service, you just need to follow the above steps and you can easily create a system backup image to restore your system to a normal state when needed. In addition, the software also provides you with Disk Clone, Partition Clone, File Backup and other functions to protect your data.