Top 2 Ways to Fix Cannot Install or Upgrade to Windows 11
You will know the reasons you cannot install or upgrade to Windows 11 and how to fix it. You can also learn how to solve the system unbootable after installation failed. Please read on.
By Jonna Updated on August 28, 2025
Why Cannot Install or Upgrade to Windows 11?
“I just build a new pc and went to install windows 11 and it says that "This PC can't run windows 11" I am using an AMD Ryzen 9 5900x which seems plenty good enough to be able to install windows 11. Is there anything I can do to bypass this error?”
– David Vandiver
With the release of Windows 11 beta, many users want to download and install it to experience the new features. If you try installing Windows 11 Insider Preview but receive the error message "This PC can't run Windows 11". It is probably because your system doesn't have two security settings turned on: Secure Boot and TPM 2.0. These two features are already built into many modern computers and processing chips from Intel and AMD. So, let's read on to find the solutions.
Minimum Requirements of Windows 11
While not enabling TPM 2.0 and Secure Boot are the most common reasons, you can also check your system for other installation conditions based on the minimum requirements of Windows 11 installation.
- Processor: 1 gigahertz (GHz) or faster with 2 or more cores on a compatible 64-bit processor or System on a Chip (SoC)
- RAM: 4 gigabytes (GB)
- Storage: 64 GB or larger storage device
- System firmware: UEFI, Secure Boot capable
- TPM: Trusted Platform Module (TPM) version 2.0
- Graphics card: Compatible with DirectX 12 or later with WDDM 2.0 driver
- Display: High definition (720p) display that is greater than 9” diagonally, 8 bits per color channel
- Internet connection and Microsoft accounts: Internet connectivity is necessary to perform updates and to download and use some features. Windows 11 Home edition requires internet connectivity and a Microsoft account to complete the device setup on first use.
Best free Windows backup software to prevent PC data loss before you install or upgrade to Windows 11.
How to Fix Cannot Install or Upgrade to Windows 11
Next, this article will show you how to enable Secure Boot and TPM 2.0 to solve the problem you cannot install or upgrade to Windows 11. You can follow the graphic tutorials provided in the article to operate by yourself.
Fix 1: Enable Secure Boot
Secure Boot can stop malware from launching when you boot your computer. When Secure Boot is enabled, only drivers with Microsoft certification will be loaded. To enhance the security of the system, Windows 11 requires Secure Boot to be enabled on your system to run the latest version. If Secure Boot is not enabled, you cannot install or upgrade to Windows 11. You can follow the graphic tutorial below to enable Secure Boot.
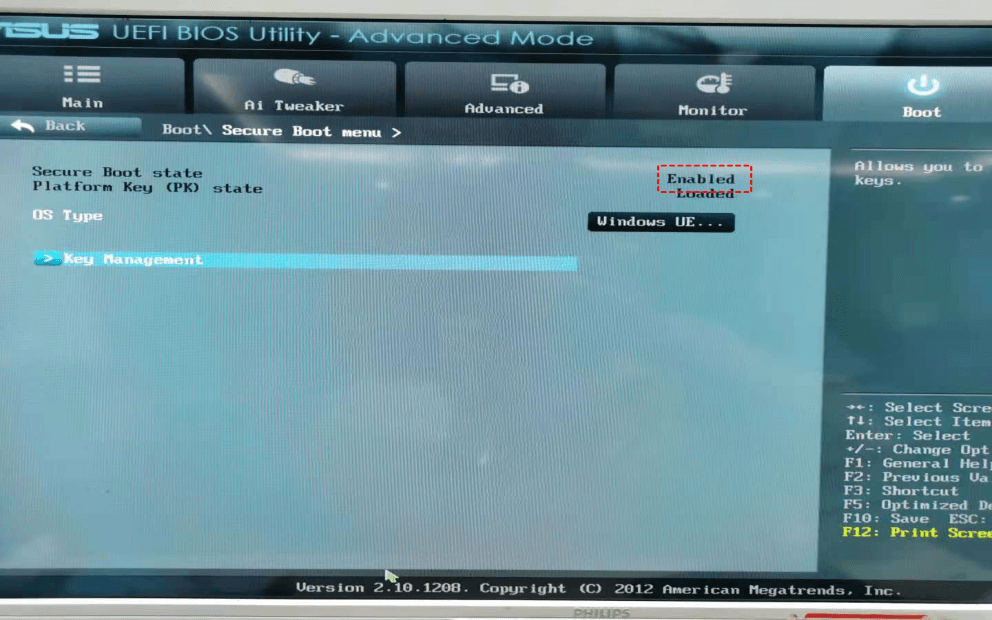
Step 1. Restart the computer and press Del (keys are different depending on the computer host) to enter the BIOS, click Boot > Secure Boot.
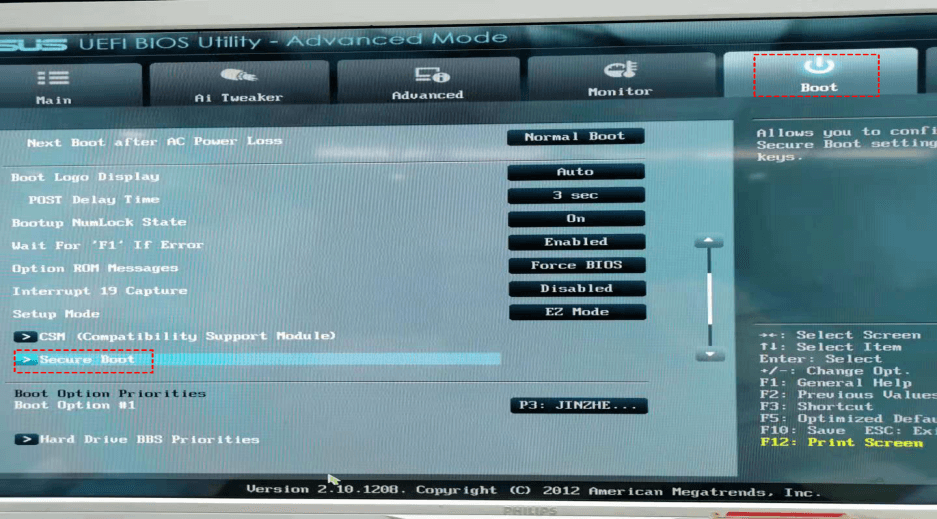
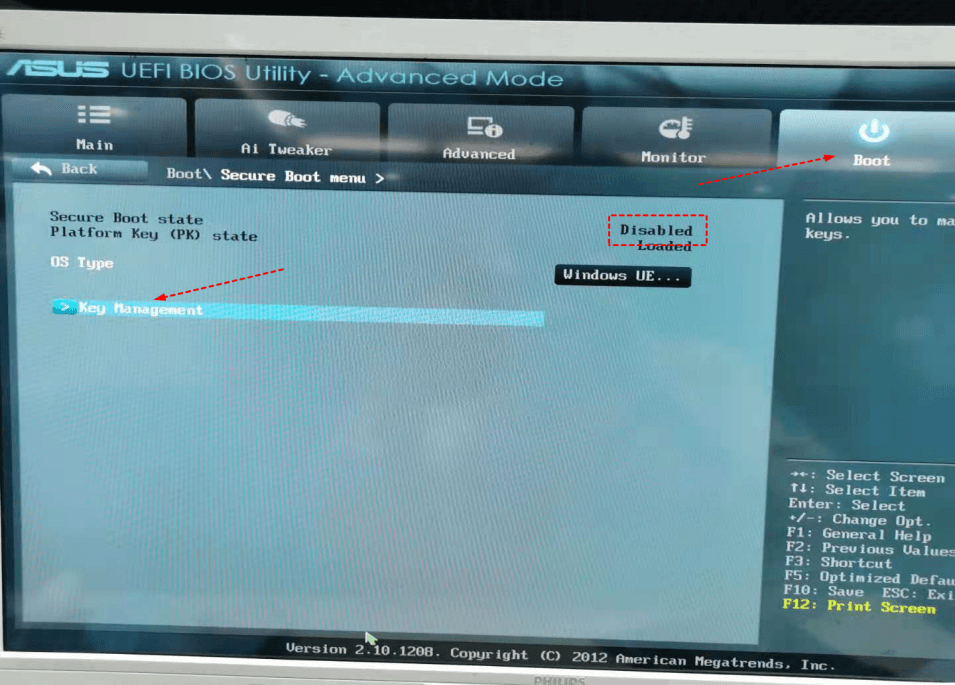
Step 2. You can see the Secure Boot is disabled, and select Key Management.
Step 3. Choose Install default Secure Boot keys to enable secure boot.
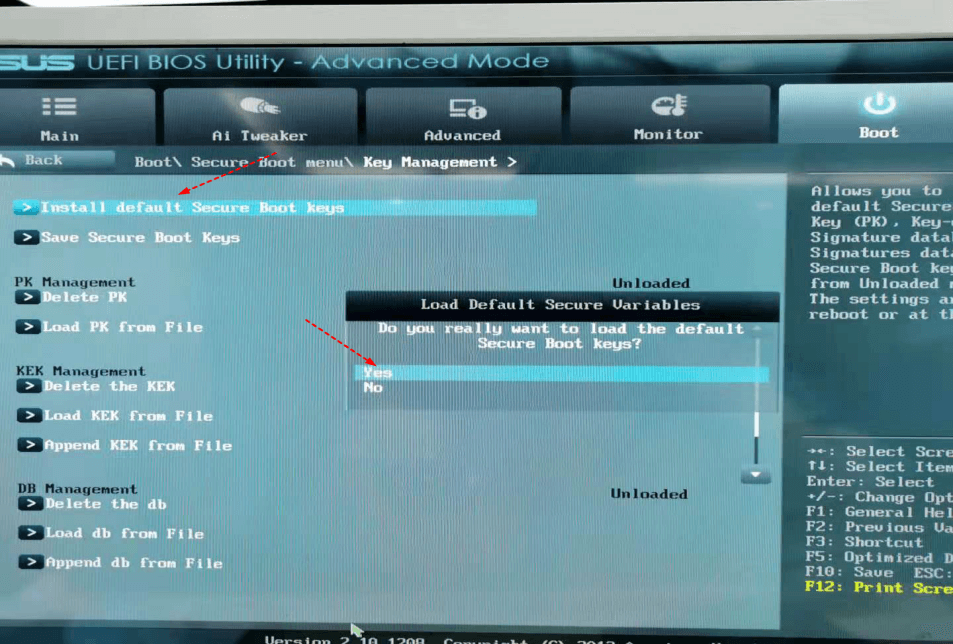
Step 4. Return to the previous column. And you will see the Secure Boot has been enabled.
Fix 2: Enable TPM 2.0
TPM is a computer chip that provides a system with hardware-based security functionalities. The hardware limitation is that it requires CPU and BIOS/UEFI firmware support. And if you don’t enable TPM 2.0, you will meet the situation cannot install or upgrade to Windows 11. Below are the graphic tutorial to check TPM on your computer and enable TPM 2.0 in BIOS.
How to Check the TPM 2.0 on Your Computer
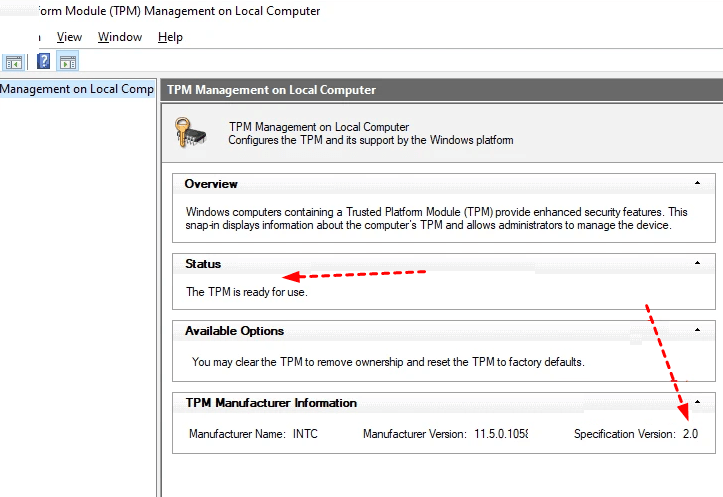
Step 1. Press Win+R together to open the Run window, then type tpm.msc and click OK.

Step 2. You will see the TPM management window. If the Status is The TPM is ready for use, it means the TPM is enabled. You can verify its version for the TPM manufacturer information.
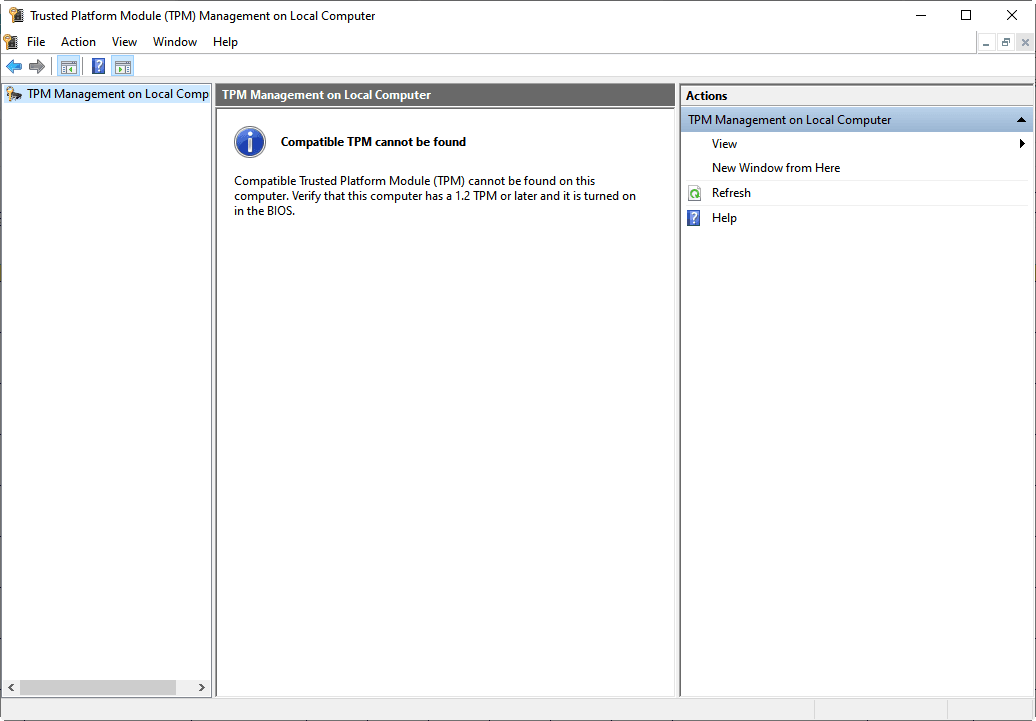
Step 3. If the TPM version is compatible but disabled, the computer will prompt Compatible TPM can’t be found. Then you can follow the steps in the next part to turn it on in the BIOS.
How to Enable TPM2.0 in BIOS
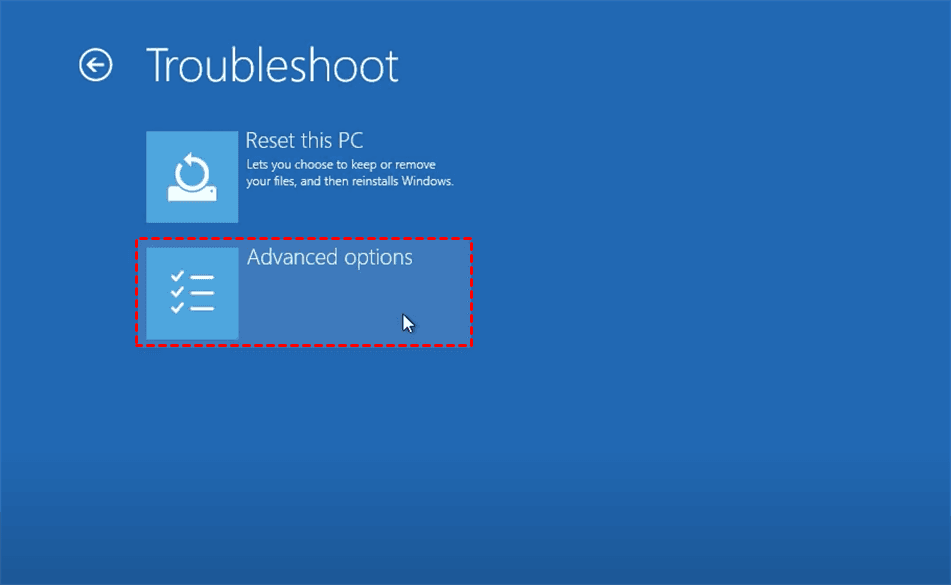
Step 1. To quickly access the Windows Advanced Options menu, please press the Shift key while clicking Power > Restart to enter the boot page, and then select Troubleshoot.
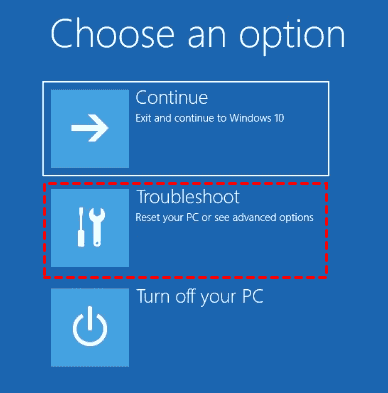
Step 2. Choose Advanced Options.
Step 3. Choose UEFI Firmware Settings to enter the BIOS.
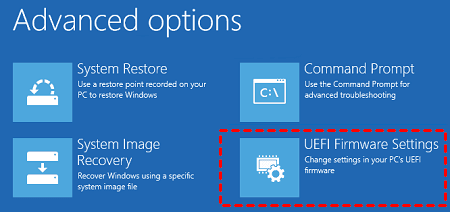
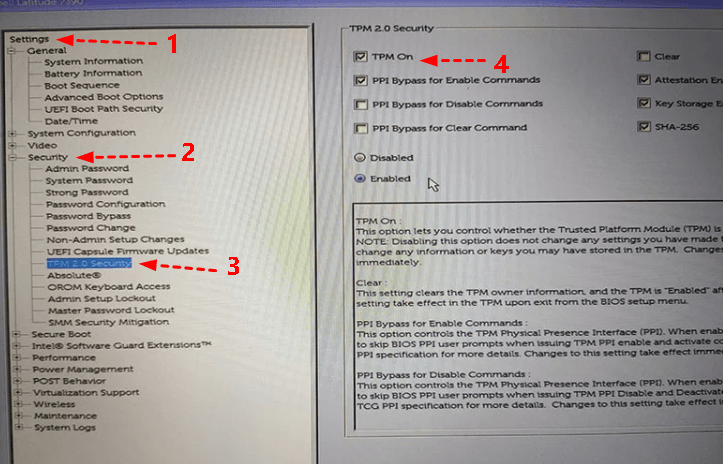
Step 4. Click Settings > Security > TPM 2.0 Security, then tick the TPM On option.
How to Solve System Unbootable due to Cannot Install or Upgrade to Windows 11
When you are installing or upgrading to Windows 11, if you make a mistake or encounter other problems that cause your system can't boot, then you can use this next method to help you restore to the previous system. You can create a system image on another functional PC using AOMEI Backupper Professional and restore the system image to the failed computer.

-
All-in-One Tool: AOMEI Backupper offers comprehensive features to handle backup, restore, and cloning needs for various user requirements.
-
Multiple Backup Types: Offers flexibility with file backup, system backup, disk backup, partition backup, etc, enabling users to back up any data they need.
-
Safe and Reliable: Ensures data safety and reliability during backups, restores, and cloning processes, making it a trusted choice for users.
-
Bootable Media for System Recovery: Allows creating bootable media to restore a crashed system by booting into WinPE and performing normal restoration tasks.
-
Universal Restore: Facilitates instant recovery of a crashed system to different hardware, ensuring compatibility and reduced downtime.
It can also help you in the following aspects:
- Migrate the system to a machine with dissimilar hardware installed.
- Real-to-virtual and virtual-to-real computer migration for system recovery, as well as testing and other purposes.
- Don't need a system reinstallation if you change the hardware on the computer.
Then you can follow the steps below to solve the system unbootable with AOMEI Backupper Professional.
Part 1. Make a System Image File
Download AOMEI Backupper Professional, install and launch it. Click Backup > System Backup, and select a target location, then click Start Backup.

Part 2. Create a Bootable Media
Go back to the homepage of the software. Click Tools > Create Bootable Media. Then, follow the instructions to create bootable USB or CD/DVD.

Part 3. Restore Backup to Unbootable Computer with Bootable Media
Step 1. Click Home > Restore > Select image to restore to navigate manually to the image file location.
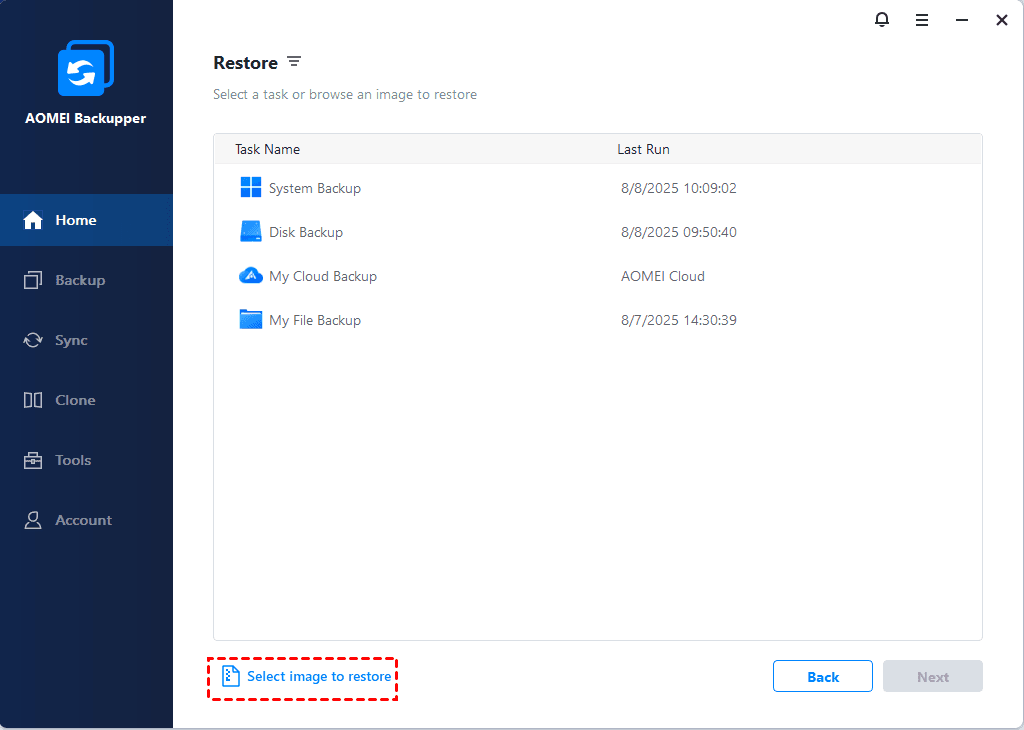
Step 2. Select Restore this system backup, then click Next.
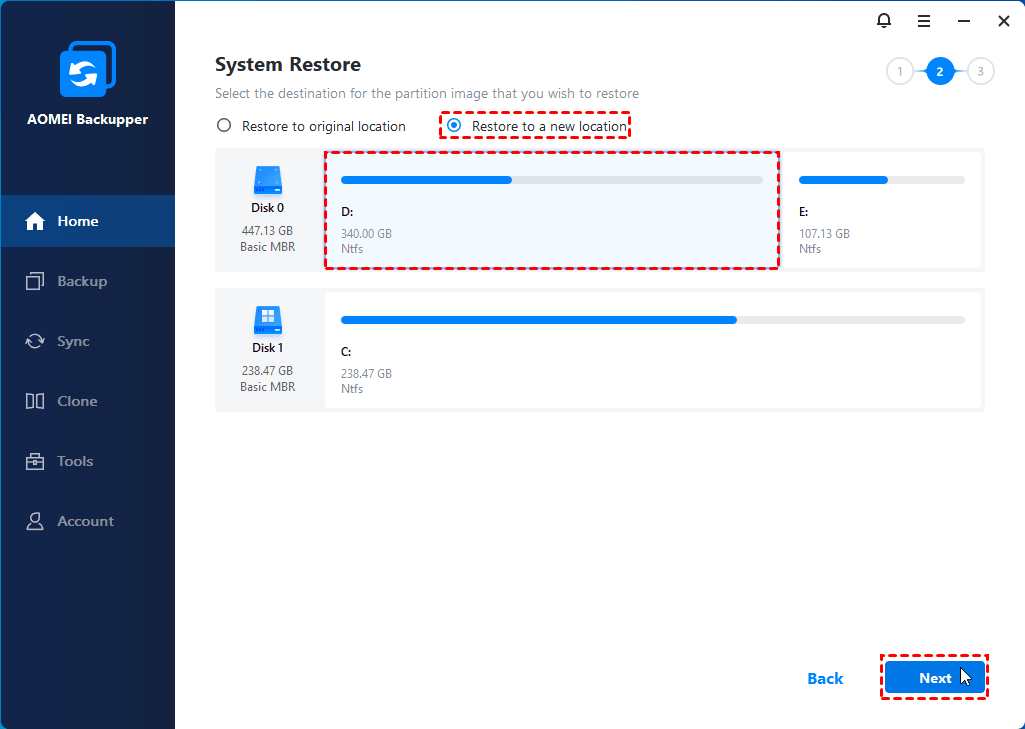
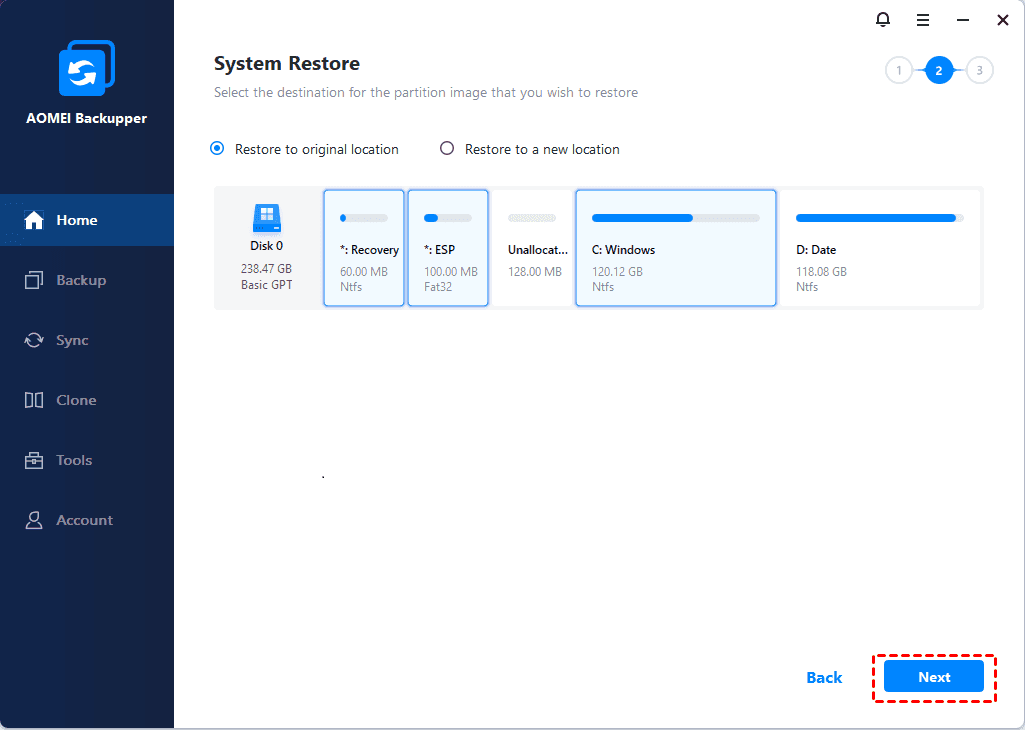
Step 3. Select the destination to save the system image. You can choose between the original location and a new location.
Step 4. Tick Universal Restore so that you can restore the system backup to another computer successfully without boot issue, and click Start Restore.
![]()
- Notes:✎...
- Edit Partitions: This feature allows you to change the partition size automatically or manually.
- SSD Alignment: It will accelerate the reading and writing speed of your SSD.
Summary
This article shows you how to fix if you cannot install or upgrade to Windows 11 by enabling Secure This Boot and TPM 2.0. If you can't boot your system due to improper operation during the upgrade or installation process, you can use AOMEI Backupper Professional to create a bootable disk and make a system backup, then restore it so that you can boot the faulty computer into WinPE and perform a system restore as normal.
If you want to protect the unlimited computers of your company, AOMEI Backupper Technician is your best choice. With the inbuilt AOMEI Image Deploy tool, you can deploy or restore the system image file on a server computer to multiple client computers easily.

