This PC Can't Run Windows 11 | How to Fix or Bypass it
Many users receive “This PC can't run Windows 11” when they try to install it, or check if their computer is compatible. Why does this happen and how to fix it?
By Delia Updated on September 5, 2025
Can your PC run Windows 11?
As the successor to Windows 10, Windows 11 offers radical changes to the user interface as well as many innovative features designed to support the current hybrid work environment and improve user productivity.
As for the upgrade, Windows Update optimizes the update engine in Windows 11, and the cumulative update package will be 40% smaller than Windows 10. Microsoft also provides free upgrades for Windows 10 users.
However, not every computer is eligible for the upgrade - you need to meet the minimum system requirements for Windows 11, otherwise you may receive "This PC can't run Windows 11" while installing.
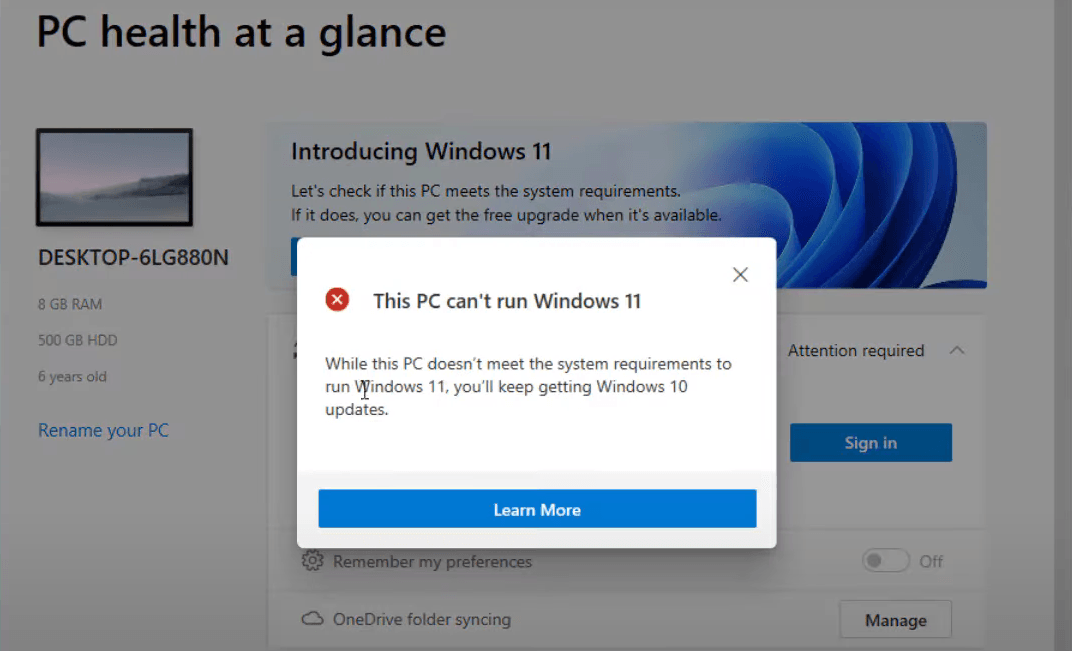
To visually check if your PC is ready, you can run the official PC Health Check. It lets you know in advance whether your computer is compatible. But if it returns "❌This PC can't run Windows 11," what can you do to fix it?
Why can't your PC run Windows 11 and how to solve it
If you receive “This PC Can’t Run Windows 11” prompt, as PC Health Check's full message says, it's most likely that your computer is not meeting the minimum system requirements. You can refer to the following table:
|
✔ Processor |
1 gigahertz (GHz) or faster with 2 or more cores on a compatible 64-bit processor or System on a Chip (SoC). |
|
✔ RAM |
4 gigabyte (GB). |
|
✔ Storage |
64 GB or larger storage device Note: See below under “More information on storage space to keep Windows 11 up-to-date” for more details. |
|
✔ System firmware |
UEFI, Secure Boot capable. Check here for information on how your PC might be able to meet this requirement. |
|
✔ TPM |
Trusted Platform Module (TPM) version 2.0. Check here for instructions on how your PC might be enabled to meet this requirement. |
|
✔ Graphics card |
Compatible with DirectX 12 or later with WDDM 2.0 driver. |
|
✔ Display |
High definition (720p) display that is greater than 9” diagonally, 8 bits per colour channel. |
|
✔ Internet connection and Microsoft account |
Windows 11 Home edition requires internet connectivity and a Microsoft account. |
Most of these requirements are not much different than Windows 10 and most computers can meet them. What really make the upgrade problem tricky are the requirements for UEFI, Secure Boot and TPM 2.0.
*If the PC Health Check app doesn’t give you exact results, you still don't know where to start, then have a try on the compatibility check tool WhyNotWin11.
How to solve "This PC can't run Windows 11"
To fix “This PC can't run Windows 11”, you need to determine which one of the minimum requirements your computer doesn't meet.
This article will mainly focus on the Secure Boot and TPM 2.0 issues, as they appear to be the most common. Try following methods to check and enable them so that your PC can run Windows 11 successfully.
1. This pc can’t run Windows 11 the pc must support secure boot
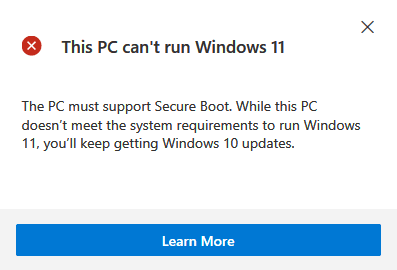
Secure Boot is a UEFI-enabled security feature required by Windows 11 install. It ensures only trusted and signed operating systems can boot on the system.
To enable Secure Boot so as to install Windows 11, your system needs to support UEFI. And even if your system supports UEFI, you may still need to enable Secure Boot manually.
Before you make any changes, you can check the status of Secure Boot on your computer.
How to check Secure Boot status
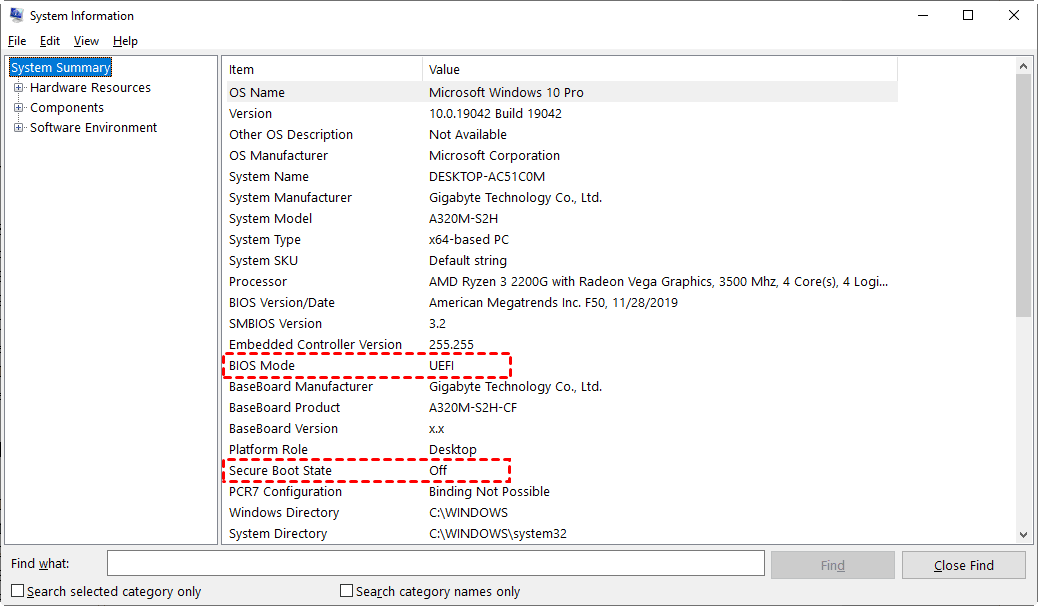
1. Press Win + R to open Run window, enter “msinfo32” in the textbox and hit Enter.
2. This will call up System Information. Then you can find “Secure Boot State” under System Summary. If it shows On, it is enabled already; If it reads Off, it's disabled or not available, and you can continue to check "BIOS Mode".
3. Then, if the BIOS Mode is UEFI, you can enable Secure Boot manually. If it is reads Legacy (BIOS), you need to switch to UEFI first.
How to enable Secure Boot mode with UEFI
If you have a UEFI boot system and simply need to enable Secure Boot, follow the steps below.
1. Navigate to Start > Settings > Update & Security > Recovery.
2. Select Restart now under Advanced startup section.

3. Then the computer will boot into Windows 10 recovery environment. Choose Troubleshoot > Advanced options > UEFI Firmware settings.
Note: If you have a legacy BIOS, the option will not be available.
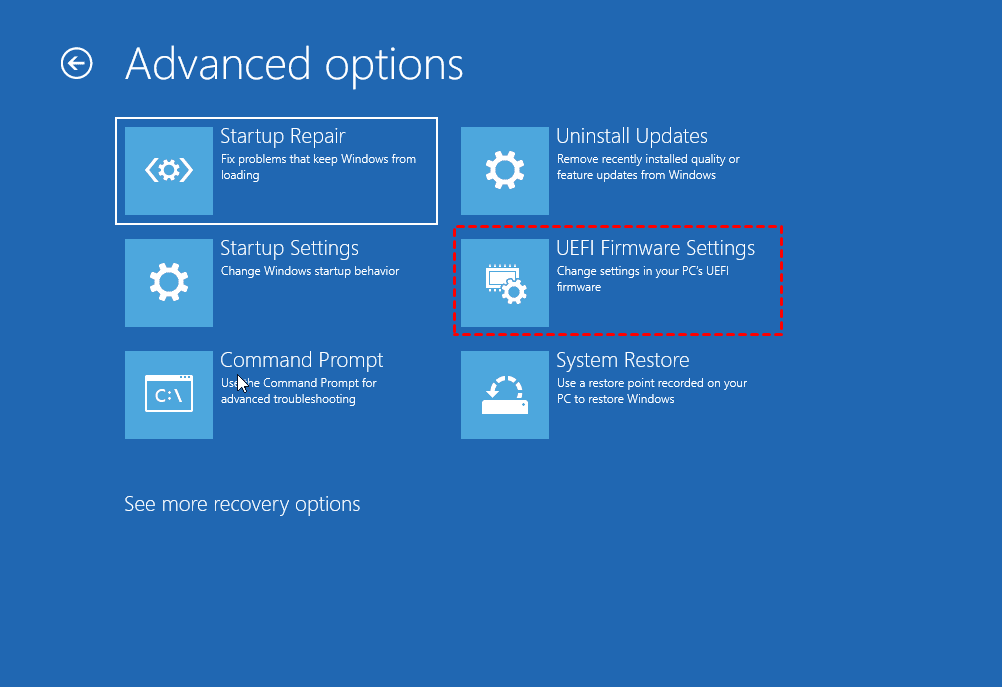
4. In UEFI settings, you can go to Boot or Security tab, select Secure Boot and make it Enabled.
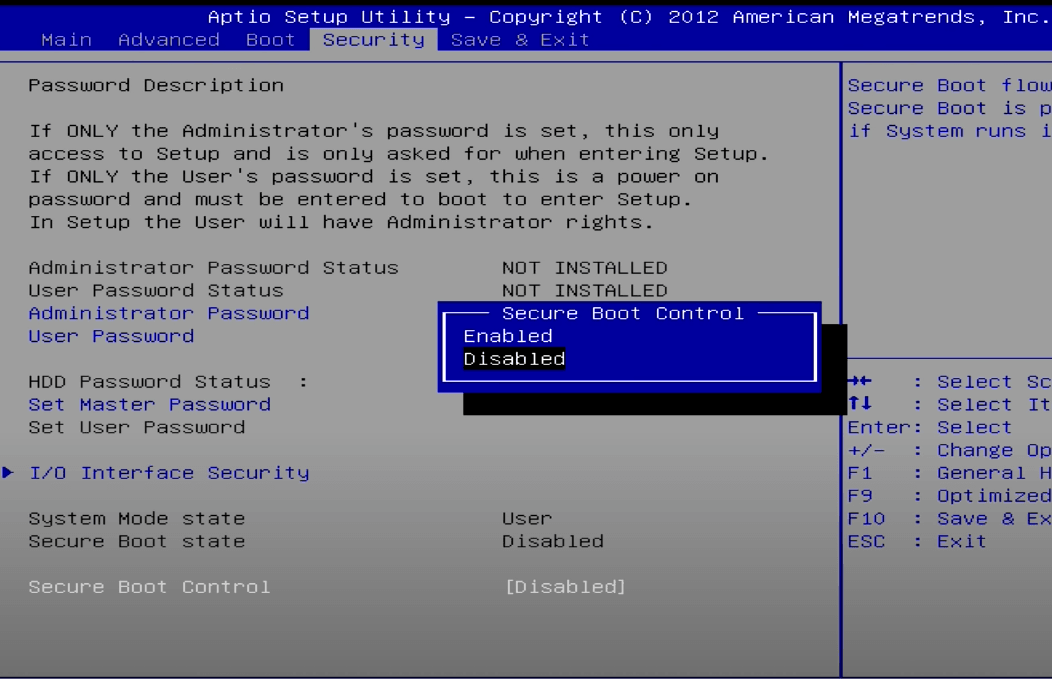
5. Press F10 to save the settings and exit. Then the computer should reboot into Windows with Secure Boot enabled.
Tip: You can also access UEFI from boot, just press the required key during startup (like F2, F10, or DEL). The specific key depends on manufacturer, if you are not sure, please refer to the user manual or search for the PC model on Internet.
If you have legacy BIOS: convert MBR to GPT and switch from BIOS to UEFI
UEFI and Secure Boot requires GPT disk. So if you have a legacy boot system, please first check the disk type.
1. Search for “disk management” in the search bar, then in the pop-up window, you can right-click the system disk and check the partition style in Volumes tab.
2. If it’s a MBR disk, then you need to covert it first. Please read convert MBR to GPT to switch from BIOS to UEFI.
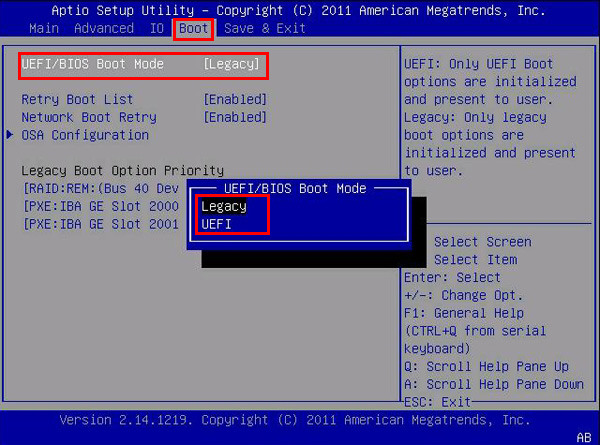
3. Now that you are using GPT partition style that supports UEFI, it’s time to access the motherboard’s firmware and change legacy BIOS into UEFI.
4. As mentioned earlier, you can press the specific key (depends on manufacturer) during startup, and enable the UEFI option under Boot menu.
2. This PC can’t run Windows 11 TPM 2.0 is a requirement for running Windows 11
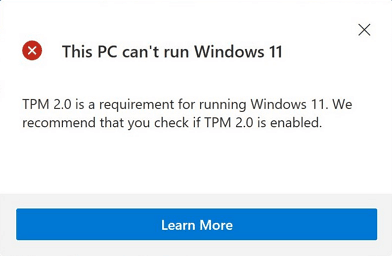
Windows 11 upgrade requires Trusted Platform Module (TPM) version 2.0, which is a security module soldered to the motherboard in the form of a chip. It supports many security features of Windows 11, like Measured Boot, Windows Hello, WD System Guard, etc. When you run Windows 11 without the TPM chip, you may not be able to access these features and are at some risk.
If your PC does not have a compatible TPM 2.0 module, you might face difficulties running Windows 11. To address this issue, you can do the following things.
Check whether your PC's hardware supports TPM 2.0
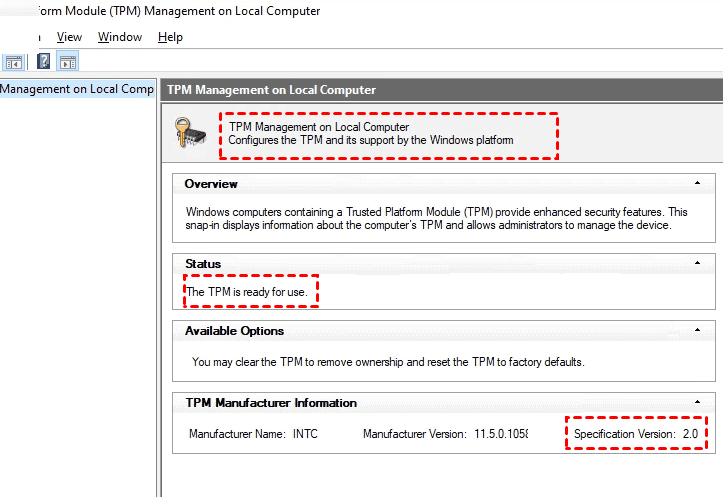
To check the TPM information on your PC, press Win + R, type “tpm.msc” in the textox and press Enter. If it’s in use and the version is 2.0, there’s no problem.
But if the version is lower than 2.0, or it says “Compatible TPM cannot be found”, then you are not allowed to upgraded to Windows 11. And there are 2 possibilities:
👉One is that Windows cannot detect the TPM module, but in fact your CPU has an integrated TPM 2.0 module inside. The system does not recognize it just because the default BIOS settings do not enable the fTPM function.
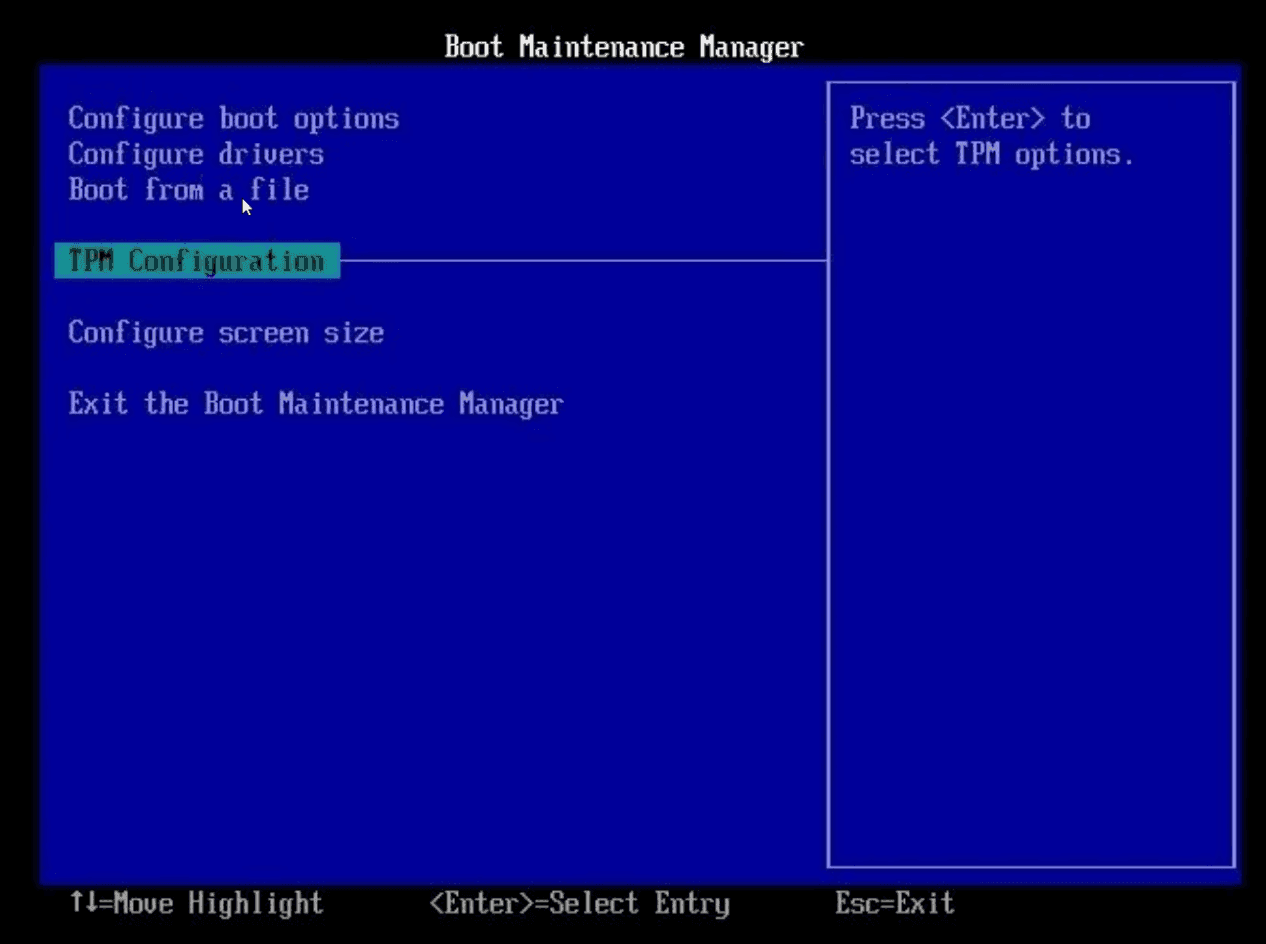
This is commonly seen in Intel or AMD models of the last four generations, that is, the 11th, 10th, 9th, 8th generation Core, or Raider 5000, 4000, 3000, and 2000 series. And in this case, you can press the specific key (depending on the manufacturer and computer model) to enter the BIOS screen during boot-up, and enable the TPM feature (generally referred to as Trust Computing in BIOS).
👉Another situation is that your computer indeed does not support TPM, which means it is not ready for Windows 11 upgrade. But if you still want to install Windows 11 without TPM 2.0, you can bypass it with some registry entries (see the following method). Before that, please consider the riskiness of this move and the possibility of Windows 11 disabling this approach in the future.
Bypass secure boot and TPM check on unsupported computers
A computer with old or weak hardware may not be eligible for Windows 11 upgrade. If you truly want to try the new system and don't plan to replace your device for now, you can also try to bypass the secure boot and TPM 2.0 check, and install Windows 11 on an unsupported computer.
📢Note:
▪ Windows 11 will run in "unsupported state" this way, which may cause you to miss important security fixes and Windows updates. So it‘s generally not recommended to do so.
▪ In case you make a wrong change to the registry and cause some serious consequences, it’s recommended to backup the registry first.
If you still want to have try, here’s a step-by-step guide.
1. Press Win + R to open the Run window, enter “regedit” and hit OK.
Tips: If you are in the progress of installing and encounter the “This PC can’t run Windows 11” error, you can press Shift + F10 to call up Command Prompt, and run “regedit” to open the registry.
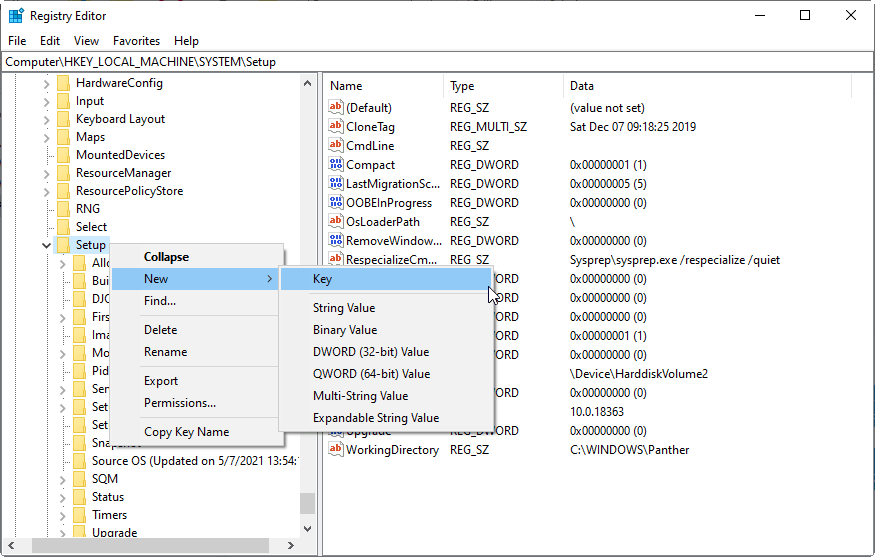
2. In the popping out Registry Editor, navigate to Computer\HKEY_LOCAL_MACHINE\SYSTEM\Setup, right-click on the Setup folder to create a new key, and name it as “LabConfig”.
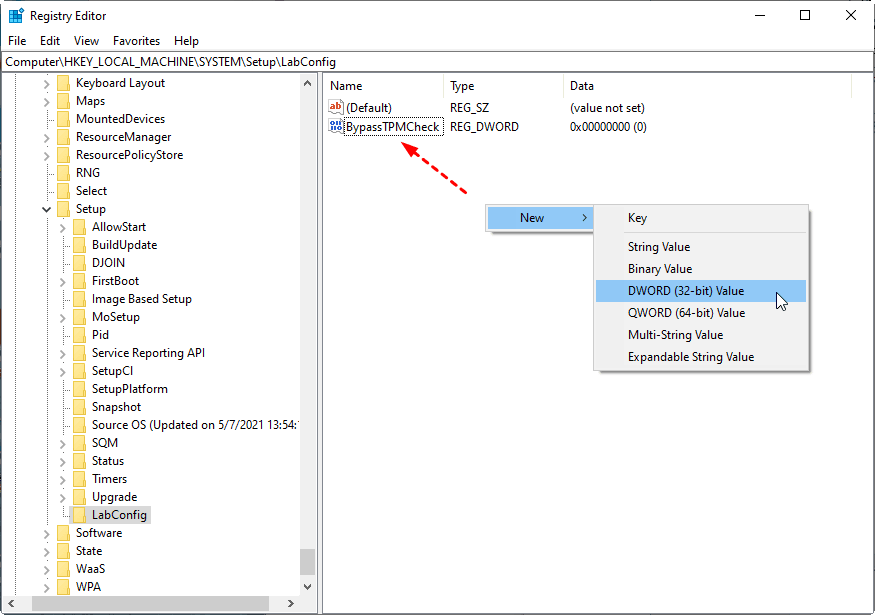
3. Under the new key, right-click the blank are to create a new DWORD (32-bit) Value and name it as “BypassTPMCheck”.
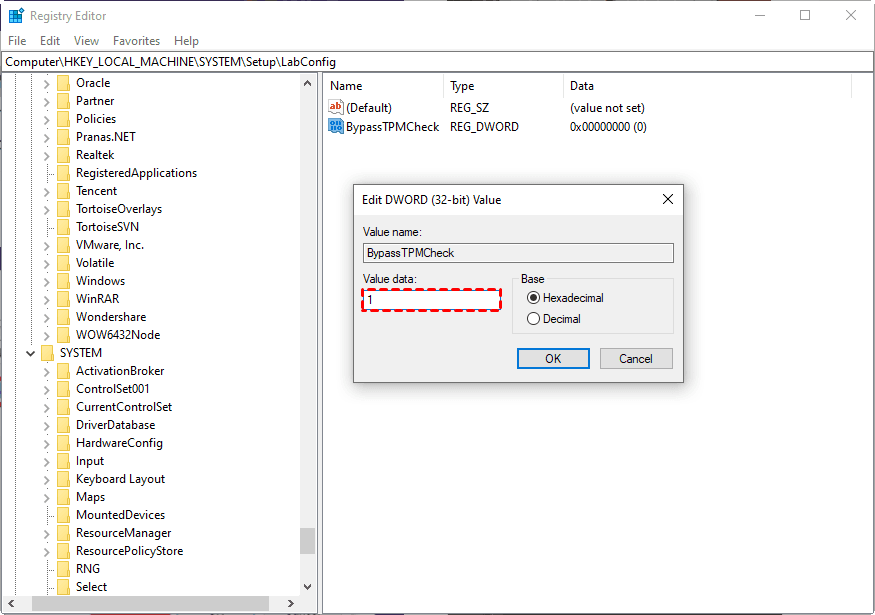
4. Double-click it and change the Value data into 1, then hit OK.
5. Create another DWORD in the same way, and give it a name “BypassRAMCheck”. Again, change its Value data into 1 and click OK.

6. Similarly, create a DWORD as “SecureBootCheck” and change its Value data into 1.
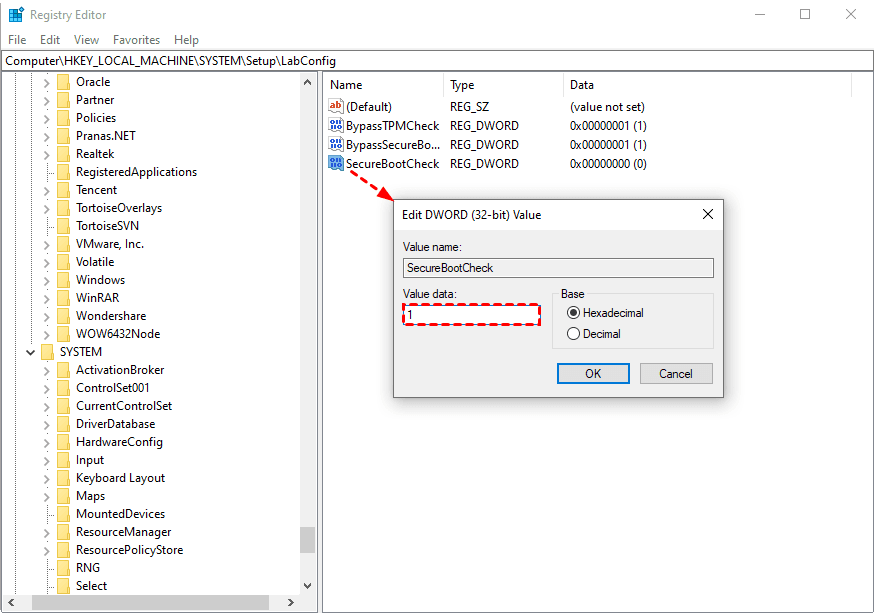
After these changes, you can exit and go backup to try installing Windows 11.
Restore Windows 11 to your PC without secure boot or TPM 2.0
If you don't want to try the above methods, then there is a lazy solution, that is, create a system backup on another computer that has successfully installed Windows 11, and then restore it to the computer you want to upgrade. This way, you can skip the installation process and resolve the “This PC can’t run Windows 11” error.
This process requires the use of AOMEI Backupper Professional. It’s a handy and comprehensive backup & restore software that supports OS including Windows 11/10/8.1/8/7 and data types including files & folders, partitions, system, disk.
When it comes to restoration, there’s a Universal Restore option, which is the key point to restore a system image created on another computer with different hardware.
*If the source computer and the target computer have the same hardware, then you don’t have to use this feature, and the completely free Standard edition is enough.
How to make a system image of Windows 11:
1. Download this software and install it on the computer running Windows 11.
2. Launch the software, go to Backup tab, and choose System Backup. All the system-related partitions required by Windows to run will be auto-selected.

3. Specify a target path for the Windows 11 system image. For an easier migration, you can save it to a removable device. Then, click Start Backup.

✍Tips: If the PC you want to upgrade won't boot (or you're worried about it going wrong), you can go to the Tools tab and create a bootable media on the Windows 11 computer.
How to restore Windows 11 system to Windows 10 computer:
After the backup is complete, you can install AOMEI Backupper on the computer you want to upgrade, and connect the device with the system image you created.
*It’s suggested to backup Windows 10 before upgrading to Windows 11. Thus even if the operation fails, or you are not satisfied with the new OS, you can easily revert to the previous version.
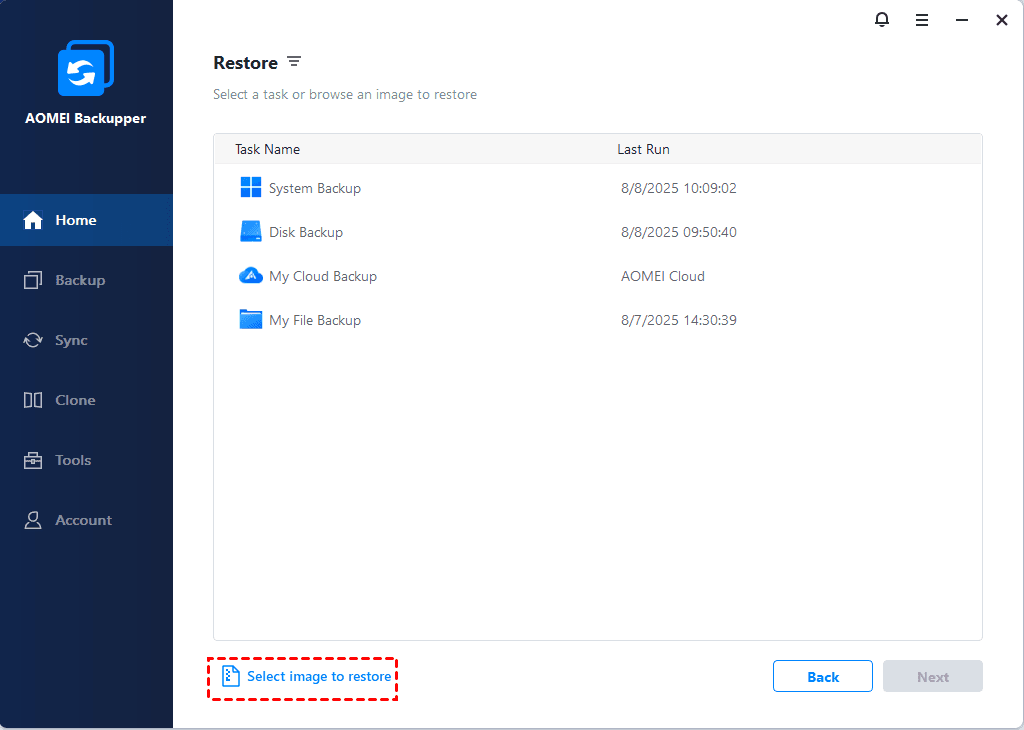
1. Launch the software, go to Home > Restore and choose Select image to restore to locate the system image.
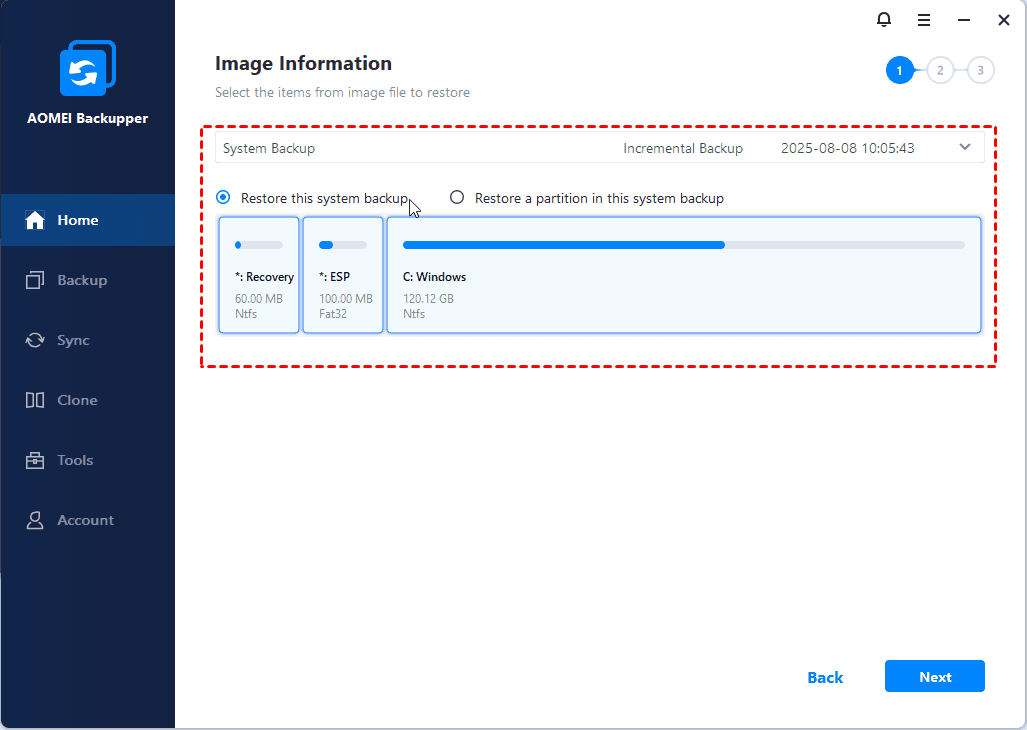
2. Select Restore this system backup and click Next to continue.
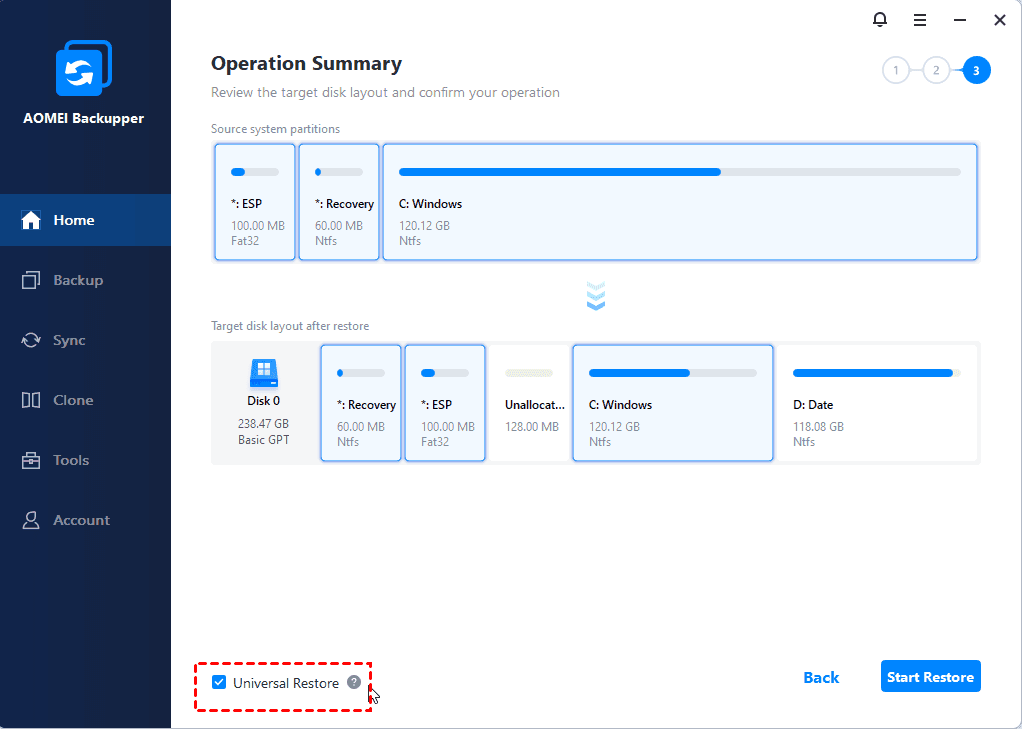
3. Choose Restore to a new location to select the target path to receive the system image and click Next to view the Operation Summary.
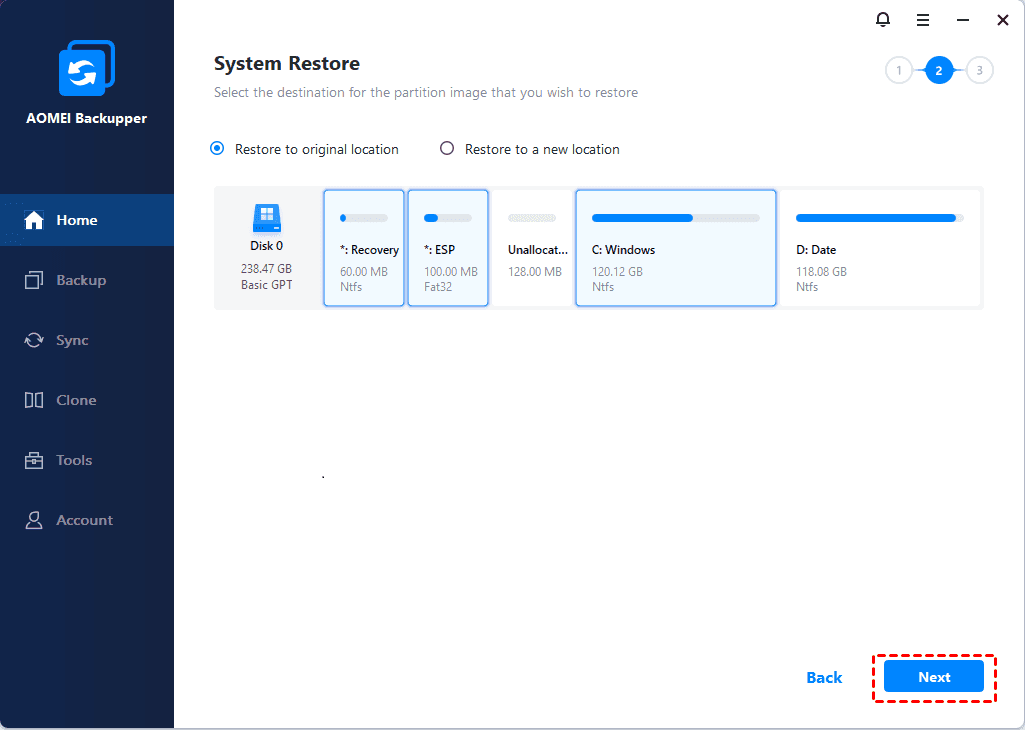
4. In this page, check your operation, and tick Universal Restore to make sure the computer can boot after restoration. Then click Start Restore.
After restoration, the Windows 11 system image should have been restored successfully. You can reboot the PC to check if it can start with Windows 11. If you don’t like the interface or performance of the new OS, you can also return Windows 11 to Windows 10 with the previously made system image.
Conclusion
As a brand new and much changed operating system, many users are curious about Windows 11 and want to find out what it is all about. However, due to the existence of minimum system requirements, many users have received “This PC can’t run Windows” prompt, and the most common reason for this is the lack of secure boot or TPM 2.0.
This article describes how to fix or bypass these issues to successfully install Windows 11. If you want to save yourself some trouble, you can consider using AOMEI Backupper to restore the system image to your computer from a computer that already has Windows 11 installed. In daily use, you can also use this tool for Windows 11 automatic backup.
In addition to backup and restore, this software is also very professional when it comes to cloning, which means that if you want to change your hard drive later, you can also simply use it to migrate Windows 11 to a new SSD.

