How to Clean Install Windows 11 without TPM and Secure Boot Easily
You'll learn the steps to easily clean install Windows 11 without TPM and Secure Boot. And how to protect your Windows 11. Please read for more details.
By Jonna Updated on December 21, 2023
Why Windows 11 Installation Has Failed?
After the launch of Windows 11, many Windows users want to upgrade to Windows 11 to experience it. However, some users have received the following error message "This PC can’t run Windows 11" or "This PC doesn't currently meet Windows 11 system requirements" when trying to install Windows 11. Mostly, your Windows 11 installation failed because your computer does not support TPM 2.0 and Secure Boot.
So, what should you do if you don't have TPM 2.0 and Secure Boot? In this article, we will show you how to clean install Windows 11 without TPM 2.0 and Secure Boot.
![]()
What are TPM and Secure Boot?
TPM (Trusted Platform Module) is a security module that is normally soldered as a chip onto the motherboard. It functions as a cryptographic processor, creating hashes and storing cryptographic keys, biometric data, user data, and other data using a hardware-based approach.
Secure Boot is one feature of the latest UEFI. The feature defines an entirely new interface between the operating system and firmware/BIOS. When enabled and fully configured, Secure Boot helps a computer resist attacks and infection from malware.
How to Clean Install Windows 11 without TPM and Secure Boot
According to the minimum requirements of installing Windows 11, the computer needs to support TPM and Secure Boot. If you are in UEFI BIOS mode, you can easily enable the two options. But if you are in Legacy Windows 11 mode, there is no way to do that. So we need to modify some registry key values on the Windows PC to clean install Windows 11 without Secure Boot and TPM 2.0. You can follow the tutorial below to bypass TPM and Secure Boot checks when Windows 11 no tpm available.
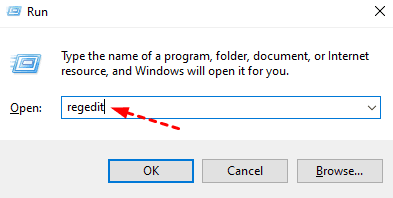
Step 1. Press win+R to open the Run interface, and type regedit to open the registry.
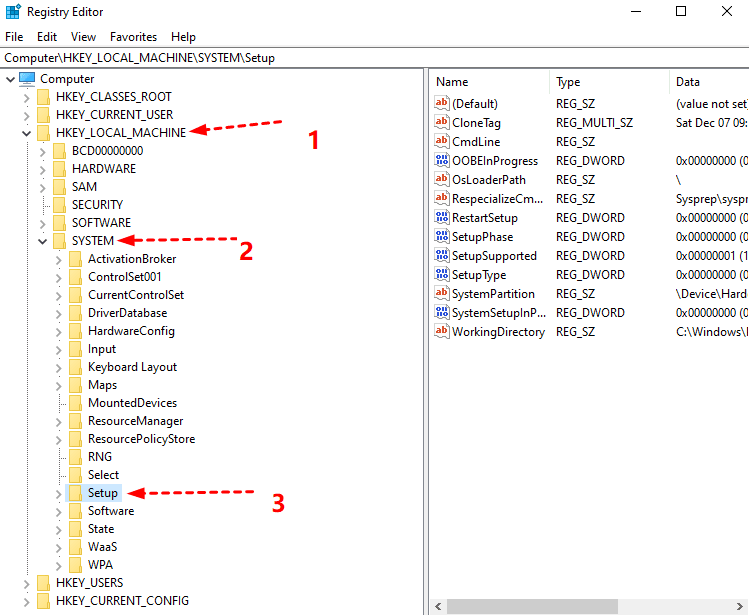
Step 2. In the Registry Editor window, navigate to the following directory.
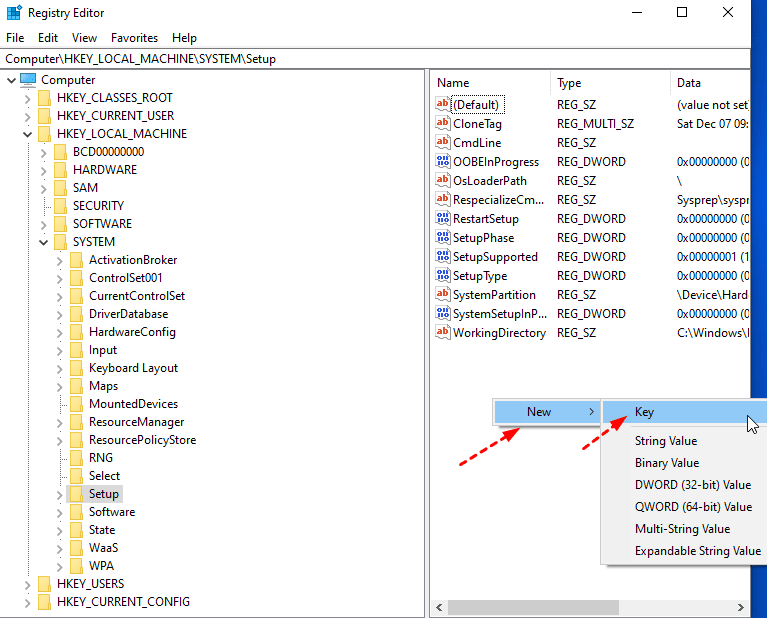
Step 3. Right-click on the blank space on the right, select New, and then select Key. A new registry key will be added on the left side of the editor. Please be sure to name it LabConfig.
Step 4. Under the LabConfig key, right-click the blank space to create two DWORD (32-bit) Value options to create new DWORD value.
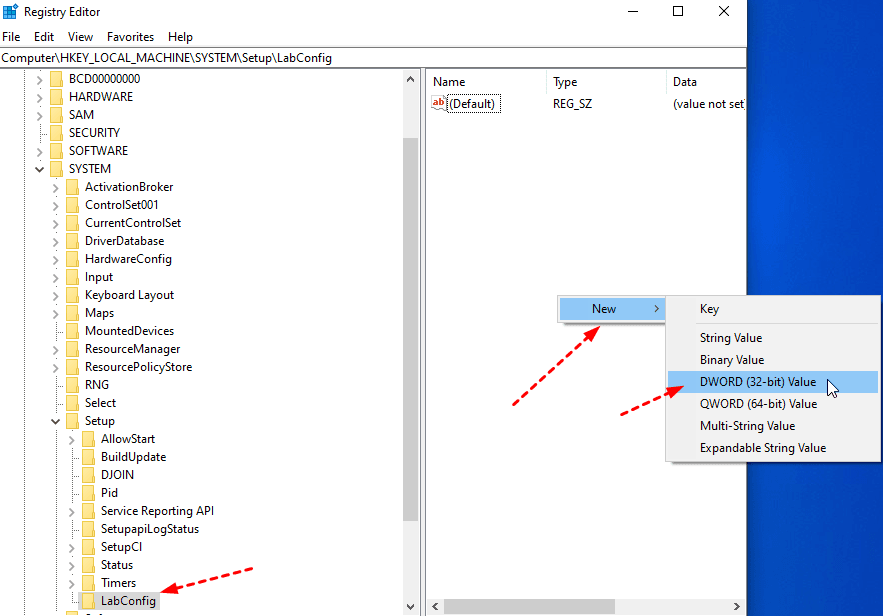
Step 5. Name them BypassTPMCheck and BypassSecureBootCheck respectively.
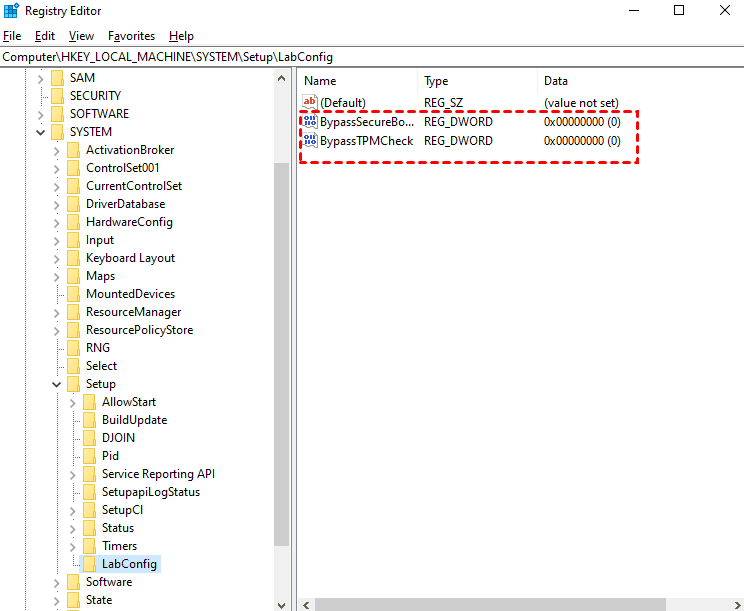
Step 6. Then double-click the two DWORD and edit their Value Data field to 1 respectively to let Windows 11 bypass TPM and Secure Boot checks.

When finished, close the registry editor window and then restart the computer. Then, you can try to run the Windows 11 setup using the Windows 11 ISO or a Windows 11 bootable USB on your Windows PC. And now, it will bypass TPM in Windows 11 installation check so that you can clean upgrade Windows 11 without TPM 2.0 and Secure Boot.
Backup Windows 11 to Protect Your Data after Installation
After you successfully upgrade Windows 11 without Secure Boot and TPM, we recommend you backup your new system. If your computer won't boot or encounter other problems, you can use this system backup to restore your Windows 11 and then use it normally. It will protect your data to the maximum extent.
You can choose free professional backup software to help you, such as AOMEI Backupper Standard, which supports multiple backup solutions, including system backup, disk backup, file backup, and partition backup. It also has the following advantages:
- You can choose different backup modes (intelligent sector backup or exact backup) and various compression levels (high/normal/low).
- You can write comments to your backups and set up email notifications.
- This software supports two backup services, VSS and AOMEI Backupper service. When Windows VSS doesn't work, the other service can ensure you can make backups properly.
- It supports schedule backup, you can set the fixed intervals with your backup, such as daily, weekly, and monthly.
- It offers incremental backup and differential backup to only backup the changed parts so that it can help you save disk space and backup faster. (Differential backup is available in the Pro version)
- The software supports multiple storage paths such as local disk, HDD, SSD, external USB, etc.
- It has great compatibility with the operating system (Windows 7, 8, 8.1, 10, 11, etc.)
And you can easily back up your Windows 11 system in just a few steps.
Step 1. Download AOMEI Backupper Standard, install and open it. Click Backup > System Backup.

Step 2. It will automatically select the system disk and other partitions needed for booting. And you need to select a destination.

Step 3. Confirm your operations and click Start Backup.

- Notes:✎...
- Options: In addition to the free settings we mentioned before, such as the choice of compression level, backup service, backup mode, etc. You can also set image encryption to provide better security for your backups. And you can upgrade to the professional version to enjoy it.
- Schedule Backup: This feature allows you to set up daily, weekly, monthly, event triggers or USB plug in to automatically backup Windows 11.
- Backup Scheme: You can enable Automatic Backup Cleanup to automatically delete old backups to save backup disk space. This feature is available in the professional version.
Summary
When your computer can't run Windows 11 because it doesn't support TPM and Secure Boot, you can follow the method mentioned in the article to clean install Windows 11 without TPM and Secure Boot.
After successful installation, you can use the free backup software AOMEI Backupper Standard to backup your Windows 11. It allows you to use your Windows 11 normally by restoring it if your computer won’t boot. It can protect your data to the maximum extent.
In addition, it is also an excellent cloning software that supports system clone, partition clone, and disk clone. You can boot your computer directly after cloning. Please download this software to explore more features.

