How to Solve Windows 11 Installation Has Failed
When everyone is excited about the upcoming release of Windows 11, have you received the prompt “This PC can’t run Windows 11”? I’ll share three methods for solving Windows 11 installation has failed.
By Clytze Updated on November 18, 2022
What Should I Do If Windows 11 Installation Has Failed?
Many users are faced with the problem of “Windows 11 installation has failed on your computer” when installing the system. The reason is that the computer does not fulfill the minimum system requirements for installing Windows 11.
The Minimum System Requirements for Windows 11 Are as Follows:
- Processor: 1 gigahertz (GHz) or faster with 2 or more cores on a compatible 64-bit processor or System on a Chip (SoC)
- RAM: 4 gigabyte (GB)
- Storage: 64 GB or larger storage device
- System firmware: UEFI, Secure Boot capable
- TPM: Trusted Platform Module (TPM) version 2.0
- Graphics card: Compatible with DirectX 12 or later with WDDM 2.0 driver
- Display: High definition (720p) display that is greater than 9” diagonally, 8 bits per color channel
- Internet connection and Microsoft accounts: Windows 11 Home edition requires internet connectivity and a Microsoft account to complete device setup on first use.
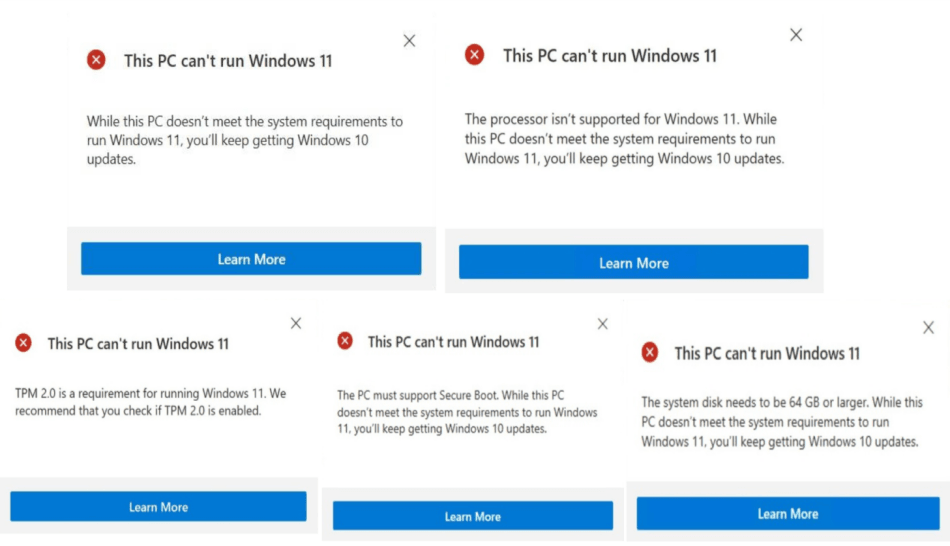
You may see the following installation failure prompts if the above configuration is not met:
- This PC doesn’t meet the system requirements to run Windows 11.
- The processor isn’t supported for Windows 11.
- TPM2.0 is a requirement for running Windows 11.
- PC must support Secure Boot.
- The system disk needs to be 64GB or larger.

If all of the above requirements are met but Windows 11 installation has failed, the most likely cause is that “TPM2.0” and “Secure Boot” are not available in the BIOS. The steps below will tell you how to enable “TPM2.0” and “Secure Boot,” as well as how to install Windows 11 without using “TPM2.0” or “Secure Boot.”
Method 1: Solve Windows 11 Has Failed to Start by Enabling TPM 2.0 and Secure Boot
Part 1: Solve Windows 11 Installation Has Failed by Enabling TPM2.0
What is TPM2.0? A TPM is a computer chip that offers a system with hardware-based security functionalities. The hardware limitation is that it requires CPU and BIOS/UEFI firmware support. The CPU used to install Windows 11 must fall within Microsoft’s permitted range. The following are the Intel CPU and AMD CPU support ranges given by Microsoft:
- 8th Generation Intel Core Processors and Newer Products
- AMD Ryzen Processor
- Ryzen 3000 Series and Newer Products
The PC health check will also show “can’t run Windows 11” even if earlier models support and enable TPM 2.0. The following methods can be used to determine whether the system has a TPM chip and whether it is enabled.
How to Check the TPM2.0 of our Computer
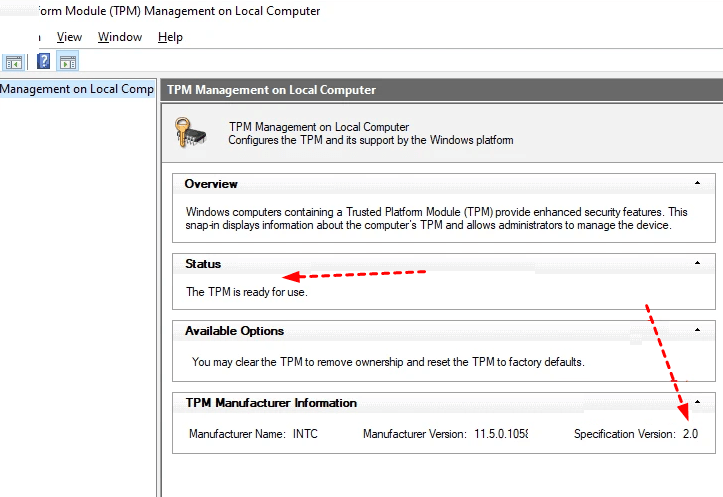
1. Press “Win” and “R” together to open the interface, then type “tpm.msc” and click “OK”.

2. The TPM management window on the local computer will open. If the “Status” is “The TPM is ready for use”, it means that the TPM is enabled. You can verify the TPM version for the TPM manufacturer information in the lower right corner.
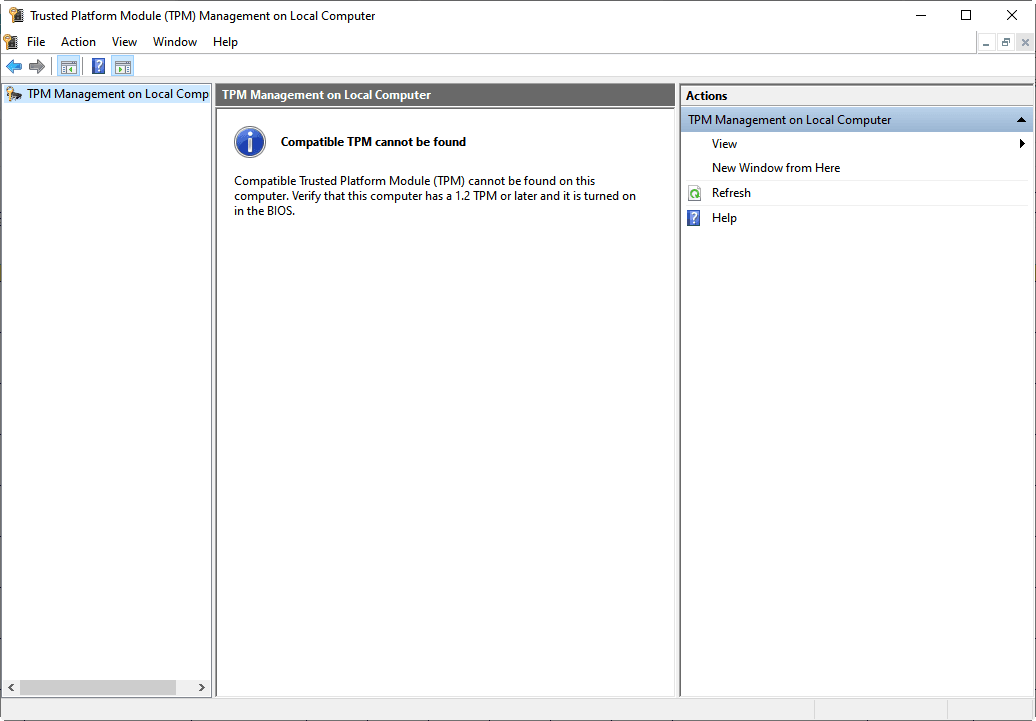
3. If the TPM version is compatible but disabled (the computer will prompt “Compatible TPM can’t be found”), then turn it on in the BIOS.
How to Enable TPM2.0 in BIOS Settings
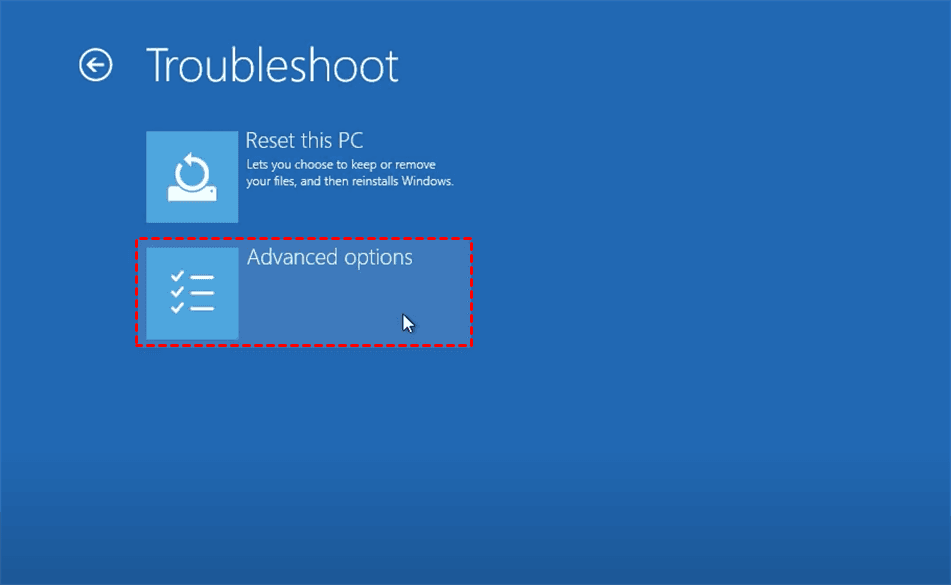
1. To quickly access the Windows Advanced Options menu, we will press the Shift key while clicking Restart to enter the boot page, and select “Troubleshoot”.
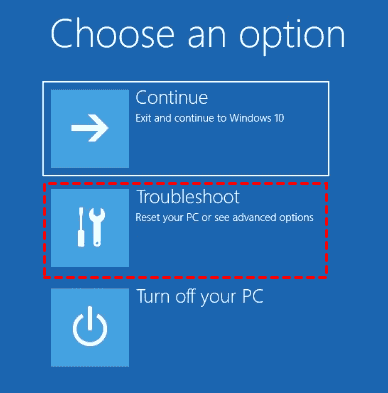
2. Select “Advanced Options”
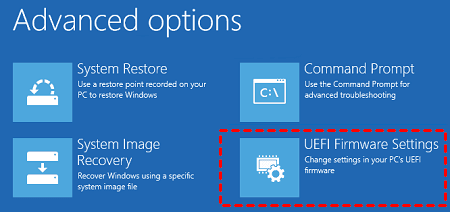
3. Select “UEFI Firmware Settings” to enter the BIOS settings.
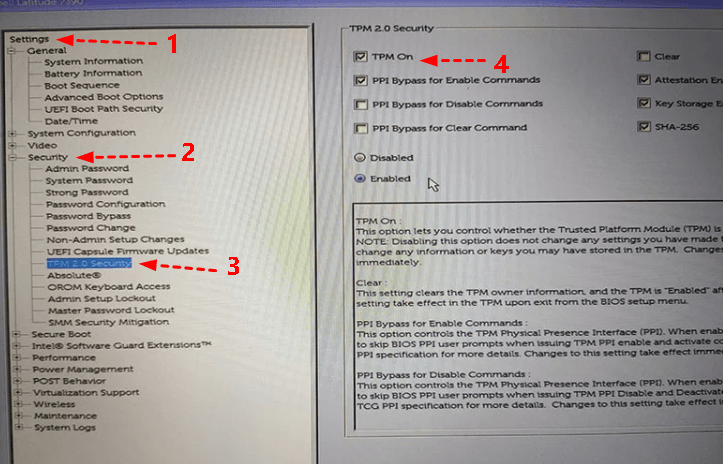
4. The name in the BIOS setting will be different, because the motherboard of the computer is different. TPM or PTT have the same function, just open it directly. For some computers, the TPM will be located in the advanced options and the name is Trusted Platform Module. Follow the steps in the diagram to turn on TPM.
Part 2: Solve Windows 11 Installation Has Failed by Enabling Secure Boot
What is Secure Boot, and how does it work? It’s a security standard that ensures PCs are only booted with software trusted by OEM (Original Equipment Manufacturer. It prevents malware from launching when you boot your computer. Only drivers with Microsoft certifications will be loaded if this option is selected.
Windows 11 requires Secure Boot to be enabled on the system to run the latest version. Fortunately, Secure Boot has extensive system support. Your PC may support it, but it just isn't enabled. Booting into the BIOS and checking whether the BIOS security settings can enable Secure Boot on your system is the quickest approach to validate Secure Boot support on your PC.
How to Enable Secure Boot in BIOS settings?
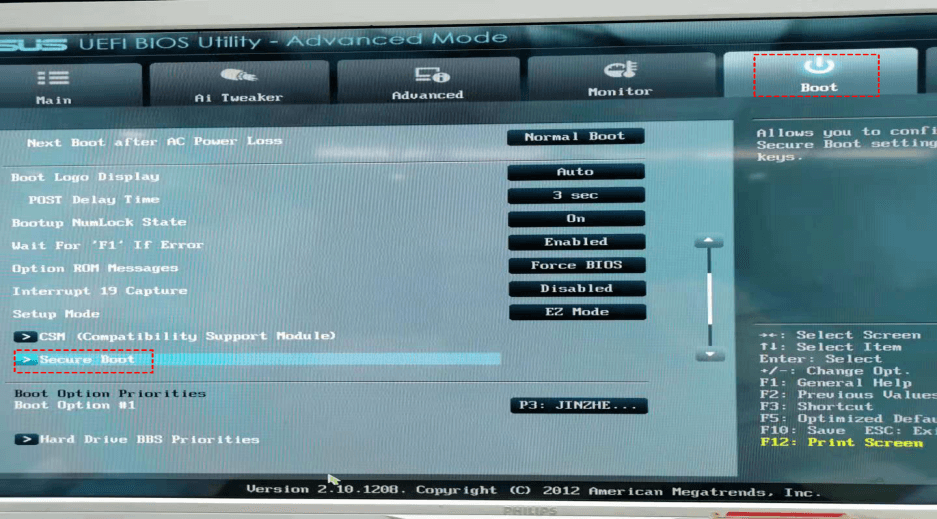
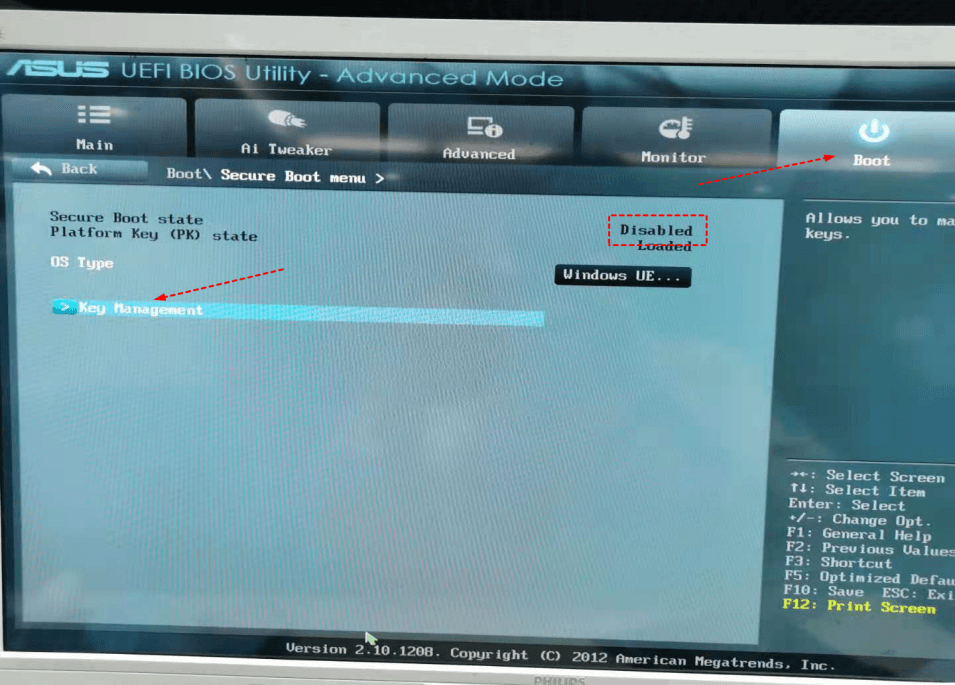
1. Restart and press Del to enter the BIOS system (keys are different depending on the computer host), click the “Boot” bar, and select “Secure Boot”.
2. We can see that Secure Boot is disabled, and we select “Key Management”.
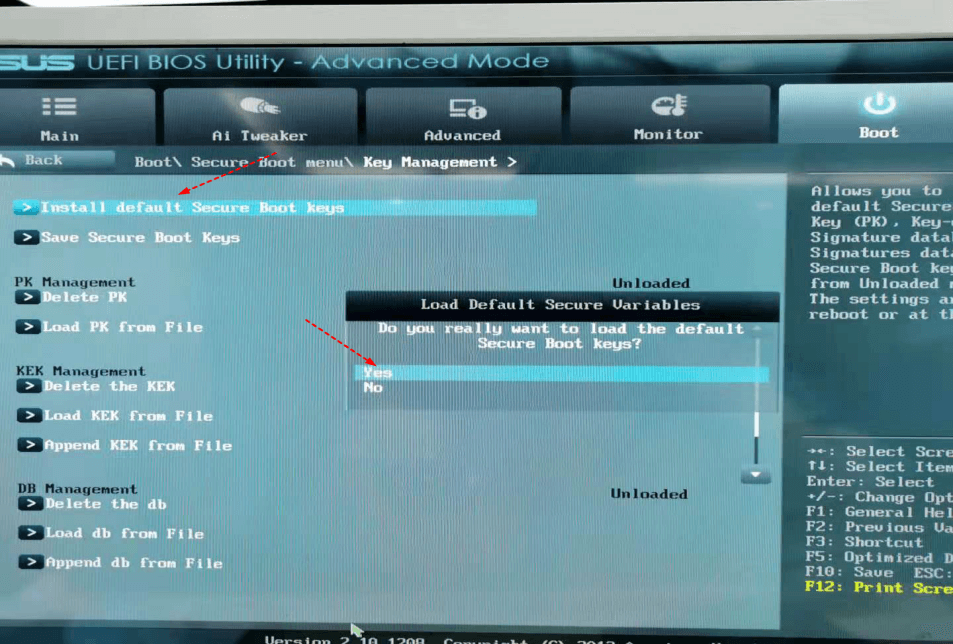
3. Select “Install default Secure Boot keys” to enable secure boot.
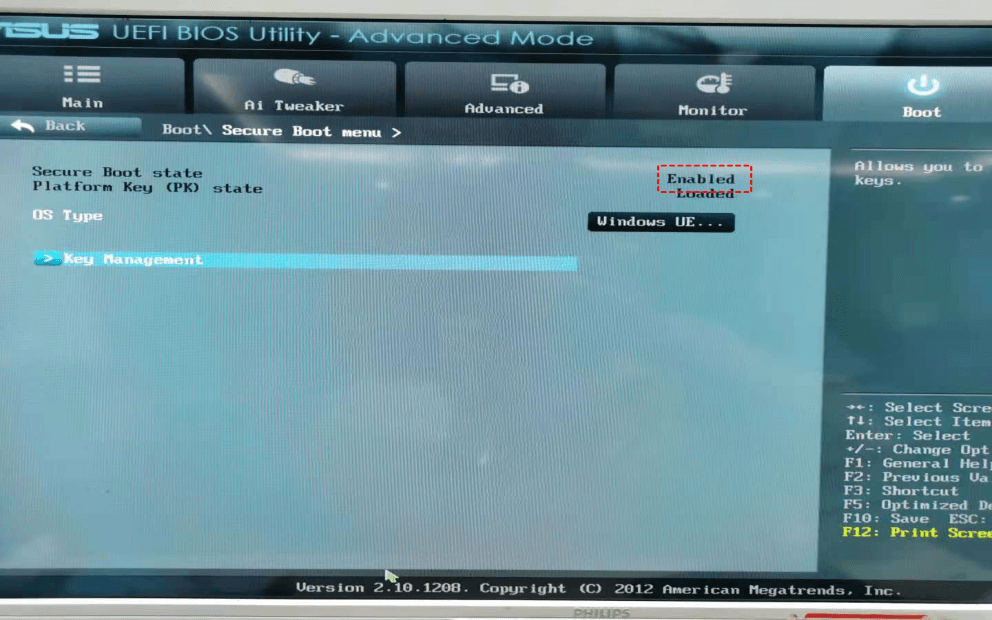
4. Returning to the previous column, we can see that Secure Boot has been enabled.
Method 2: Solve Windows 11 Has Failed to Start by Bypassing the “Secure Boot” and “TPM 2.0” Requirements
Installing Windows 11 has the problem that it requires “Secure Boot” and “TPM 2.0” to be enabled on the computer, if you are in “UEFI BIOS mode”, enabling these two options is a very simple process. However, in “Legacy BIOS mode”, this is not possible at all. So, we can bypass the Secure Boot and TPM 2.0 check during Windows 11 installation by modifying some registry keys values on the Windows PC.
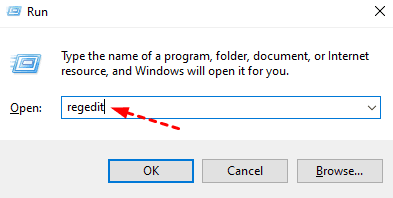
1. Press “win+R” to open the Run interface, and type “regedit” to open the registry.
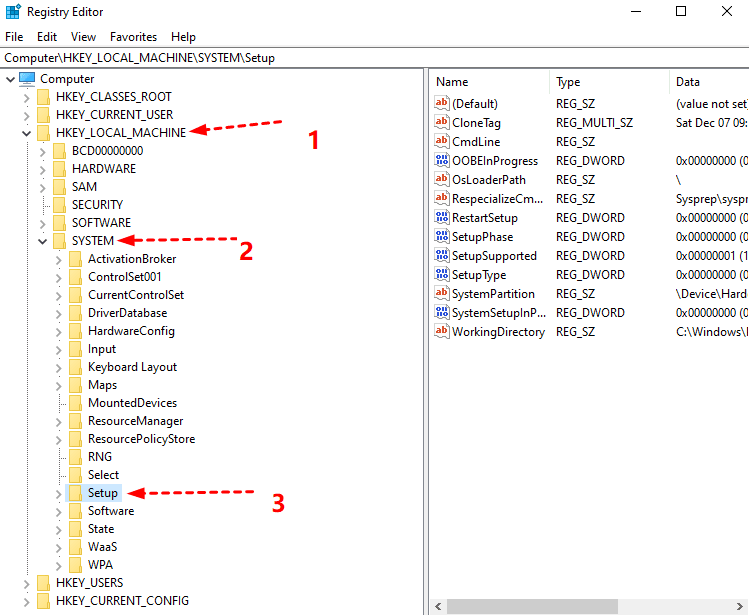
2. In the Registry Editor window, navigate to the following directory.
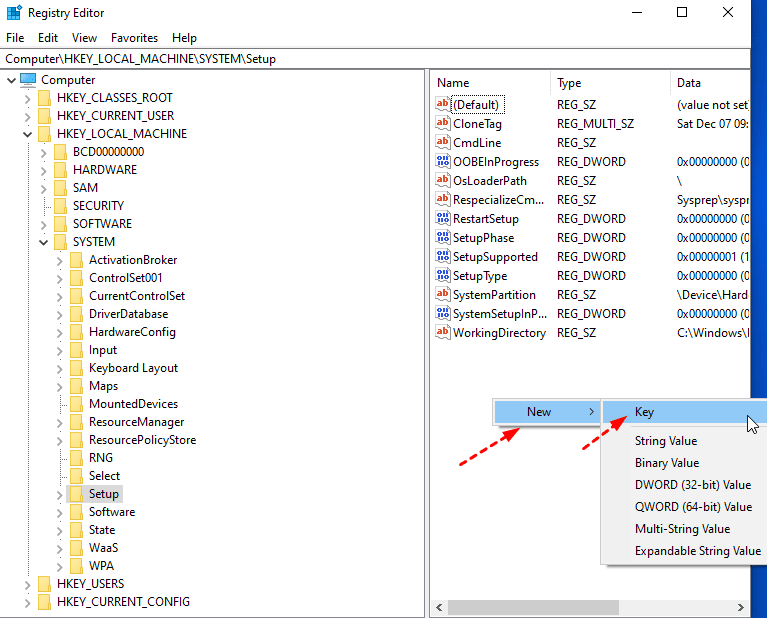
3. Right-click on the blank space on the right, select “New”; and then “Key”. A new registry key will be added on the left side of the editor. Please be sure to name it “LabConfig”.
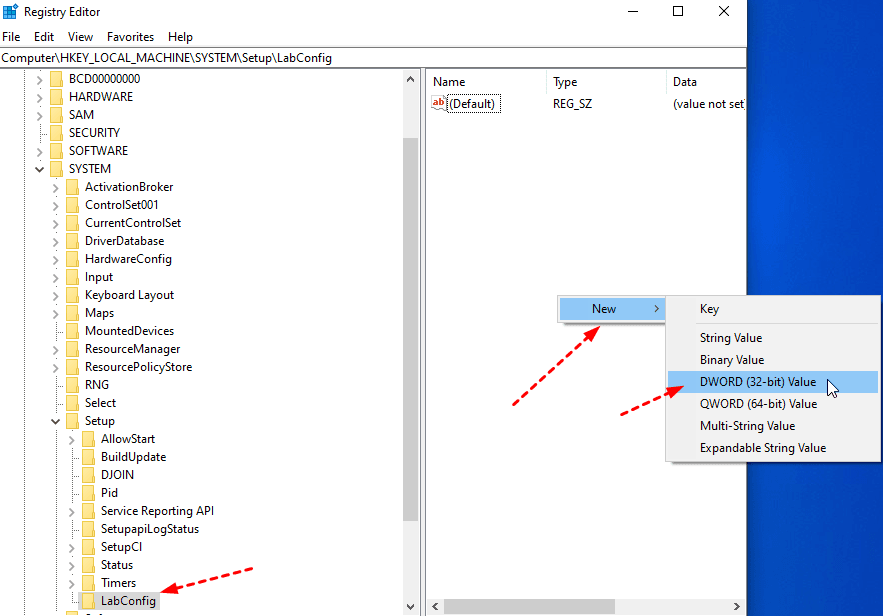
4. Under the “LabConfig” key, right-click the blank space to create two “DWORD (32-bit) Value” options to create new DWORD value.
5. Name them “BypassTPMCheck” and “BypassSecureBootCheck” respectively.
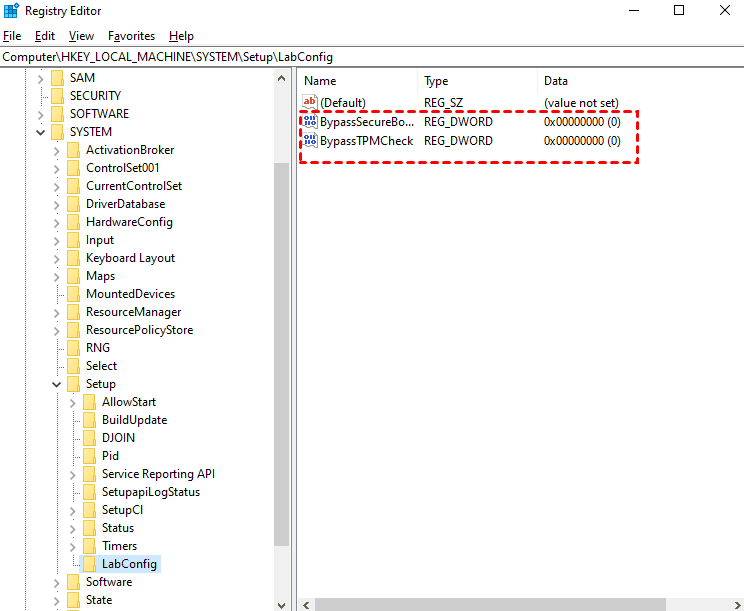
6. Then double-click the two “DWORD” and edit their “Value Data” field to “1” respectively.

7. When finished, close the registry editor window and restart the computer to make the new registry key take effect. Finally, try to run the Windows 11 setup by installing the Windows 11 ISO on the Windows PC. It will bypass TPM 2.0 and Secure Boot check and allow you to install Windows 11.
Best Solution to System Unbootable after Windows 11 Installation has failed to start
If none of the above methods can solve the problem that “Windows 11 installation has failed” and the system can’t be restored to the original system due to operation error. Besides, there is no earlier restore point or backup to restore the computer. Then this method may help you.
You need to find a functional computer with Windows 10 system, and use AOMEI Backupper to create bootable media and make a system image. Finally you can use the bootable media to enter the WinPE system and restore Windows.
Here I’d like to recommend a free backup software called AOMEI Backupper Standard, which can handle the majority of your backup requirements. Below are some obvious advantages of it:
- It supports 4 backup solutions, namely, file backup, system backup, disk backup, partition backup. Thus, you can backup any items you want.
- It supports schedule backup at a fixed interval, including daily, weekly, monthly.
- It supports backing up only changed files with incremental or differential backup.
- It has a great compatibility in the operating system (Windows 7, 8, 8.1, 10, 11, XP, Vista, etc.) and storage device (USB, HDD, SSD, NAS, cloud service, etc.).
So, this program can offer an efficient method to solve the problem Windows 11 installation has encountered an unexpected error. And the following is a specific graphic tutorial.
Create bootable media
Download AOMEI Backupper Professional, install and open it. Click “Tools” on the left, and select “Create Bootable Media”. Then follow the instructions to create a bootable USB/CD/DVD.

Make a system image file on the computer
Enter the homepage of AOMEI Backupper Professional. Click “Backup” on the left, then click “System Backup”, and finally you need to select a target location and click “Start Backup”.

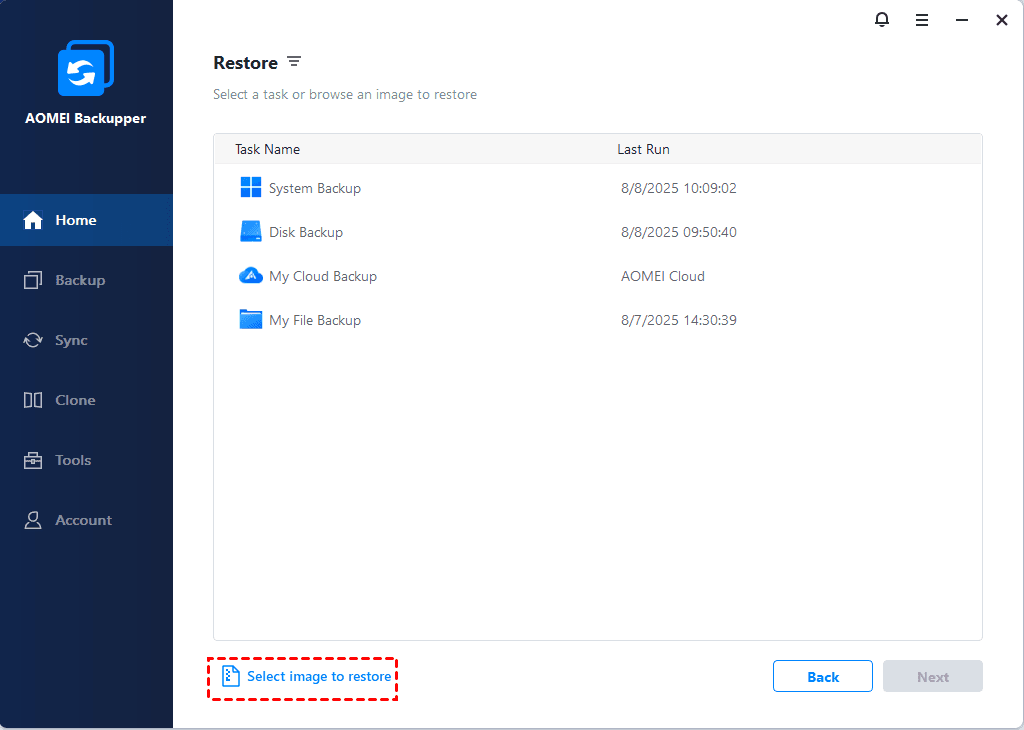
Restore backup to unbootable computer with bootable media
1. Connect the bootable disk and the disk with system backup to the computer. You need to change the boot order in the BIOS and set the bootable USB as the first boot option. Then boot the computer from the bootable media. Click “Restore”, and next click “Select Image File” to find the backup file.
2. Select “Restore this system backup”, check “Restore system to other location”, and then click “Next”.
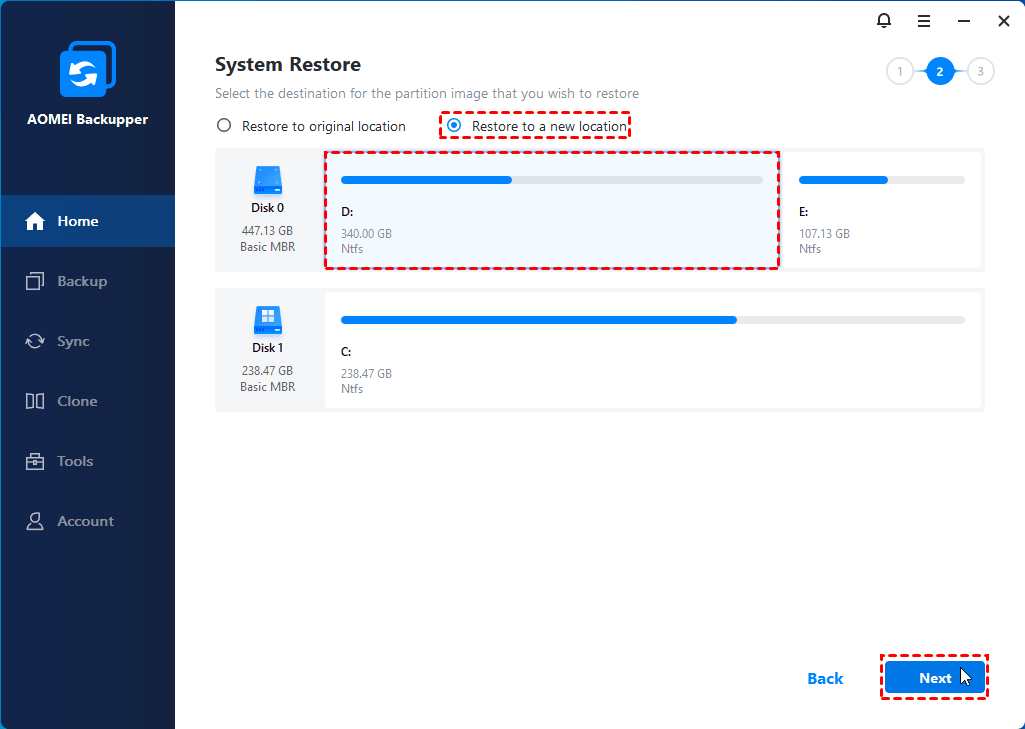
3. Select the destination for the system image that you wish to restore.
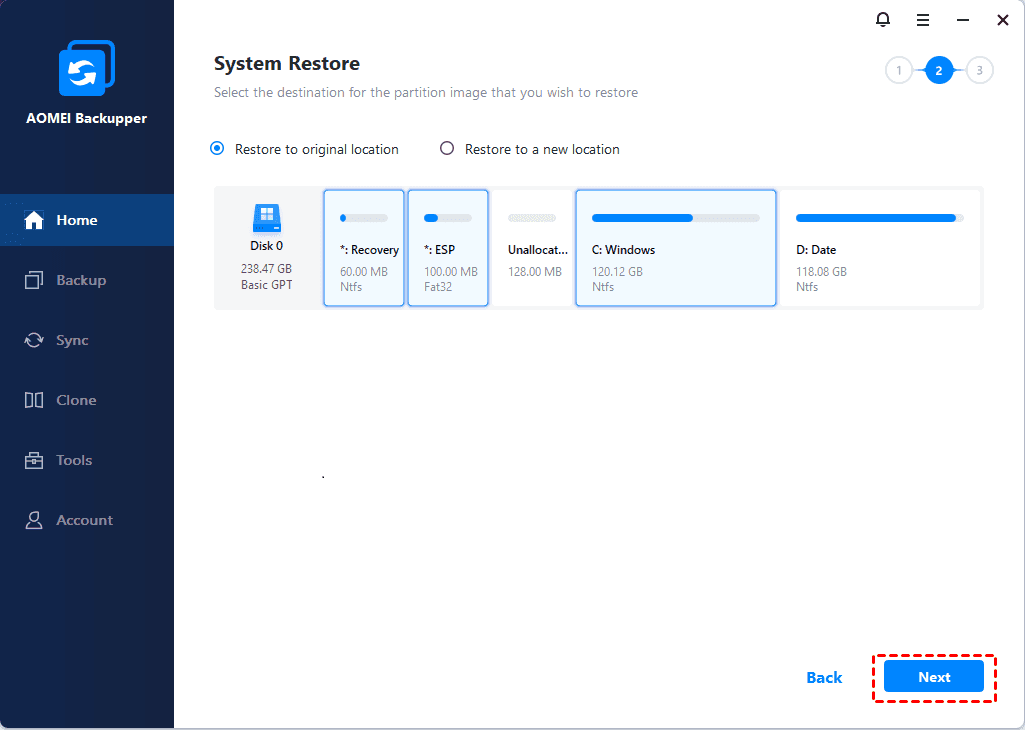
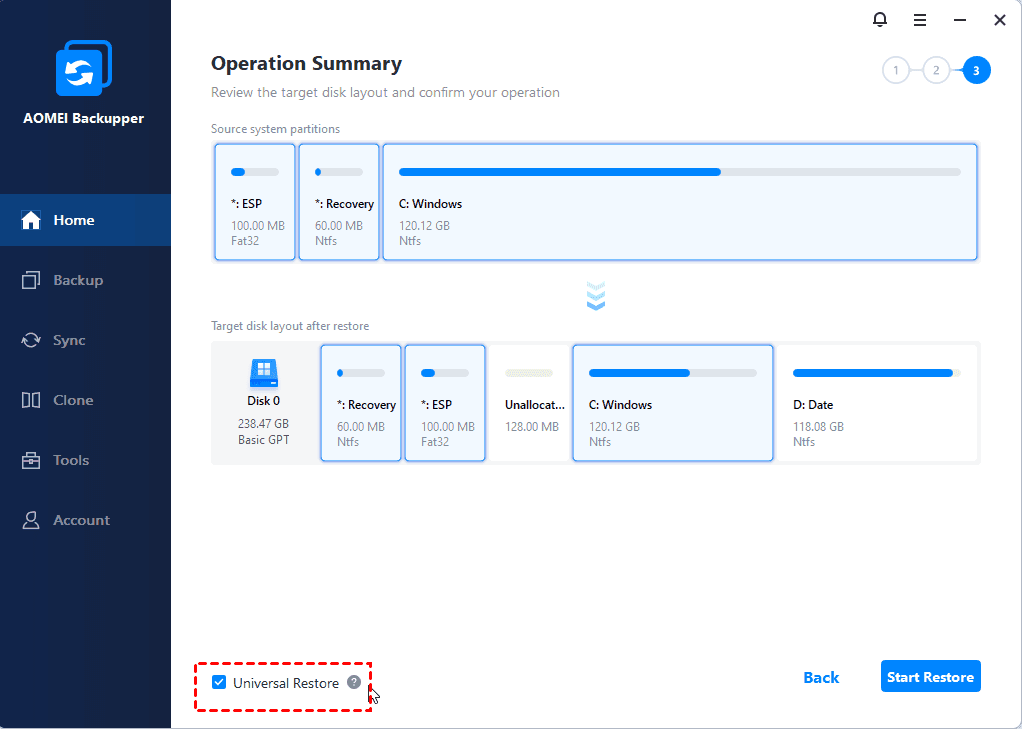
4. Tick “SSD Alignement” and “Universal Restore” option in the lower left corner, then click “Start Restore”.
Notes:
- Be sure to check the “Universal Restore” option if you are restoring on another computer.
- Check the SSD Alignment can improve the read and write speed and disk lifespan.
Summary
The above are the solutions to “Windows 11 installation has failed”. If you’re having trouble installing Windows 11, you can try enabling “TPM2.0” and “Secure Boot” or bypassing them to upgrade to Windows 11 directly. I hope it will be helpful to those who need it.
If you are troubled by this problem “windows 11 has failed to start”, you can use AOMEI Backupper Professional Edition to restore your system.
In addition, it is recommended that you make regular backups of your system to prevent losing a lot of data after encountering problems (e.g.data infection by malware, hard disk corruption).
The software can also provide users with lots of features, such as partition clone, basic sync, system backup, etc. You could download the free version to enjoy free features.
If you like it, you could also choose to upgrade it to the Professional Edition to experience more brilliant features, such as “Enable Backup Scheme”, it will delete old image files automatically to save disk space for you.