16 Ways Fixed: Kernel Security Check Failure Windows 11
It can be frustrating to meet the kernel security check failure issue on your Windows PC. Here offer you 16 feasible ways to solve this problem.
By Maggie Updated on December 12, 2024
User case: Windows 11 BSOD - Kernel Security Check Failure
I am experiencing a Blue Screen of Death on my brand-new desktop that I built.
Stop Code: KERNEL_SECURITY_CHECK_FAILURE
I experience the BSOD seemingly randomly while using Windows 11. I have no trouble booting up Windows, but anything ranging from 10 minutes after to 10 hours after I inevitably receive the same bluescreen.
Due to this, I am currently using Windows 10 on a separate drive. I would like to use Windows 11, but crashing in the middle of use is unacceptable.
- Question from Microsoft Community
What does kernel security check failure mean in Windows 11?
The "kernel check failure" blue screen of death (BSOD) error is a common and often frustrating issue faced by many users.

We have compiled a list of 16 solutions that can help you resolve kernel security check failure Windows 11. However, before you begin, it's advisable to identify the specific cause of the error to ensure that you select the most appropriate solution for your situation. Understanding the root cause can significantly enhance the effectiveness of your troubleshooting efforts.
- Corrupt system files
- Incompatible or malfunctioning hardware
- Outdated or incompatible drivers
- Running an older version of Windows
- Issues with the memory
How do I fix kernel security check failure Windows 10 or 11?
Fix 1. Unplug all external devices and restart the computer
The Windows 11 blue screen kernel security check failure can sometimes be triggered by compatibility issues with external devices. To address this, it's recommended to unplug all external devices before attempting to restart your computer. This step can help determine if any of the connected external devices are causing the error, allowing you to isolate and resolve the compatibility issue.
Step 1. Completely Shut Down the Computer: Ensure that your computer is fully powered off.
Step 2. Disconnect All External Devices: Unplug all external devices connected to your computer, including keyboards, headphones, external hard drives, and any other peripherals.
Step 3. Restart the Computer: After disconnecting all external devices, restart your computer to see if the error persists.
Fix 2. Enable legacy advanced boot menu
According to some user feedback, enabling the old version of the advanced boot menu can help to fix the "kernel security check failure" error. Here are the detailed steps to enable this option:
Step 1. Enter the Windows Recovery Environment (Windows RE) by shutdown your computer and restart it. Repeat twice.
Step 2. Click Troubleshoot > Advanced Options > Command Prompt.
Step 3. In the Command Prompt window, type C: and hit Enter.
Step 4. Then type BCDEDIT /SET {DEFAULT} BOOTMENUPOLICY LEGACY and press Enter.
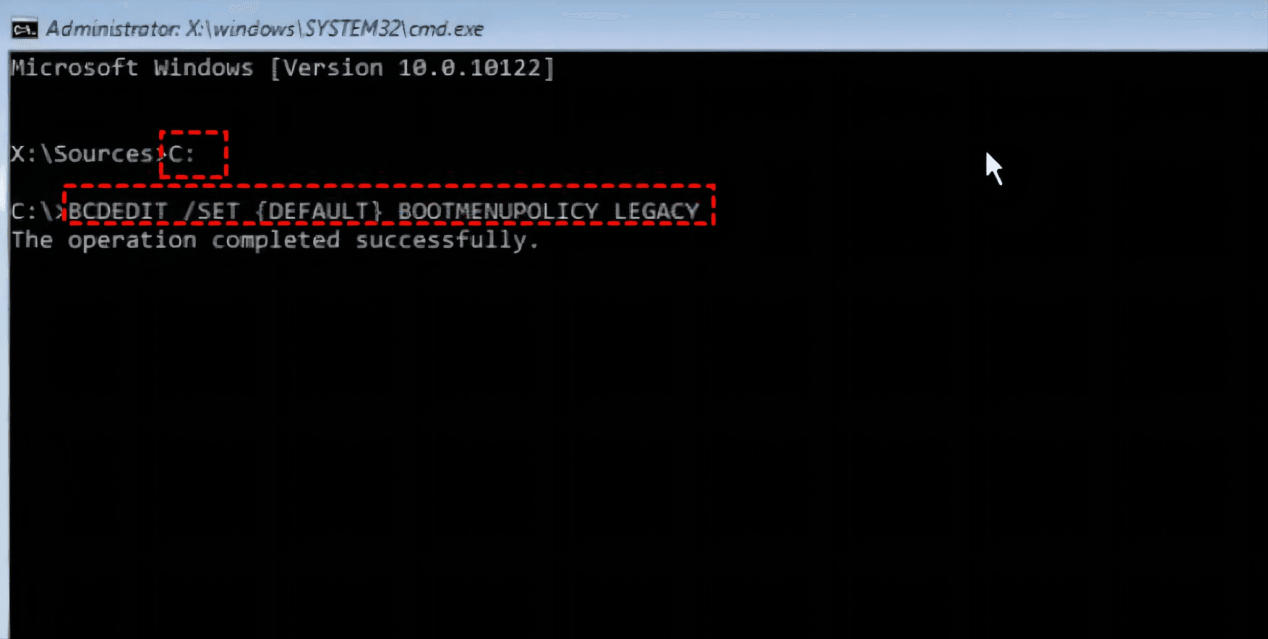
Step 5. Type exit and press Enter to exit the Command Prompt. After restarting your computer, see if you still get the blue screen error message. If you still get it, go to the next solution.
Fix 3. Uninstall recently installed applications in safe mode
Safe Mode is a diagnostic mode in Windows that automatically disables non-core services and processes, aiding in the resolution of various problems. In cases where recently installed applications may be causing compatibility issues and resulting in the "Windows Kernel Security Check Failure" error, it's recommended to uninstall these applications while in Safe Mode.
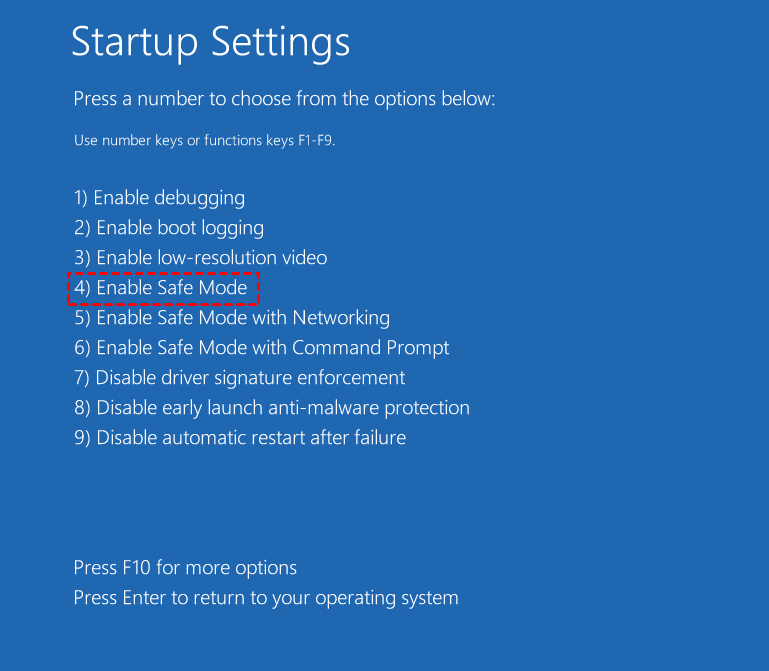
Step 1. Enter the Windows recovery environment, click Troubleshoot > Advanced Options > Startup Settings, press F4 or the number key 4 to enable Windows Safe Mode.
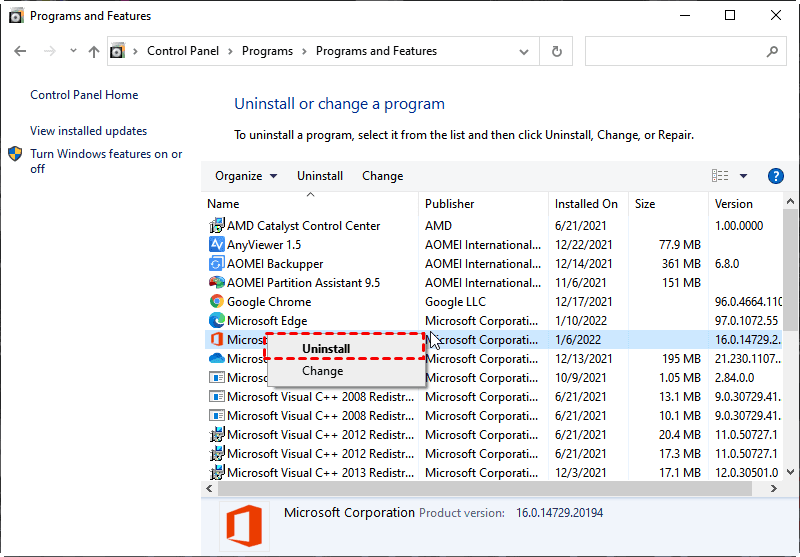
Step 2. Choose Windows + S simultaneously to open the search box, type control panel and press Enter.
Step 3. Click Programs > Programs and Features > Uninstall a program. Select a recently installed program, right-click it, and select Uninstall.
Step 4. Confirm your operation and wait for the uninstallation process to complete. Then restart your computer to see if the blue screen error persists. If it does, then you need to move to another option.
Fix 4. Reinstall or update computer drivers in safe mode🔥
Outdated or incompatible hardware drivers can frequently lead to the blue screen kernel security check failure. To resolve this issue, it's essential to reinstall or update these hardware drivers while in Safe Mode.
Reinstall hardware drivers
Step 1. Enter the Windows Recovery Environment and start Windows Safe Mode as described above.
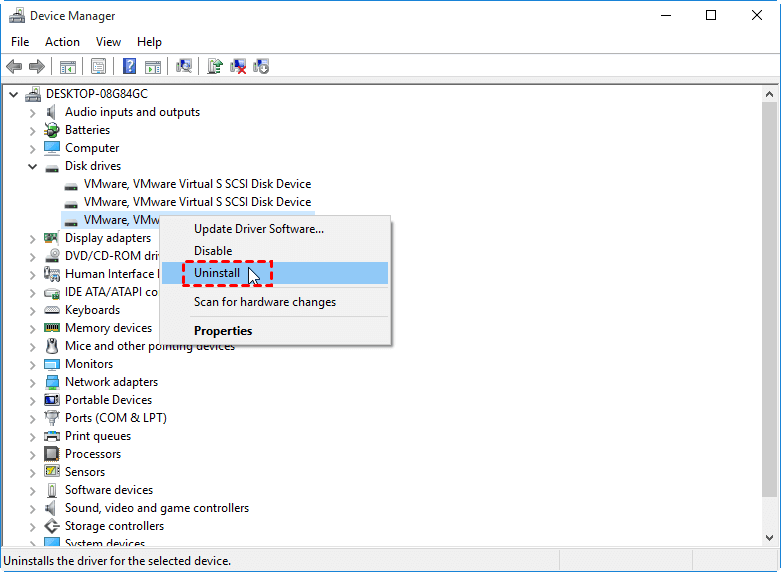
Step 2. Press Windows + X simultaneously and select Device Manager from the expanded menu.
Step 3. Select and expand the Disk drives, and then select the disk drive that may cause the blue screen error. Right-click it, select Uninstall in the expanded menu, and confirm this operation.
Step 4. Right-click the top computer name and select Scan for hardware changes in the expanded menu to reinstall the previously removed drivers.
Update hardware drivers
Step 1. Boot into the Windows Recovery Environment, and then press the number key 5 or F5 to Enable Windows Safe Mode with Networking.
Step 2. Still, press Windows + X at the same time and select Device Manager from the expanded menu.
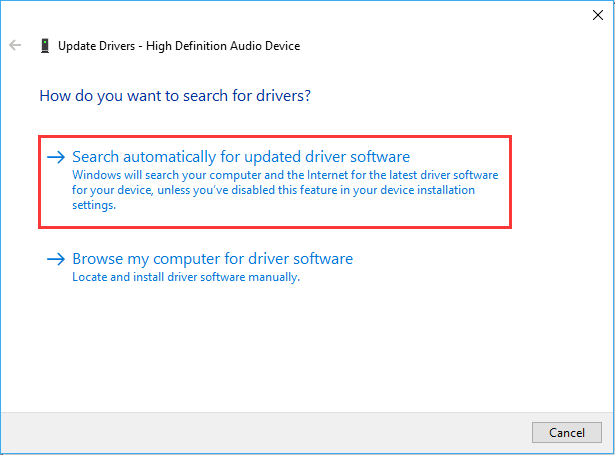
Step 3. Select and expand the Disk drives, and then choose the disk drive that may cause the blue screen error. Right-click it and select Update Driver from the expanded menu.
Step 4. Select Search automatically for updated driver software and wait for the process to complete. If there is an update, please download and install it, and restart your computer.
After restarting your computer, see if you still get the blue screen error message. If you still get it, go to the next solution.
Fix 5. Run Windows memory diagnostic tool🔥
"Kernel Security Check Failure" errors can indeed be linked to memory issues. To investigate and potentially address this concern, you should use Windows' built-in memory diagnostic tool to test your computer's memory.
Step 1. Enter the Windows Recovery Environment and enable Windows Safe Mode with networking.
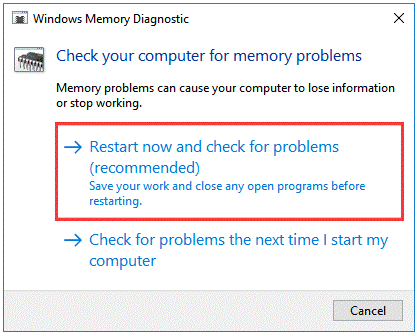
Step 2. Open the Run dialog by choosing Windows + R, type mdsched and press Enter.
Step 3. There are two options in the Windows Memory Diagnostic window, the first is to Restart now and check for problems, and the second is to Check for problems the next time I start my computer, here the first option is recommended.
Step 4. Wait for the check to complete, you will receive feedback regarding the status of your computer's memory.
If the diagnostic tool identifies faulty memory, it's crucial to replace the defective memory module promptly. Once the faulty memory is replaced, restart your computer to determine if the "Kernel Security Check Failure" error persists. If the error continues to occur, proceed to explore the next troubleshooting solution to continue addressing the issue effectively.
Fix 6. Run CHKDSK🔥
"Kernel security check failure" error can be caused when your disk is corrupted. Therefore, you need to check and fix the errors that exist on the disk.
Step 1. In the Startup Settings window, press F6 or the number key 6 to Enable Safe Mode with Command Prompt.
Step 2. Use Windows + S to open the search box, enter cmd to open Command Prompt and choose to run as administrator.
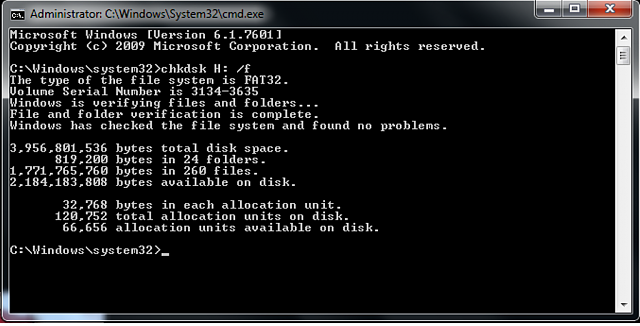
Step 3. In the Command Prompt window, type chkdsk [drive letter]: /f and press Enter to execute the command.
►Tip: You can replace the letter F with the exact drive letter you want to check. For example, if you want to check H: drive, then you should type: “chkdsk H: f”.
Step 4. Type chkdsk [drive letter]: /r to repair the found error.
Fix 7. Run SFC scan🔥
Windows System File Checker is a utility that can help you check and repair corrupted system files. Since the corrupted system file is an important cause of the "Kernel security check failure" error, you can fix this error with SFC.
Step 1. In the Startup Settings window, press F6 or the number key 6 to Enable Safe Mode with Command Prompt.
Step 2. Use Windows + S to open the search box, enter cmd to open Command Prompt and choose to run as administrator.
Step 3. In the Command Prompt window, type sfc /scannow and press Enter to execute this command.
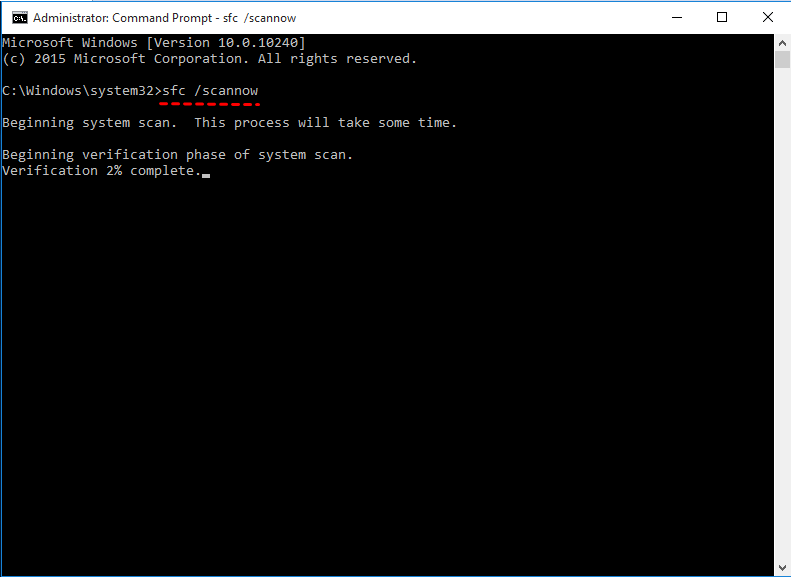
Step 4. After running the SFC scan, it's crucial to patiently wait for the check and repair process to complete.
Once the scan and repair are finished, restart your computer to determine whether the "Kernel Security Check Failure" error persists. If the error message still appears after restarting your computer, proceed to explore the next troubleshooting solution to continue your efforts to resolve the issue effectively.
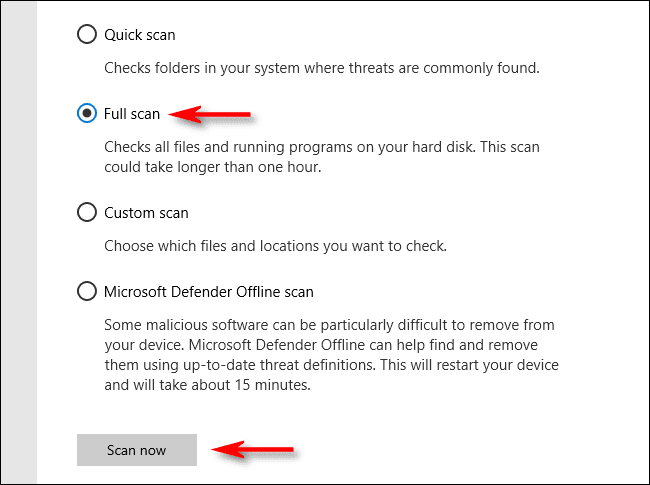
Fix 8. Scan for and remove viruses and malware
Certain viruses or malware can also be the trigger for "Kernel security check failure" error. Therefore, you need to scan and remove these viruses and malware.
Step 1. In Safe Mode, use Windows + S to open the search box, type and select Windows Security.
Step 2. In the Windows Security window, click Virus & threat protection.
Step 3. In the Current threats section, click Scan options. Then select Full Scan, and click the Scan Now button.
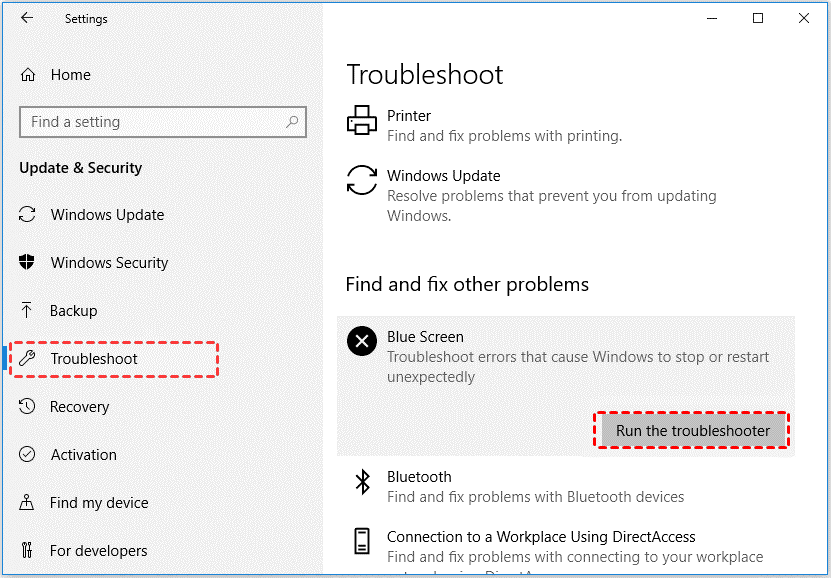
Fix 9. Use the Windows troubleshooter🔥
Windows 10 has a built-in troubleshooter that can help you troubleshoot most problems, and it's a worthwhile approach.
Step 1. In Safe Mode, use Windows + I to open Windows Settings and select Update & Security.
Step 2. Navigate to Troubleshoot tab in the left panel, in the right panel you should see the troubleshooter about the Blue screen, click on the Run the troubleshooter button.
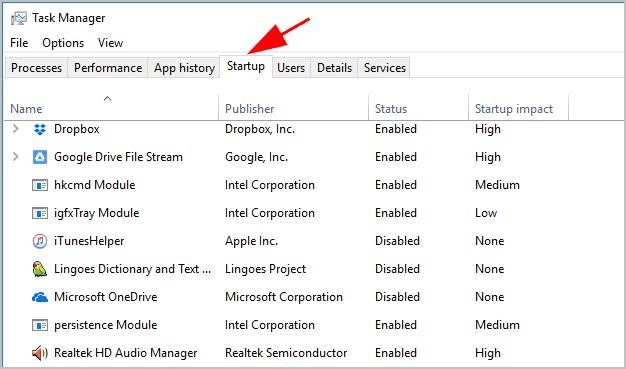
Fix 10. Temporarily disable third-party antivirus software
Occasionally, third-party antivirus software can interfere with the proper functioning of your Windows system, leading to the "Kernel Security Check Failure" error. To investigate this possibility and potentially resolve the error, it's advisable to temporarily disable your third-party antivirus software.
Step 1. In Safe Mode, use Esc + Shift + Ctrl to open the Task Manager.
Step 2. Go to the Startup tab at the top, select third-party antivirus software, and click the Disable button in the lower right corner.
Fix 11. Windows system restore🔥
If you created a system restore point before the blue screen error "kernel security check failure" in Windows 10, System Restore can restore your computer to a previous point in time to fix this error.
Step 1. Enter the Windows Recovery Environment and select Troubleshoot > Advanced Options > System Restore.
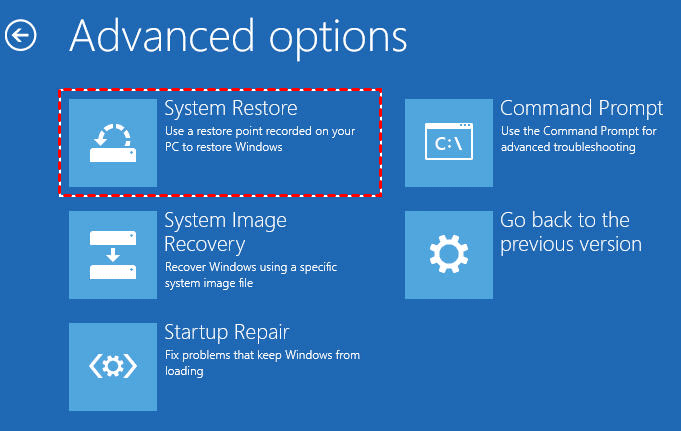
Step 2. Next, you need to follow the prompts to select the appropriate restore point and wait for the process to complete.
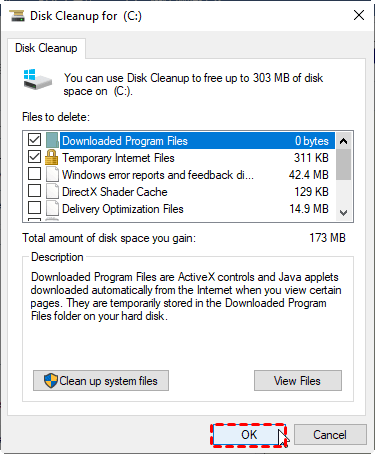
Fix 12. Free up disk space
Insufficient disk space can indeed be a source of various problems, including the "Kernel Security Check Failure" error. To address this issue, it's crucial to free up disk space on your computer.
Step 1. In Safe Mode, use Windows + E to open E.
Step 2. Right-click the local disk C, and select Properties in the expanded menu.
Step 3. Go to the General tab and click the Disk Cleanup button.
Step 4. Select the files you want to remove and hit OK. You can tick all types of items for maximum cleanup.
Fix 13. Verify the driver
Windows includes a built-in Driver Verifier Manager that can test all installed drivers and identify any that are malfunctioning or broken.
Step 1. In Safe Mode, use Windows + S to open the search box, enter cmd to open Command Prompt and select Run as administrator.
Step 2. In the Command Prompt window, type verifier and press Enter.
Step 3. In the Driver Verifier Manager window, select Create standard settings and click Next.
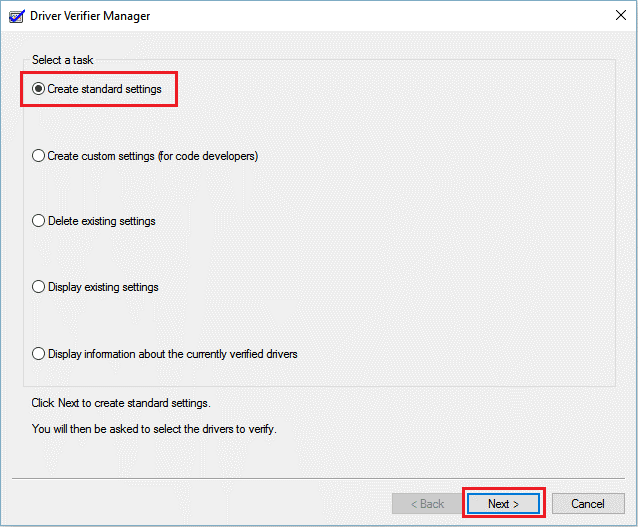
Step 4. Select Automatically select all drivers installed on this computer, and then click the Finish button.
►Note: If you can determine that there is a problem with a driver, you can also choose Select driver names from a list.
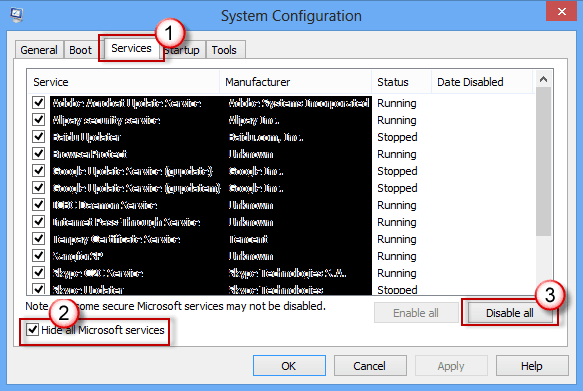
Fix 14. Perform a clean boot🔥
A Clean Boot is another Windows diagnostic mode, akin to Safe Mode, but with a distinction: you must manually disable third-party applications and services. This method is also useful for addressing the "Windows Kernel Security Check Failure" error. Please note that this method requires you to enter the Windows system normally.
Step 1. Use Windows + R to open the Run dialog, type msconfig and press Enter.
Step 2. Go to the Services tab at the top of the System Settings window, check the Hide all Microsoft services checkbox in the lower left corner, and then click the Disable all button.
Step 3. Then on the Startup tab of System Configuration, select Open Task Manager.
Step 4. In the list of startup tabs, select each startup item in turn, click the Disable button in turn, and then close the Task Manager.
Step 5. Go back to the Startup tab of System Configuration and click the OK button.
Fix 15. View the event log file
You can view the event log file to see what caused the "Kernel security check failure" error so you can take action.
Step 1. In Safe Mode, right-click the Start button and select Event Viewer from the expanded menu.
Step 2. Expand Windows Logs in the left panel and select System.
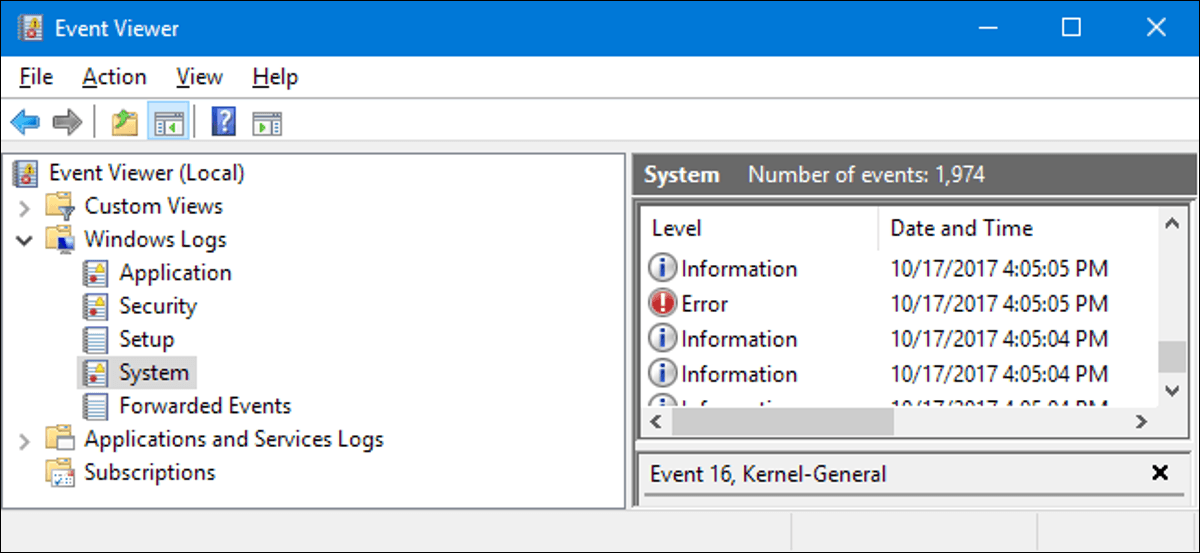
Step 3. Select the errors in the list in turn and view their error descriptions. If you just got a blue screen error, just select the first error log.
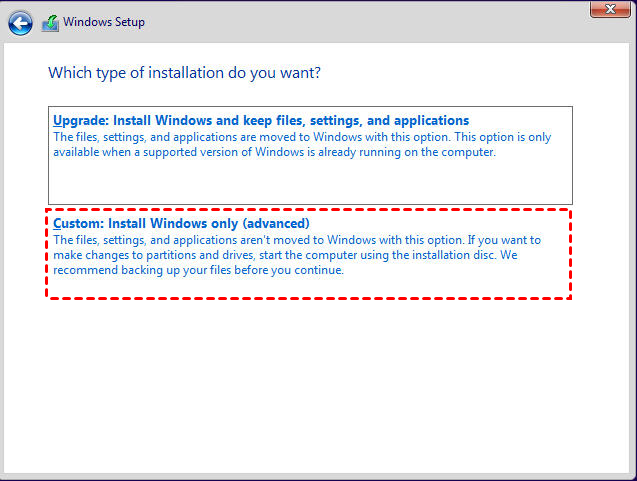
Fix 16. Reinstall Windows 11🔥
If none of the above solutions can help you fix the "Kernel security check failure" error, you can also choose to reinstall Windows 11, which is the last and most effective solution.
Step 1. Reboot your computer into the BIOS to adjust the boot priority items, and set the CD-ROM or pen drive as the highest priority.
►Note: It's important to note that various motherboard brands may have different methods for accessing specific settings or features in the BIOS. For detailed instructions and guidance on accessing BIOS settings on your specific motherboard, refer to the corresponding motherboard manual that came with your computer or motherboard.
Step 2. After restarting, press any key to execute Windows 11 Setup. Do the following in order:
- Set the language and input method in turn.
- Click Install now.
- Enter the product key (you can also skip it directly).
- Select the version of Windows 11 you want to install.
- Accept the license terms.
- Select the Windows installation type, here it is recommended to select Custom: Install Windows only (advanced).
Step 3. Then select the disk to install Windows 11 and choose Next. Wait for the installation to complete, follow the prompts to make settings, and wait for Windows 11 to start.
Suggestion: how to always keep data safe🔥
Hoping you have troubleshoot the “Kernel security check failure" error through the above 16 solutions to make your computer return to normal. Disk corruption, Windows system file errors, and virus intrusions that cause this error should arouse your attention. When a disk is damaged, all data on the disk will be lost. For the sake of data security, it is recommended that you use AOMEI Backupper Standard for disk backup before trying any repair solutions to avoid any situation that may lead to disk data loss.
▶You can utilize its schedule backup feature to auto backup your changed data in daily/ weekly/ monthly/ event trigger and USB plug in mode. What’s more, you can only backup the changes via incremental and differential backup once you create a full copy. (differential backup is free in the advanced version).
▶AOMEI Backupper Standard has a clear interface and simple operation, and is suitable for Windows 11/10/8.1/8/7 and other versions. If you are a server user, please consider its Server edition.
▶It allows you to quickly backup files to external hard drive, local disks, NAS devices, cloud, and more.
Next, the detailed operation steps of AOMEI Backupper Standard disk backup will be introduced to you. First, we need to download and install the software.
Step 1. Launch this software. Click Backup in the left tab select Disk Backup option.

Step 2. In the Disk Backup window, click the Add Disk button. In addition, you can click the pencil icon in the upper left corner to modify backup task name to distinguish.

Step 3. Choose the save path according to your own situation, and click the Start Backup button in the lower right corner after confirming that it is correct.

Conclusion
Facing the "Kernel Security Check Failure" blue screen error message can be a frustrating experience, but with the 16 provided solutions, you have a range of options to address and resolve the issue, restoring your computer's normal operation. It's important to recognize that some of these solutions may involve addressing disk corruption, making data backup crucial to avoid potential data loss during the repair process.
AOMEI Backupper Standard offers a free and professional disk backup service, making it convenient for users to back up their hard disks to their preferred locations. Beyond disk backup, the software provides a range of other valuable functions, including system backup, file backup, and partition backup. These comprehensive features ensure that you can protect your computer's data comprehensively and securely.

