How to Manage Windows 10 Backup Options to Protect Your Data
How to manage File History backup options in Windows 10? How to configure settings of Backup and Restore? In this post, I'll show you the way to do Windows 10 backup settings, and also an alternative with more backup options.
by Lena Updated on October 20, 2022
Case: how to manage Windows backup options?
"Anyone knows how to manage the Windows 10 backup options? Windows 10 Backup has no longer given the options to chose which partitions or folders to backup as part of a full-backup. It gives the option to add drive but chose by default what to backup. How can I change the settings?"
Nowadays many people have realized the importance of backup, it should be part of the routine to avoid unexpected data loss and system failures. But as the OS version changes, some people get confused with the backup mechanism of Windows 10, and wonder how to configure backup settings to get what they really want.
Here in this post, I'd like to introduce how to set up Windows 10 backup options in File History as well as Backup and Restore for better data protection.

How to configure Windows 10 backup options
As you probably already know, Windows 10 comes with several backup methods, each with different backup options. But how to set them up respectively?
1. Backup options in Windows 10 File History
File History was first introduced in Windows 8. It’s now the primary built-in Windows 10 backup utility which focuses on backing up your personal files in User folder to an external hard drive.
How to manage backup options in File History:
Click Start > Settings > Update & Security > Backup, or you can search for backup and restore directly.
Step 1. Connect your external hard drive, click the + button to choose it.

Step 2. Then the Automatically back up my files option is toggled on, you can click More options to configure further backup settings for Windows 10 File History.
Step 3. In BACKUP OPTIONS, you can set up how often File History backups up your files, how long your backups will be saved, and what other folders you want to back up.
◆ By default, File History will automatically backup your files in User folder every hour, and keep versions forever. You can adjust the settings as you like.
◆ If you are ready to make a backup right away, you can click Back up now under the Overview.
◆ Click Add a folder under Back up these folders to specify other folders you want to backup; scroll down to the bottom of BACKUP OPTIONS, you can click Add a folder under Exclude these folders to specify the folders you don't want to backup.
◆ Also at the bottom, you can click Stop using drive option, and choose another drive. The previous backup will not be deleted, but it can only backup to one drive at once.
◆ To recover a file from the backup, click Restore files from a current backup under Related settings, locate the file and select the version you want, then click the restore button.

You can also click See advanced settings to view your backup status intuitively, and manage all the related options. What worth mentioning is that you can Add network location here.

Supplement: how to fix Windows 10 Backup options crash problem?
Some users have reported that they encounter the Windows 10 Backup options crash problem. When clicking More options, the settings window just closes a few seconds after coming up. If you have this problem, try following methods to fix it.
Fix 1. Restart your computer.
Fix 2. Switch the Automatically backup my files from Off to On.
Fix 3. The Windows 10 Backup options crash issue may occur if some system files are corrupt. You can perform the system maintenance troubleshoot or System File Checker to resolve the problem.
-
To perform the system maintenance troubleshoot: Go to search box and type Troubleshooting and click Troubleshooting when it appears > Click System and Security > System Maintenance > Click Next and follow the prompts to run the troubleshooter.
-
To perform System File Checker: Right-click Start menu > Choose Command Prompt (Admin) > Type “sfc/scannow” and hit Enter.
2. Backup settings of Backup and Restore
Windows 10 inherits the Backup and Restore feature in Windows 7. It enables you to backup libraries & folders, or create a Windows 10 system image.
When the system isn't working normally, you can enable Windows 10 system restore to recover your Windows as well as your programs and configurations. Thus you don’t need to reinstall the system which is quite time-consuming.
How to configure backup settings in Backup and Restore:
Go to Control Panel > System and Security > Backup and Restore (Windows 7), or you can directly search for backup and restore on the task bar.
There are two commonly used options, Set up backup and Create a system image.
-
If you want to create an image of everything on your drive, including the Windows 10 installation, settings, programs and personal files, choose Create a system image.
-
If you want to backup Windows default (or selected) libraries and folders, choose Set up backup. If you've created a backup in this way, the existing task will be displayed here, and you can click Change settings to configure the backup settings.

To set up backup:
Step 1. Select where you want to save your backup and click Next. In addition to local disk or external hard drive, you can also click Save on a network... to specify a network location.

Step 2. Choose to backup Windows default folders or folders selected by yourself, then click Next. If you select Let me choose, tick the drives or folders you want to backup in the next step.

Step 3. Click Change schedule if you want to set up an automatic backup, tick Run backup on a schedule to configure the settings of frequency, then click OK, and Save settings and run backup.

To create a system image:
Step 1. Choose the destination to save the backup and click Next. You can choose a hard disk, one or more DVDs, or a network location.

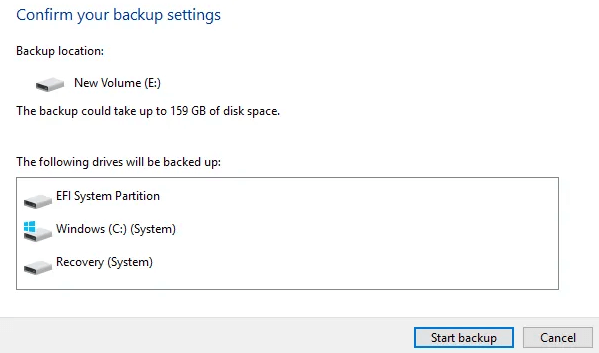
Step 2. The drives that are required for Windows to run will be included by default. You can select the others drives that you want to backup. Click Next to continue.

Step 3. Check the backup settings and click Start backup to confirm.
It may take some time to finish the backup and you can continue to work during the process.
When the progress completes, you will be asked if you want to create a system repair disc that can help you to boot the computer. Make the decision according to your needs.
Note: you can also create a restore point of Windows 10 for system recovery, but it's actually not a backup, but a snapshot of system configuration and settings in Windows Registry.
3. Alternative to backup Windows 10 with more options
Though Windows 10 provides some backup utilities for different situations, they have certain restrictions and the process is somewhat complicated and slow. It doesn't meet your needs to clone or sync the data, either.
If you want a more powerful data-protect solution in Windows 10, maybe you can consider the backup & restore freeware - AOMEI Backupper Standard. It offers complete and flexible backup options to keep your data safe.
★ It offers 4 backup options - system backup, disk backup, partition backup, and file backup. Meet all your needs to backup different levels of data.
★ It supports scheduled backup - you can set a automatic task on daily/weekly/monthly/etc. basis, so as to liberate your fingers.
★ It allows you to backup to various destinations - including the local drive, externatl hard drive, USB flash drive, or a network share.
★ It provides different backup modes - in addition to full backup, AOMEI Backupper also enables you to perform incremental or differential backup, which can greatly save your storage space.
Next, I will show you how to backup Windows 10 system with AOMEI Backupper.
Step 1. Free download AOMEI Backupper, install and launch it.
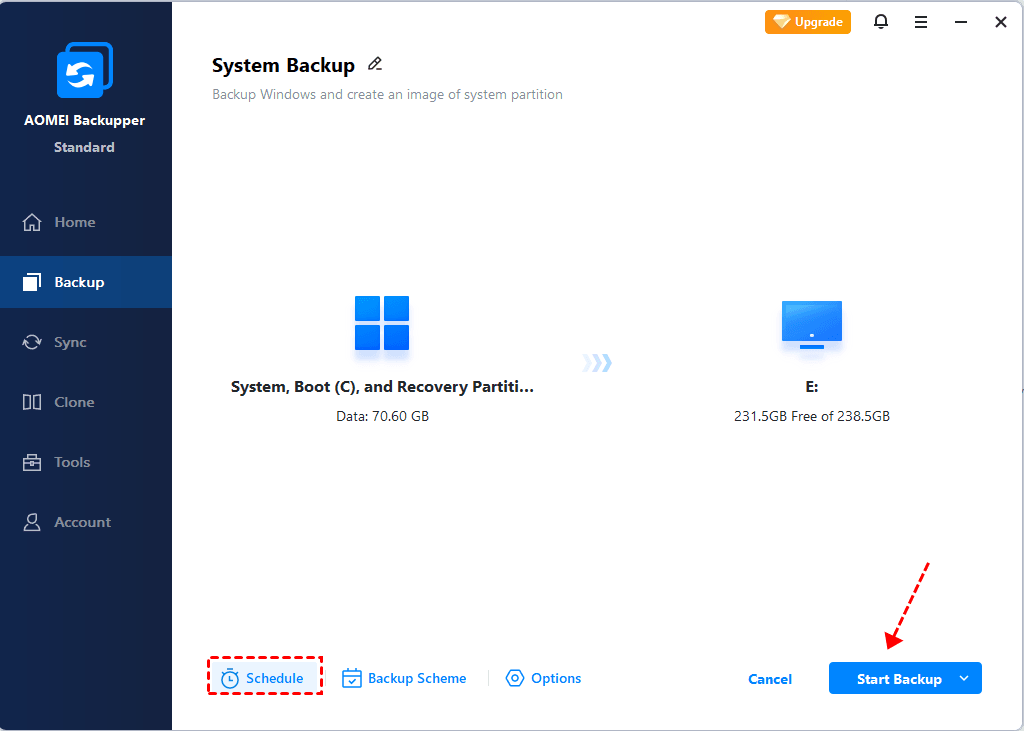
Step 2. Click Backup and then choose the backup option you want. Here take System Backup as an example, it can backup Windows and create a image of system partition.

Step 3. System Partitions will be selected automatically, so you just need to select the backup path, and click Start Backup to start the progress.
◆ Click Options to set the compression level, choose backup mode, enable email notification, etc.
◆ If you want to set up an automatic backup task, click Schedule to choose Daily/Weekly/Monthly as you want. You can also upgrade to Professional edition to enjoy two more options - Event triggers and USB plug in.
◆ Scheme option can delete old backup images automatically to free up the storage space. It's available in Pro and higher editions.
Now you've finished the backup, to restore it, just click on the backup task in Home page, or go to Restore tab.
If you want to create an exact copy of selected data, try using Clone or Sync features.
Conclusion
No matter in File History or Backup and Restore, configuring Windows 10 backup options properly can help you to better protect important data. But if you want a more flexible backup & restore solution, a powerful tool like AOMEI Backupper could be a better choice.
It's a comprehensive software comes with complete backup options and allows you to easily retrieve important files, as well as restore the crashed system. And not just backup, with its rich functionality, you can also migrate Windows 10 to another hard drive, clone HDD to SSD, or sync files between computers.