How to Create Scheduled Task to Copy Files to Another Folder
This comprehensive guide provides detailed instructions on setting up scheduled tasks to copy files, offering three distinct solutions. It also introduces AOMEI Backupper as a powerful tool for automating backups and file management.
By Jonna Updated on March 27, 2026
How to auto-copy files from one folder to another
If you simply want to transfer files from one folder to another, just copy them manually. But what if these files are modified frequently and you want to keep the latest copy?
Generally, you can create a batch file with command lines, and use Windows Task Scheduler to copy files to another folder or even a mapped network drive regularly.
If you find this method can hardly meet your needs, or you want an easier solution with an intuitive GUI, you can also try a powerful alternative. I will then describe the two approaches separately.
The easiest way to schedule file copy between local folders, network drives, cloud services, etc.
Create a scheduled task to copy files to another folder
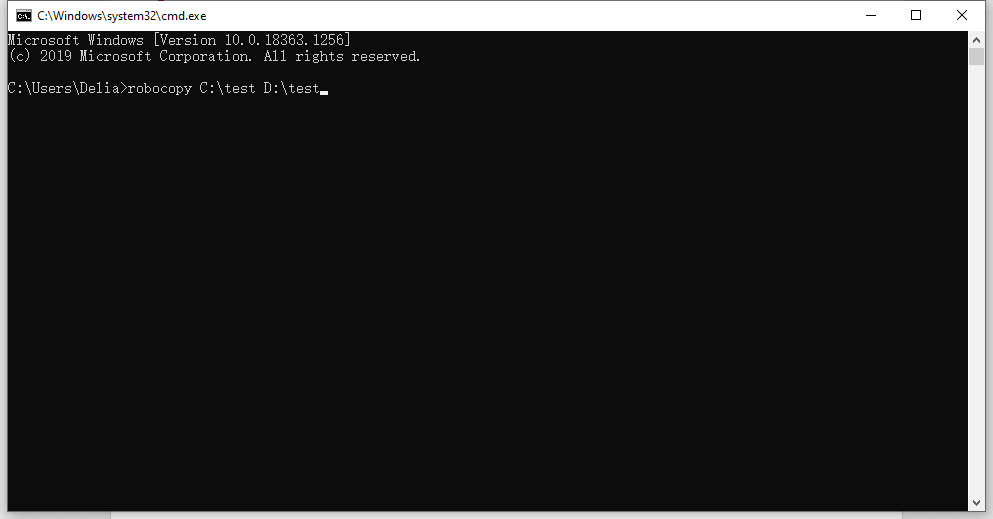
To begin with, the most commonly used command lines to copy files & folders are Xcopy and Robocopy. I will use Robocopy here because it’s a more robust replacement for Xcopy.
Step 1. First, you need to create a .bat file with a text editor, Notepad, for example. You can right-click on the desktop and choose New > Text Document.
Step 2. Open the text document and type the command. The basic syntax for robocopy is:
robocopy [source] [destination]
Fill in the source directory and target directory as you want. For instance, if I want to copy files from a desktop to a D drive, then my command is:
robocopy C:\Users\Delia\Desktop\copy D:\copy
If you want to transfer other files between other source and target directories simultaneously, just add another command line in Notepad according to your needs.
In addition, you can add some switches to customize the file copy, such as:
- /s to copy subdirectories and exclude empty directories;
- /xo to exclude older files;
- /mov to move files to another folder while deleting them from the source folder.
Here’s a full list of robocopy parameters you can refer to. Pick and combine them appropriately, and you can accomplish a lot of wonderful things.
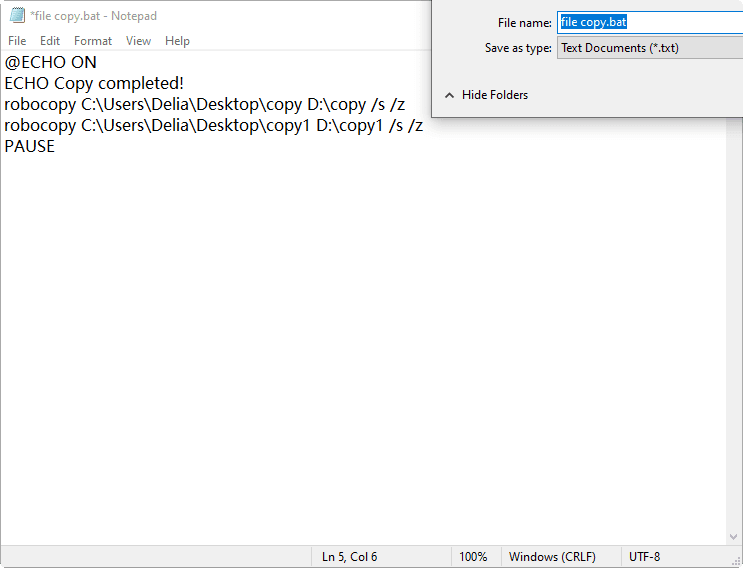
What’s more, if you want to receive a message after completing file copy, and press any key to exit, you can use the echo and pause commands. For example:
@ECHO OFF
ECHO Copy completed!
robocopy C:\Users\Delia\Desktop\copy D:\copy /s /z
robocopy C:\Users\Delia\Desktop\copy1 D:\copy1 /s /z
PAUSE
By this script, the “copy completed” message will display after the files are copied to the target directories, and the cmd window will pause until I press any key to continue.
Step 3. Click File > Save As… and give the file a name, then change the extension from .txt into .bat and Save it.
This will create a batch file that you can double-click to run the commands. Furthermore, you can create a scheduled task with Windows Task Scheduler to copy or move files to another folder automatically.
✍You can also create robocopy scheduled tasks by parameters. For instance, /MOT:m will execute another incremental backup if changes are detected in "m" minutes.
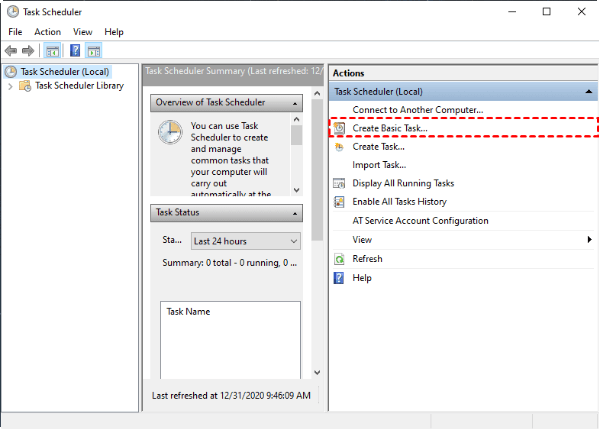
Step 4. Open Control Panel and view it by large icons or small icons, then choose Administrative Tools > Task Scheduler. Alternatively, you can directly search for it.
Choose Create Basic Task… on the main interface, and follow the wizard to make your choice.
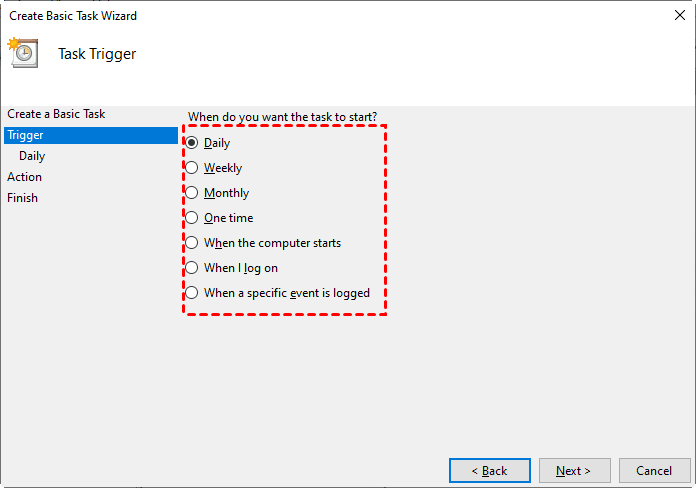
You can enter the task name and description, and choose how to trigger the task. If you want to create a scheduled task to copy files to another folder every day, just choose Daily and set up the specific time point on the next page.
Choose how you want the task to be performed. Here, select Start a program and browse for the .bat file you just created.
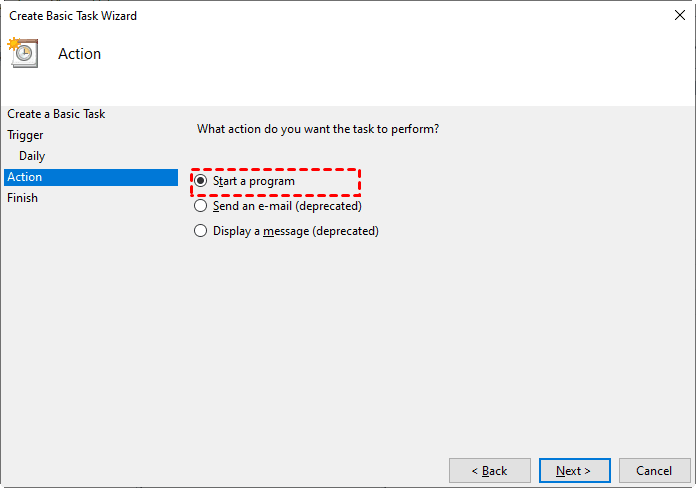
Confirm all the settings and click Finish to schedule the file copy task. You can find it in the Task Scheduler Library afterward, and feel free to edit or delete it.
How to schedule a task to copy files to a network drive
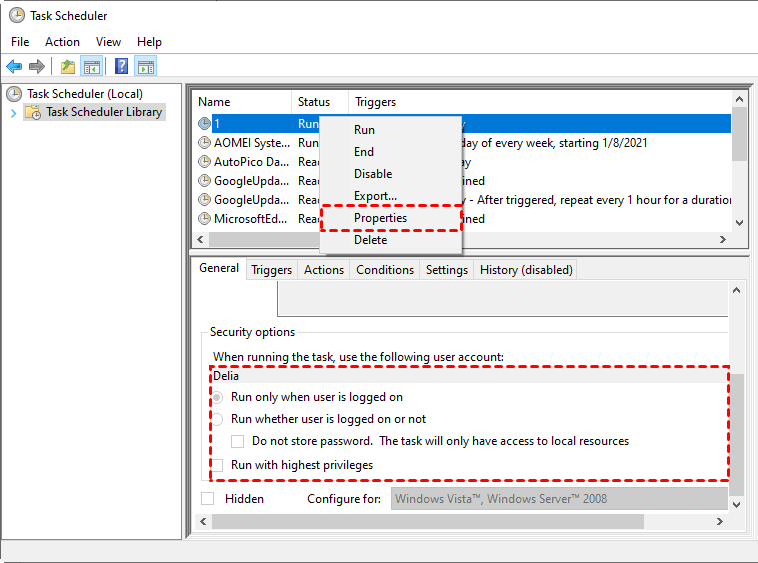
When you use Task Scheduler to copy files to or from a mapped network drive, you may find it doesn’t work. If so, check the security options of the task in the Task Scheduler Library.
Task Scheduler can only access mapped network drives with the option “Run only when the user is logged on” enabled. If not, please right-click the task and choose Properties to modify the settings.
Easier way to auto copy files to other locations - FREE
Using Robocopy and Task Scheduler offers flexibility for various tasks, but it requires a certain level of technical expertise. For a more user-friendly solution with robust data protection features, consider AOMEI Backupper Standard.
This free software supports Windows 11, 10, 8.1, 8, and 7, enabling you to copy files between internal and external disks, flash drives, network locations, and cloud drives. This way, you can efficiently manage your file copy tasks without needing advanced computer knowledge.

-
Schedule copy files to another folder/drive
-
Schedule copy local folder to network
-
Auto sync folders between computers
-
Auto sync network folder to OneDrive, Google Drive
-
Offer to schedule in daily, weekly, monthly, event triggers, etc.
This software helps you to create a scheduled task within 4 steps to copy files to another folder automatically. If you want any changed files to be synced instantaneously without a schedule, you can upgrade to the Professional edition to enjoy Real-Time Sync. Just download the free sync software and follow the guide below to copy files.
How to schedule tasks to copy files to another folder:
Step 1. Open the software, select Sync on the left side, and choose Basic Sync to sync changed files from the source directory to the target directory.
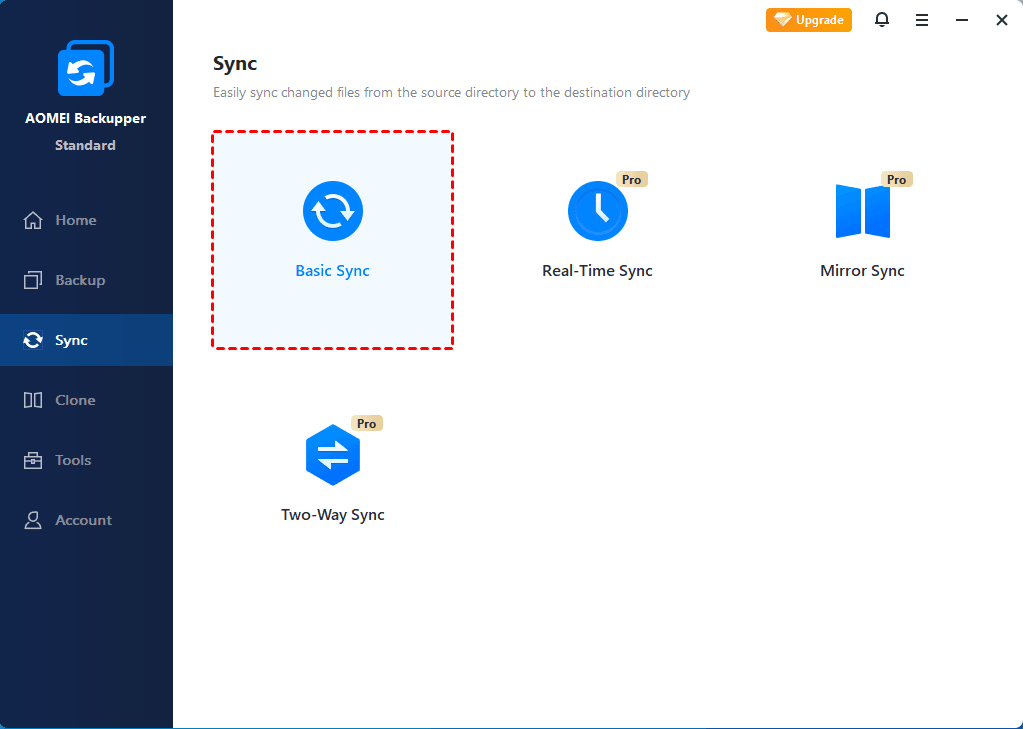
✍Other sync modes (available in the Pro edition):
Real-time sync: Sync changed files from the source folder to the target folder in real-time.
Mirror sync: Keep the files in the target folder exactly the same as in the source folder.
Two-way sync: Sync changed files in a source folder and target folder to the other side mutually.
Step 2. Click Select Source to specify what you want to copy. To copy files from a network location, you can click Network Share > Add Network Share in the Select Source window to specify a path.

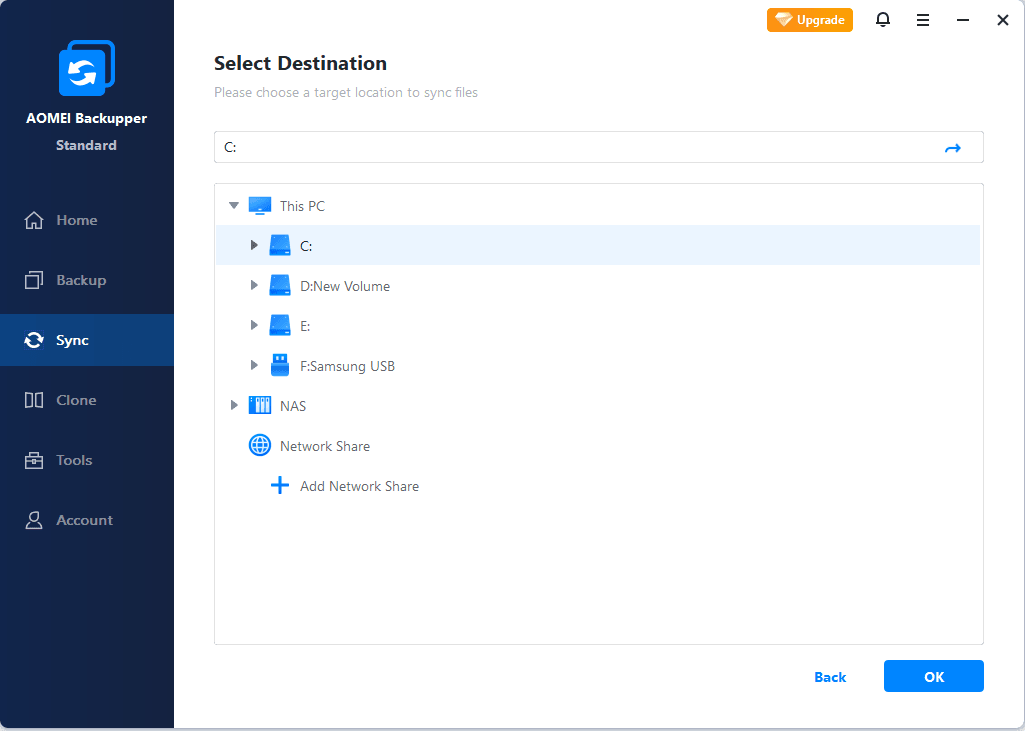
Step 3. Click the destination box to select the target path. To copy files to the network location, you can click Network Share > Add Network Share in the Select Destination window. As for a mapped network drive, you could select it under This PC, just like local drives.
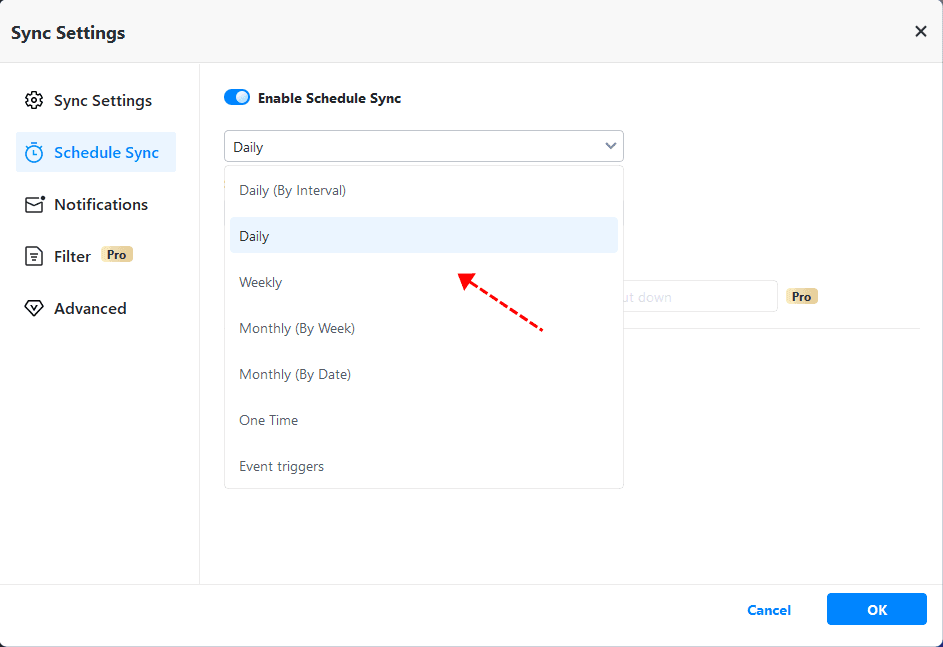
Step 4. Click Schedule Sync to set up automatic file copy, and click Start Sync to execute the scheduled task.
✍Schedule options include Daily (By Interval), Daily, Weekly, Monthly (By Week), Monthly (By Date), One Time, and Event triggers.
Supplement: backup files to another folder as images
Using Basic Sync, you can create an exact copy of your files, preserving the original folder structure and file formats. The copied files are immediately accessible, but any changes or mistakes made in the source folder will also be mirrored in the target directory, preventing restoration to an earlier version.
AOMEI Backupper also allows you to back up files, partitions, OS, and disks into compressed image files, with options for automatic scheduling. These backup images aren't usable without restoration, but they let you maintain different versions of your data, enabling you to revert to any previous version as needed.
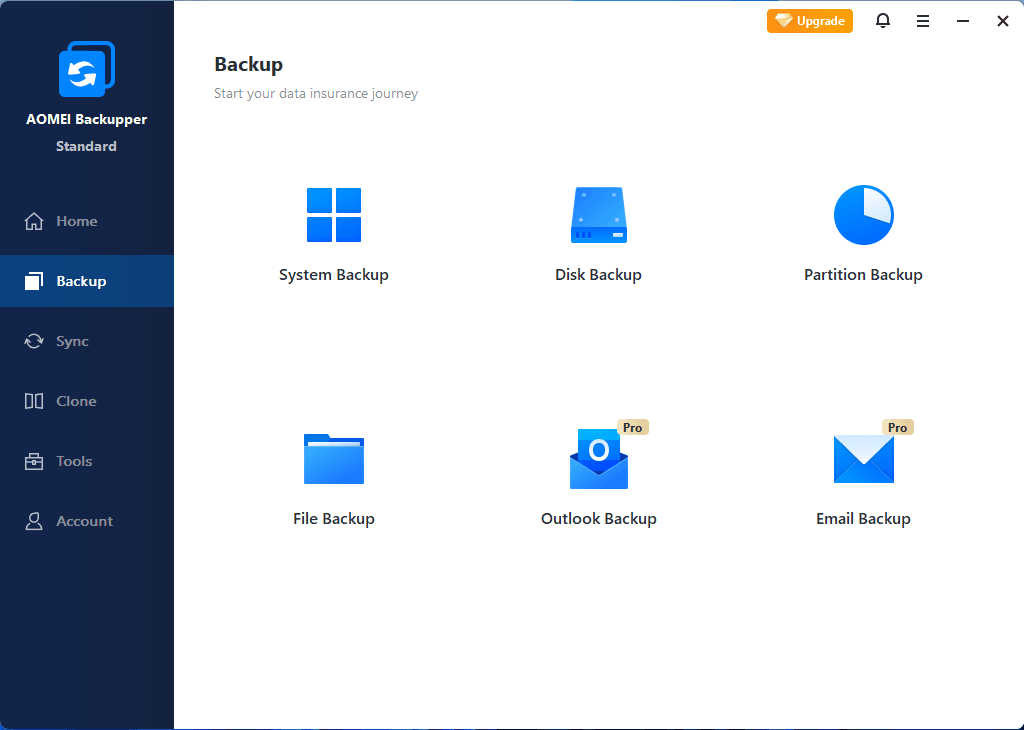
To do it, go to the Backup tab and choose the option you need. Also, you can do incremental or differential backups to save only changed files and therefore save storage space.
Just like the Sync method, AOMEI Backupper supports backing up files to multiple locations. Cloud backup is one of the most popular methods, but most cloud storage services only offer a few gigabytes of free storage, while users often need to back up a large amount of data. How can you manage this? You can consider backup files to AOMEI Cloud using the File Backup feature. When you sign up, you get 1TB of free cloud storage for 15 days. The process is automated and requires no manual intervention.
The Importance of Automating File Copy Tasks
Key Benefits
- Time Efficiency: Automates repetitive tasks, freeing up time for more critical activities.
- Consistency: Ensures files are copied at regular intervals without fail.
- Data Safety: Regular backups protect against data loss.
Use Cases
- Backup Management: Automatically copy important files to a backup folder.
- Data Synchronization: Keep files synchronized between different locations.
- Organizational Needs: Automate the organization of files into specific directories.
FAQs about scheduled tasks to copy files to another folder
Conclusion
Windows allows you to create scheduled tasks to copy files to another folder regularly, but this requires knowledge of xcopy/robocopy commands and Task Scheduler. For a more user-friendly experience, you can use professional software like AOMEI Backupper.
AOMEI Backupper not only supports file backup and sync but also offers advanced data management and protection features. Whether you need to transfer OS to another hard drive or manage complex data, its Disk Clone and System Clone features come in handy. It also provides different versions, including a Server edition for Windows Server users, ensuring tailored solutions for various needs.

