Clonezilla Network Clone: Complete Guide & Alternative
This page teaches you how to do Clonezilla network clone and provides an alternative professional network cloning software for cloning multiple computers over network with ease.
By Jonna Updated on June 6, 2025
What Does Network Clone Mean?
Network cloning is the process of duplicating the contents of one computer’s hard drive, such as the operating system, applications, settings, and data, to multiple target computers over a local area network (LAN). Instead of manually installing everything on each machine one by one, it makes it simple to distribute a pre-configured system image from a central server to several computers simultaneously. Network cloning is essential in scenarios like:
- Classroom or lab setups: Quickly prepare dozens of PCs with the same OS and tools.
- Corporate environments: Reimage PCs for a company-wide refresh; or roll out a new system to employees without the need for individual configuration.
- Disaster recovery: Restore multiple machines after a system failure using a stored master image.
Clonezilla is a free and open-source software used for partition and disk imaging and cloning. Also, it offers network clone that help you image and roll out multiple machines with ease. This guide explains everything in detail about Clonezilla network clone, and offers alternative network cloning software with an intuitive interface.

How to Perform Clonezilla Network Clone: Step by Step Guide
Setting up a Clonezilla clone over network requires a bit of prep work, but once it's configured, it is highly effective. Here's how to get started:
Step 1. Prepare the Environment
- Requirements: One server PC (with Clonezilla SE installed) and client machines that support PXE boot.
- Ensure all machines are on the same subnet.
Step 2. Set Up Clonezilla SE (Server Edition)
- Use a dedicated Linux machine to install Clonezilla Server Edition.
- Install the required services: DHCP, TFTP, NFS, and DRBL.
- Run the drblsrv -i command to start the DRBL setup.
- Configure the network interface and allow Clonezilla to assign IPs via DHCP.
Step 3. Prepare the Disk Image
- Boot the master machine using Clonezilla Live.
- Use the save disk option to capture the disk image.
- Store the image on the Clonezilla server in the appropriate directory.
Step 4. Deploy the Image via Network Clone
- Boot the client machines via PXE (Preboot Execution Environment). Make sure that all target machines are set to boot from the network, they should automatically detect the DRBL server and load Clonezilla.
- Choose restore disk on the server and select the stored image.
- Deploy using multicast or unicast depending on network conditions.
Step 5. Reboot and Verify
- After cloning, clients will automatically shut down or reboot.
- Boot them up to ensure the system image was successfully deployed.
Disadvantages of Clonezilla Network Clone
That's all about how to clone with Clonezilla over network. While network cloning on Clonezilla is powerful, it's not perfect. Several drawbacks may make it less than ideal in certain environments:
🔻Complex setup: The setup process, especially for the server edition, is not beginner-friendly.
🔻No GUI for operations: Everything is command-line driven, which can slow down troubleshooting or configuration.
🔻Limited hardware compatibility: PXE booting and certain drivers may not work seamlessly across all systems.
🔻Lack of automation: There’s no easy scheduling or automation unless you script it yourself.
Clone Multiple Computers over Network with Network Cloning Software
Overwhelmed by the complexity of Clonezilla network clone? If you need a more streamlined, intuitive solution, try AOMEI Image Deploy - a professional image deployment software and network cloning software. Worked perfectly on Windows 11/10/8.1/8/7 and Windows Server 2025/2022/2019/2016/2012/2003, this tool allows you to clone Windows image to multiple PCs over network.
It offers AOMEI Image Deploy Free, which is applicable to unlimited PCs and up to 20 servers, and AOMEI Image Deploy Technician, applicable to unlimited PCs and servers and working on computers with dissimilar hardware. You can download the AOMEI Image Deploy Free Edition and have a try first.
It is important to note that you need to prepare a system image or a disk image without SID in advance, as a backup file containing the SID may cause incompatibility with the deployed computers. In this case, we recommend that you use sysprep to remove the SID before deploying the image without the SID.
However, AOMEI Image Deploy cannot create backup images. That means you need to download other software to create a system image or disk image. You can try free backup software like AOMEI Backupper Standard.
Suppose you don't want to download two software programs, you can just try the all-in-one software, AOMEI Backupper Technician or Technician Plus, which supports creating system backup images and image deployment. In addition, it offers various functions such as cloning systems/disks/partitions, creating bootable disks, and so on.
Step-by-Step Guide on System Clone over Network using AOMEI Image Deploy
Before deploying the created image to multiple computers, there are a few things you need to confirm and prepare to ensure that the AOMEI Image Deploy runs smoothly.
1️⃣Select a fully functional computer running Windows 11, 10, 8, 7, XP, Vista, or Server 2003, 2008, 2012, 2016, 2019, 2022 operating systems. And make sure it uses the same network segment as all client computers.
2️⃣Ensure that the Windows Recovery Environment (Windows RE) is installed on the server computer system. If the system version is lower than Windows 7, download Windows AIK/ADK.
3️⃣Configure the necessary system settings, applications, and data on the server computer.
4️⃣Verify that the network interface cards (NICs) in all client computers support PXE booting(or network booting).
5️⃣Ensure that the target disks used for mirror deployment have the same serial number. It is recommended to remove all other disks in the client computers and keep only the target disk for image deployment.
Once you are ready, you can follow the steps below to learn how to set up multiple computers with the same configuration. Take for example cloning a Windows 10 image to multiple computers.
Step 1. Create Bootable USB with AOMEI Backupper
Download and launch the free AOMEI Backupper software and go to Tools > Create Bootable Media to create a bootable USB or CD/DVD.

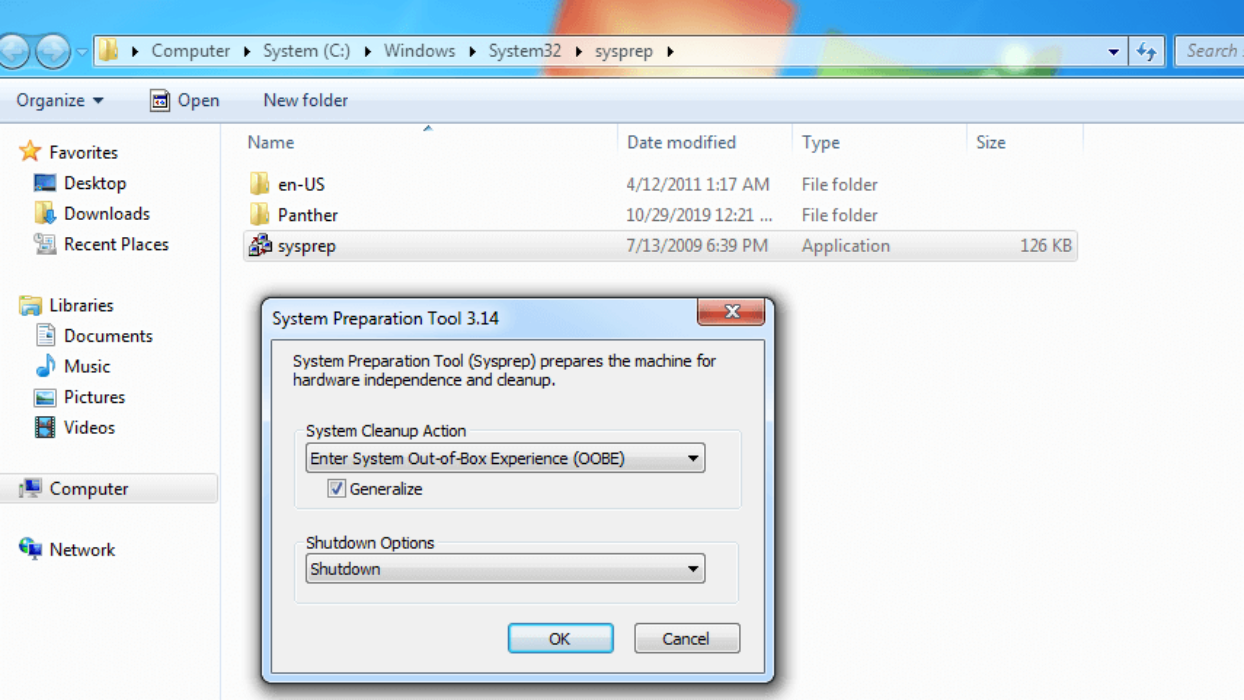
Step 2. Remove the SID a Properly Configured Computer
Press Win + R and type sysprep to open Sysprep.exe. Choose Enter System OOBE, tick Generalize option, and select Shutdown. This step is critical for users to avoid compatibility issues after deployment.
Step 3. Create a System Image without SID via AOMEI Backupper
Plug in the bootable drive and boot your computer from it. On AOMEI Backupper homepage, select Backup > System Backup or Disk Backup, select a network path to save the backup image, and click Start Backup to backup Windows 10 to network drive.

Step 4. Create Windows PE or Bootable ISO File
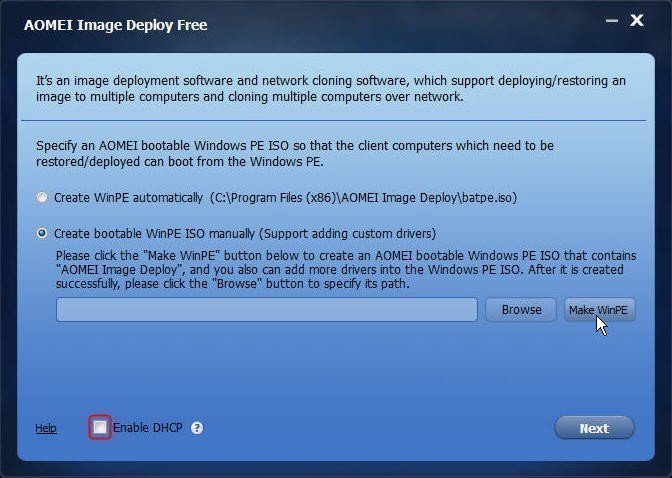
Start AOMEI Image Deploy Free edition on the server computer in the same LAN. Then, click Create WinPE automatically to create a bootable ISO file and check Enable DHCP to boot client computers over network. Finally, click Next.
- ★Notes:
- If there are driver incompatibilities in the client computer's hardware that prevent the automatically created WinPE from booting the target computer, select theCreate bootable WinPE ISO manually option. This option allows you to add compatible drivers to WinPE.
- If you are using a router and have assigned an IP address to your computer, you usually need to enable the DHCP server. It is recommended to check Enable DHCP to ensure that client computers can automatically connect to the network.
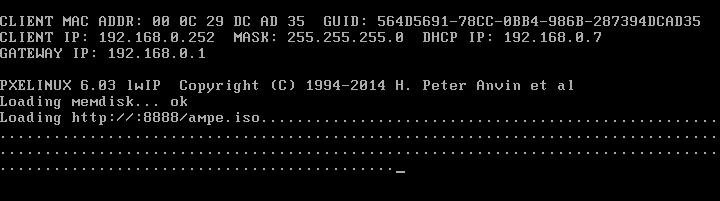
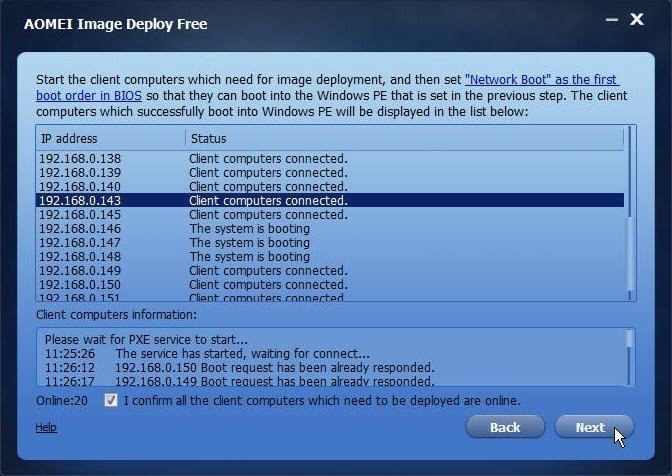
Step 5. Boot All Client Computers over PXE or Network Boot
When AOMEI Image Deploy displays The service has started, waiting for connect..., boot all client computers and set PXE boot or network boot as the first boot option and boot from that option. The client computers will display the following:
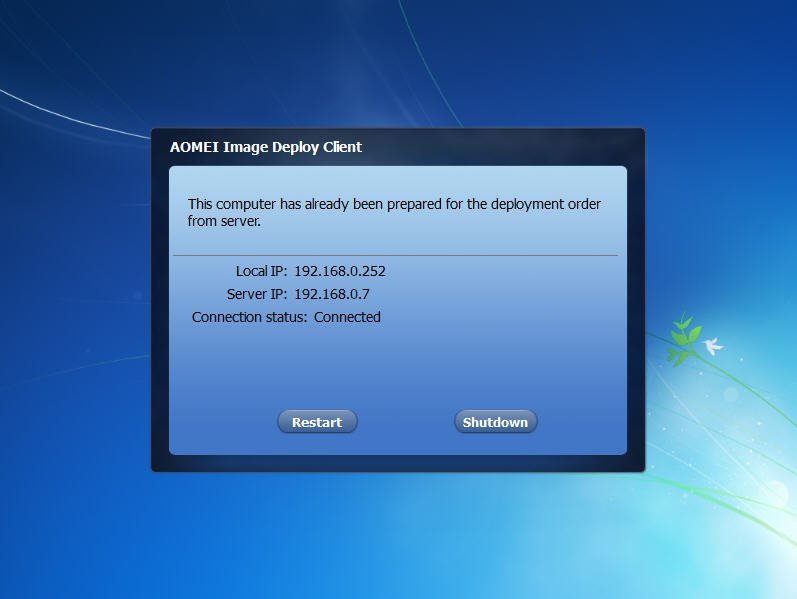
Also, you will see on the server computer the IP addresses and status of all client computers once they are connected (client computers are connected). In this case, check I confirm all the client computers that need to be deployed are online and click Next.
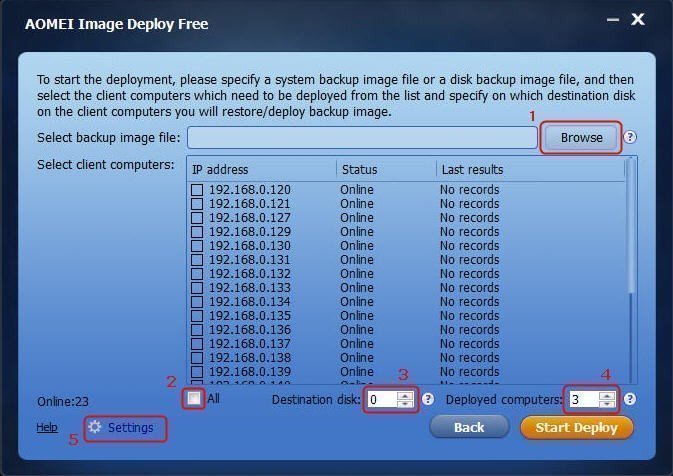
Step 6. Specify Backup Image and Set Deployment Settings
Click Browse in the Select backup image file box to locate the backup image to be deployed. Then, check All to select all online client computers or only some client computers for image deployment.
After that, set the number of target disks and the number of computers to be deployed at once. Please note that all target disks must be the same. Usually, if there is only one disk on a client computer, the number is 0. Finally, click on Start Deploy to deploy the image to multiple computers.
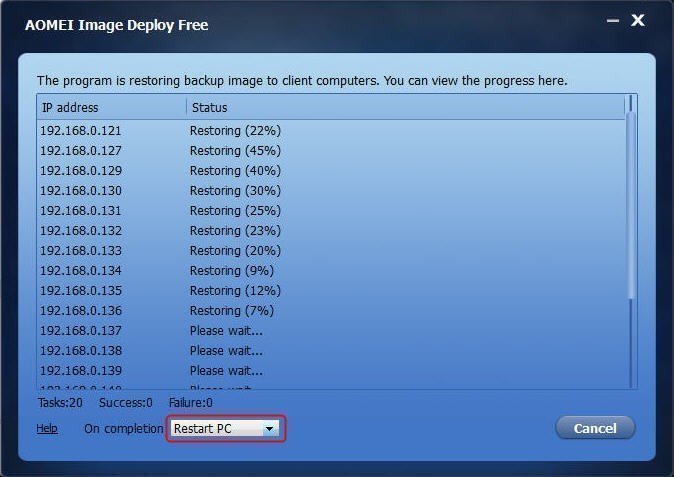
This is all about deploying Windows 10 image to multiple computers. Now, you can view the progress of image deployment for each client computer on this software. You can preset the actions after completion, including shutting down the computer and restarting it.
FAQs about Clonezilla Cloning
#1. Can Clonezilla clone Windows 10?
Yes, Clonezilla can clone Windows 10 systems, including all partitions and boot sectors. However, Windows must be shut down properly to avoid inconsistencies during cloning.
#2. Can Clonezilla clone to a larger drive?
Clonezilla supports cloning to a larger drive, but you may need to manually resize partitions after cloning, especially if the image doesn’t automatically utilize the extra space.
#3. What is the difference between Clonezilla Live and Server?
- Clonezilla Live is designed for single-machine use. You boot from a USB and perform the cloning locally.
- Clonezilla Server Edition (SE) supports network-based deployment for cloning multiple systems simultaneously.
#4. What are the disadvantages of Clonezilla?
Clonezilla’s primary drawbacks include:
- A command-line-heavy interface
- Lack of real-time monitoring
- Complexity in network setups
- Require Linux knowledge for advanced use
#5. Does Clonezilla copy empty space?
By default, Clonezilla uses a smart cloning method that skips empty blocks, making the process faster. However, if you choose the “dd” option, it will copy everything - including empty space.
Verdict
Clonezilla network clone is a powerful solution for those who need to deploy images across multiple systems, like using Clonezilla to clone Windows 10 to multiple computers. It’s free, open-source, and highly customizable. However, it’s not the easiest tool to use, especially for those unfamiliar with Linux environments and manual configurations.
For those who prefer simplicity and speed without sacrificing control, tools like AOMEI Image Deploy offer a more intuitive experience.

