Clone IDE Hard Drive to IDE or SATA with Best Duplicator [Guide]
This article discusses how to clone old IDE to new IDE hard drive or SATA drive without reinstalling Windows 11/10/8/7/XP/Vista. The easiest way is using IDE to IDE duplicator.
By Delia Updated on June 18, 2025
The need to clone IDE hard drive
Cloning an IDE hard drive refers to creating an exact copy of the entire contents of one IDE hard drive onto another. And cloning IDE to IDE or SATA is commonly done for various reasons, including:
- Backup and data recovery: Cloning allows you to create a backup of your entire hard drive, ensuring that all your data, settings, and applications are preserved. In case of hardware failure or data loss, you can easily restore the system to its previous state.
- Upgrade or replacement: If you have an old IDE hard drive and want to upgrade to a larger or faster one, cloning is a convenient way to transfer all everything and avoid reinstalling the operating system and apps.
- Disk imaging and system deployment: In a corporate or IT environment, system administrators often use cloning to create a standard disk image that can be deployed across computers.
Prepare for IDE to IDE clone
To clone an IDE hard drive, you'll need a few things:
| 💾Prepare the target drive | Ensure it has enough space to accommodate all the data of the source drive. |
| 💻Connect both hard drives | If your computer has two connectors, you can connect both drives directly. If not, you can use an external USB-to-IDE or SATA-to-USB adapter to connect the destination drive externally. |
| 🔐Backup the target drive | It is essential to have a backup of critical data before starting the cloning process, because everything on the target disk will be overwritten. |
| 🔰Pick a IDE hard drive cloner | When it comes to hard drive replacing or upgrading, a cloning software is needed if you don't want to install OS and programs from scratch. |
Here I will present you AOMEI Backupper Professional. It's not only a reliable IDE to IDE hard drive duplicator, but also applies to cloning IDE to SATA or even cloning SATA to NVMe. It supports Windows 11/10/8.1/8/Vista/XP, working well on both newer systems and older systems.

-
Complete cloning options: It offers System Clone for only OS migration, Partition Clone for specified partitions, and Disk Clone for entire disk duplication.
-
Intelligent clone mode: You can copy only used sectors and therefore clone larger IDE hard drive to smaller IDE/SATA drive.
-
Sector-by-sector clone mode: You can copy every sector indiscriminately when the target drive is larger or equal-sized.
-
Create Bootable Media: Create a WinPE bootable drive to perform disk clone without booting into Windows. This ensures the stability of the cloning process and also speeds it up.
Download and install the IDE hard drive cloner to have a try!
How to clone IDE to IDE/SATA step by step in Windows
1. Install the new IDE HDD to your PC. Install the IDE to IDE cloner – AOMEI Backupper Professional and start it.
2. At the main console, click Clone > Disk Clone. If you only want to transfer Windows to another drive, simply choose System Clone instead.

3. Select current running IDE hard drive as the source disk.

4. Select the new IDE hard drive or SATA drive as the target disk.

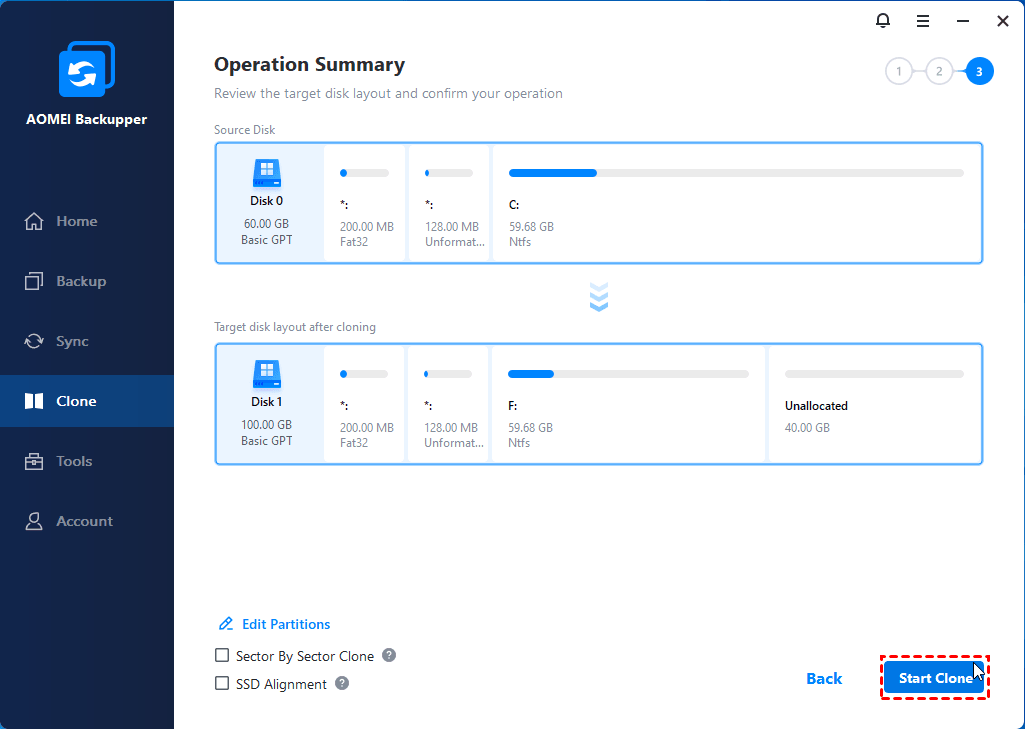
5. Check the Operation Summary and click Start Clone at last.
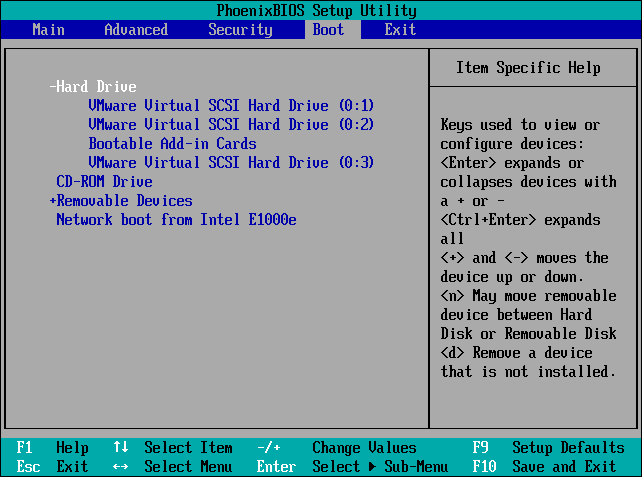
On completion, replace old IDE drive with the new one. It is suggested to remove original IDE hard drive to perform a thorough boot test. If you want to keep the old drive for storage, remember to enter BIOS during startup, and change the boot order (give the cloned hard drive the first priority).
📑Tips:
👉 Edit Partitions: you can resize partitions or convert disk type of new IDE drive. You have 4 options in total.
- Copy without resizing partitions: It will not resize the partition size.
- Add unused space to all partitions: It will reallocate the unallocated space to each partition of the target disk, appropriate for the disk size.
- Manually adjust partition size: It allows you to extend unallocated space to any partition on the destination disk you want.
- Convert the destination disk from MBR to GPT: It helps to convert the partition style of the destination disk if it is different from the source disk.

👉 Sector By Sector Clone: you can recover deleted and formatted data by ticking this. However, it will make edit partitions unavailable.
👉 SSD Alignment: when you clone IDE hard drive to SSD, check this option to improve the target SSD’s reading & writing speed and prolong its life span.
👉 This IDE cloner supports data disks and system disks of all brands and partition styles. You can clone MBR to MBR/MBR to GPT or GPT to GPT/GPT to MBR directly. But you still need to make sure the partition style of the target disk is compatible with the boot mode (MBR for Legacy BIOS and GPT for UEFI).
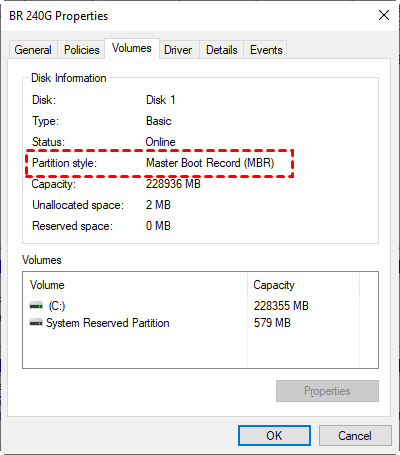
If you are not sure about the partition style of your disk, check it here:
- Press Win + R to open the Run window. Then, type diskmgmt.msc and hit OK to open disk management.
- Then, right-click the disk and select Properties in the pop-up window.
- Select the Volume tab and confirm the partition style.
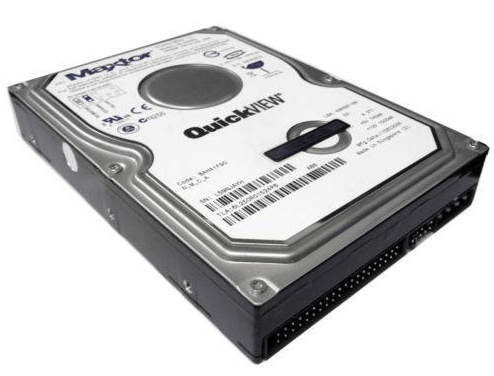
Bonus: What is IDE hard drive?
An IDE (Integrated Drive Electronics) hard drive, also known as Parallel ATA (PATA) hard drive, is a type of storage device used in older computer systems. IDE drives were widely used in personal computers from the early 1980s up until the mid-2000s when they were gradually replaced by Serial ATA (SATA) drives.
In modern computer systems, IDE hard drives are no longer commonly used, but some manufacturers still build their computers with this kind of hard drive. Generally speaking, except for low data transfer rate, IDE hard drive can meet most basic computer operations like reading and writing files. Surely, for a user who pursues fast running speed in gaming, it is suggested to upgrade IDE hard drive to SATA HDD/SSD.
FAQs about cloning IDE hard drive
1. Can I clone an IDE hard drive to a larger drive?
2. Is it possible to clone an IDE hard drive to an SSD?
3. Do I need to format the target IDE drive first?
Conclusion
AOMEI Backupper, the easiest IDE to IDE hard drive duplicator, provides a good way to clone IDE disk in Windows. To clone a particular data partition, try Partition Clone feature instead.
If you’re running Windows Server operating systems, like Windows Server 2008, 2012, or 2016, the specialized Server edition is more suitable for you.

