Upgrade IDE Hard Drive to SATA SSD in Windows 10, 8, 7 (Bootable)
How to upgrade IDE hard drive (HDD) to SATA SSD without data loss and reinstalling? The easiest solution is using professional cloning software like AOMEI Backupper.
By Jonna Updated on August 22, 2023
About IDE and SATA hard drive
The Integrated Drive Electronics (IDE) interface, also called Advanced Technology Attachment (ATA) or Parallel Advanced Technology Attachment (PATA), was the first computer interface standard that developed by Western Digital and COMPAQ Computer.
IDE has been widely applied to computers since 1986. But with the development of technology, the traditional IDE hard drives with a maximum data transfer rate of 133 MB/s can no longer satisfy the user needs. Therefore, the Serial Advanced Technology Attachment (SATA) drive was subsequently introduced in 2003, and dramatically replaced IDE hard drive.

Why upgrade IDE hard drive to SSD?
Compared with IDE hard drive, SATA disk has many advantages:
- The data transfer rate of SATA drive can reach up to 6GB/s.
- SATA hard drive is usually created with larger capacities.
- SATA interface supports hot plugging while IDE does not.
- It has better error correcting capability since it works with embedded clock signal, which also improves the reliability of data transmission.
Some technological features are not listed here, but they also bring us more convenience. In a nutshell, upgrading IDE hard drive to SATA disk like SATA SSD is definitely worth it.
As for the method, some users would like to swap old hard drive with the new one and clean install Windows 10 on it. Nevertheless, most PC users find it is simpler to just clone IDE HDD to SATA SSD, thus they don’t have to reinstall Windows, programs and re-configure those settings. Well, here's a guide to help you do so.
Presiquetes of upgrading IDE HDD to SSD
There are some things you need to prepare before cloning data and OS from IDE HDD to SSD.
-
Check if your PC actually supports SATA interface.
-
A SATA SSD (or HDD) to replace the IDE hard drive.
-
Reliable IDE hard drive duplicator - AOMEI Backupper Professional. This ensures the successful boot after data migration from IDE hard drive to SATA SSD. AOMEI Backupper supports cloning big IDE hard drive to smaller SATA SSD and vice versa, which saves the time of resizing partition.
-
If you want to upgrade IDE laptop to SSD, a USB-to-SATA cable adapter might be necessary.
How to replace IDE hard drive with SSD via AOMEI Backupper?
1. Install the SATA SSD on your PC. Install AOMEI Backupper and start it. Click Disk Clone under the Clone tab. If you want to migrate operating system only, please choose System Clone instead.

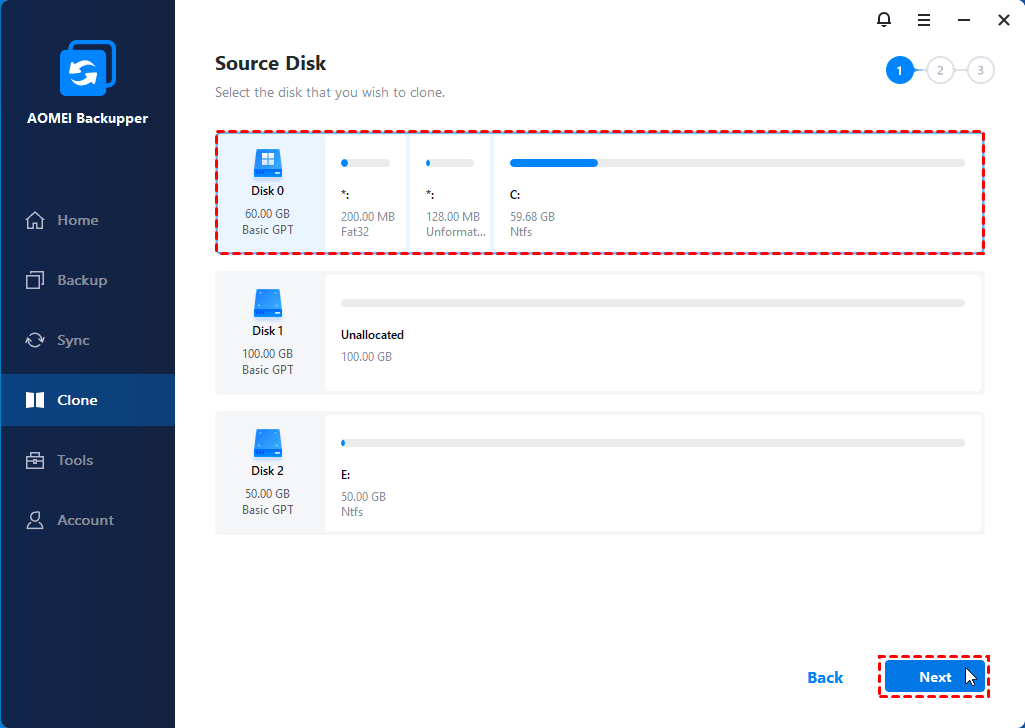
2. Select the IDE hard drive as the source disk.
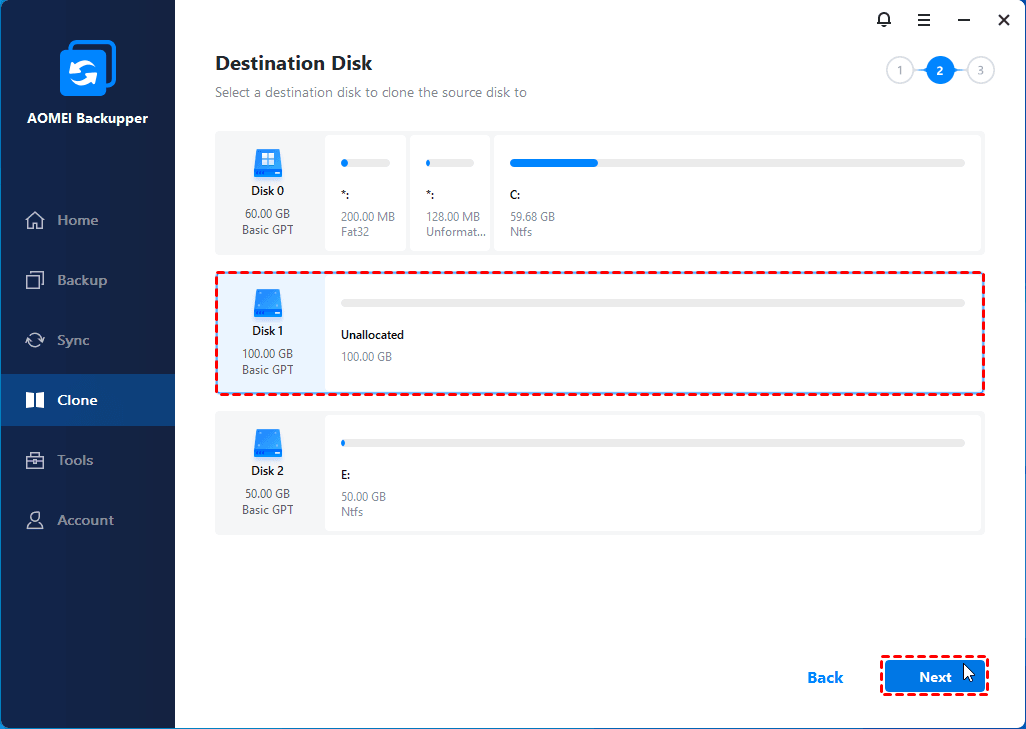
3. And then select the SATA SSD as the target disk. Please pay attention to this step, because all the data on the target disk will be overwritten.
4. At the lower left corner, tick the SSD Alignment option to improve the reading and writing speed of the target SSD. You can also check Sector by sector clone to copy all the sectors to a larger or equally sized target disk. Then click Start Clone to execute the operations.

5. After cloning, you can remove old IDE hard drive to test if the cloned SSD works. Remember to switch IDE mode to AHCI mode in BIOS before you boot from the SSD.
Tips: You can create bootable media to complete this task under Windows PE mode, which consumes less power and takes up less time.
FAQs on upgrading IDE to SATA SSD
#1. Can I replace an IDE hard drive with SATA?
Yes, you can replace an IDE hard drive with an SSD by cloning IDE to SSD. But you have to use professional disk cloning software like AOMEI Backupper, which facilitates the seamless cloning of data, encompassing the operating system, from the IDE disk to the SSD drive.
#2. Can SSD work in IDE mode?
The IDE mode was not originally intended for SSD drives, and in the worst scenarios, it can result in accelerated degradation of the drive beyond its intended specifications. By switching to AHCI mode, you can significantly enhance the drive's longevity and ensure a safer usage experience.
#3. How do I upgrade my laptop hard drive to SSD?
Upgrading hard drive on laptop to SSD is an easy task using third-party cloning software like AOMEI Backupper, since Windows does not offer a cloning tool that allows you to perform this task. This software not only allows you to upgrade hard drive to SSD with larger capacity but also enables you to clone hard drive to smaller SSD hassle-free.
Conclusion
It only takes several steps to upgrade IDE hard drive to SSD with the help of AOMEI Backupper. As a matter of fact, this all-around software is capable of many other things. Except for SATA disk, you can clone HDD to MSATA SSD as well. In the days of using SSD later, you can use this software to automatically backup files to external drive to add an extra layer of protection for your PC.

