How to Clone SATA SSD to M.2 NVMe [Step-by-Step Guide]
You will learn more about SATA vs NVMe in this article and how to clone SATA drive to NVMe SSD without boot issues.
By Lily Updated on August 28, 2025
💡Key Takeaways:
|
|
|
Step 1. Go to Clone tab and choose Disk Clone Step 2. Specify the SATA drive as Source Disk and the NVMe drive as Destination Disk Step 3. Overview the operation and start clone Step 4. Boot from the cloned NVMe |
Case: Can I Clone SATA SSD to NVMe SSD?
“I plan to clone my Windows 10 and files on Crucial SATA SSD to a new NVMe SSD, from which I will always boot, but I'd also like to wipe the source SATA SSD and use it as additional storage space on the same PC. Can I do this and how?”
YES, you can clone SATA SSD or HDD to NVMe as long as your system supports it. Most of NVMe SSDs use the M.2 form factor, but not all M.2 slots support NVMe - some M.2 slots only support SATA-based SSDs, so it's better to check your motherboard’s manual to see which type of M.2 drives it supports.
💬If your motherboard has an M.2 slot that supports NVMe, and your computer supports UEFI boot mode, you can then use disk clone software to clone SATA to M.2 NVMe SSD directly. It’s also a wise option to keep the SATA drive as a secondary storage device.
Some NVMe SSDs in add-in card form can also be installed directly into a PCIe expansion slot on a motherboard. These cards are often referred to as "NVMe SSD add-in cards" or "NVMe PCIe expansion cards."
In the next section, I will elaborate on what you need to prepare for this.
What to Do Before Cloning SATA to NVMe
As stated, NVMe-enabled M.2 slot (or PCIe expansion slot in some cases) and UEFI boot mode are required for SATA to NVMe clone. In addition, you still need to do the following preparations:
✅Download and install disk clone software
A NVMe SSD will not boot in legacy mode. It needs to be partitioned as GPT to work with UEFI. So if your source SATA drive is formatted with MBR in old BIOS, you will need to convert the partition style in advance to avoid cloning SATA SSD to NVMe inaccessible Boot Device and similar issues.
To simplify the process and improve the success rate, I would recommend AOMEI Backupper Professional here.

-
It has a Disk Clone feature that can clone system disk from GPT to GPT or MBR to GPT without conversion. If you only want to clone Windows 10 from SATA to NVMe, you can use System Clone instead.
-
It runs in an intelligent clone mode by default to copy only used sectors. You can clone larger HDD to smaller SSD or clone SSD to larger SSD.
-
For the target NVMe SSD, you can perform automatic SSD Alignment to accelerate its reading and writing speed.
This program works on all editions of Windows 11, 10, 8.1/8, 7, and Vista. Download it to have a shot.
(*The Clone features in Free Trial are for demo only. To complete the operation, please upgrade to full version.)
✅Connect NVMe SSD into the NVMe M.2 slot correctly
Motherboards using the recently released Intel z97 and AMD FX 990 chipsets support both M.2 SATA and PCIe SSDs. In addition, there are numerous notebooks already having M.2 PCIe slots.
You can check your system specifications and user manual to see if it is compatible. If yes, make sure to connect the NVMe SSD to the right slot, otherwise it may not show in BIOS.
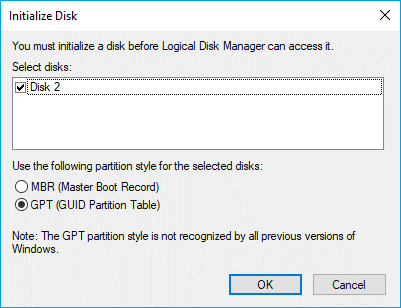
If the NVMe SSD is brand new, you may be asked to initialize it when you install it (or open Disk Management). Select the partition style as GPT (GUID Partition Table) and click OK.
✅Get enough space to run disk cloning
Cloning hard drive from one to another requires the target drive has enough space to hold all the existing data on the source disk. And this affects whether the cloning is successful or not. To avoid cloned drive won't boot due to not enough space, try the following steps:
- Check disk space of both SATA and NVMe drive. Type diskmgmt.msc in the search box and press Enter to open it. Then, you will see all the available disks and its capacity, partition style, file system, etc.
- Free up space by deleting unnecessary files and apps, run a disk cleanup to clear temporary files in SATA drive.

✅Related tips: check partition style (MBR/GPT)
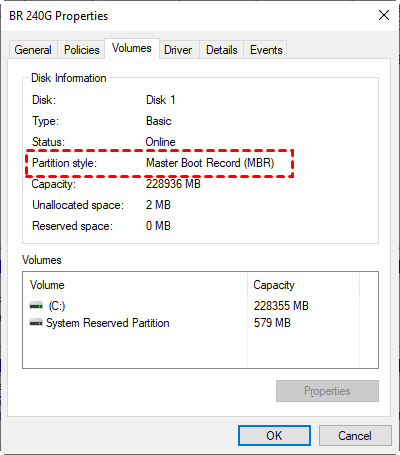
Make sure your target NVMe is partitioned as GPT to properly support UEFI, otherwise you may encounter boot problems. To check the partition style of a disk:
- Press Win + R to open the Run window. Type "diskmgmt.msc" and hit OK to open disk management.
- Then select the disk, go to "Properties" > "Volume" > "Partition style" to check whether the partition style is MBR (Master Boot Record) or GPT (GUID Partition Table).
How to Clone SATA to NVMe Step by Step
To clone SATA to NVMe, you can use the disk cloning software to migrate all the data and OS directly. The way to clone SATA SSD and SATA HDD are all the same. Follow the guide below to do it step by step.
📑If there's any important data on the NVMe SSD, please first go to Backup tab and backup files to external hard drive or other devices. This is because cloning SATA to NVMe will overwrite everything on the target NVMe SSD.
Step 1. Set up disk cloning via the tool you installed
Launch the cloning software, go to Clone tab and choose Disk Clone.
If you only want to clone Windows 10 to NVMe SSD, you can also use the System Clone feature.

Step 2. Specify the SATA drive and the NVMe drive respectively
Select the SATA hard drive or SSD as the source disk, click Next. Then select the NVMe SSD as the destination disk, hit Next to continue.

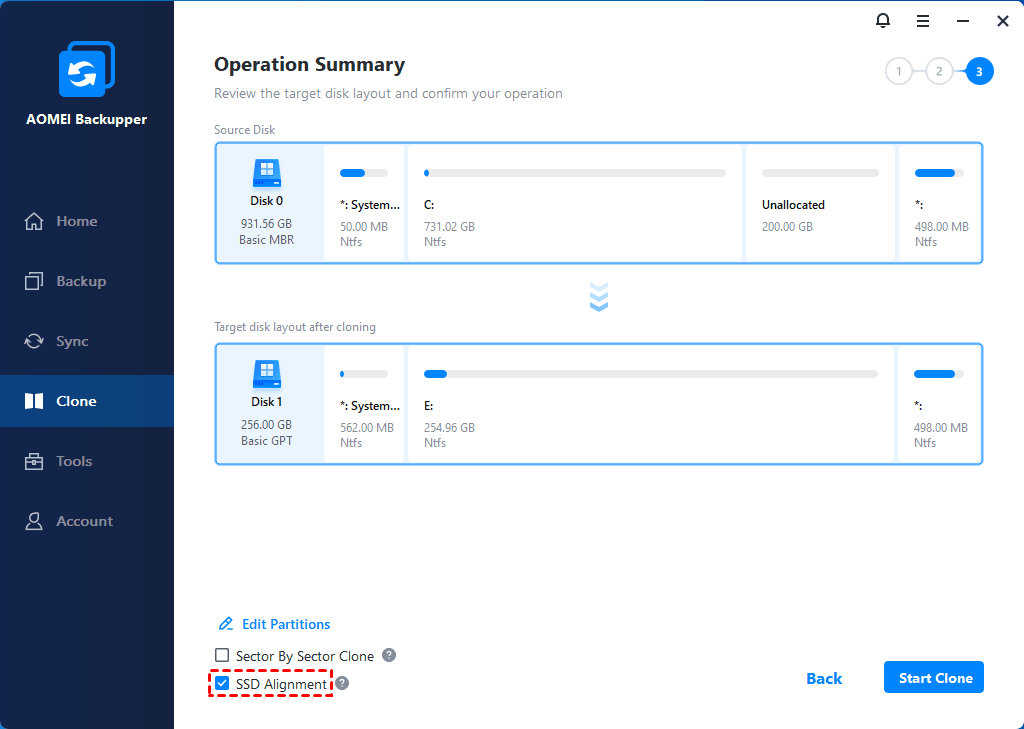
Step 3. Overview the operation and start clone
Tick SSD Alignment to improve the performance of the NVMe SSD, then click Start Clone to execute the operation.
💬You can also use the following features:
👉 Sector By Sector Clone: Clone all the sectors, including the blank and logically bad sectors. You can tick this option when cloning SATA SSD to a larger NVMe SSD. It will take longer time accordingly.
👉 Edit Partitions: Adjust the partition size of the destination disk.
- Copy without resizing partitions: It will not resize the partition size.
- Add unused space to all partitions: Reallocate the unallocated space to each partition of the target disk.
- Manually adjust partition size: It allows you to extend unallocated space to any partition as you want.
- Convert the destination disk... (optional): Convert the partition style (MBR/GPT) of the target disk if you want it to be the same as the source disk. You can also leave it unchecked to keep the partition style unchanged.

Step 4. Boot from the cloned NVMe
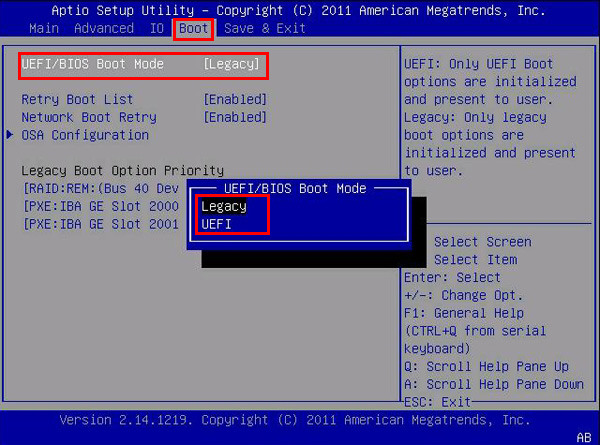
Restart the computer, press a specific key (e.g. F2, F8, F12, Del, etc.) to enter BIOS settings, make sure the boot mode is UEFI boot mode.
If it's Legacy mode, change it to UEFI here, otherwise you may find the cloned NVMe SSD won’t boot.
Note if you want to keep the SATA SSD/HDD as a data storage device, you need to set NVMe SSD as the first boot option in the UEFI menu. As for the SATA drive, you could use the Disk Wipe tool to wipe the hard drive as you like.
AOMEI Backupper also supports you to clone NVMe to SATA, you just need to connect the SATA drive properly and select the source disk and target disk accordingly.
Troubleshooting: Windows Won't Boot from the Cloned NVMe
If you've cloned a SATA drive to M.2 NVMe and are experiencing issues with booting, there are several potential reasons for this problem. You can try the following troubleshooting steps:
1. Ensure the cloning process goes smoothly:
Ensure that the cloning process completed successfully without errors. If there were errors during the cloning process, it might have resulted in an incomplete or corrupted copy of the operating system.
2. Check boot order in BIOS/UEFI Settings:
Make sure your motherboard's BIOS/UEFI firmware is set to boot from the NVMe drive. Access your BIOS/UEFI settings during startup (usually by pressing a key like F2, Del, or F12) and check the boot order.
3. Check the boot mode (UEFI vs. Legacy):
Check if your motherboard is set to use UEFI or Legacy boot mode. NVMe drives often work best with UEFI. Ensure that the cloned system matches the boot mode your motherboard is set to use (Legacy BIOs for MBR and UEFI for GPT).
4. Make sure the required drivers are installed:
NVMe drives sometimes require specific drivers to work properly with your operating system. Ensure that you have the necessary drivers installed. You can often find these drivers on your motherboard manufacturer's website.
For more details, you could refer to: Cloned SSD won't boot
Bonus: SATA vs. NVMe, Which One is Better?
Why do many users want to clone SATA to NVMe? NVMe SSDs utilize the PCIe interface to connect to a computer's motherboard, allowing for high-speed data transfer rates and low latency. Here's an explicit comparison:
SATA (Serial Advanced Technology Attachment) is an interface used to connect solid-state drives (SSDs), hard disk drives (HDDs) and optical drives. SATA greatly improves upon its predecessor - PATA, and under ideal conditions, the read speed can reach up to 600 MB/S.
NVMe (Non-Volatile Memory Express) is the new standard host controller interface that uses the PCI Express (PCIe) bus to connect SSDs. An NVMe SSD can reach a top speed of 3500MB/S, which is 6x faster than a SATA SSD. But given the high speed and low latency, it also costs more - kind of like the comparison between HDD and SSD.
In a nutshell, if you pursue high read & write speed and have enough budget, NVMe SSD is a good choice. The problem is, how can you migrate all the data and the operating system from SATA to NVMe?
Cloning SATA to NVMe FAQ
|
🔍 1. Are M.2 and NVMe the same? No. M. 2 is the SSD form factor, while NVMe is the interface that connects it to the motherboard. They work in conjunction with each other but are 2 completely different concepts. |
|
🔍 2. What is the difference between PCIe 3.0 and 4.0 NVMe performance? The PCIe 4.0 interface offers twice the speed of the previous PCIe 3.0 standard, operating at an impressive 2GB/s per lane, while the latter was limited to 1GB/s per lane. This translates to a significant increase in the maximum sustained read/write speed of PCIe 4.0 drives, which can reach up to 5,000MBps, compared to the 3,500MBps achievable by PCIe 3.0 drives. |
|
🔍 3. What happens if you use a PCIe 4.0 NVMe SSD in a PCIe 3.0 M.2 motherboard slot? You can use a PCIe 4.0 NVMe SSD in a PCIe 3.0 M.2 motherboard slot but the performance will be limited to the maximum speed of PCIe 3.0. |
|
🔍 4. Can a SATA M.2 go to an NVMe slot? Generally speaking, no. This is because NVMe M.2 SSD uses PCIe interface, while SATA and PCIe are 2 different interfaces that are incompatible with one another. But in some cases, a single M.2 slot can support both SATA and PCIe drives. Then you can enter BIOS to configure this M.2 slot to PCIe mode or Auto mode. |
Summary
If you want to clone SATA to NVMe SSD for faster reading and writing speed, AOMEI Backupper is a great helper with its powerful disk cloning feature. With it, you can easily transfer data and operating system between disks with different sizes and partition styles.
Moreover, this software offers complete data protection and disaster recovery solutions. You can use it to schedule automatic backup on regular basis, or perform incremental and differential backup to save changed files only.

