Solved: Acronis True Image WD Edition Will Not Clone
If you are experiencing the “Acronis True Image WD Edition will not clone” issue, continue to read this article, learn the main cause, and fix it by following these 5 practical methods.
By Ivy Updated on March 19, 2025
🌟 Video Guide: How to Fix Acronis True Image WD Edition Will Not Clone
(*This video only offers 3 solutions. To learn more solutions, please read below.)
WD SSD does not come along with disk cloning software, so many users turn to Acronis True Image WD Edition to repalce hard drive. It's designed for the Western digital drive. But sometimes users may encounter the Acronis True Image will not clone issue.
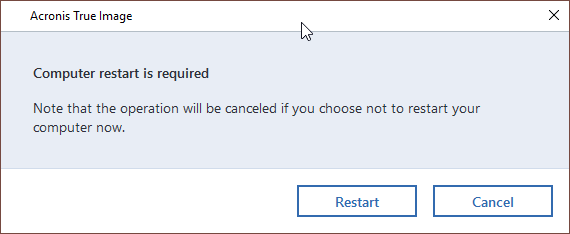
“I got a new SSD from Western digital and then downloaded the cloning software from their website, but this software always tell me ”Acronis computer restart is required” Whenever I try to clone hard drive with it. But Acronis True Image not cloning after restart. Why Acronis WD clone failed? Is it possible to fix it? If not, is there any alternative WD disk cloning software?”
Don't worry too much, this article will explore in-depth the reasons why Acronis True Image WD Edition will not clone and provide corresponding solutions to fix it. The easiest method is using another cloning software. You can try to fix this issue step by step or directly use the ultimate guide below.
🔗 You may also be interested in: WD disk cloning software.
Why Acronis True Image WD edition will not clone?
You may encounter the following three situations while cloning hard drive to WD SSD, from which you can look for relevant clues suggesting possible causes:
#1: Acronis True Image not cloning after restart. When you clone disk using Acronis True Image within Windows, you will be asked to restart the computer. If your computer does not boot to the recovery environment, the Acronis True Image WD edition will not clone. The possible cause is the Secure Boot option is enabled.
#2: Acronis not recognizing WD HDD/SSD. Acronis True Image WD edition does not support the exFAT file system, so Acronis won’t recognize it and you cannot use a hard drive formatted as ExFAT as the target drive. The possible causes are the invalid MBR, EFI partition on the wrong drive, or third-party software blocking access to hard disk drives.
#3: Acronis True Image WD edition installation restricted. This product edition requires at least one Western Digital drive to be installed in your system and the problem is related to a USB cable connected to a WD disk. If you are using a USB 3.0, try USB 2.0 instead.
Now you can continue to fix the Acronis True Image clone failed error, here are 4 solutions responsibly based on the possible cause. Please go to the specific solution directly.
✔ If your system continuously restarts but does not clone, please go to Solution 1 or Solution 3.
✔ The Acronis True Image WD edition does not recognize the connected drive. Go to Solution 2.
✔ If you receive the installation restricted error, please go to Solution 4.
🔥 For a 100% working solution, system reserved partition, or EFI partition on the wrong drive, please go to the ultimate solution.
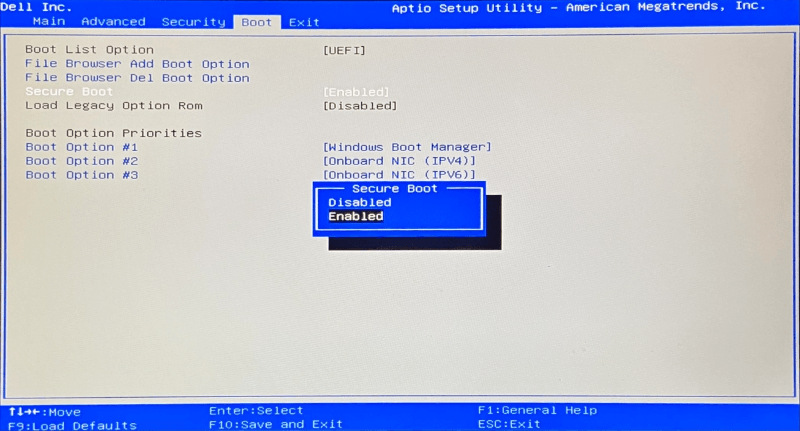
Solution 1: Disable secure boot
The secure boot will be one of the reasons why the Acronis clone failed. To fix this issue, you need to disable Secure Boot in BIOS. Of course, you can enable Secure Boot again after cloning disk with Acronis True Image.
Step 1. Restart your computer, and then press the specified key (eg: F1, F2, ESC, etc) on the initial screen to enter BIOS.
Step 2. Find the Secure Boot option and select Disable. Usually, this option is either under the Security tab, the Boot tab, or the Authentication tab.
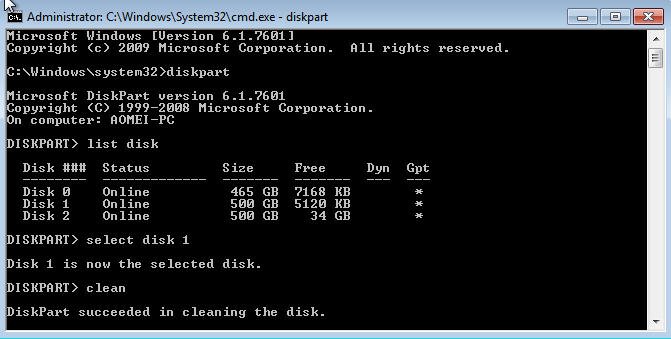
Solution 2: Clean WD hard drive
Sometimes, you can see your disk showing normally in Disk Management. But, it cannot be detected by a third-party tool like Acronis. This situation may be caused by an invalid MBR. Also, the software you use may not support the file system of disk. To fix the problem, you can clean the disk and initialize it, then use Acronis True Image to clone HDD to SSD again.
⭐Tip: This operation will erase the disk entirely, so you need to backup files in advance if there is something important.
Step 1. Type cmd in the search box, then run as administrator.
Step 2. Type diskpart.
Step 3. Type list disk.
Step 4. Type select disk n (n is the number of your disk).
Step 5. Type clean.
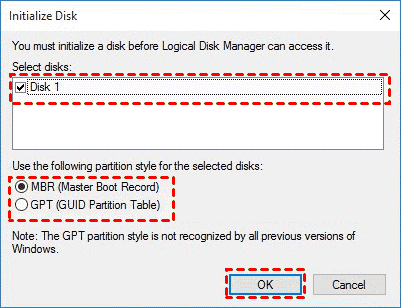
Step 6. Press Win + R to summon the Run window, then type diskmgmt.msc.
Step 7. Right-click the disk marked as Unknown, then select Initialize Disk. Select a disk type: MBR or GPT, and click OK.
Step 8. Right-click the initialized disk and click New Simple Volume to create a new one. Remember to select FAT32 or NTFS as file system.

Solution 3: Try Acronis bootable media
As mentioned above, the WD hard drive may not reboot in the recovery environment, so you can choose to clone hard drive with Acronis bootable media. It can ensure that all your internal or external hard disks will be detected on the system. Please note the bootable disk type should be WinPE.
Solution 4: Download and run the .exe file
If you receive this error message, "Acronis True Image WD edition installation restricted - this product edition requires at least one Western Digital drive to be installed in your system", you could contact WD support, download the special .exe file and run it three or four times, then install the Acronis and use it clone to smaller SSD. You can also replace USB 3.0 with USB 2.0 to connect your WD disk.
Ultimate solution: Try powerful cloning software
After trying the above solutions, if the Acronis WD clone still failed, you could consider using professional disk cloning software as a replacement. Here I strongly recommend AOMEI Backupper, which works well in cloning hard drive to all series of WD SSD, such as WD Black, WD Blue, WD My Passport, WD Green, WD Elements, etc., regardless of partition style, partition size, or file system.
Meanwhile, its Disk Clone feature is able to move system reserved partition or EFI partition, which resolves the Acronis True Image WD edition clone not working issue due to boot partition on the wrong drive, making disk cloning more convenient.

- Simple and easy to use: Even novices can operate this software as a professional.
- Different cloning scenarios: clone hard drive to larger drive, clone larger HDD to smaller SSD, as well as clone MBR disk to GPT disk or vice versa.
- Support cloning disk with different interfaces, such as SATA, PCIe, NVMe, etc. i.e.: transfer Windows 10 to NVMe SSD.
- Compatible with all brands of SSD disks, such as WD, Samsung, Intel, SanDisk, Kingston, etc.
- Improve SSD disk performance, such as reading & writing speed.
- Support Windows 7/8/8.1/10/11/XP/Vista
📢 Note: The Clone feature in the free trial version can only be demonstrated, it's suggested to upgrade to the full version of AOMEI Backupper to make this process smooth.
Necessary Steps Before Cloning:
If the destination disk is smaller, please clean the disk to get enough space to store everything on the source disk, otherwise, the cloning process will fail. You can try to uninstall programs no longer in use or delete useless files. Also, you can directly clone only OS partition instead of the entire disk.
Step 1. On the main page of AOMEI Backupper, click Disk Clone under the Clone tab. To clone only the system, click "System Clone" to start.

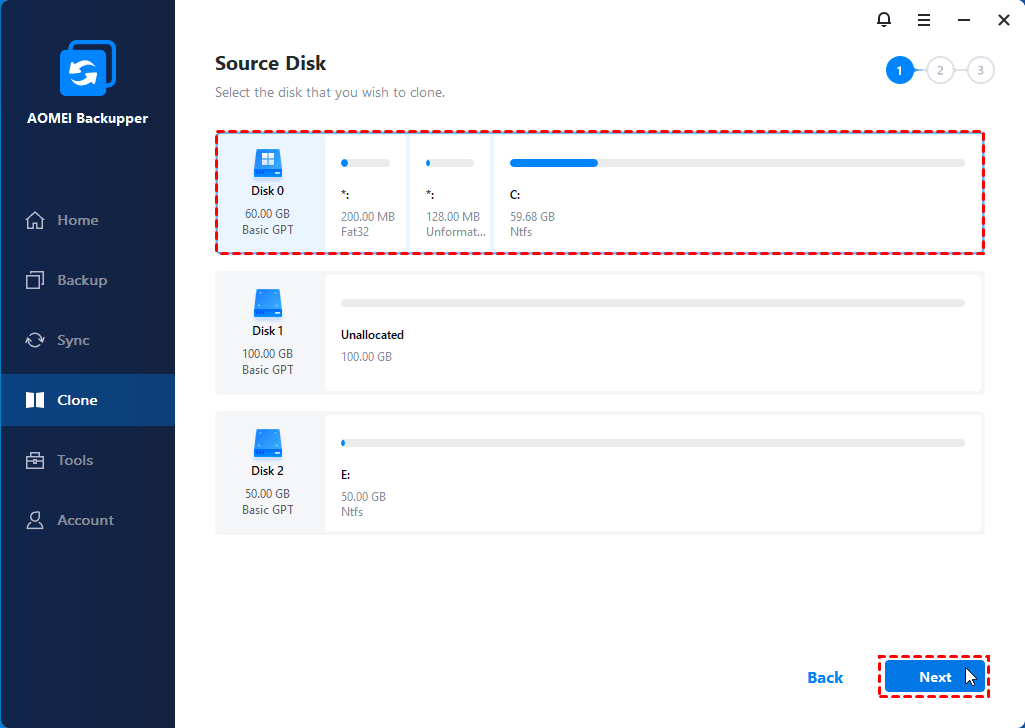
Step 2. Select the source disk and click Next.
Step 3. Select the Western Digital SSD as destination disk and click Next. If there are multiple partitions on the destination disk, it's suggested to tick the first partition for secure boot.

Step 4. Check the option "SSD Alignment" to accelerate the writting and reading speed of your WD SSD disk as well as extend its lifespan. Then, click Start Clone to clone hard drive to WD SSD.

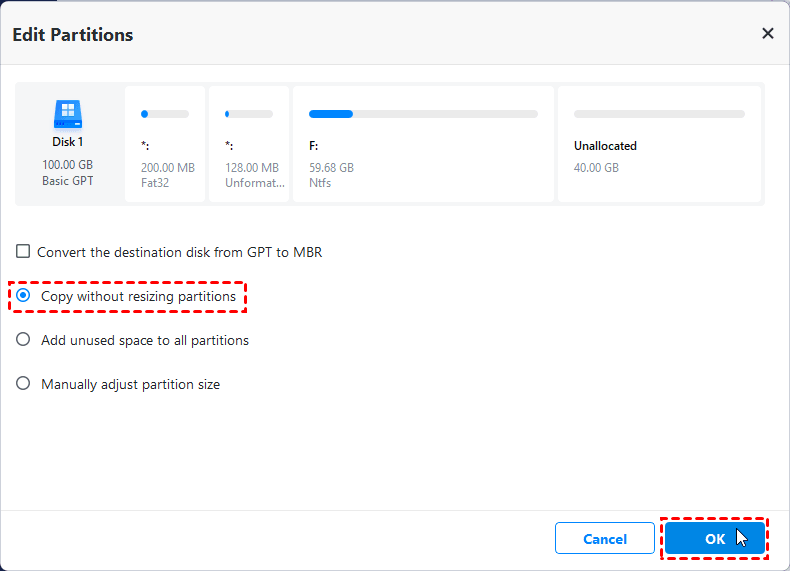
Also, you can use the Sector by sector clone feature to keep the old partition layout or Edit Partitions to adjust the partition size on the destination disk. And the latter one is more practical since it resolves two potential issues during the cloning process.
#1: The cloned drive not show full capacity.
One of the biggest reasons for the "cloned hard drive shows wrong size" error is the cloning software by default makes an exact copy of the source disk unless you change the partition size while cloning. To prevent this from the beginning, try the following 3 options.
👉 Copy without resizing partitions: It will not resize the partition size.
👉 Add unused space to all partitions: It will reallocate the unallocated space to each partition of the target disk, appropriate for the disk size.
👉 Manually adjust partition size: It allows you to extend unallocated space to any partition on the destination disk you want.
#2: The cloned drive not bootable after cloning.
The main cause of "cloned SSD won't boot" is the destination and source disk has different partition styles and you don't convert them to the same before cloning. In this situation, you can simply check the Convert the destination disk from MBR to GPT or vice versa, depending on the disk partition styles of them.
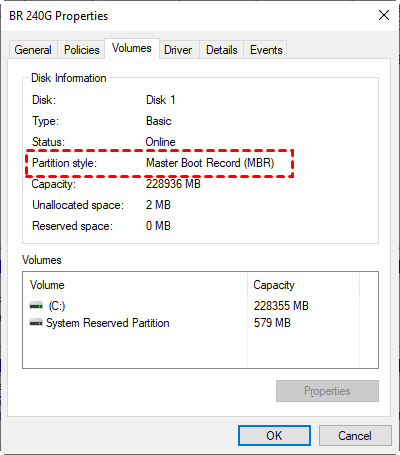
Both MBR and GPT are two different disk types for data storage. And you can check its disk properties in Disk Management. The overall steps are below:
- Press Win + R to open the Run window. Then, type diskmgmt.msc and hit OK to open disk management.
- Then, right-click the disk you want to clone and select Properties in the pop-up window.
- In the Properties window, select the Volume tab and confirm the partition style. It can be MBR (Master Boot Record) or GPT (GUID Partition Table).
- Similarly, check the disk partition tyle of the destination disk. If it is still MBR, you can directly clone hard drive to WD SSD. If not, you need to convert the disk partition style and the easiest way is to use the Edit Partitions feature.
✅ Notes:
✔️ For server users, you could use AOMEI Backupper Server. It supports Windows Server 2003/2008/2012/2016/2019 and all the R2 versions.
✔️ This software is still an M.2 SSD cloner, thus you can use it to migrate Windows 10 to M.2 SSD, clone M.2 SSD to M.2 SSD, etc.
Now, things are half done. You just need to check if the cloned SSD will boot. Only in this way, you can ensure it's available, so you can use it to replace old/damaged hard drive or when the system crashes.
Step 1. Completely shutdown your computer and replace hard drive with cloned SSD using the screwdriver.
Step 2. Install the computer back cover tightly, and connect the power cable.
Step 3. Restart your computer and press specific key shown on the initial screen to access BIOS screen. Usually, the key is F2 or ESC.
Step 4. At last, change the cloned SSD as the first boot option and start Windows from it.

Conclusion
Reading here, you may already solve the cloning problem, “ Acronis True Image WD edition will not clone”. You can turn off the Secure Boot option to solve “Acronis computer restart is required”. Also, you can clear disk and reinitialize it to solve “Acronis True Image not detecting hard drive/SSD”. Besides, you still can try to use Acronis bootable media or contact WD support directly.
Except for these solutions, using AOMEI Backupper Professional to clone WD SSD can be a great choice to fix Acronis true image cloning problem. It makes everything easy. With the help of it, you can clone hard drive in simple steps and boot your computer successfully. Also, you can clone system partition with "System Clone" and clone data partition with "Partition Clone".
If you are experiencing the Acronis True Image WD Edition will not clone issue, the easiest method is to try another powerful cloning software. AOMEI Backupper 👍 is a good choice!

