The Disk Image Isn’t Initialized - How to Use It
You can learn how to easily fix the disk image isn’t initialized. And you can choose a more secure backup software to backup your disk. Please read on for more details.
By Clytze Updated on November 18, 2022
User Case
I made a system image backup of my Windows 10 Toshiba laptop onto a Seagate External hard drive prior to doing a clean install of Windows 10. Now I'd like to open some individual files from that system image. I was able to mount the Seagate external hard drive as a VHD with the letter E: assigned to it. But when I try to open the hard disk image file I get an error message below. So, how can I solve this problem? Any help would be appreciated.

If you also encounter the problem as described in the case, this article will provide you a solution to fix it. For protect your data on the disk, you can select a more secure and professional backup software AOMEI Backupper can help you.
What Is VHD and VHDX?
VHD (Virtual Hard Disk) is a file format representing a virtual hard drive. VHDX (Hyper-V Virtual Hard Disk file format) is the successor format to VHD. The difference between VHD and VHDX is the capacity limit. VHD is limited to 2TB while VHDX is limited to 64TB.
An image backup is a VHD or VHDX file. Therefore, if you want to access the image backup file, you need to restore it. If you only need to restore some of these files in the image or if you encounter the problem mentioned above, you can choose to mount it. You can continue reading to learn how to solve the problem that you couldn’t mount file and the disk image isn't initialized.
Disk Image Isn’t Initialized - How to Use It
You can initialize the disk with the built-in tool Disk Management. And you can follow the steps below.
Step 1. Press Win+X together and choose the Disk Management option.

Step 2. In the Disk Management window, switch to the Action tab located in the upper-left corner and select Attach VHD.
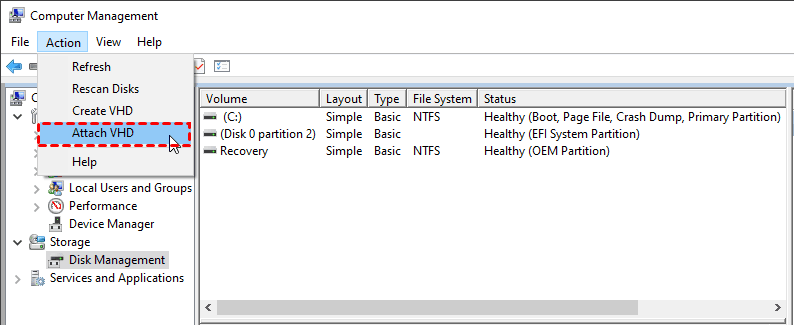
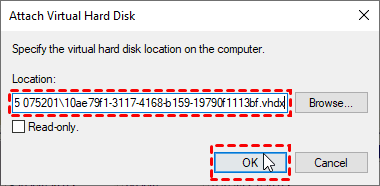
Step 3. When a new window pops up, hit the Browse button to go to the file location. Then, select the Windows system image VHD/VHDX file and click OK.
Tip:
If you want the mounted VHD or VHDX file to be read-only while it's attached as a drive, then check the Read-only box, otherwise leave it unchecked.
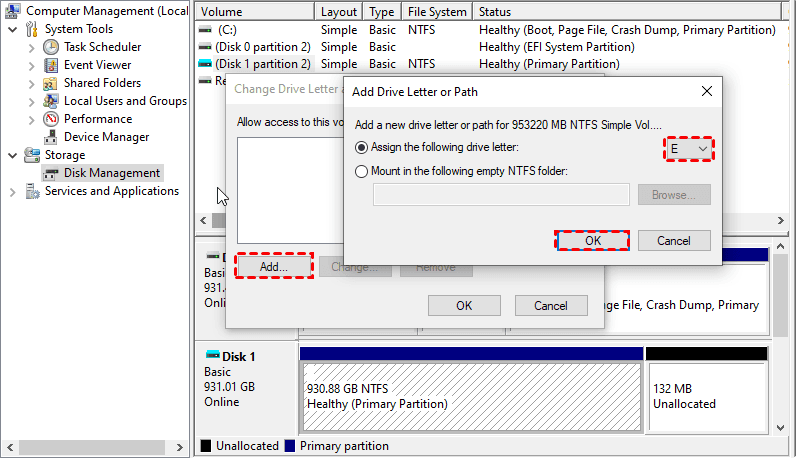
Step 4. After attached, you will find the partitions or disk didn't show in File Explorer only visible in Disk Management. Now, you should assign drive letter for the partitions on the mounted disk: Right-click the partition > Change Drive Letter and Path... > Add... > Choose a drive letter > OK.
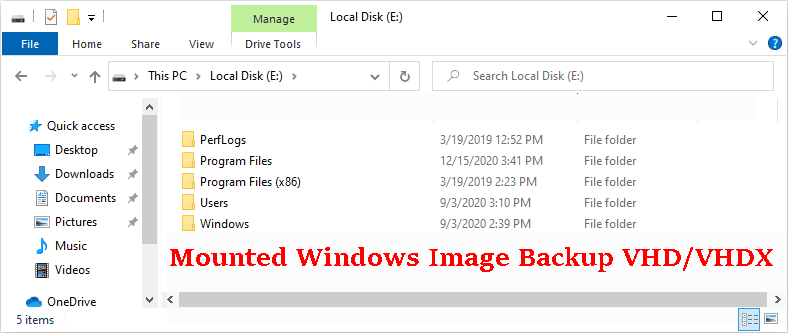
Step 5. The .vhd/.vhdx file will now be mounted and attached as a drive. You will see it open in a separate File Explorer window. And you can recover single or multiple files from your Windows image backup.
The More Secure Way to Backup Your Disk
A corrupted partition on a disk will cause the disk to be uninitialized and thus the disk image will not be available. Then you can only reinstall Windows if your computer has a problem and the reinstallation process will uninstall all your installed programs and delete data on the disk, etc. This is what users don’t want to see.
To protect your data on the disk, you can choose a more secure and professional backup software to help you. AOMEI Backupper Standard is a good choice. And it has the following advantages.
- 4 backup solutions: It offers System Backup, Disk Backup, Partition Backup and File Backup to meet all your backup needs.
- Schedule backup: It allows you to set the fixed intervals (daily/weekly/monthly) to run the backup task automatically.
- Different methods: You can choose full backup or incremental backup to perform your scheduled backup.
- Various backup locations: You can backup your disk to HDD, SSD, USB drive, cloud, network, etc.
- Multiple operating systems: It supports not only all Windows PC systems but also all Windows Server systems.
Now, you can follow the graphic tutorial below to backup your disk.
Step 1. Download AOMEI Backupper Standard, install, and open it. You can click Backup > Disk Backup.

Step . Click Add Disk to choose the disk you want to backup.

Step 3. You need to select the destination for your disk backup and then click Start Backup.

Notes:
- Options: You can enable email notification, choose the compression level for the disk backup and select splitting ways you want, etc.
- Schedule: You can set the disk backups to run automatically at fixed interval as daily, weekly or monthly.
- Schemes: You can select a backup scheme and it will help you save the target disk space by deleting the older backups. It is available in the professional version.
Summary
In this article, you will learn how to use the disk image isn't initialized. To protect the data on the disk, you can use the professional disk backup software AOMEI Backupper to help you. It can not only help you backup disk easily and safely, but also its various backup functions help you protect your data in all aspect.
In addition, if you want to protect your company's unlimited computers, you can try AOMEI Backupper Techplus. Download the software to explore more features.