Complete Guide for High Memory Usage in Windows 10 (14 Solutions)
This guide will share detailed information about high memory usage in Windows 10, including how to check the memory usage and 14 solutions to fix the problem. Please read on.
By Clytze Updated on November 18, 2022
User Case: Why Is My Windows 10 Memory Usage So High?
“Even though I'm not using any programs, the memory usage is still very high in my Windows 10. And when I open a browser or run a program, the memory usage even reaches 99%, is this a normal situation? How can I reduce the memory usage?”
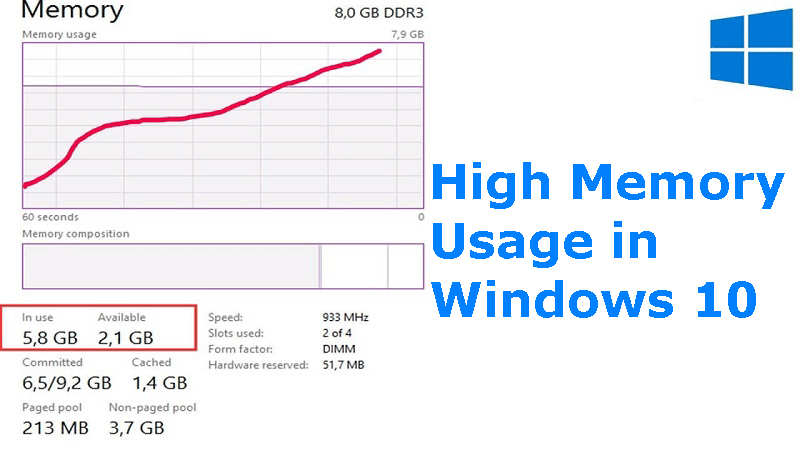
Memory is one of the important components in a computer, it is used to temporarily store the computing data in the CPU and exchange the cache data with the CPU. Since all programs in a computer run in memory, the performance of memory has a great impact on the computer, and the operation of memory also determines the overall speed of the computer running fast or slow. The larger the memory your computer is, the faster the system will run programs.
In the daily use of the computer, Windows 10 high memory usage is one of the very common problems, which is shown as: before you open any software, the memory already occupies more than 70%, and when you use the computer, the memory usage even reaches 99%, which eventually leads to a significant lag in the computer.
I believe many users may encounter the same problem. To solve it, you need the right remedy. The following parts will show you the causes of high memory usage in Windows 10 and solutions. You can read on for more details.
How to Check the Memory Usage in Windows 10
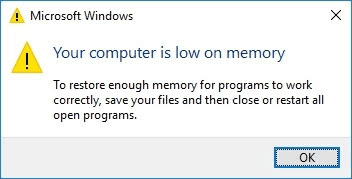
Windows 10 high memory usage is usually related to RAM (memory) and you may receive the following message when your computer has high memory usage in Windows 10.
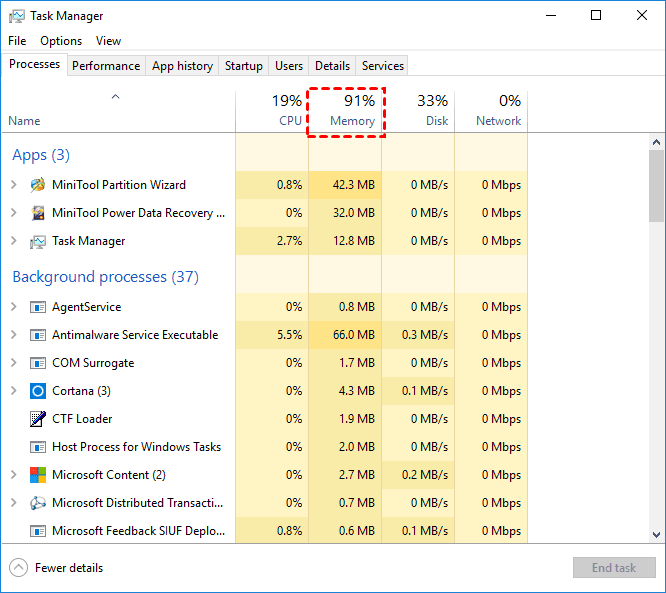
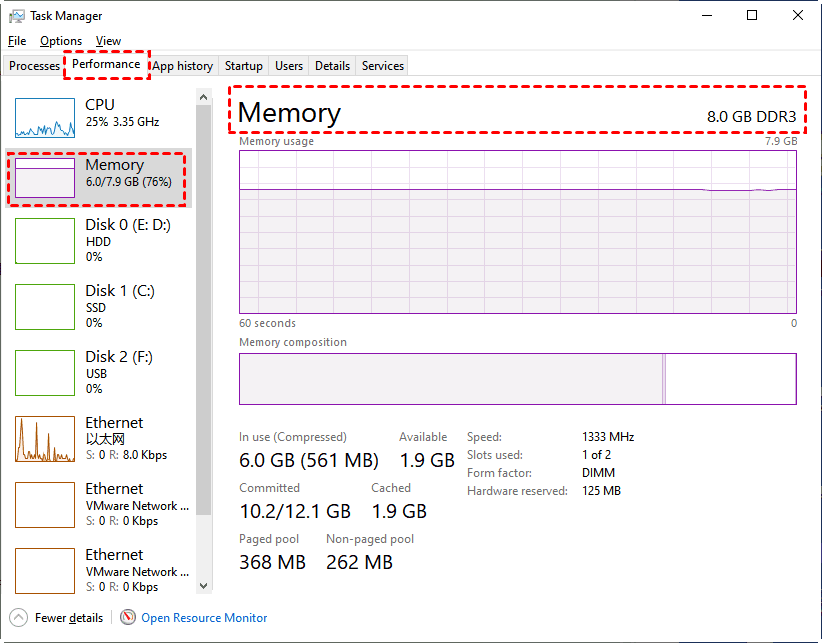
In addition, you can also open Task Manager by pressing the Ctrl + Shift + Del key together to check the memory usage. If the memory column shows 70%-99% (as shown in the picture below), you can identify your computer has a high memory usage problem with Windows 10.
Reasons for High Memory Usage in Windows 10
When your computer has the problem of high memory usage in Windows 10, you need to know that it is not caused by Windows 10, but by the application you are using and the hardware itself or other factors. To solve this problem, the method you choose to use should depend on the cause. Many reasons will cause the problem and this article summarizes the most common ones below.
- Running too many programs at the same time
- Too many programs started automatically at boot
- Registry hacks fail to free up virtual memory
- Insufficient physical or virtual memory
- Insufficient disk space
- Attack by virus
- Other reasons
How to Fix High Memory Usage in Windows 10
After knowing the reasons, you can fix high memory usage in Windows 10with 14 ways. And you can follow the steps below.
- Method 1: Disable startup programs
- Method 2: Close unneeded applications
- Method 3: Increase virtual memory
- Method 4: Increase physical memory
- Method 5: Disable Superfetch service
- Method 6: Defragment the hard disk
- Method 7: Set ClearPageFileAtShutdown to free up virtual memory
- Method 8: Run a virus scan
- Method 9: Move programs to an external hard drive
- Method 10: Uninstall unnecessary applications
- Method 11: Tune your computer for optimal performance
- Method 12: Disable Chrome preload option
- Method 13: Disable NDU in the registry
- Method 14: Reset or reinstall Windows 10
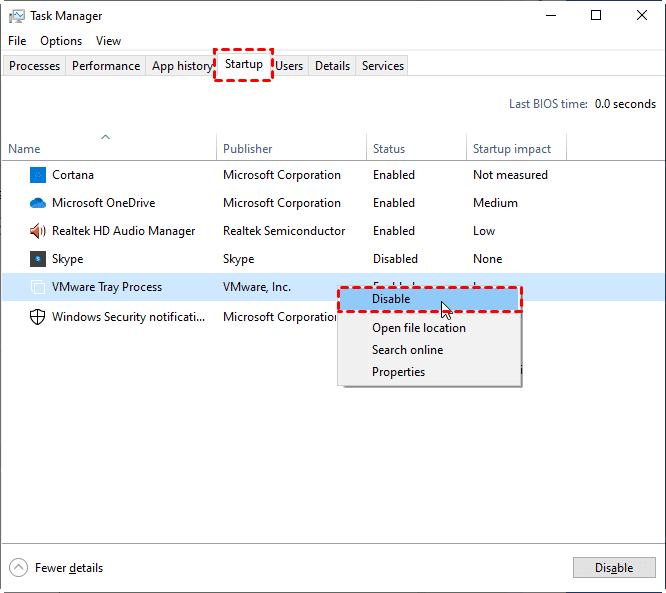
Method 1: Disable Startup Programs
Disabling programs that run automatically at startup will effectively reduce system load and save considerable memory usable space. And here are the steps.
Step 1. Press Ctrl + Shift + Del keys together to open Task Manager.
Step 2. Under the Startup tab, select the startup program you want to disable, then right-click it and select Disable.
Method 2: Close Unneeded Applications
If the high memory usage in Windows 10 is caused by running several programs at the same time, you can simply end them to solve the problem.
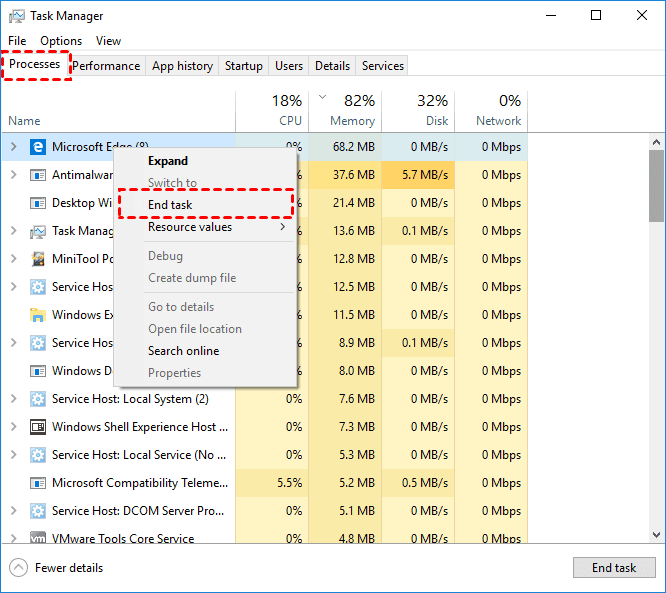
Step 1. Press Ctrl + Shift + Del to open Task Manager.
Step 2. Under the Processes tab, right-click the program you don't want to run, and then click End task.
Method 3: Increase Virtual Memory
Virtual memory is a computer system memory management technology that allows a portion of disk space to be used as memory to relieve memory pressure. You can manually increase virtual memory to solve the problem of high memory usage in Windows 10. Please follow the steps below.
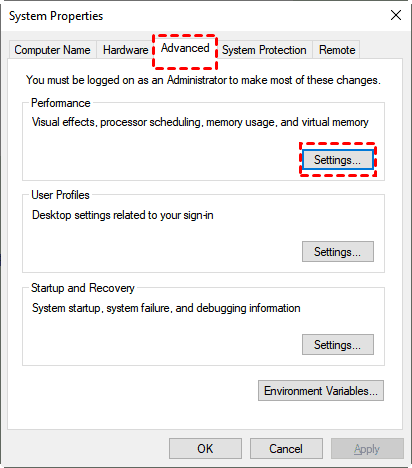
Step 1. Press Win+R together to open the Run window, type sysdm.cpl and press Enter to open System Properties.
Step 2. Under the Advanced tab, click Settings.
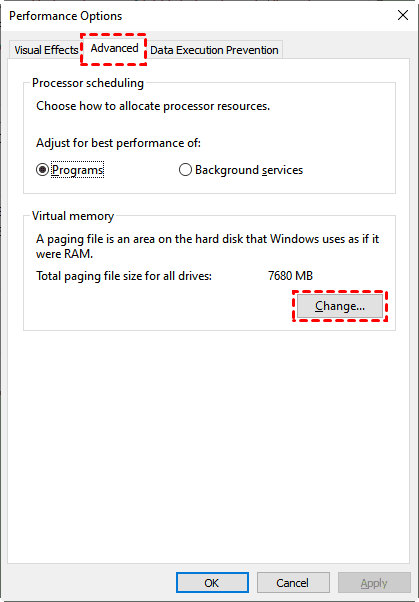
Step 3. In the pop-up window, select Advanced > Change.
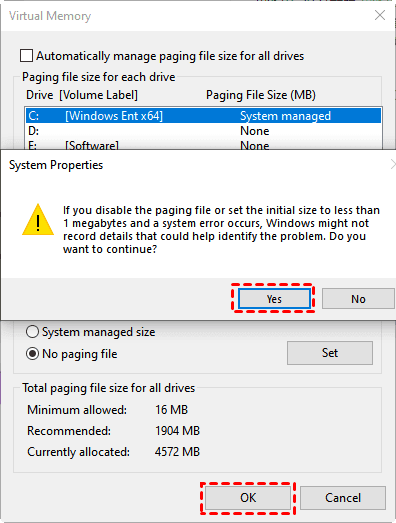
Step 4. Uncheck Automatically manage paging file size for all drives and select partition C (system partition), then check No paging file and click Set.
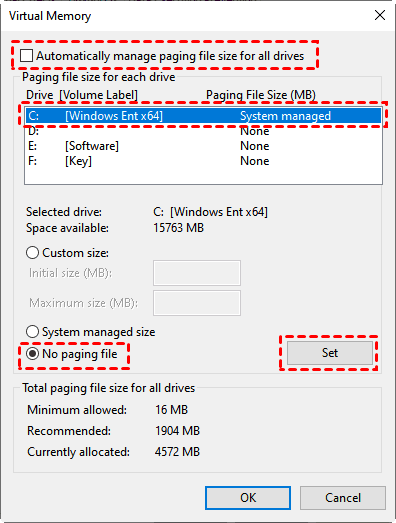
Step 5. Click Yes in the pop-up window, and finally click OK.
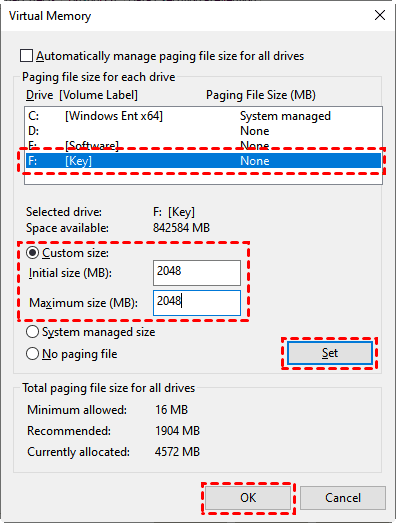
Step 6. If you also need to increase the virtual memory of non-system disk (take F drive as an example), you can check Custom Size, and then set the values of Initial size and Maximum size to 2048MB, and finally click Set and OK.
Notes:
- Setting the Initial size and Maximum size values to the same size will prevent the system from frequently requesting paging files of different sizes that consume system resources for no reason, and it will improve operational efficiency.
- You can adjust the Initial size and Maximum size values to 1.5 or 2 times the physical memory, which can be found under the Performance option of Task Manager.
- It is recommended that you restart your computer to allow the changes to the Initial size and Maximum size to take effect.
Method 4: Increase Physical Memory
If your computer is running low on memory, you can also choose to add a new memory stick to your computer to fix high memory usage in Windows 10.
Step 1. Press Ctrl + Shift + Del to open Task Manager.
Step 2. Under the Performance tab, check how much memory your computer is running on and how much memory is currently being used.
If you are just using your computer for daily operations such as watching TV or browsing the web, 4GB of RAM is enough. If you are using it for work, it is recommended that you can use 8GB of RAM. What's more, if you are using it for technical work (such as writing code, film editing, rendering, 3Dmax) or playing large games, you need to use 16GB of RAM or more.
Tip:
When selecting a memory stick, you need to confirm your computer's memory stick model in advance. If you don't know how to check it, you can seek professional help.
Method 5: Disable Superfetch Service
The Superfetch service can help programs create caches, which serve to make full use of free memory and quickly load a portion of the data pieces needed to run commonly used programs, thus improving computer performance.
Therefore, the Superfetch service may also cause high memory usage problems on solid state drives (if your computer is using a mechanical drive, you don't need to disable the Superfetch service), and you can solve the high memory usage problem by disabling the Superfetch service.
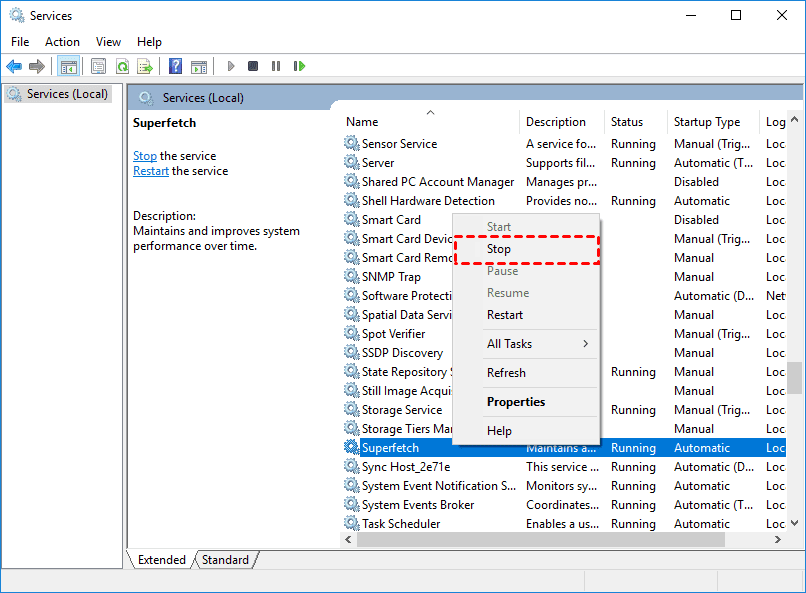
Step 1. Open the Run window, type services.msc and press Enter to open the Services window.
Step 2. Find the Superfetch service and right-click Stop.
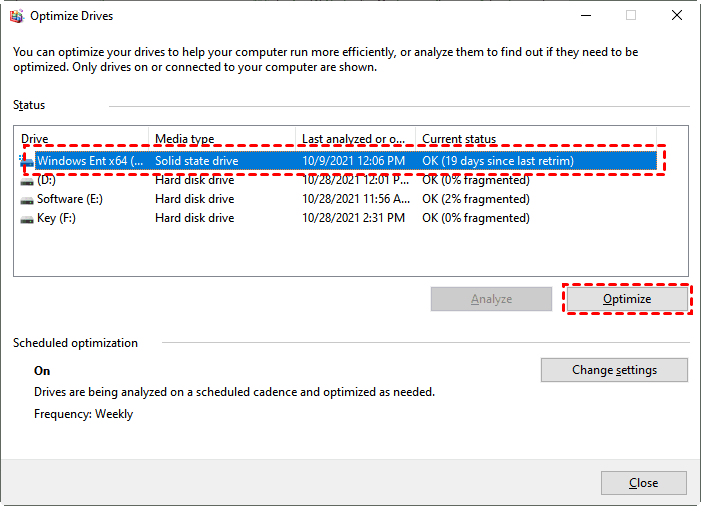
Method 6: Defragment the Hard Disk
Defragmenting your hard drive can help your computer run more efficiently, here are the detailed steps.
Step 1. Press Win+R to open the Run window, type dfrgui and press Enter to open the Optimize Drives.
Step 2. Click on the drive that needs to be defragmented and then click Optimize.
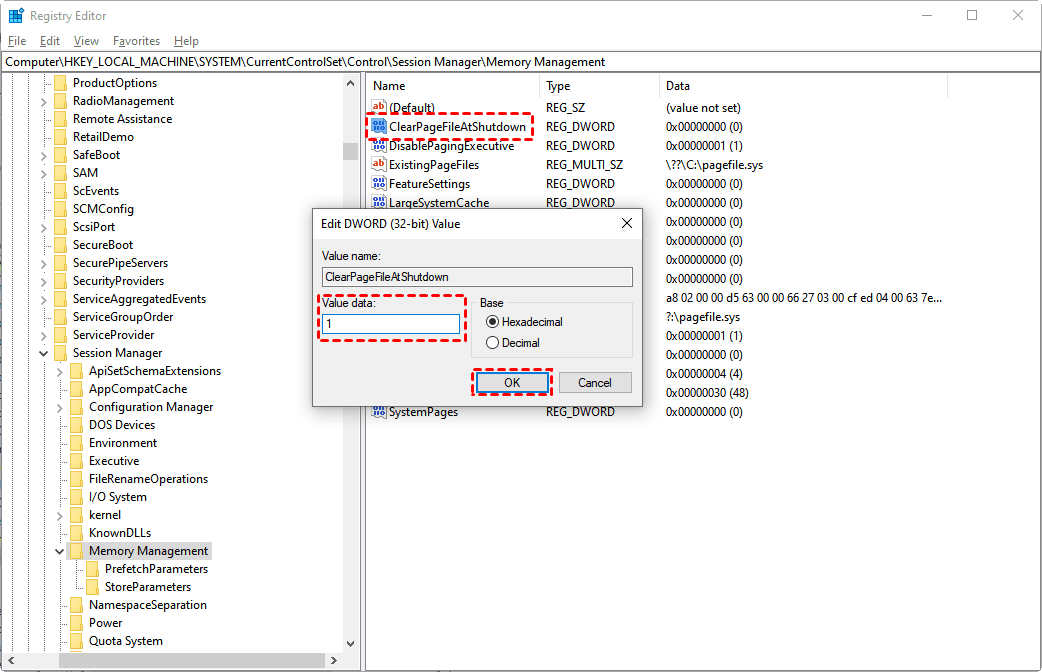
Method 7: Set ClearPageFileAtShutdown to Free up Virtual Memory
A registry hack can delete page files at shutdown to free up virtual memory. You can follow the steps below to set up a registry hack.
Step 1. Press Win+R to open the Run window, type regedit and press Enter to open the Registry Editor.
Step 2. Navigate to the path below.
Computer\HKEY_LOCAL_MACHINE\SYSTEM\CurrentControlSet\Control\Session Manager\Memory Management.
Step 3. Find ClearPageFileAtShutdown and double click to open it, then change the value to 1, click OK. Restart your computer to enable the Registry Hack setting.
Method 8: Run A Virus Scan
When our computer accidentally suffers from a virus infection or malware, this can also cause your computer to have a high memory usage in Windows 10. To solve it, the best way is to install antivirus software on your computer and run a virus scan to remove all viruses and malware.
Method 9: Move Programs to An External Hard Drive
Perhaps you can try moving programs to an external hard drive to free up more running memory. For example, you can safely move installed programs to an external hard drive to solve the problem of high memory usage in Windows 10.
Method 10: Uninstall Unnecessary Applications
Uninstalling unnecessary applications can also achieve the goal of freeing up running memory. The following are the detailed steps.
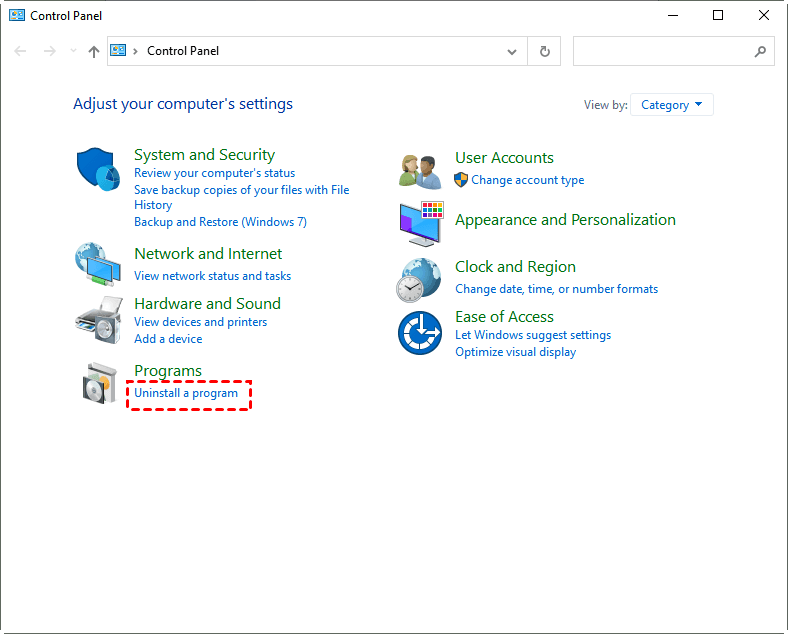
Step 1. Type control in the Run window and press Enter to open the Control Panel.
Step 2. Click Uninstall a program.
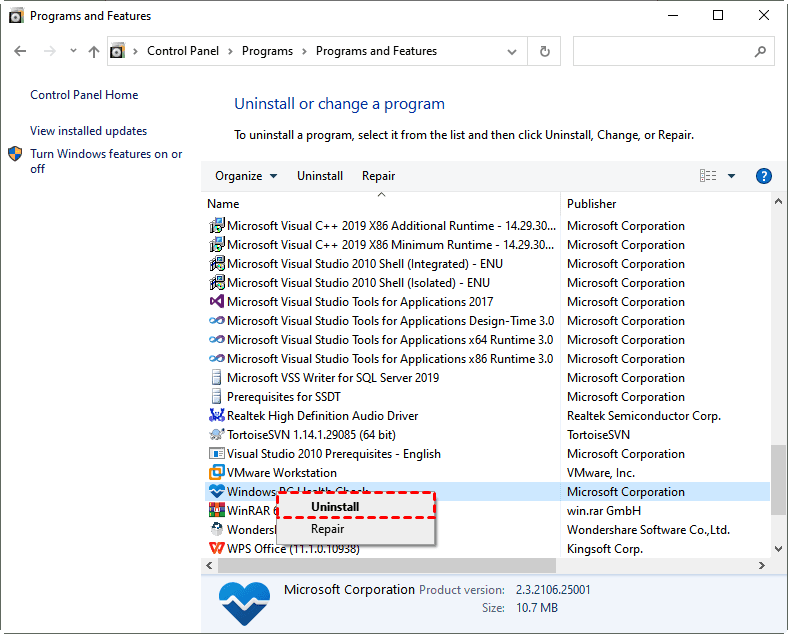
Step 3. Right-click the unnecessary program and select Uninstall.
Method 11: Tune Your Computer for Optimal Performance
Tuning your computer for optimal performance is one of the ways to solve high memory usage in Windows 10, and here are the steps.
Step 1. Right-click This PC and select Properties.
Step 2. Find and click Advanced System Settings > Advanced > Settings.
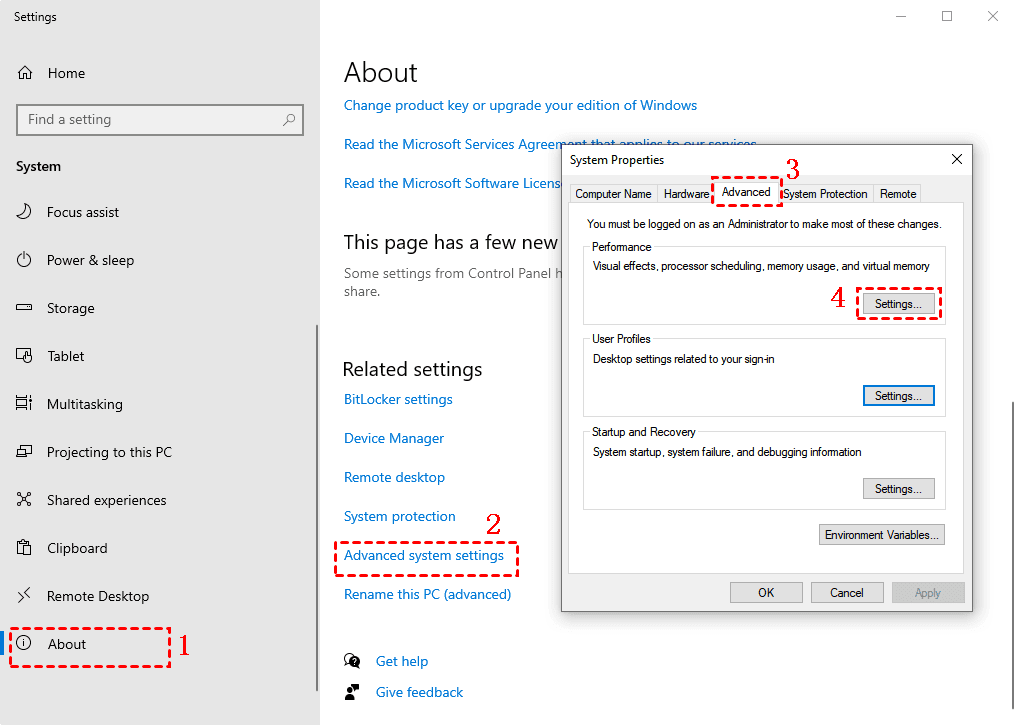
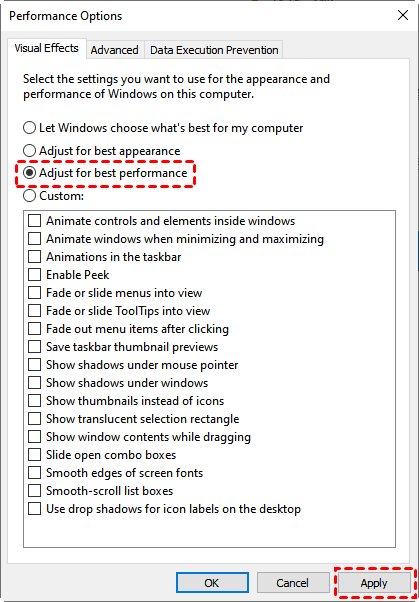
Step 3. In the new pop-up window, select Adjust for best performance and click Apply.
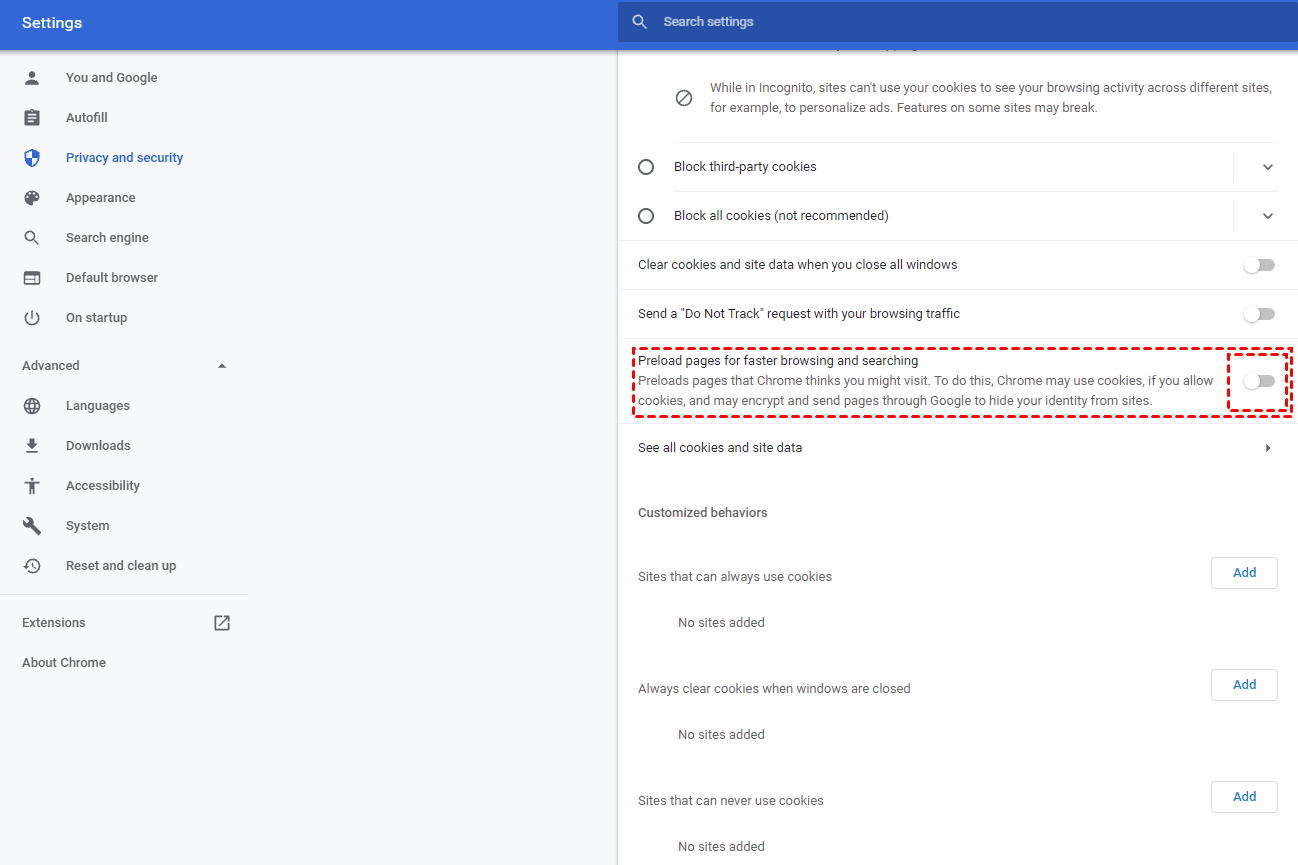
Method 12: Disable Chrome Preload Option
In order to make the web browsing process smoother, Chrome has added a page preload option. It preloads the next web page that the user is going to view and shows the web page at a faster speed when the next page is actually opened.
Although this option enhances the user experience, it will also cause high memory usage in Windows 10, you can choose to disable this option.
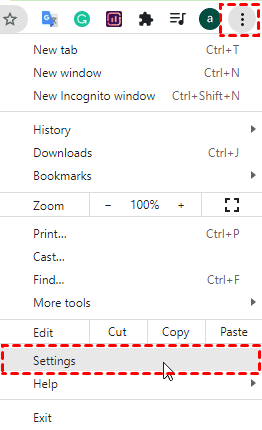
Step 1. Click the Settings button in the upper right corner, and then select Settings.
Step 2. In the left menu, select Privacy and security, then select Cookies and other site data on the right.
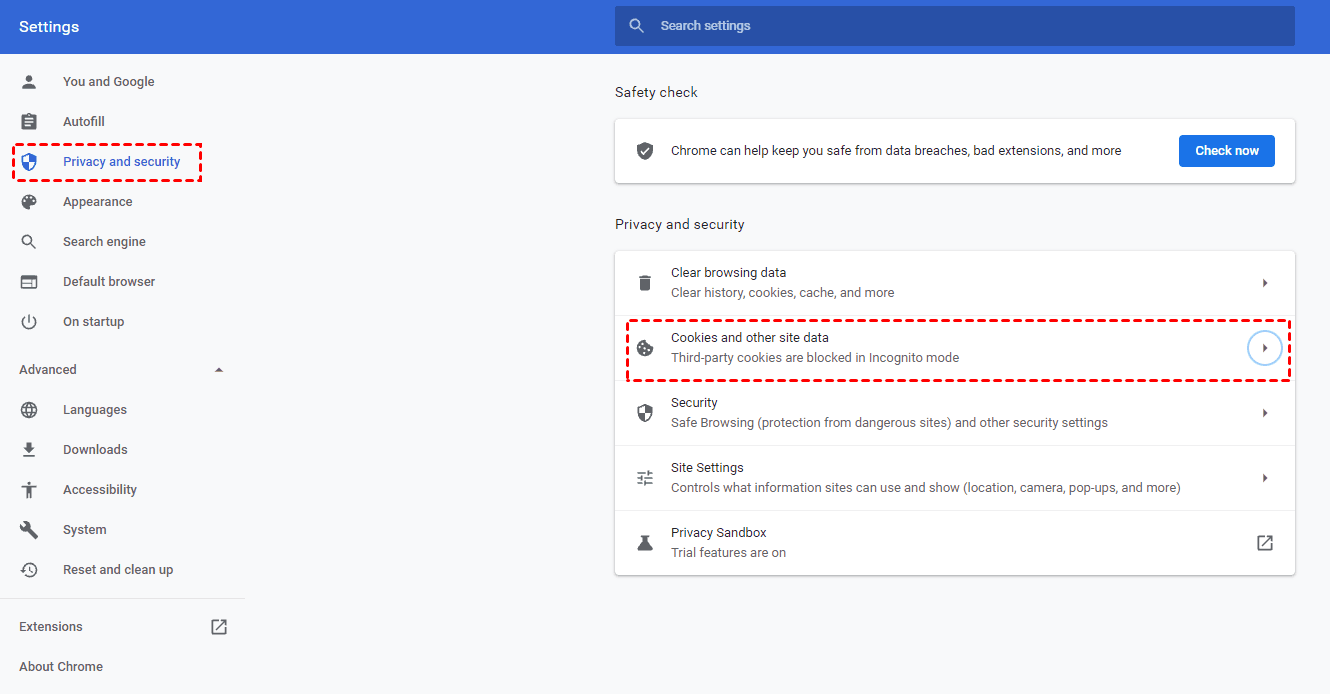
Step 3. Find the Preload pages for faster browsing and searching option and close the button on the right.
Method 13: Disable NDU in the Registry
Disabling NDU files in the Registry is also a solution for high memory usage in Windows 10, but this method may affect the use of your Internet. If none of the above 11 methods can solve your problem, you may try this method.
Step 1. Type regedit in the Run window and press Enter to open the Registry Editor.
Step 2. Navigate to the path below.
HKEY_LOCAL_MACHINE\SYSTEM\ControlSet001\Services\Ndu.
Step 3. Find the Start file in the Ndu file, double click to open this file and change the value to 4, then click OK.
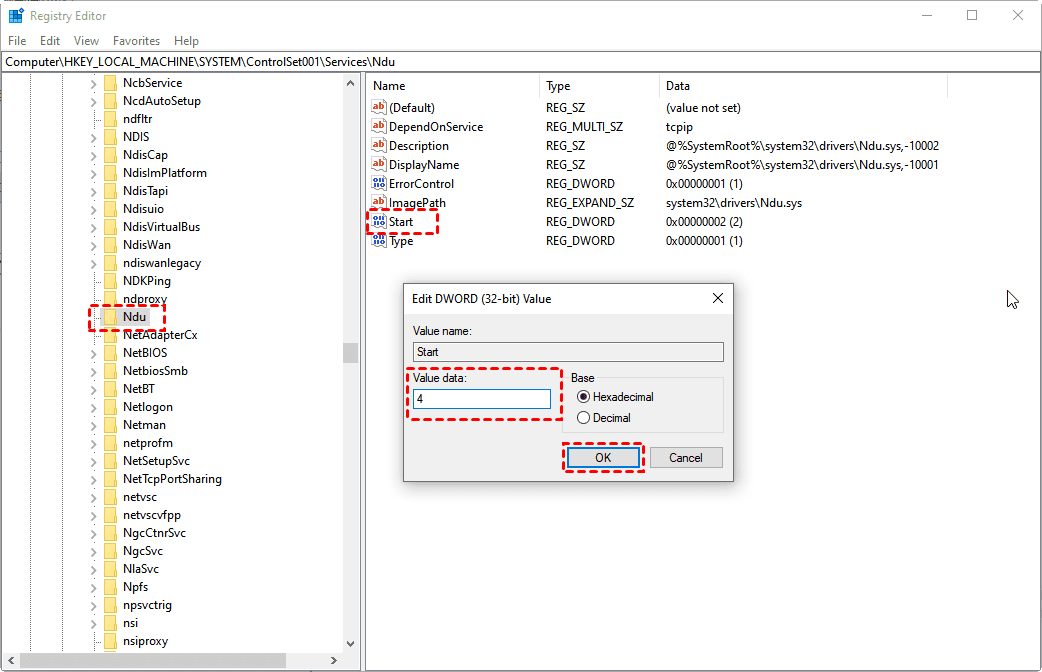
Please restart your computer to see if the problem is solved. If you find that your computer's Internet connection is disabled, we recommend you perform the above steps again and change the value back to 2.
Method 14: Reset or Reinstall Windows 10
If you have tried all the above methods and still can't solve the problem of high memory usage in Windows 10, you can only choose to reset your computer or reinstall your Windows 10. If you don't know how to reset or how to reinstall Windows 10, we recommend you to seek professional help.
Backup Your Windows 10 before Resetting or Reinstalling
If you accidentally lose your data during resetting or reinstalling process, and you happen to have not backed up your Windows 10 system, which will cause you to permanently lose your important data. Therefore, when you decide to reset your computer or reinstall Windows 10, it is recommended that you use the free and safe backup software - AOMEI Backupper Standard to backup your important data in advance. This software also has the advantages below.
- 4 backup solutions: It offers System Backup, Disk Backup, File Backup and Partition Backup to meet your different needs.
- Schedule backup: You can automatically perform your scheduled backups with different fixed intervals (Daily/Weekly/Monthly) to improve your data security.
- Backup Methods: You can perform the scheduled backup by full backup method or incremental backup method.
- Multiple backup paths: It allows you to backup your system to local disk, USB flash drive, SSD, HDD, NAS, cloud drive, network share folder, etc.
- Various systems: It supports different operating systems, such as Windows 11/10/8.1/8/7.
Before you perform the backup task, please download AOMEI Backupper Standard and then follow the graphic tutorial below.
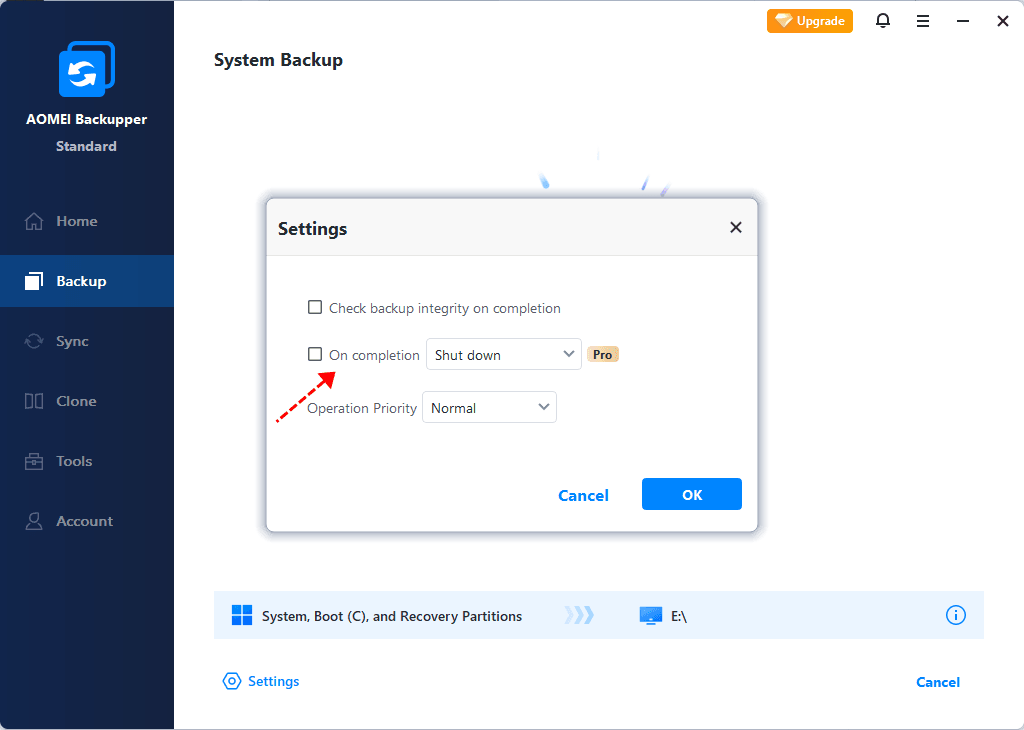
Step 1. Open AOMEI Backupper Standard and click Backup > System Backup.

Step 2. Your system partition will be automatically displayed in the window, please select the destination path and click Start Backup.

Notes:
- Options: You can choose different backup modes (Intelligent Sector Backup or Exact Backup). And it allows you to compress or split your backup.
- Schedule: You can perform the scheduled backup with fixed intervals, such as Daily/Weekly/Monthly/Event trigger/USB plug in. And professional version supports the last two features.
- Scheme: It offers different backup methods (full backup/incremental backup/differential backup). If you want to perform the differential backup, you can upgrade to the professional version to enjoy it. And you can select a backup scheme, it will help you to save target disk space by deleting the older backups.
Step 3. When you start the backup, you can set your computer to Shutdown/Restart/Hibernate/Sleep after the backup is complete by clicking on the settings icon in the lower left corner. Then click Finish when the backup is finally complete.
Summary
All the 14 methods shared above can solve the problem of high memory usage in Windows 10. If you are going to reset your computer or reinstall Windows 10, in order to prevent data loss, it is recommended that you backup your system in advance with the free and safe backup software AOMEI Backupper Standard.
Besides, the software also provides you with other useful functions. For example, you can use AOMEI Backupper to clone hard disk to a larger one to get enough storage space or migrate Windows 10 to another drive, synchronize files between computers, etc. You can download the software and explore more features.