Fix 'Device Not Migrated' on External Hard Drive Easily – 10 Ways
How to fix 'Device Not Migrated' error of external hard drive? Read this article to learn what causes this error and 10 corresponding fixes, and learn another easy way to keep your data safe.
By Yuka Updated on September 11, 2024
User Case
Have an error with my external hard drive, can anyone help me?
"When I installed a new external hard drive for my desktop, I couldn't find it from File Explorer. When I try to find the hard drive from Device Manager, I get an error message: Device not migrated due to partial or ambiguous match. I went to check the meaning of this error message, it may be caused by incompatible motherboard or damaged device. But my external hard drive is brand new, and I looked at the desktop's motherboard and it should work with my new hard drive. To fix this error message, I tried using the sfc /scannow command in the Command Prompt to repair system files and replace the motherboard's data cable socket. But these efforts are all in vain. All I can say for sure is that mine is brand new, including the SATA cables. Hope someone can help me!”
- Question from Microsoft Community
What is the “Device Not Migrated” error?
When your Windows system is updated, data is moved from one device to another, a process known as device migration. If this process cannot be completed, it means that the new Windows version does not recognize the hard drive (external and internal hard drive), Realtek HD audio, monitor, microphone, etc. connected to the computer, and an error like "Device Not Migrated" will appear.
The following will mainly introduce the reasons and solutions for the device not migrated on external hard drive in Windows 10. External hard drive is a common external storage device. When it is connected to the computer, the "Device Not Migrated" error appears. You can't use the external hard drive because it doesn't work properly. So what is causing this error? Below is the answer for you.
Causes of Device Not Migrated error
This error is caused by incompatible existing drivers or corrupted system files. The following scenarios can also cause a "Device Not Migrated" error:
- ● Some device drivers are incompatible or corrupted.
- ● Some system files are corrupted.
- ● Windows version update.
- ● There are two operating systems installed on your computer.
- ● Your Windows system is not compatible with Plug and Play function.
- ● Incompatible hard drive program.
- ● Chipset drivers are outdated.
- ● BIOS settings are incorrect.
Now that we know what's causing this error, we need to know how to confirm if the same error occurs on our computer. Next, you'll learn how to view this error message.
How to view the “Device Not Migrated” error of external hard drive
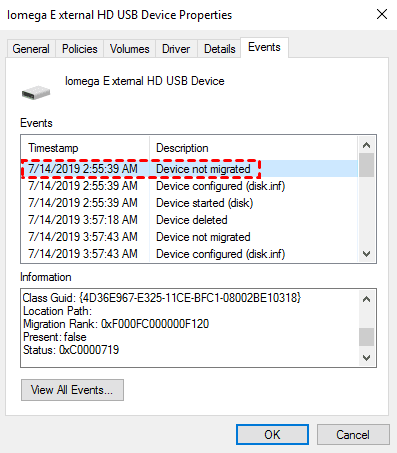
If you're not sure if your computer is getting the "Device Not Migrated" error, you can check it out by following these steps:
- Use the Windows + X key combination to open the menu and select Device Manager.
- Find your external drive in Disk drives, right-click it, and select Properties from the expanded menu.
- Next, you can find the error message under the Events tab.
How to fix "Device Not Migrated" error on external hard drive – 10 ways included
Here are 10 ways to fix the "Device Not Migrated" error on an external hard drive, you can browse through it first and then learn the specific steps.
#1. Restart the computer
Restarting the computer can effectively solve most problems, when you encounter the external hard drive device not migrated error, you can try restarting the computer first to see if it fixes the problem.
Click the Windows icon in the lower left corner of the desktop, then click Power options, select the Restart option in the expanded menu, and wait for the computer to restart.

#2. Check the computer USB interface
Most external hard drives are connected to the computer via a USB interface. Therefore, when encountering the "Device Not Migrated" error on an external hard drive, you should first check if the USB port on your computer is in working order.
Most USB ports are exposed and can collect dust over a long period of time. At this point, it is recommended that you wipe them carefully with a soft, dry cloth. If your computer has a free USB port, you can try to replace the port and plug the external hard drive connection data cable into another port.
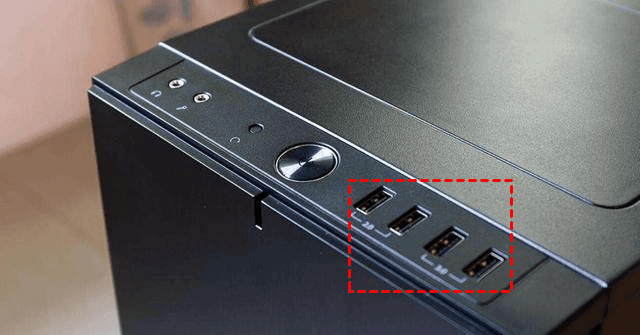
In addition, you can also check whether the current USB interface is working properly by replacing other USB devices (mouse, keyboard, etc.). If you confirm that the USB interface is damaged, please contact professional repair personnel immediately, do not try to repair them without authorization.
#3. Update or roll back Windows version
Microsoft's regularly released Windows update program may fix errors on your computer, which may help you fix the external hard drive device not migrated error on your external hard drive. In addition, if you have problems with your current Windows system, you can also roll back to the previous system version, which may also help to fix this error.
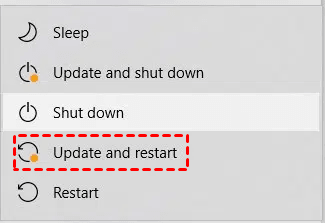
✦ Update Windows version
- Use the Windows + I key combination to open Windows System Settings, find and click Update & Security.
- Go to the Windows Update tab and click Check for updates in the right window.
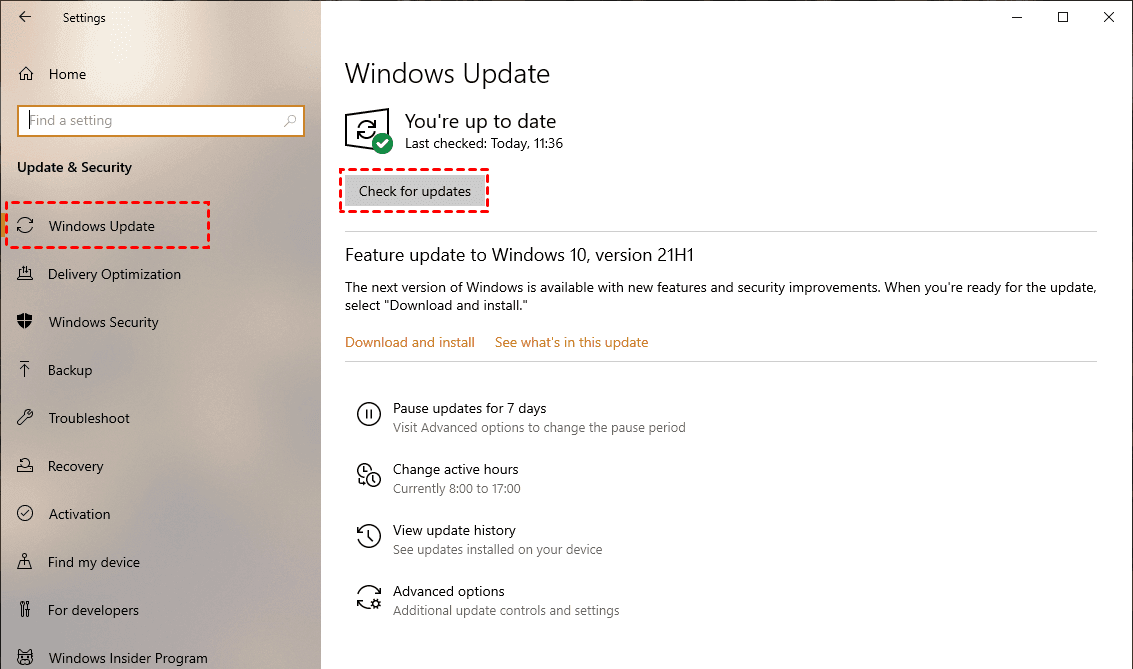
- If an update is available, download it when the network is good. After the download is complete, click the Start button in the lower left corner of the desktop, and then click the power icon. Select the Update and restart option in the expanded menu to restart the computer.
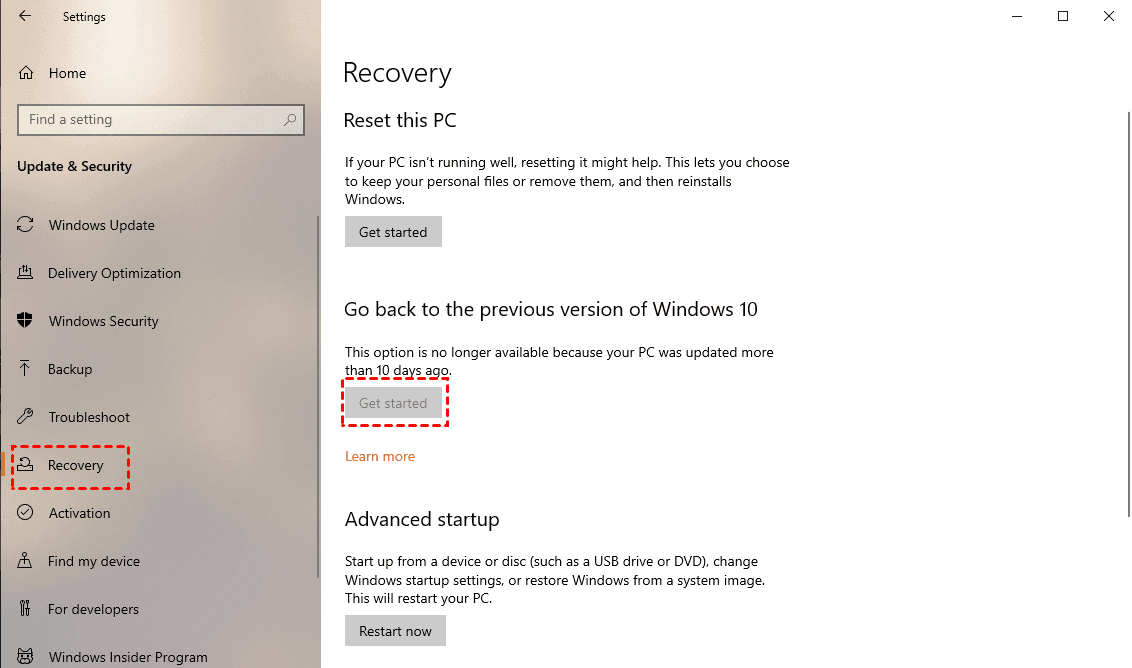
Go back to the Windows version
Open the Update & Security window and switch the tab to Recovery on the left. Click Get Started in the right window, then follow the prompts and restart your computer.
#4. Reset BIOS to factory settings and update
The "Plug and Play" feature allows automatic and dynamic connection of hardware and drivers. Normally, this function is no problem. But when your computer uses incorrect BIOS settings, the "Plug and Play" function is forced to stop, resulting in the "Device Not Migrated" error on the external hard drive. To do this, you need to reset the BIOS to factory settings. Also, updating your computer's BIOS can help fix this issue as well.
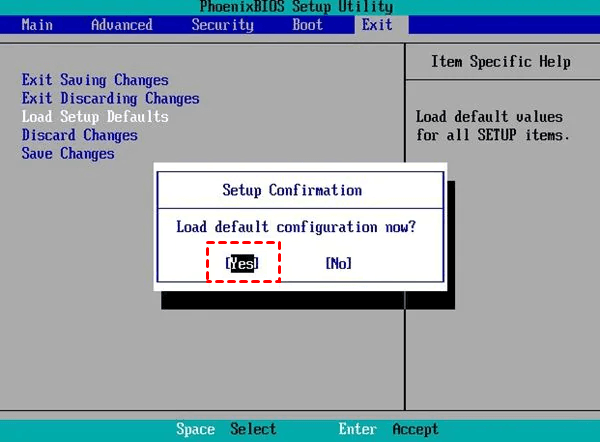
✦ Reset the BIOS to factory settings
- Restart your computer and press a specific key to enter the BIOS (keys are different for different brands of motherboards, you can contact your motherboard manufacturer for support).
- In the BIOS settings, you can see multiple options such as Load Setup Defaults, Setup Defaults, Load Default Settings, etc., depending on your motherboard brand.
- Take my BIOS interface as an example, click the Load Setup Defaults option, and click Yes in the confirmation pop-up window to reset the BIOS to factory settings.
✦ Update BIOS
- Check your computer motherboard, identify the motherboard manufacturer, and visit the appropriate website on your browser. If you have a laptop, you can find the motherboard manufacturer on the laptop brand website.
- Download the latest BIOS version and extract it to a USB device. Insert the external hard drive again and restart the computer to enter the BIOS setup.
- Find the BIOS update option from the BIOS settings and click Update BIOS.
#5. Update the chipset driver
If your computer's chipset drivers are too old, it may cause "Device Not Migrated" error on external hard drive in Windows 10. So, you can try to update the chipset driver to fix this error.
- Use the Windows + X key combination to open Device Manager. Find the problematic driver and right-click on it. In the expanded menu, click the Update driver option.
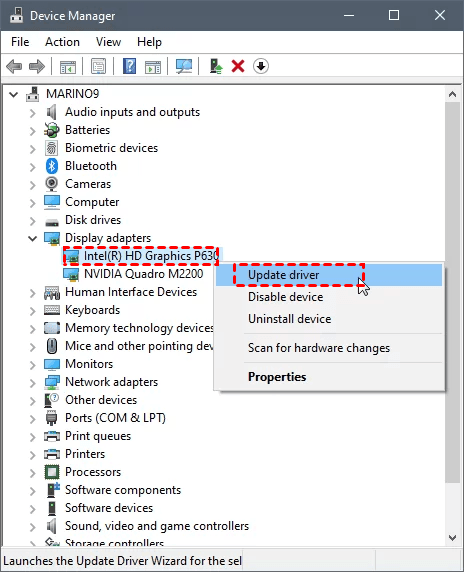
- Next, a pop-up window for device driver update will pop up automatically, select Search automatically for updates. Wait for the automatic search to complete and update the driver.
#6. Uninstall and reinstall the hard drive in compatibility mode
Reinstalling the system can effectively solve most problems or errors. In the same way, reinstalling the hard drive driver can also effectively fix the "Device Not Migrated" error on an external hard drive.
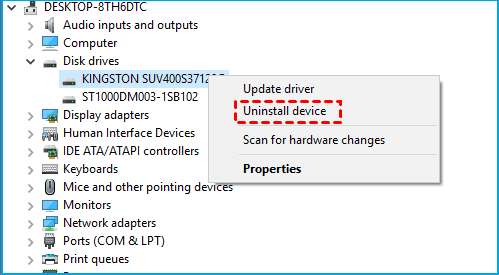
- Use the Windows + X key combination to open Device Manager and right-click on your external hard drive. Select Uninstall device in the expanded menu, and confirm the uninstallation again in the pop-up window.
- Next, you need to reinstall the hard disk driver, here it is recommended to install the driver in compatibility mode. First, we need to download the driver's source file (setup) from the hard drive manufacturer's website.
- Locate the hard drive source file in the download directory, right-click it, and select Properties from the expanded menu.
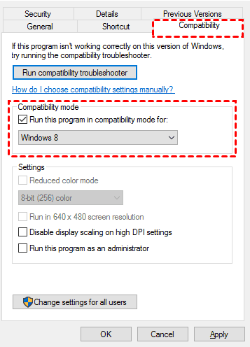
- Switch to the Compatibility tab above and tick the Run this program in compatibility mode for checkbox. And select the appropriate Windows system according to your computer, and finally click Apply, and then click OK.
#7. Check system files by running an SFC scan
System File Checker (SFC Scan) can comprehensively inspect your Windows system, scan for corrupted system files and replace them with the correct ones.
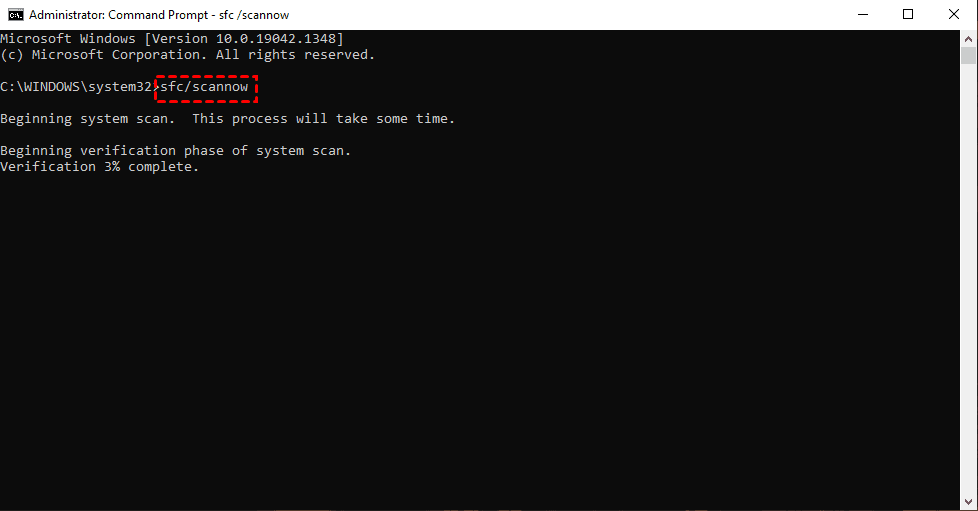
- Type cmd in the taskbar search box, and select Run as administrator in the right window.

- Type sfc /scannow in the Command Prompt and press Enter to execute this command. Wait for the automatic scan and repair of corrupted system files, this may take some time.
#8. Go back to a system restore point
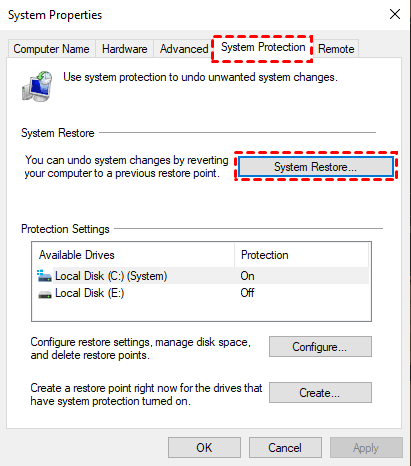
A restore point is a saved state of the operating system in a normal operating configuration, which allows you to restore the system to a point before the error occurred. Please note that this method requires that you have previously set a system restore point, otherwise errors cannot be fixed using this method.
- Type restore in the taskbar search box, find and click Create a restore point.
- Click the System Restore... button in the System Protection tab of the System Properties window.
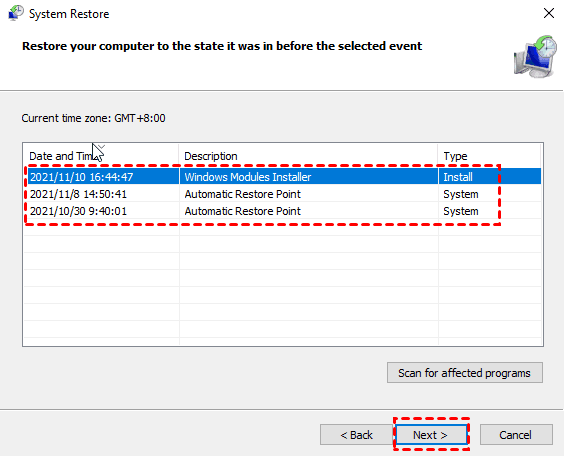
- In the System Restore window, click the Choose a different restore point option. Then select the restore point before the "Device not migrated" error occurs, click Next, and wait for the system restore to complete.
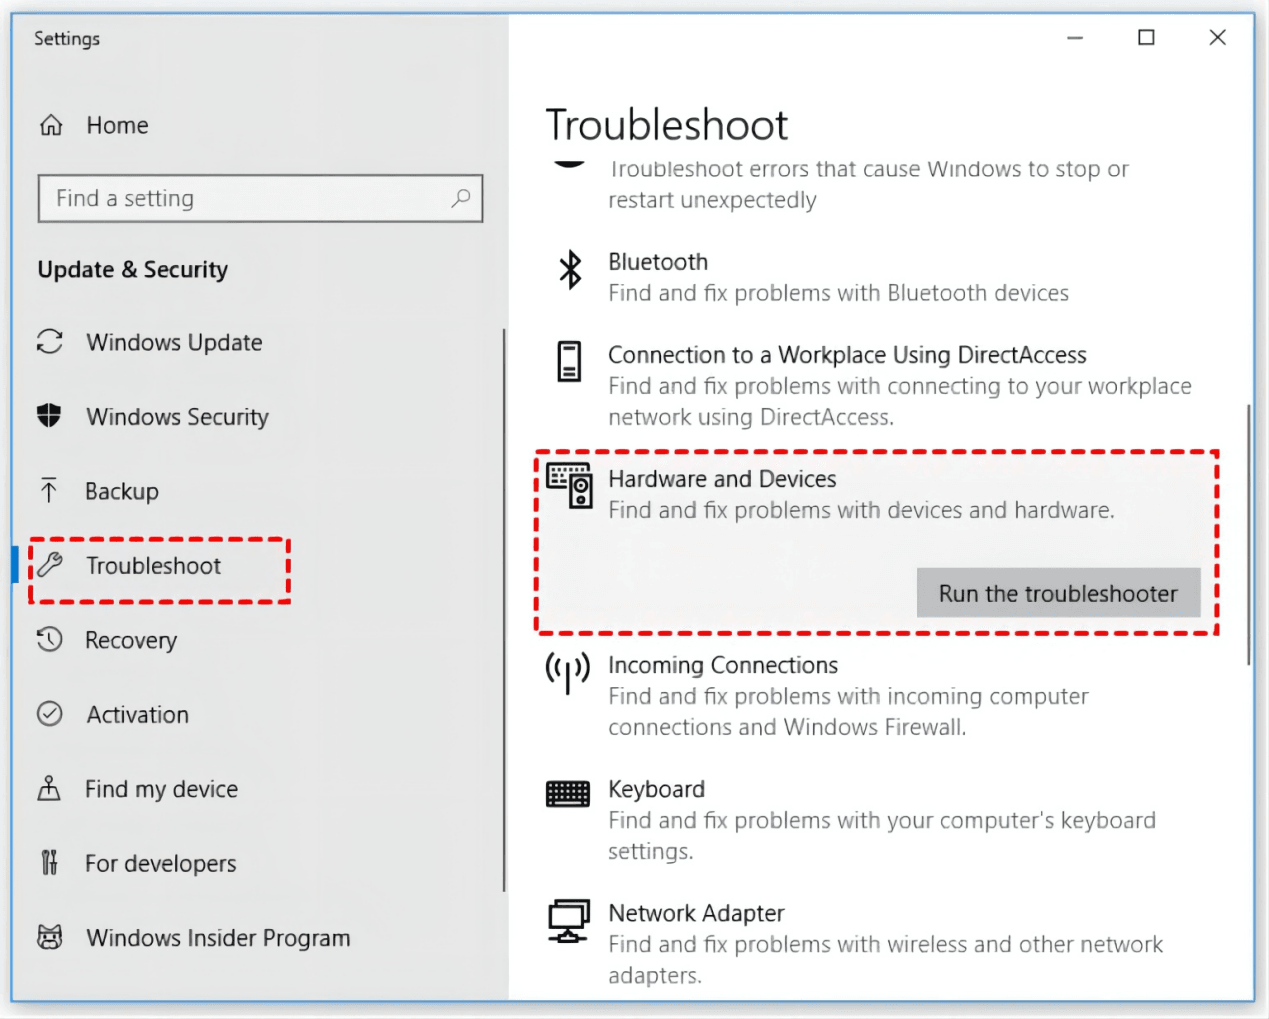
#9. Run the Hardware and Devices troubleshooter
The hardware and device troubleshooting tools built into Windows can help you fix many errors. So, when you encounter the error "Device Not Migrated" on your external hard drive, you can try this tool, maybe it can help you fix the error.
- Click the Start button on the far left of the taskbar and click the Settings button in the expanded menu. In the Windows Settings interface that opens, find and click the Update & Security option.
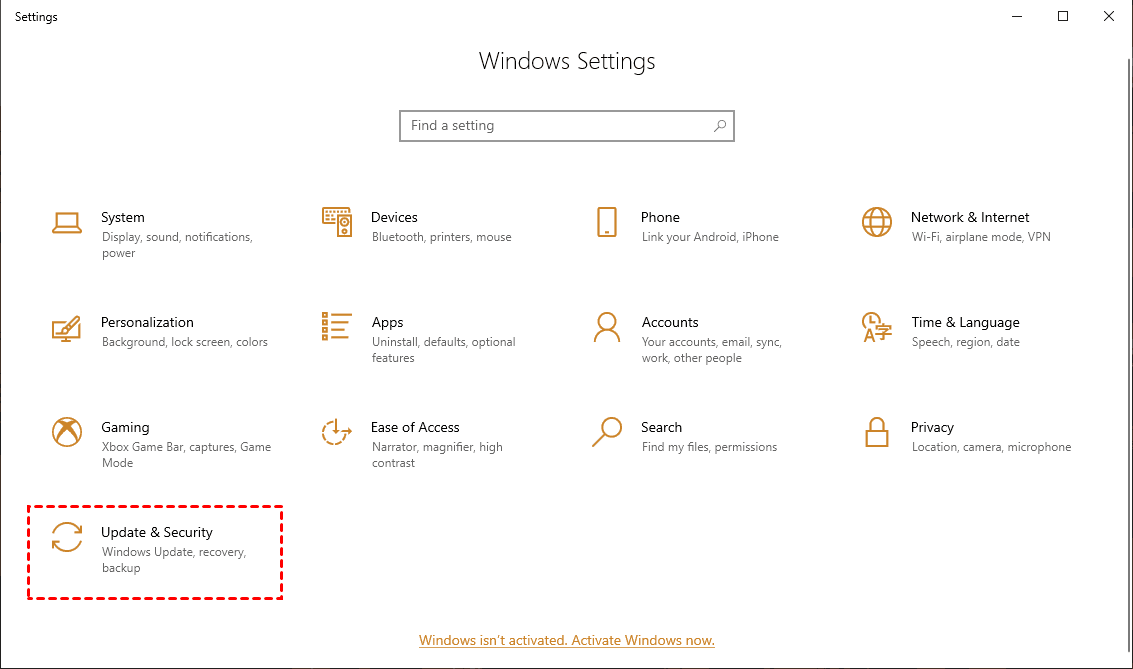
- Switch to the Troubleshoot tab in the left window, find Hardware and Devices in the right window, and click the Run the troubleshooter option.
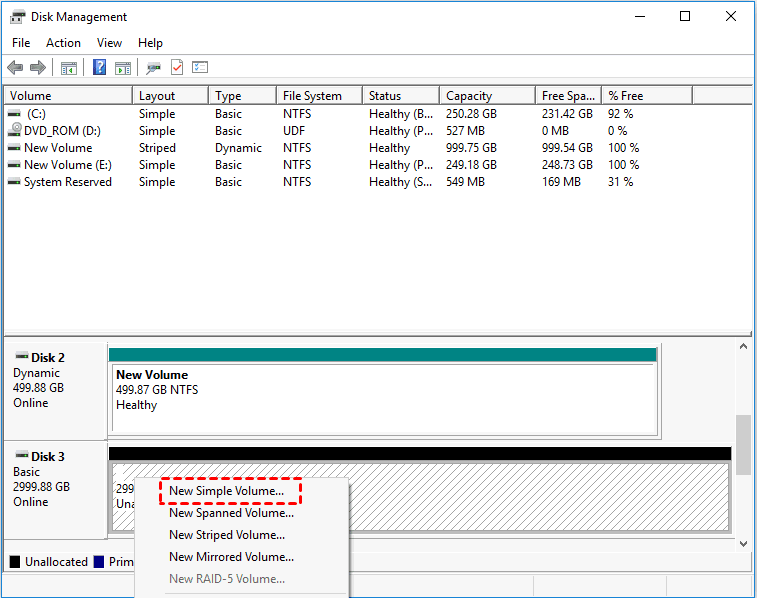
#10. Partition your external hard drive
Although it may seem a little incomprehensible, there are users who have fixed the "Device Not Migrated" error on their external hard drive by partitioning the external hard drive, maybe you can give it a try.
- Use the Windows + X key combination to open the menu, click on the Disk Management option, and you can see your external hard drive.
- Right-click on the Unallocated external hard drive volume, select New Simple Volume from the expanded menu, and follow the prompts to partition.
I believe you can fix the "Device Not Migrated" error on the external hard drive after trying the above 10 methods in turn. Then make it appear correctly in the File Explorer and migrate the data to another device in its entirety. But it must be reminded that although the convenience of an external hard disk can provide you with more convenience, it is still a storage device in essence, and its service life is limited.
Prevent data loss from external hard drive - the simplest way
Therefore, for the consideration of data security, it is recommended that you use AOMEI Backupper Standard to back up the disk to prevent the loss of hard disk data. AOMEI Backupper Standard is a free and professional disk backup software for Windows 11/10/8.1/8/7 and other system versions. When the "Device Not Migrated" error is fixed, you can use this software for disk backup. With just a few simple steps, you can safely escort your hard drive data.
The external hard disk has limited space. In order to save the storage space of your external hard disk, you can use the Incremental Backup function of AOMEI Backupper Standard to improve the backup efficiency and reduce the use of storage space. In addition, you can also use this software to perform Partition Backup and System Backup to provide all-round protection for your data.
The following will introduce the detailed operation steps of AOMEI Backupper Standard disk backup. But before that, we need to download and install the software. If you are Windows Server users, try AOMEI Backupper Server.
- Run AOMEI Backupper Standard, switch to the Backup tab on the left, and select the Disk Backup option in the right window.

- Click the Add Disk button to add a disk. For better distinction, you can click the pencil icon next to Task Name in the upper left to change the task name.

- In the pop-up window, select the source disk you want to back up, here you can select your external hard drive.
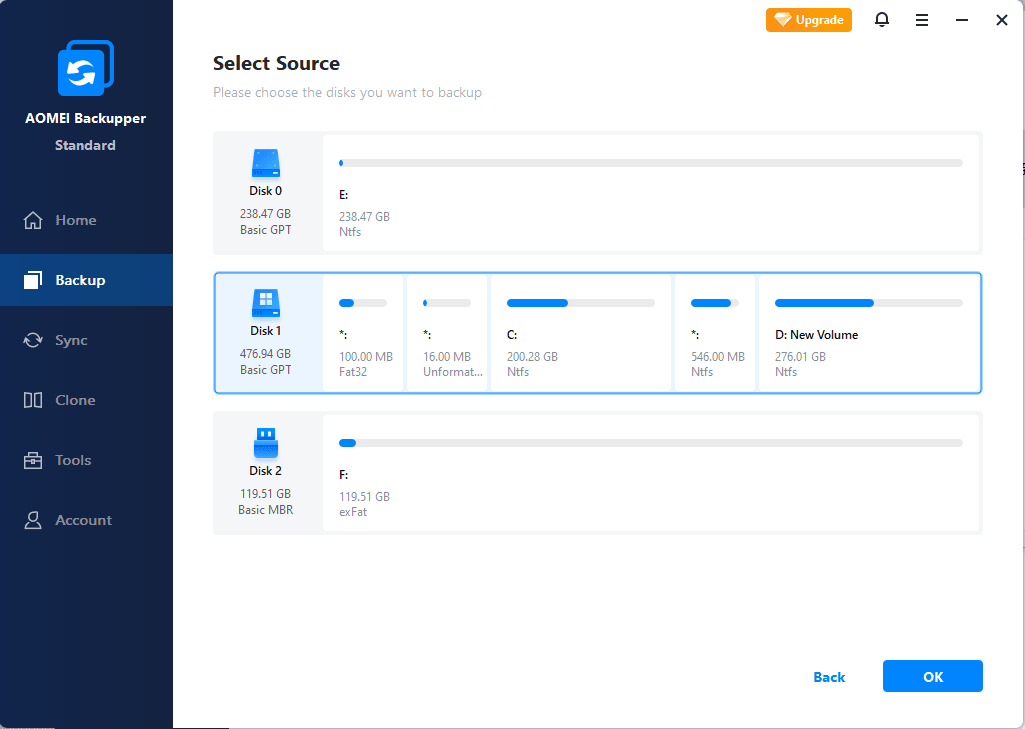
✡ Note: This process allows you to add multiple source disks, with the caveat that you cannot restore multiple disks contained in one image file to a larger disk. Therefore, if you want to add multiple disks, you need to restore them individually.
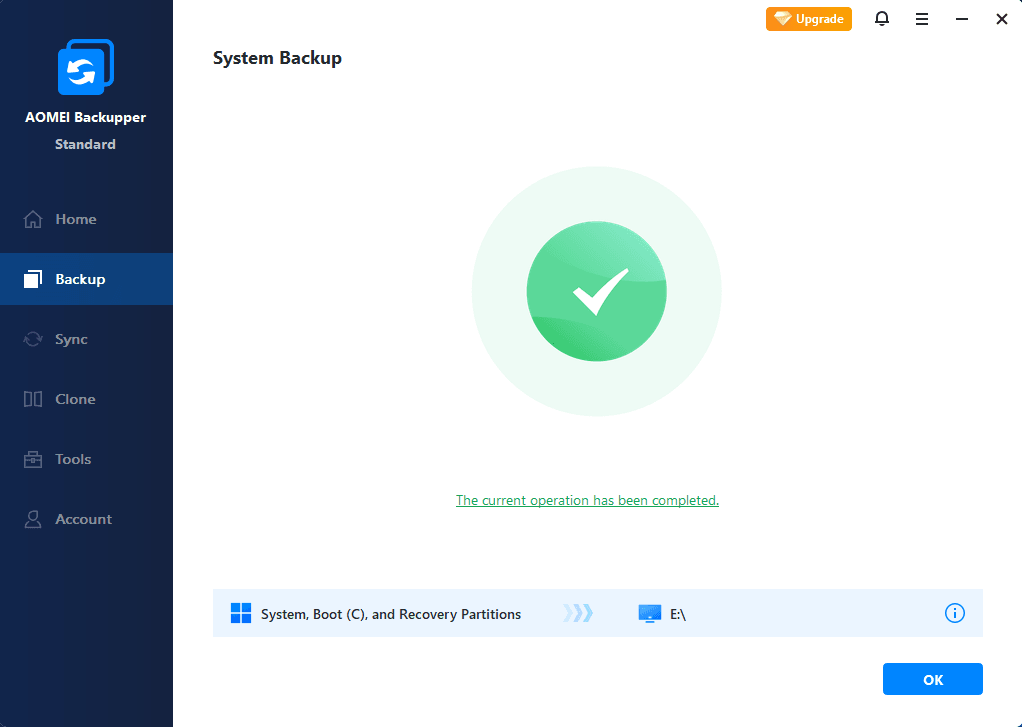
- Click the address bar pointed by the white arrow to select the destination path to store the data. Then click the Start Backup button in the lower right corner and wait for the backup to complete.

Tips✍:
✩ Options: You can click Options in the lower left corner to customize the comments, enable email notifications, enable image encryption, and more.
✩ Schedule: You can click Schedule in the lower left corner to customize the backup frequency, daily, weekly and monthly.
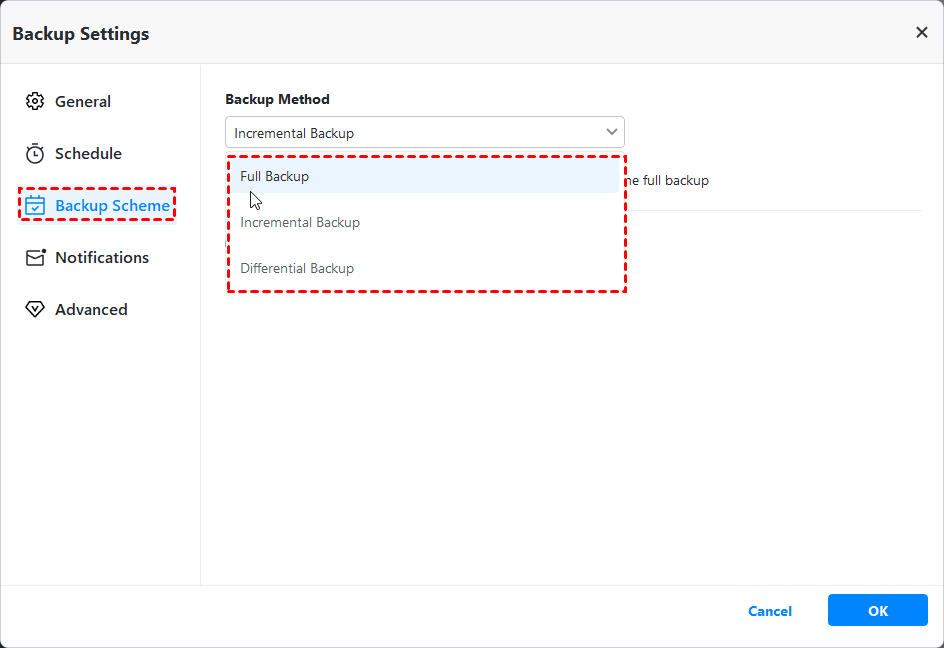
✩ Scheme: You can click Scheme in the lower left corner to customize the backup method (full backup, incremental backup, differential backup), and if it is the professional version, you can also enable the automatic backup cleanup function.
- After the backup is complete, click the Finish button.
Other useful features you might use:
- AOMEI Backupper Standard provides you with disk restore function so that you can restore the desired disk backup image.
- If you want to view the contents of a disk backup without restoring the backup image, you can use the Explore Image feature on the Tools tab.
- If you want to migrate the system to an external hard drive, you can upgrade to AOMEI Backupper Professional with a discount first, and then use the System Clone function to perform the system migration.
For data security reasons, it is strongly recommended that you create a Windows PE bootable disk in case you need it. As long as you have created a system backup before, you can use the bootable disk to restore your Windows system in the event of a system crash.
Summary
When you encounter the error "Device Not Migrated" on the external hard drive, you can first understand the cause of this error, and then try the above 10 methods in turn, which can help you effectively fix this error. For security reasons, it is recommended that you use AOMEI Backupper Standard to make regular backups of the disk.
AOMEI Backupper Standard is easy to operate, and you can realize disk backup in just a few simple steps. If you have additional needs like disk restoration and system cloning, you can also use this software to do it.

