Top 3 Ways to Backup Windows Server to QNAP NAS
You can backup Windows Server 2012/2016/2019/2022 to QNAP NAS without any issues. Scroll down to get 3 effective methods. We will also address related faqs. By the end, you will have a thorough understanding of how to effectively back up your Windows Server to QNAP NAS.
By Sebastian Updated on October 24, 2024
User Case: Can’t Use WSB to Backup Server to QNAP NAS
“Hi, we have three Hyper-V VMs, two running Server 2016 and one running 2012 R2. The two 2016 VMs were created from the same original template. All three have Windows Server Backup configured to run a full backup to a QNAP NAS device. The backups were completed successfully on the 2012 R2 VM and one of the 2016 VMs but the other Windows Server 2016 backup to QNAP NAS failed with the following error: 'The specified backup disk cannot be found'. If anyone is able to help with this, it would be appreciated.”
Due to an SMB issue, many users have received this error "The specified backup disk cannot be found" during the Windows Server 2012/2016 backup process. Anyway, I'll show you three ways to back up Windows Server 2012/2016/2019/2022 to QNAP NAS below.
Method 1: Backup Server to QNAP NAS with VHD or VHDX File
Here you will learn the first way to backup server to QNAP NAS with VHD or VHDX file. The process is divided into two parts, you need to create a VHD or VHDX file first with Computer Management, then backup server to this file using Windows Server Backup. For detailed steps, please continue to see below.
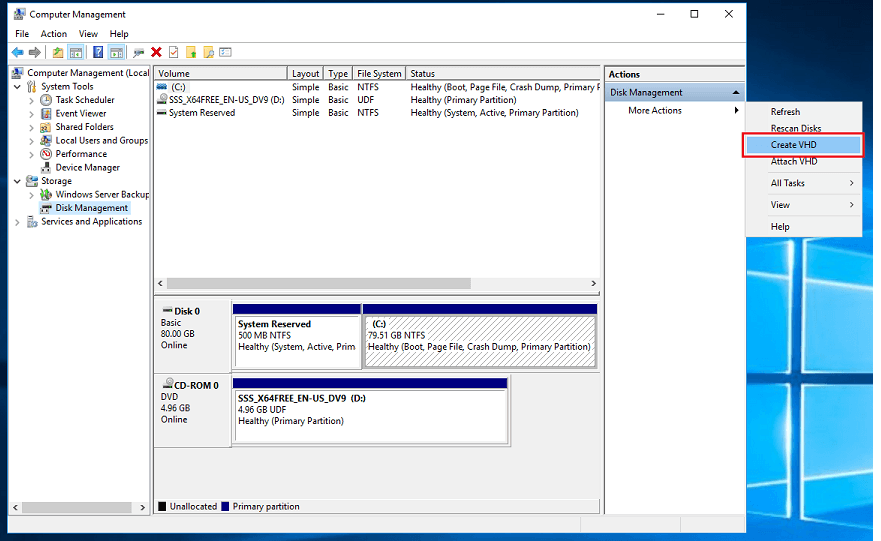
Step 1. Open Server Manager and click Tools > Computer Management > Disk Management, then you will be navigated to a new window.
Step 2. In the Disk Management window, go to the Actions tab, click More Actions, and then Create VHD.
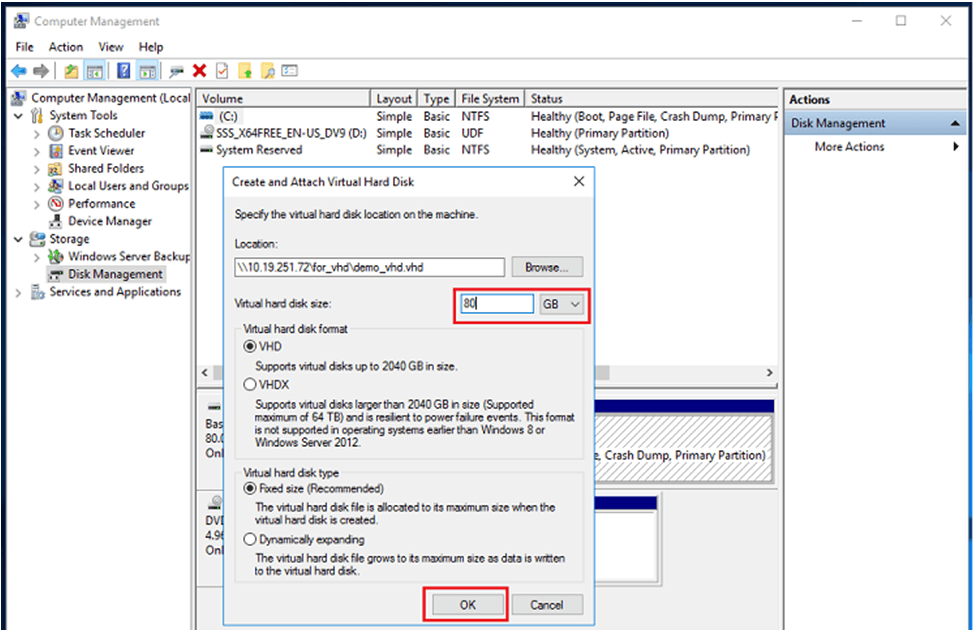
Step 3. Then, you will see the Create and Attach Virtual Hard Disk window, click Browse, and select the shared folder on the QNAP NAS. Specify a file name for it and click Save.
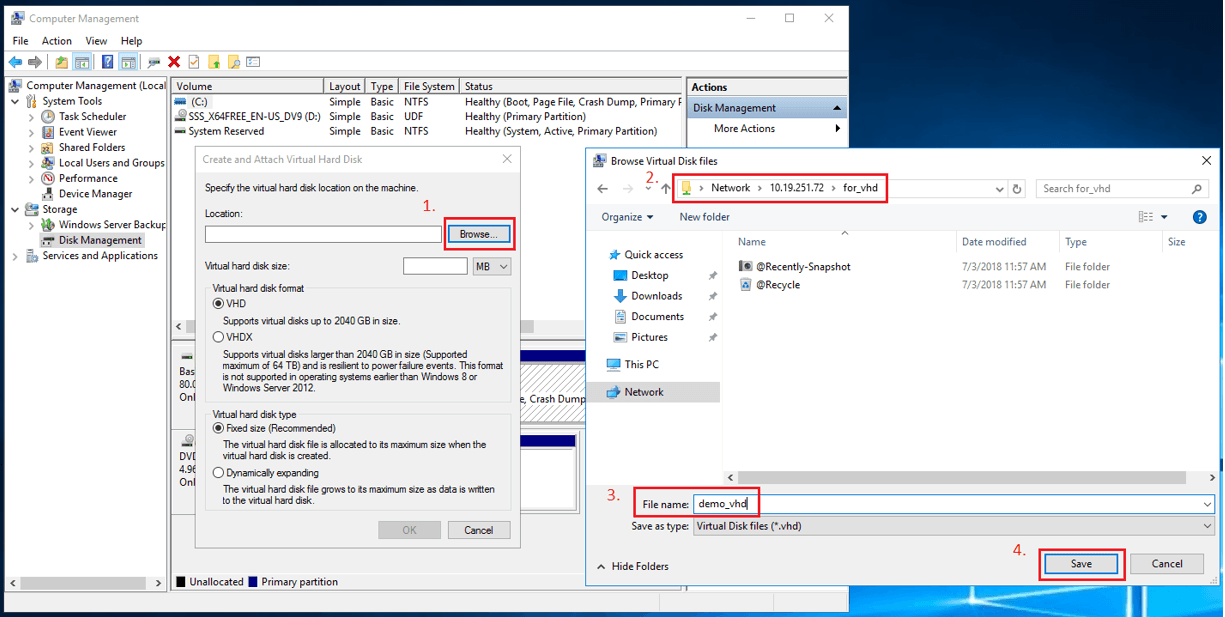
Step 4. Specify the virtual hard disk format (VHD or VHDX) and disk size, and click OK to confirm.
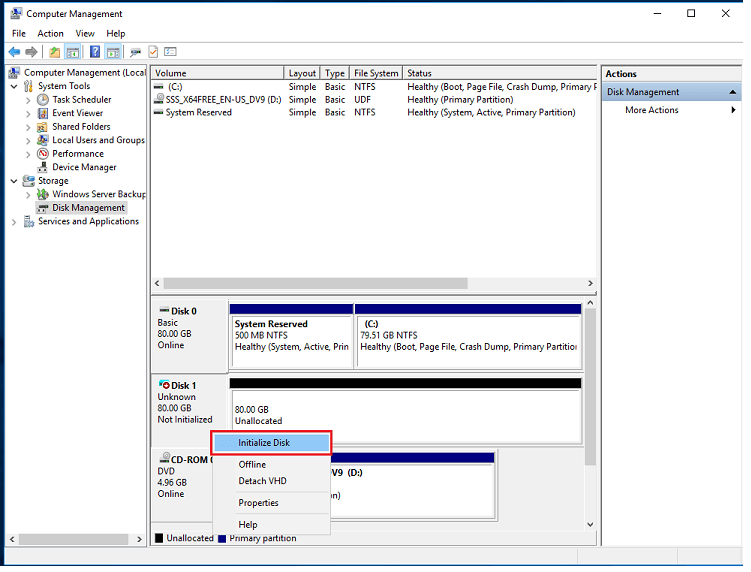
Step 5. Right-click the VHD or VHDX and then select Initialize Disk > MBR or GPT partition style and click OK.
Step 6. Right-click the unallocated space and select New Simple Volume. Then, follow the on-screen instructions to finish the rest of steps.
Step 7. Open Windows Server Backup and create a backup task with the newly created VHD or VHDX disk.
Tip✍: If you are not familiar with Windows Server Backup, please refer to this guide and remember to select VHD or VHDX disk as backup destination: create system image backup in Windows Server 2016.
Method 2: Backup Windows Server to QNAP NAS with AOMEI Backupper
If you want to backup to QNAP NAS in Windows Server 2012/2016/2019/2022 etc. without creating a VHD or VHDX file, you can turn to a professional NAS backup software. AOMEI Backupper Server is a great option because of the following advantages:
✡ It supports backing up system, disk, partition, and files to all kinds of NAS or network share, such as QNAP NAS, Synology NAS, network share, etc.
✡ It allows you to schedule a backup of what you want to NAS or network share. You can use Daily/Weekly/Monthly schedule backup or Event trigger and USB plug-in feature.
✡ It can manage full backup and incremental backup or differential backup flexibly to ensure you always have the changes made on your server.
✡ More so, it is still able to delete old backup images to free up disk space for new backups.
If your computer is not bootable, it still allows you to create a bootable media on another computer and use it to boot the current computer. You can also choose AOMEI Backupper Technician to protect multiple computers.
Then, please download AOMEI Backupper Server to perform Window Server 2012/2016/2019/2022 backup to QNAP NAS.
Step 1. Launch this program. Select “System Backup” under the “Backup” tab.

Step 2. In the next screen, you can see all the required partitions to start your server computer have already been selected. You need to just select the destination path by clicking the triangle down. Click Add Share or NAS Devices to continue.
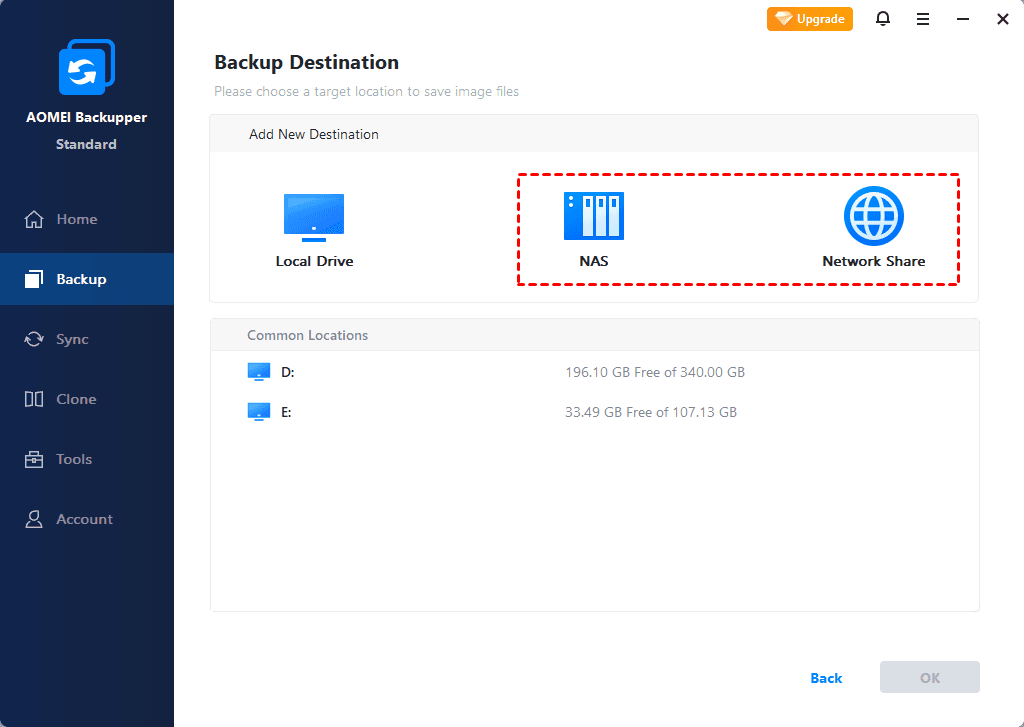
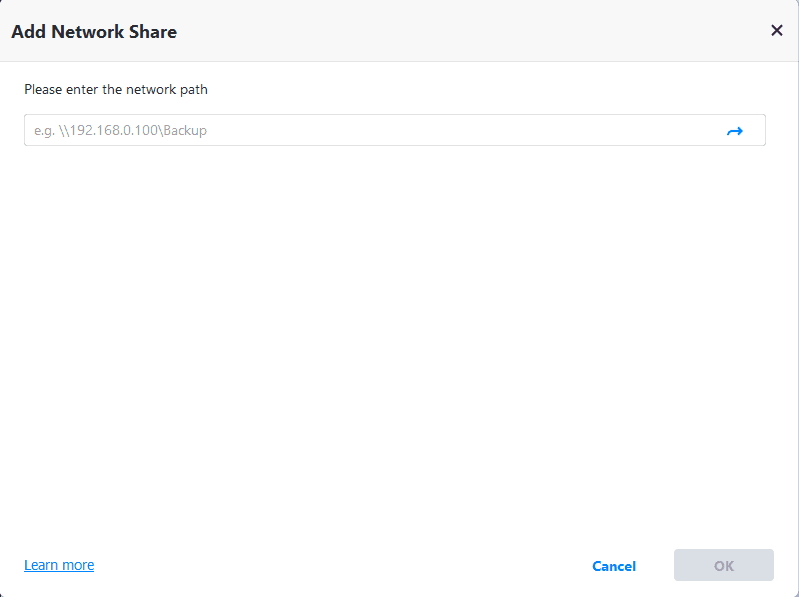
Step 3. In the Add Share or NAS Devices window, type the IP address of the QNAP NAS and click the blue button at the right. Type username and password if it prompts.
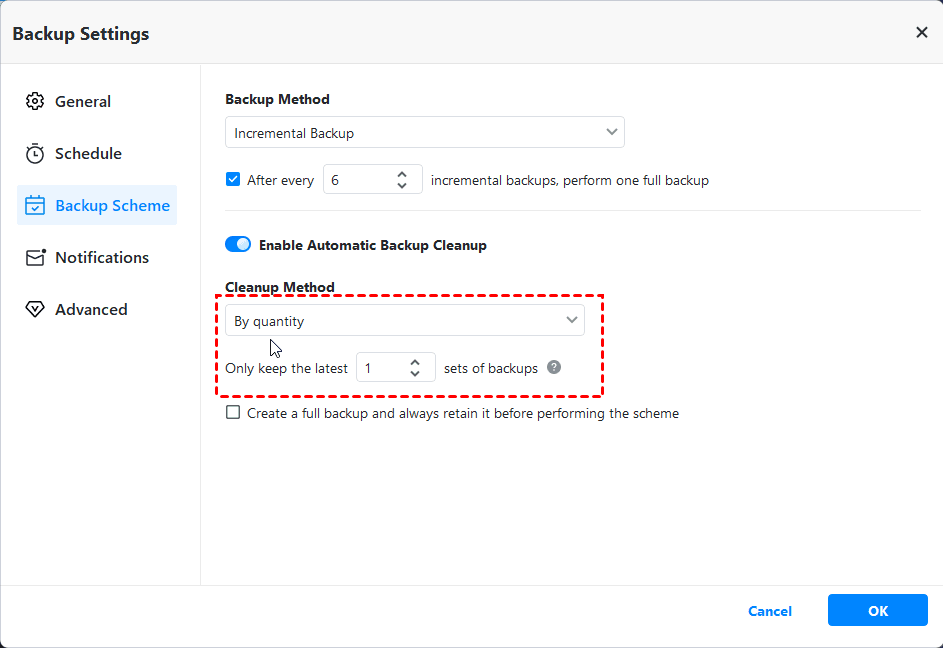
Step 4. Then, you will go back to the main page of System Backup. Set backup settings with "Options", “Schedule Backup”, "Backup Scheme", and click “Start Backup” to backup Windows Server 2012/2016/2019/2022 to QNAP NAS.

Notes✍:
1. You can set email notifications to get the backup task info timely, set normal or high compression levels to save disk space, enable passwords to prevent any unwanted access or malicious damage, etc.
2. You can set schedule backup with the following 5 options.
📌Daily/Weekly/Monthly: To backup your Windows Server automatically, set the backup task to run daily, weekly, or monthly instead of backing up manually.
📌Event Triggers: Four events are included: User login, User logoff, System startup, and System shutdown. You can trigger the backup task at these events and then back up the files and folders.
📌USB plug-in: It's especially convenient to backup the system to the USB device or backup system files on USB to another location while detecting the USB device of the task is plugged in.

3. You can click Backup Scheme to select the backup methods - Full Backup, Incremental Backup, or Differential Backup. After that, click Enable Automatic Backup Cleanup and select cleanup method: By quality, By time, and By daily/weekly/monthly.
Method 3: Backup Windows Server to NAS QNAP with AOMEI Cyber Backup
The best enterprise backup software - AOMEI Cyber Backup provides a convenient and reliable solution for centralized backup management of all Windows operating systems.
- It enables you to create system/disk/partition backup for a bunch of Windows PCs and Servers, supporting Windows 11/10/8.1/8/7 and Windows Server 2022/2019/2016/2012 (R2)/2008 (R2).
- You are allowed to save backup images on a local disk, external hard drive, network share or NAS device, etc.
- You can schedule a backup task to run daily/weekly/monthly using the full/incremental/differential backup method.
Follow the instructions below to backup the Windows Server to QNAP.
Step 1. Download, install, and run AOMEI Cyber Backup. Log in with an AOMEI Cyber Backup account or Windows account.
Step 2. Click Source Device > Windows > Add Windows Device to add the Windows Server device that you want to backup. You need to enter the IP address, username, and password of it.
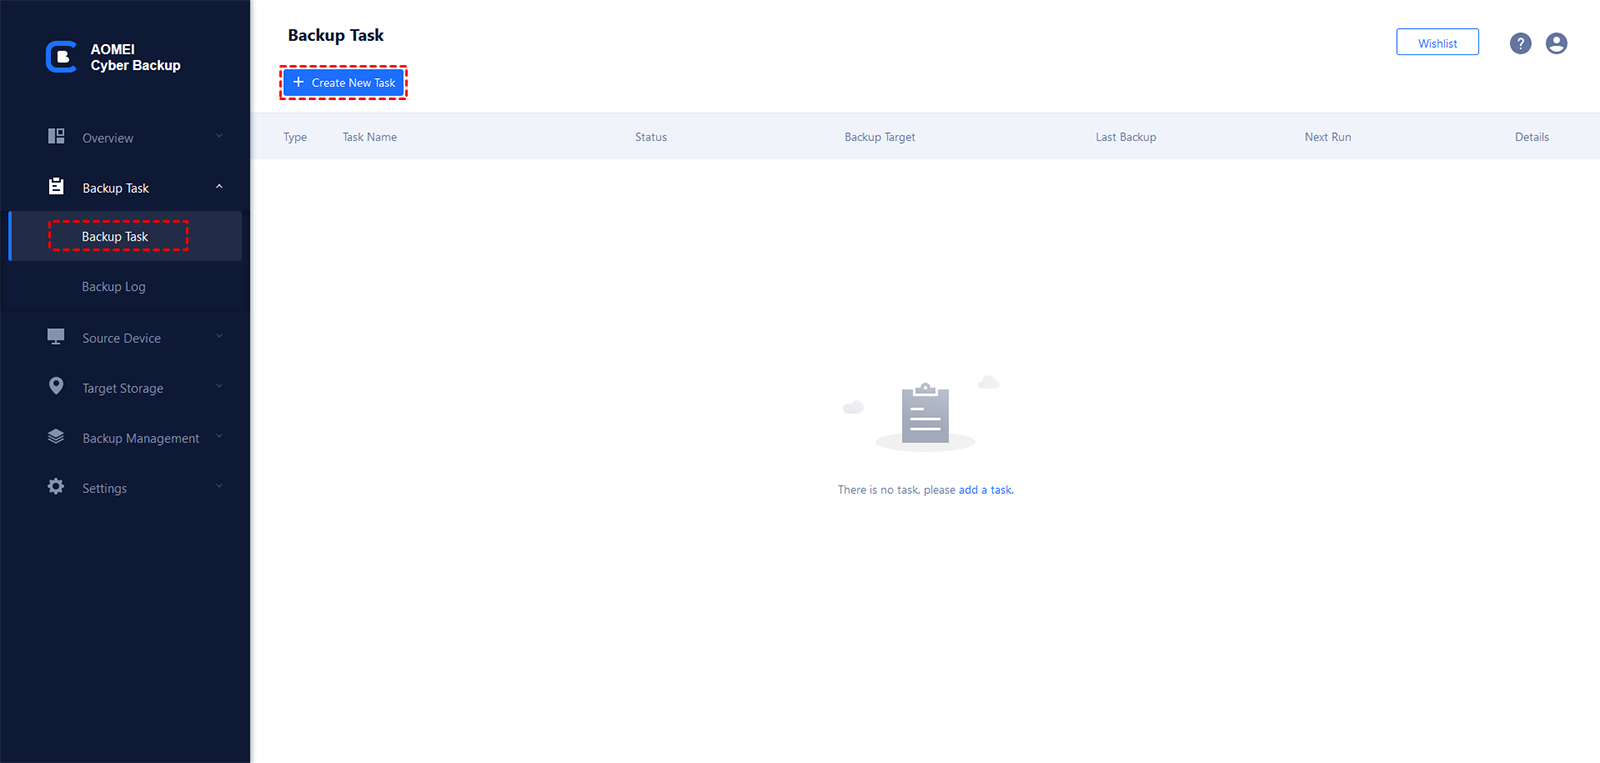
Step 3. Create a new backup task.
- Click Backup Task on the left menu bar and select Backup Task > Create New Task.
- Choose System Backup as the Backup Type.
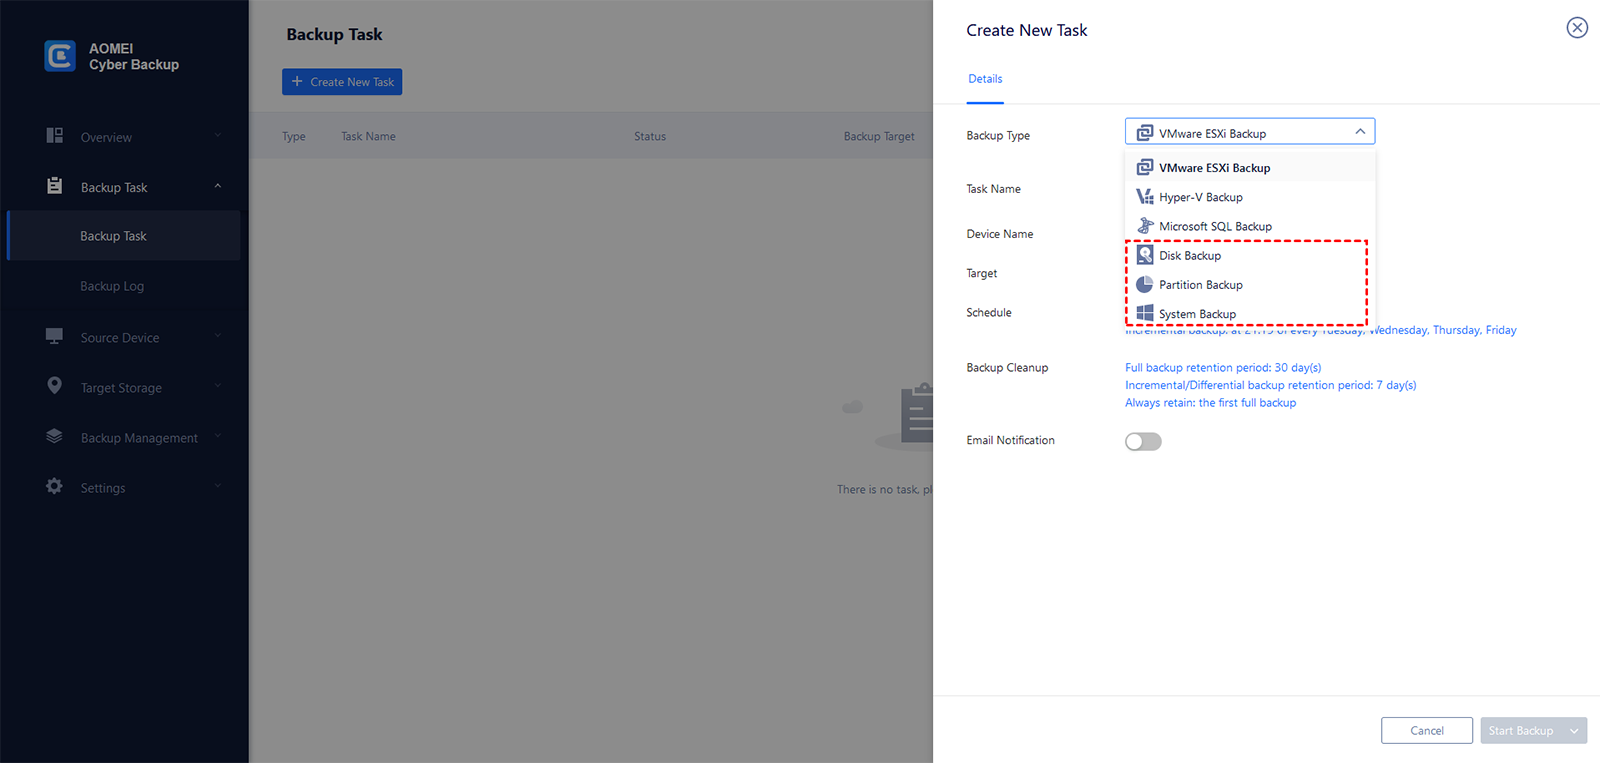
- Edit the Task Name based on your needs.
- In the Device Name field, click Select + to select the device you just added.
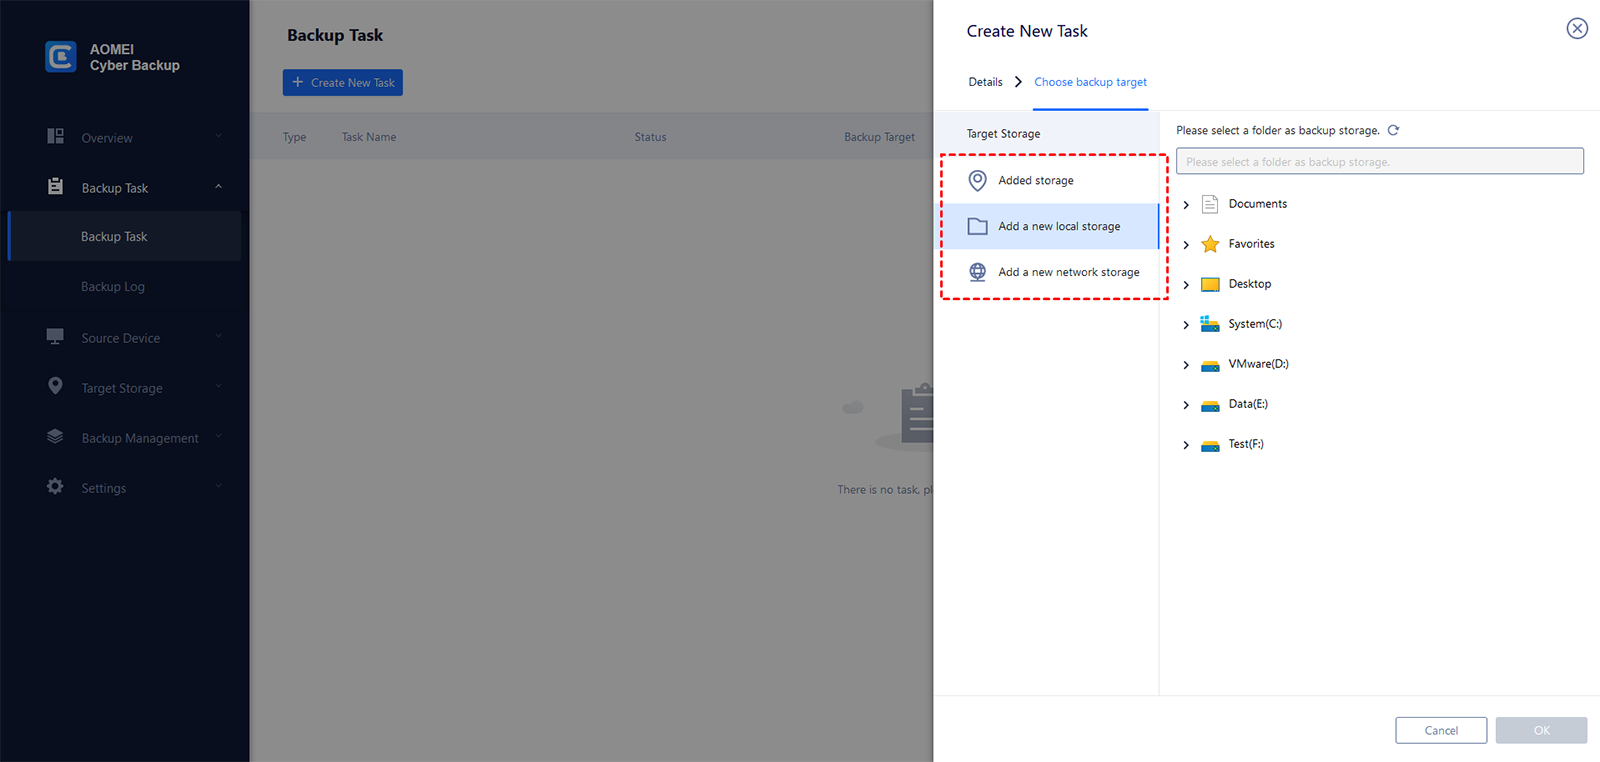
- In the Target field, click Select + > Add a new network storage. Then input the network path of your QNAP NAS, fill in your username and password, and click Verify. After that, choose a network folder as the backup target.
- Change the default schedule settings in the Schedule field.
- Click Start Backup > Add the schedule and start backup now to run your first backup.
FAQs about Backup Windows Server to QNAP
Q1: Can I restore data from QNAP NAS?
A1: Yes, you can restore data from your QNAP NAS using the same software you used for backup, ensuring your data is easily recoverable.
Q2: What if my QNAP NAS runs out of space?
A2: If your NAS is running low on space, consider cleaning up unnecessary files, archiving older data, or upgrading to a larger capacity NAS.
Q3: Can I backup my Windows Server to multiple destinations?
A3: Yes, you can configure your backup software to target multiple locations, ensuring redundancy and increased data security.
Conclusion
In this article, you can learn three ways to backup a Server to a QNAP NAS. You can use WSB to backup the server to QNAP NAS with VHD or VHDX File, or you can try third-party tools like AOMEI Backupper and AOMEI Cyber Backup.
As long as you create a system backup in advance, you can restore your computer to a normal state when you encounter any system problems later. To boot your server in case of boot failure, you can create a rescue media using AOMEI Backupper. Try it now to discover more!