AOMEI Backupper


How Do I Backup Windows 10 to QNAP NAS? (3 Solutions)
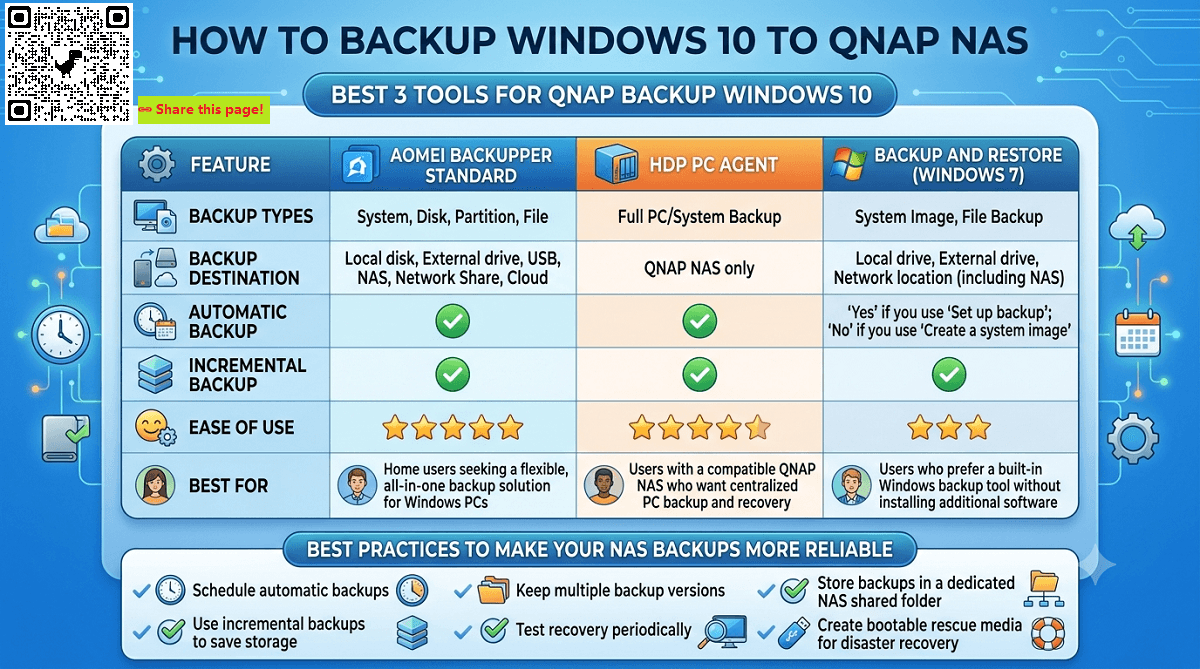
Here we will explain three great solutions to backup Windows 10 to QNAP NAS, including built-in tools and third-party software. Scroll down to learn more.

By Lily Updated on June 30, 2026


Why backup Windows to QNAP NAS?
Network Attached Storage (NAS) is usually used by individuals and businesses to save backups. When we are faced with a number of NAS options, QNAP NAS is a well-known and well-respected one! QNAP NAS provides excellent data transfer speed which ensures that your backups go smoothly, allowing you to easily move all your system and file backups to external storage devices when required.
As some users have been concerned about the stability of Windows 10, we would recommend backing up your system drive to QNAP NAS just in case something unexpected happens. Besides, you can enjoy the following advantages:
- Data Security and Redundancy: QNAP NAS supports RAID configurations and encryption to protect your data against hardware failures, unauthorized access, and ransomware.
- Scalability: Easily expand storage as your needs grow, eliminating the need for multiple external drives.
- Remote Access and Disaster Recovery: Access your backups remotely and recover data quickly in case of hardware failure or disasters.
🌟 To check more scenarios about backing up Windows to NAS, please refer to this complete guide: Backup Windows to NAS.
#1. QNAP Backup Windows 10 with AOMEI Backupper
AOMEI Backupper Standard is free QNAP backup software that helps you backup your data to your QNAP NAS easily.

 AOMEI Backupper
-
It doesn’t just help you backup your Windows 10 OS to a QNAP NAS. It can also be used to complete disk backups, partition backups, and file backups in Windows.
-
Schedule Backup: Helps you create automatic backups. You can choose an exact time of every day, week or month to run the backup job.
-
Incremental Backup: Saves only changed data since last full/incremental backup, thus reducing the backup time and backup image size.
 100% Secure
Download AOMEI Backupper now and follow the steps below to create Windows 10 backup to QNAP. The steps also apply to backing up Windows 10 to Synology NAS, FreeNAS, etc.
1. Install and launch AOMEI Backupper Standard. Next, select System Backup under the Backup tab.
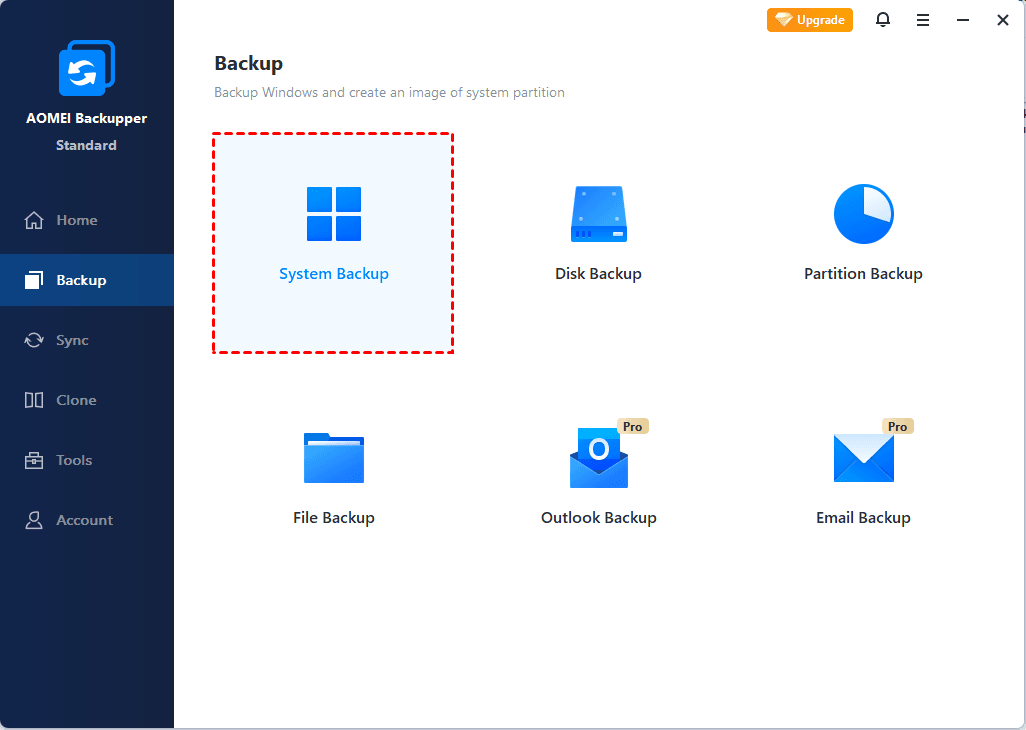
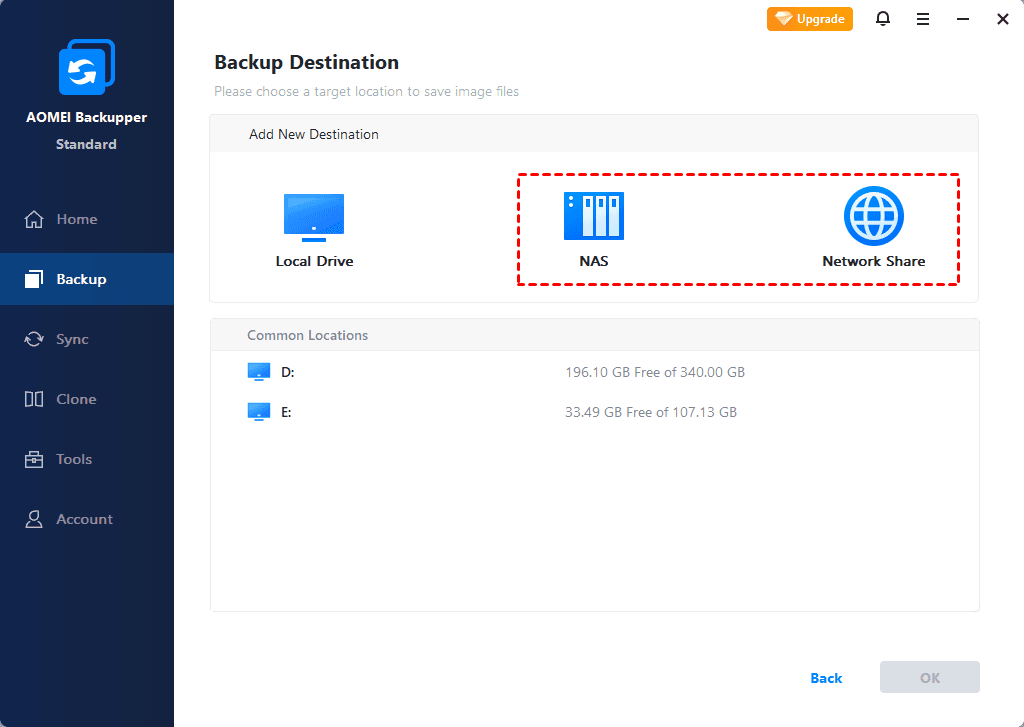
2. The system related partitions will be chosen by default. Then you should click the destination box and choose NAS > Add NAS in the pop-up window.
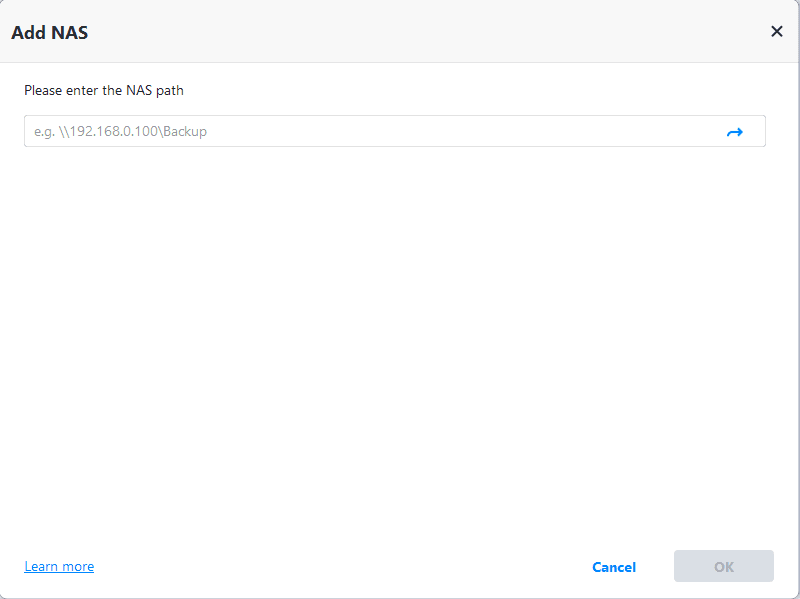
3. In the next window, type the network path or name of your QNAP NAS and click the arrow icon at the right. Input username and password if it is required. Then, choose one folder on the QNAP NAS as the destination path to store the backup image.
4. Enable Schedule to run automatic backups as necessary. Finally, click Start Backup. If you have a lot of system files, then the backup may take a little while to complete.
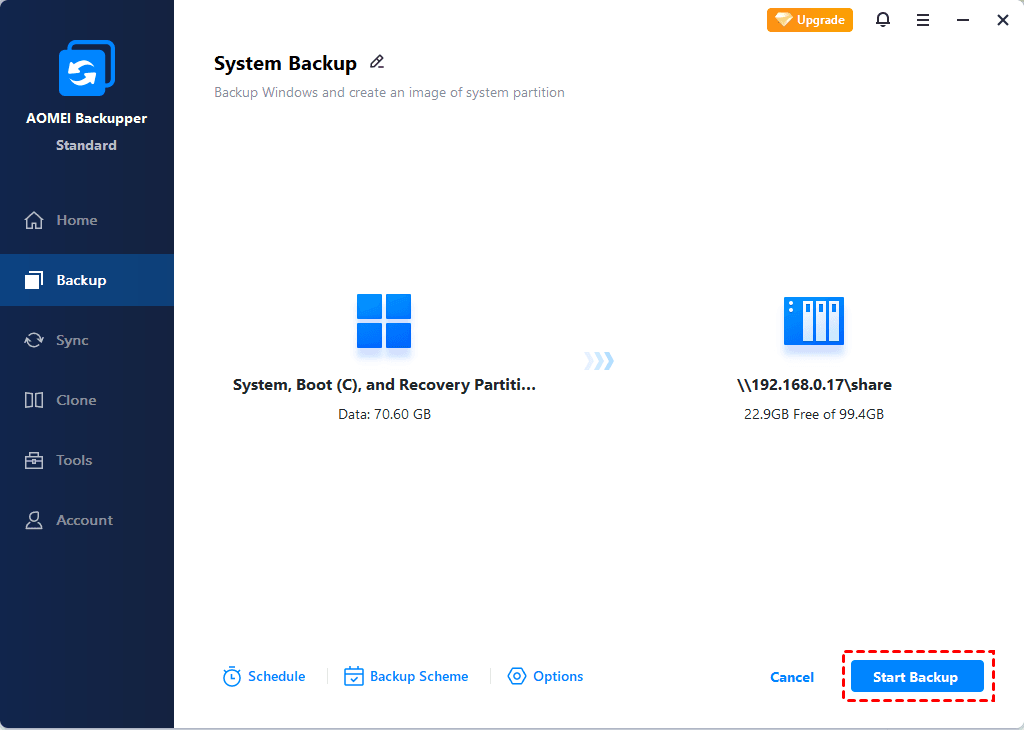
Backup Scheme: You can choose the backup method (full/incremental/differential backup) and enable automatic backup cleanup here. Some features are available in AOMEI Backupper Professional and higher editions.
#2. Backup Windows to QNAP NAS with HDP PC Agent
QNAP provides a tool - HDP PC Agent (formerly known as NetBak PC Agent) to help users perform system backup and full device restoration for applications, system settings, and data from Windows PC and servers. Learn how to use it to backup Windows 10 below:
✅ Requirements
● Your QNAP NAS user account is an administrator account.
● HDP for PC/VM 2.0 or later is installed on your QNAP NAS.
● HDP PC Agent is installed on your Windows PC.
1. Open HDP PC Agent on your Windows 10 PC. Enter your QNAP NAS IP address or server name, then sign in with your NAS administrator credentials.
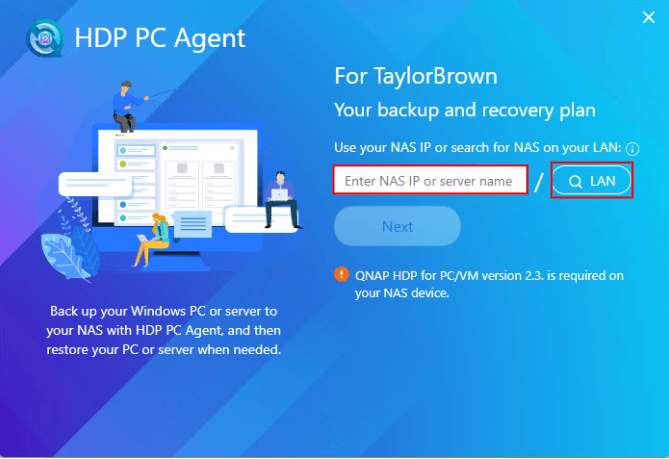
💡 Note: If your NAS is on the same local network, you can use the Search LAN button to locate it automatically.
2. You’ll go to the Create Backup Job window. In the Device&Target tab, select the PC volumes you want to backup and select a target repository. Click Next.
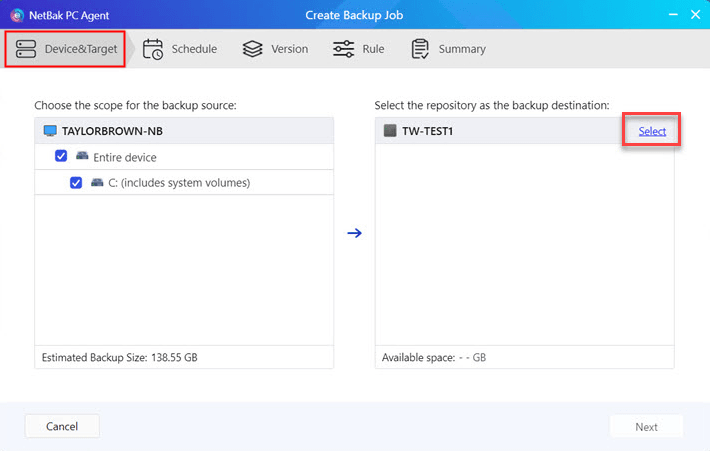
💡 Note: If you have no repositories, click Create Repository to create one.
3. In the Schedule tab, set up manual/daily/monthly backup or backup via event triggers. Click Next to continue.
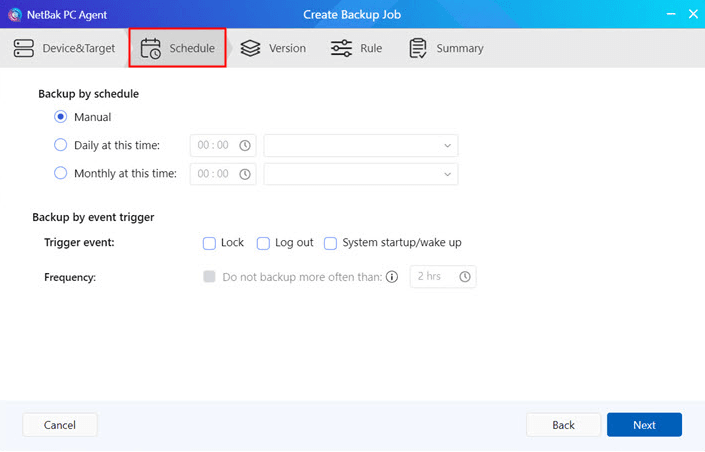
4. In the Version tab, specify how many backup versions will be kept in the repository and click Next.
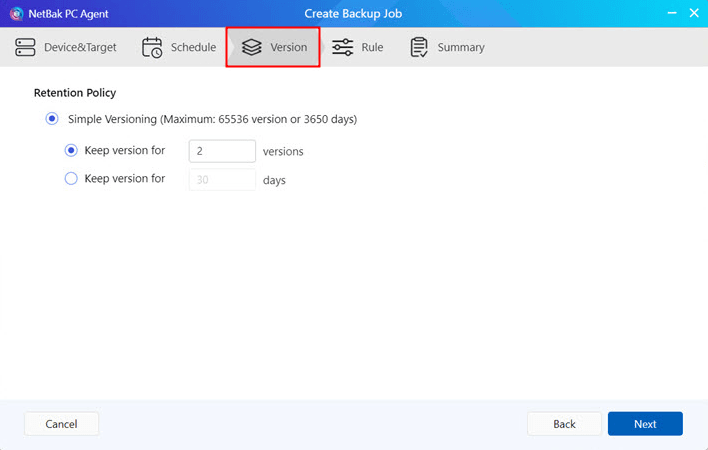
5. Specify further miscellaneous options to apply under the Rules tab and click Next.
6. Review your backup settings under the Summary tab and click Create.
7. After the backup job is created, click Backup Now to perform an immediate backup.
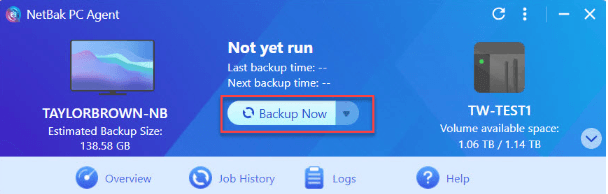
💡 Note: Do not power off, sleep, or log out of your device while the backup job is running.
#3. Backup PC to QNAP with the Windows 10 inbuilt backup tool
You can backup Windows 10 to QNAP with the Windows 10 inbuilt backup tool - Create a system image (also compatible with Windows 7):
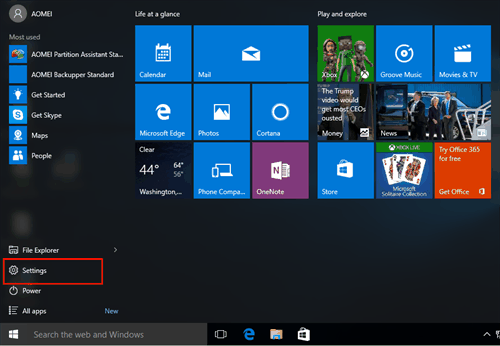
1. Open the Start Menu and click on Settings.
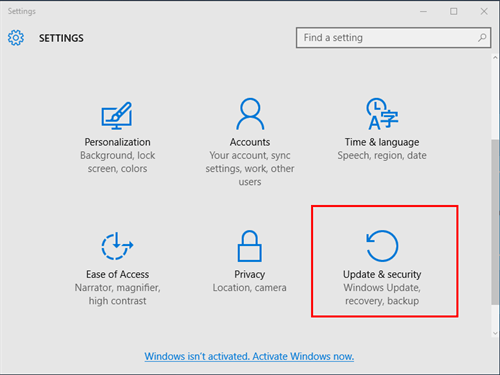
2. Click on Update & security.
3. Click Backup > Go to Backup and Restore (Windows 7).
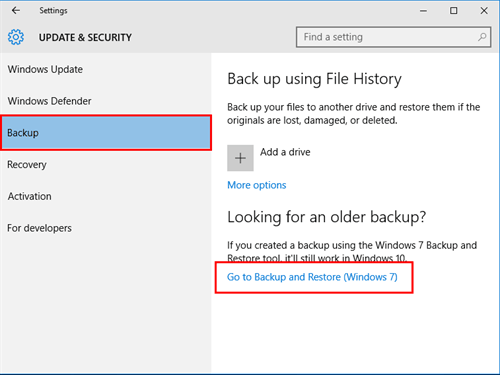
💡 Note: In newer versions of Windows 10, you may click Files backup > Go to Backup and Restore (Windows 7).
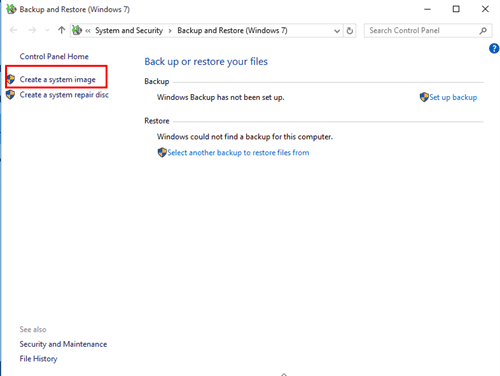
4. Select Create a system image.
5. Click On a network location and then the Select button.
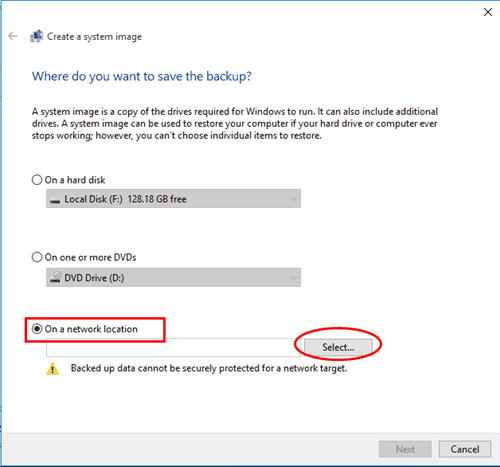
6. Enter “\\QNAP NAS IP address\shared folder name” in the Network Location field and enter username and password for network credentials. Click OK. Then click Next.

7. Select the drives to backup and click Next. Finally, click Start backup to execute it. Once the backup is completed, you can check the files in the File Station on the QNAP NAS.
FAQs about QNAP Backup Windows 10
1. Does QNAP have backup software for Windows 10?
Yes, QNAP has backup software for Windows 10. It is HDP PC Agent, which works with Hyper Data Protector (HDP) to back up Windows PCs to a QNAP NAS. It supports scheduled backups, centralized management, and system recovery.
2. How often should I back up Windows 10 to my QNAP NAS?
For most home users, a daily incremental backup is sufficient to protect important files while minimizing storage usage. If your data changes frequently, such as work documents or business files, you may want to schedule backups multiple times per day.
3. Why is my Windows 10 backup to QNAP NAS slow?
If your Windows 10 backup to QNAP NAS is slow, possible causes include:
- A slow Wi-Fi connection instead of a wired Ethernet connection.
- Large files or the first full backup.
- Limited NAS or PC hardware performance.
- Network congestion or insufficient available storage on the NAS.
Summary
As we’ve discovered, AOMEI Backupper is a convenient and versatile piece of software for backing up Windows 10 to a QNAP NAS, but it doesn’t just stop there. AOMEI Backupper can be used to easily create a bootable rescue media in case of a system crash and clone hard drive without reinstalling Windows.
To make a backup of client computers in the network on one centralized console, AOMEI Cyber Backup is available. Click the links above to discover more great features of AOMEI products.
 100%
Clean & Secure
100%
Clean & Secure