Top 5 Ways to Fix Windows 11 Install not Detecting SSD
Wanna figure out why does SSD not showing up when installing Windows 11 and how to fix it? From here, you will be provided with a full tutorial to finish this task with ease. Keep reading to learn more details.
By Clytze Updated on September 1, 2025
User case
SSD not detected during Windows 11 Install
Good day. While I was trying to install Windows 11 in my laptop, it showed me that there was no detected disks for installation. This is strange because I was able to install Fedora on my laptop without any problems. My laptop supports the Safe Boot option, and qualifies for the Windows 11 Installation. How can this be fixed?
- Question from Microsoft Community
In this tutorial, I will show you how to fix the problem of not finding the SSD when installing Windows 11. Just keep reading for more detailed information.
How to deal with Windows 11 can’t recognize SSD
To solve the issue of how to find SSD on Windows 11 when you want to perform an installation, you can follow the given methods in the next part to get rid of it. Try them one by one to see if there is one meet your actual needs.
👉 Method 1. Load driver
👉 Method 2. Disable Secure Boot in BIOS
👉 Method 3. Change boot mode
👉 Method 4. Check for BIOS update
👉 Method 5. Update SSD drivers
Method 1. Load driver
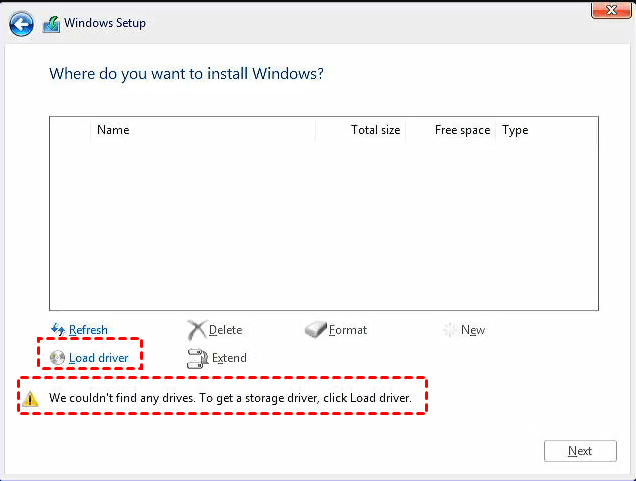
If you experience that Windows cannot find drives when installing Windows 11, and it alerts you with “We couldn’t find any drives” message, please try to load the relevant drivers during the Windows installation process.
Method 2. Disable Secure Boot in BIOS
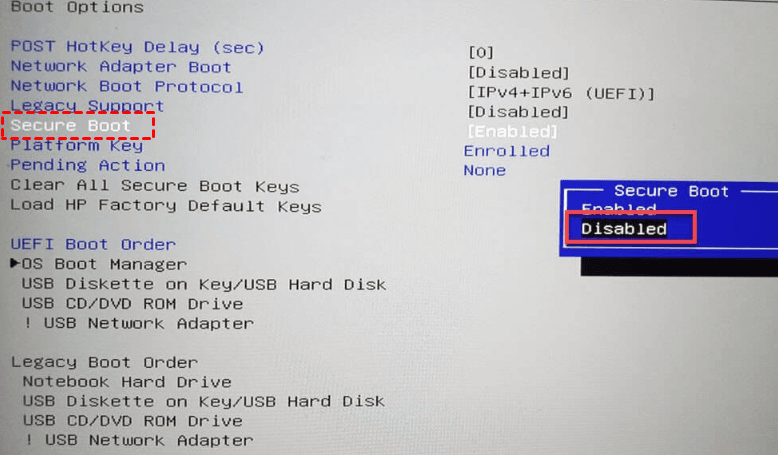
According to feedback from some users, disable Secure Boot in BIOS will help solve the problem of SSD not showing up.
1. Restart the computer and enter the BIOS by pressing the F2 or Del key during the boot process.
2. Go to the Security interface and select the Secure Boot option and set it to Disabled state.
Method 3. Change boot mode
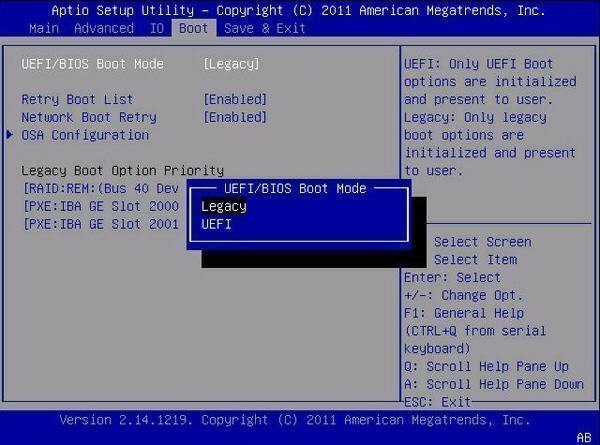
If the boot mode of your computer is not suitable for the SSD, you may unable to detect it. In such case, boot your PC into BIOS, ensure that is in UEFI Mode.
1. Boot the PC, and press the manufacturer’s key to open the menus. Common keys used: Esc, Delete, F1, F2, F10, F11, or F12. (During startup, there’s often a screen that mentions the key.)
2. From the BIOS Main menu screen, select Boot.
3. From the Boot screen and UEFI/BIOS Boot Mode option, select UEFI Boot Mode, and press Enter.
4. Press F10 to save the changes and exit the screen. Then you can check if the SSD can be detected.
Method 4. Check for BIOS update
An outdated BIOS version may also cause Windows 11 install not detecting SSD issue, at this point you can try to update the BIOS to fix the issue.
1. Download the latest BIOS (UEFI) from manufacturer’s website.
2. Unzip it, if necessary, copy to a USB flash drive formatted to FAT32 (NTFS may not be supported).
3. Restart your computer and enter the BIOS (UEFI) by pressing the appropriate key on your keyboard (commonly F2, Del or F10).
4. Navigate the menus to find the update screen and click an Update button and select the file on your USB drive.
5. Wait until the update process has completed, then restart the computer. During the BIOS update process, never power down or interrupt the update to avoid update failure and damage to the motherboard.

Method 5. Update SSD drivers
1. Press Windows + R at the same time to open Run dialog, type devmgmt.msc and click OK.
2. In Device Manager, double click Disk drives to expand it. (Your SSD may display as Unknown device. So if you don’t see your SSD in Disk drives, you can check Other devices).
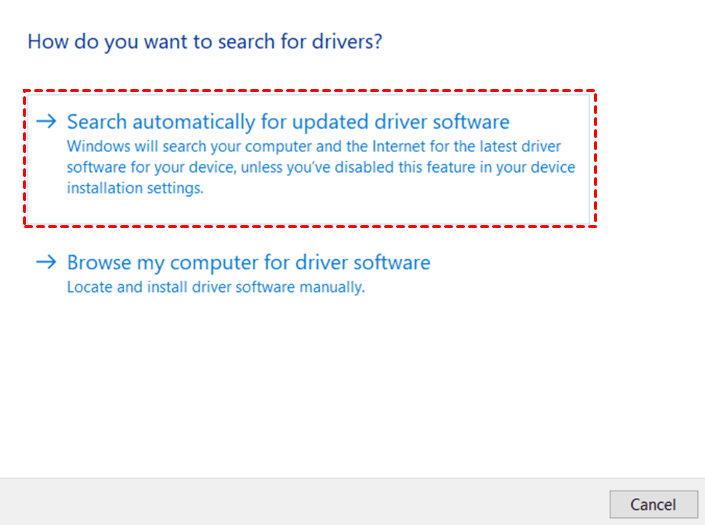
3. Right click on your SSD, and select Update driver.

4. Choose Search automatically for updated driver software and follow the on-screen instructions to finish the process.
Why SSD not showing up when installing Windows 11?
There are multiple reasons why Windows 11 install no drivers were found will appear. It could be a missing SSD drive, a bad partition table, or misconfigured BIOS settings.
- Improper connection. If you encounter SSD not showing up when installing Windows 11, the first thing to check is a connection problem. This problem can occur if the SSD is loosely or improperly connected with an external connection.
- Misconfigured BIOS settings. If your BIOS settings are set to the wrong compatibility mode according to your SSD, it will likely cause the SSD to not show up when installing Windows 11. You will need to change the boot mode in BIOS.
- Outdated SSD drivers. Outdated drivers are the main cause of many problems. Therefore, if your SSD drivers are not up to date, you need to update your drivers.
- Outdated BIOS. If your BIOS update procedure fails, your system will be useless until you replace the BIOS code.
Extra tip: Backup your PC continuously to prevent data loss
Since the Windows 11 upgrade still has some bugs or flaws at the moment, it is recommended to backup the operating system you are currently using now before installing Windows 11 using SSD. When the upgraded Windows 11 is not compatible with your computer, you can restore it.
Here I will introduce you to the best free backup and restore software - AOMEI Backupper Standard, which is designed for all Windows PC, including Windows 11/10/8/7. It enables you to backup system, files, disk, partitions to multiple locations such as internal/external hard drives, NAS devices, USB flash drives, Network location and clouds, etc. in a daily, weekly, or monthly basis. For example, you can backup Windows 11 to Synology NAS. Also, you are allowed to create bootable media in case of system failure or hard drive crashes.
Now you can follow the specific steps to backup your operating system as a data recovery solution. Click the download button below to install this freeware on your PC.
Step 1. After the installation of this freeware, open it and click Backup > System Backup.

Step 2. This tool will select the system partition and the relevant partitions that are required to start Windows by default. You just need to select a destination path to store your system backup image.

Step 3. Confirm the operation and click Start Backup to back up your Windows OS.

You can customize your backup to suit your needs by clicking“Schedule”, “Backup Scheme”, and “Options” at the bottom left of the program.
★ Schedule: You are allowed to set backup tasks to be executed Daily (By Interval), Daily, Weekly, Monthly (By Week), Monthly (By Date), One Time, and Event triggers. These features can help you automatically backup to avoid missing changed data.
★ Backup Scheme: It provides you with full, incremental and differential backup (in advanced versions). The last two backup methods can help you save space on the destination disk because they only back up changed files.
★ Options: You can write a note for your task to help you distinguish it from other backup tasks. In addition, you can enable encryption (paid) and email notification for this task.
Final words
Most users encounter the issue of Windows 11 install not detecting SSD and have no idea to solve it. This article provides you with 5 effective solutions of this issue and provides you a free and secure way to protect your computer data and system.
AOMEI Backupper can be your best data protection assistant, which not only allows you to backup your Windows 11 system, but also help you with ASUS laptop stuck on logo screen in Windows 10 with ease. You can explore more powerful features in AOMEI like sync and clone, so why not to try it now?