Windows 11 NVMe Not Detected? Top Ways to Fix It Now!
According to this article, you can get the top ways to fix the NVMe not detected issues, and gain an easy freeware to avoid data loss.
By Clytze Updated on October 28, 2024
💡 Key takeaways:
|
Fixes for NVMe not detected in BIOS |
|
|
Solutions for NVMe not showing up in Disk Management |
Solution 1. Update NVMe SSD driver |
|
Easiest way to backup NVMe SSD |
To avoid data loss caused by unpredictable situations, backup NVMe SSD in advance. |
User case
NVMe SSD is not detected in Windows 11
Hello, I recently bought Wd sn550 1tb NVMe SSD. When I installed it on my motherboard m.2 slot it does not showing in bios, disk management, device manager and anywhere else. I updated my bio to latest version but it also didn't work. I thought that SSD might be faulty so I checked my SSD in my friend’s PC it was working absolutely fine. The SSD I bought is also mentioned in support list but still my motherboard is not showing any signs that SSD is connected. Please help me.
- Question from tom’s HARDWARE
As mentioned above, you are probably like those users who are wondering, “why is my NVMe not showing up?” Don’t get worried about that, for this article will provide some simple and effective fixes for you to tackle this problem. Before jumping to the solution, let's figure out what’s causing this problem.
Reasons why NVMe not detected in Windows 11
There could be multiple reasons causing NVMe SSD not detected in Windows 11. Here I have demonstrated some possible reasons that can cause such a problem.
▸The NVMe SSD is not properly installed or plugged in.
▸BIOS is not compatible with SSD.
▸The driver is disabled in BIOS.
▸The driver is out of date or not installed.
▸The drive letter is missing.
▸The NVMe SSD may be corrupted or damaged.
So how do we solve these relevant issues? Keep reading to learn more about how to make your NVMe detected in Windows 11.
Fixes for NVMe not detected in BIOS
If you are stuck with the problem of NVMe SSD not detected in BIOS, you can try the following solutions in order to finish this task.
Fix 1. Reinstall the NVMe SSD
Before you try the following methods, you can check whether the NVMe SSD exist installation and insertion problems.
1. Disconnect the power to the PC and locate the M.2 interface module on your own motherboard.
2. Remove the mounting screws, then insert the NVMe SSD into the slot and put the screws on it.
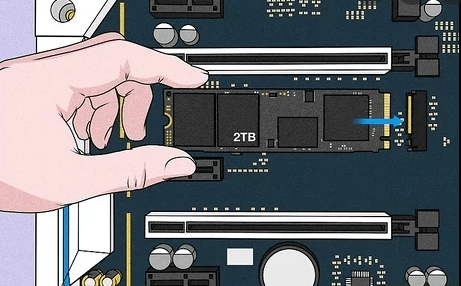
3. Reboot your PC and follow the on-screen instructions.
If the problem is not solved, then you can try the following measures.
Fix 2. Set up NVMe SSD in BIOS
If your drive is not configured with SATA controller settings, you will experience problems such as NVMe not detected in BIOS. Due to this, you need to reconfigure the BIOS settings of your SSD to fix the problem.
1. Reboot your computer, press F2 or Del to enter the BIOS setup page when your PC is booting.
2. Go to “Advanced” and click on the drop-down menu next to “PCI Express X4_3 Slot Bandwidth” to change it to M.2 mode.
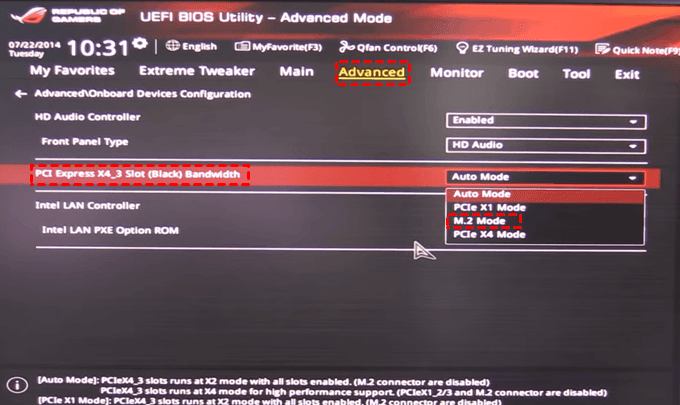
Tip: The exact process from step 2 will vary depending on your motherboard.
3. Save your changes and restart your computer, and confirm if the NVMe appears in the BIOS.
Fix 3. Disable Compatibility Support Module
The main function of the Compatibility Support Module (CSM) is to detect compatibility modes at boot time. If you are installing an NVMe SSD and want to boot from this drive, then you need to disable CSM and enable the UEFI option. This will help with the issue of NVMe not detected in BIOS.
1. Reboot your computer and press F2 to enter the BIOS.
2. Find the Launch CSM option at the bottom of the Boot tab and set it to Disabled.
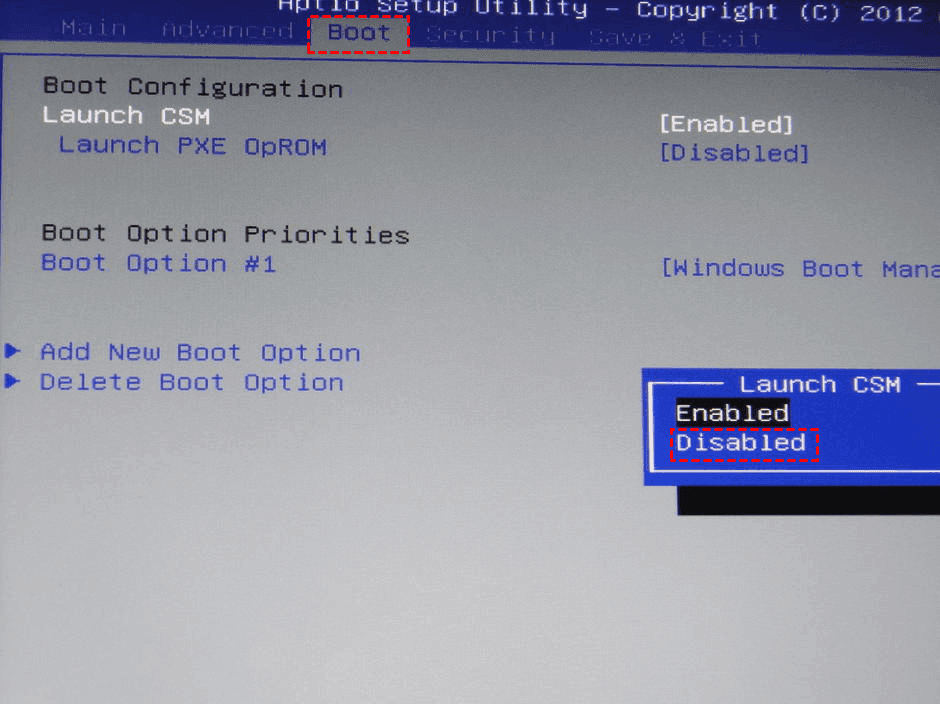
3. Confirm the changes and exit BIOS. Reboot the computer and verify if NVMe SSD appears in the BIOS.
Solutions for NVMe not showing up in Disk Management
Another situation is that your NVMe SSD not showing up in Disk Management. To satisfy your needs, you can follow the listed two methods to tackle this issue.
Solution 1. Update NVMe SSD driver
Outdated NVMe drivers may cause problems with NVMe SSD not showing up in Disk Management. You can try to update it to solve this issue.
1. Right-click the Start button and select Device Manager>Disk drives, right click on the NVMe SSD and select Update driver.
2. Tap Search automatically for updated driver software and wait for the process to complete. If there are any updates available, tap the Update button and restart your computer.

3. Reboot the computer and verify that the NVMe SSD is detected in Disk Management. If not, go to the next method.
Solution 2. Get the missing drive letter back
1. Right-click the Start button and select Disk Management.
2. Find the partition where the drive number is missing, right-click it and select the Change drive letter and paths option in the expanded menu.
3. In the new window, tap the Add button.
4. Select Assign the following drive letter and select a drive number in the list and tap OK to save the changes.

5. Reboot the computer and verify whether the SSD is detected in Disk Management.
Solution 3. Format the NVMe SSD
Formatting the NVMe SSD can safely and effectively solve various problems caused by corrupted files or improper installations, including problems such as the SSD not showing up in the BIOS. You can follow the steps below.
1. Right-click the Start button and select Disk Management from the list.
2. Select a partition and right-click it, then click Format to repair the drive.
3. Confirm the information in the SSD formatting pop-up window. It is recommended to select NTFS and uncheck “Perform a quick format”. Then click OK and wait for the SSD formatting to finish.
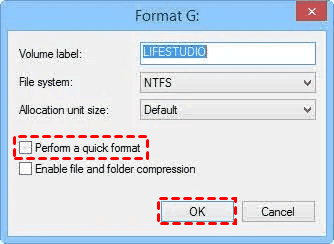
By formatting your NVMe SSD, the corrupted data will be deleted and Windows can detect your NVMe SSD again. However, by formatting it, you may lose your data.
Therefore, it is recommended that you back up the important files and data in your NVMe SSD in advance before executing the above repair methods to prevent unnecessary data loss. Here, a worth-trying free backup software will easily solve your trouble. Moving on to gain more detailed information about the easiest way to backup your NVMe SSD regularly.
Easiest way to backup NVMe SSD periodically to avoid data loss
As it is said in the earlier part, you may face the risk of data loss when you are in the process of trying the above fixes. So in this section, you will learn how this free backup utility—AOMEI Backupper Standard can protect your data.
First of all, you can download and install AOMEI Backupper Standard, try it by yourself.
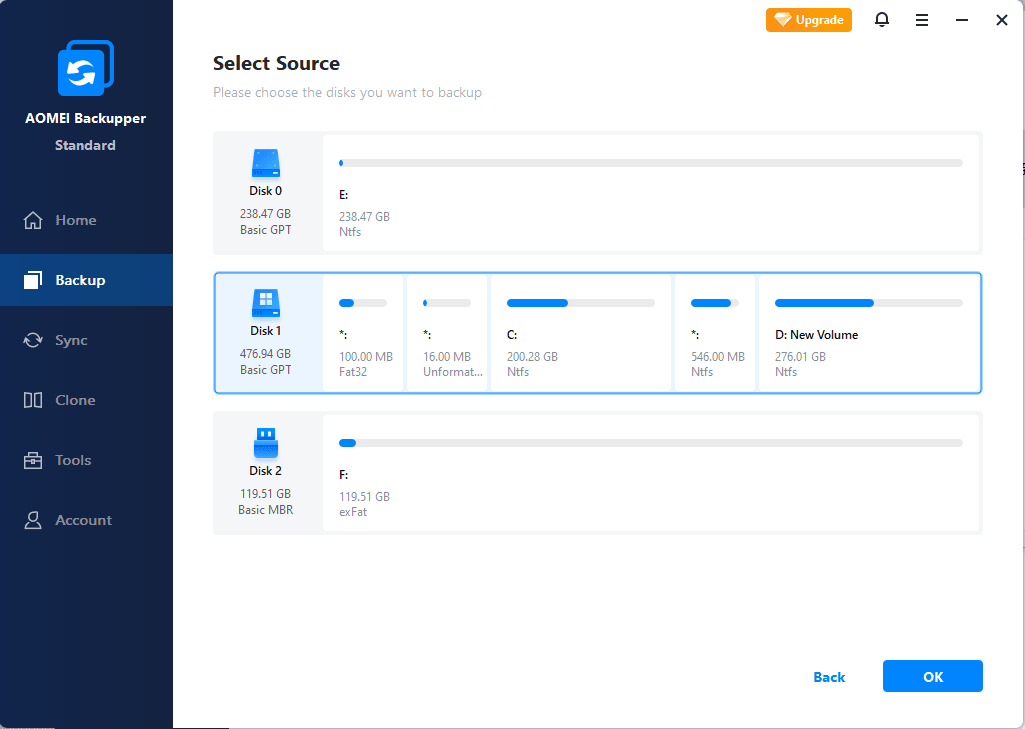
Step 1. Open this freeware, in the left tab page, select Backup and then select Disk Backup.

Step 2. Click Add Disk, you can use the Task Name to name this backup field to help you distinguish it from other backups.

Step 3. Select the source disk that you want to back up.
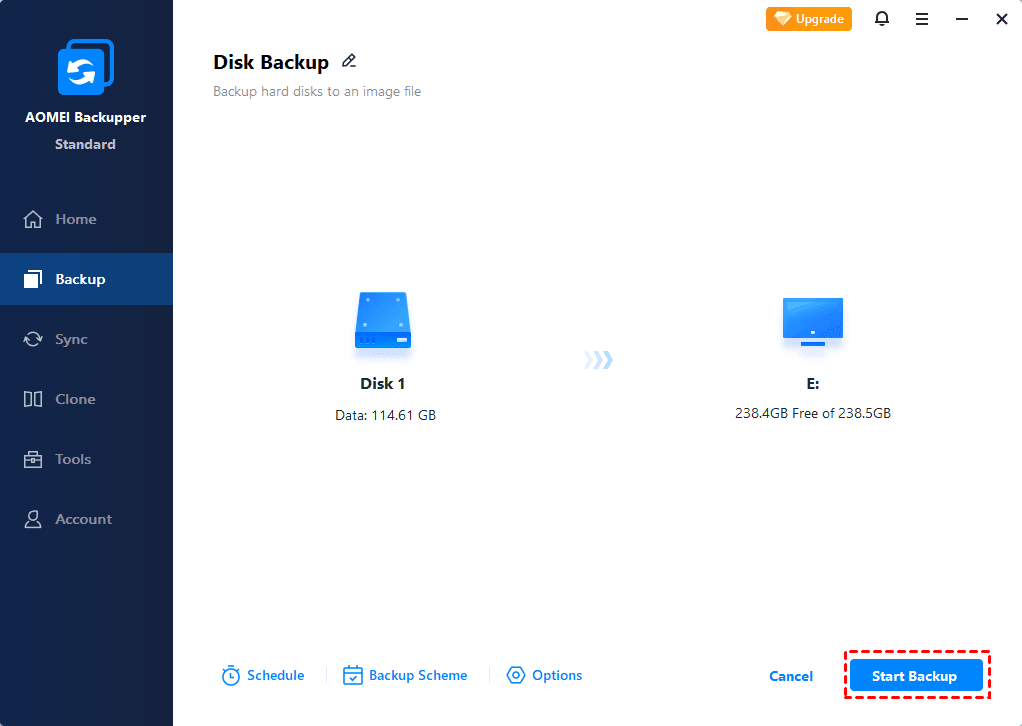
Step 4. Select a destination path to store the image file. Make sure that the destination has enough space to accommodate the image files of the backup disk.

Step 5. Confirm your operation and click the Start Backup button to create disk backup in Windows 11 and wait for the process to complete.
Extra help: If you would like to restore the NVMe SSD backup image, please use the feature Disk Restore.
Summary
The problem of Windows 11 NVMe not detected can often cause you a lot of trouble, but you can try the above solutions to solve such problems, which I hope will help you and ensure that the NVMe SSD will be ready for use as soon as possible.
Besides that, with the best free backup software—AOMEI Backupper, you can easily backup your important files with a few clicks to avoid data loss. Not only that, but AOMEI Backupper is also a great cloning software that can help you clone SSD to SSD in Windows 11, or clone Window 11 to another hard drive. To explore more features, hurry up and try it out!