M.2 SSD Not Detected on Windows 10/11: 11 Fixes to the Issue
Read this detailed post of step-by-step tutorial to learn how to solve the problem of M.2 SSD not detected in Windows 10/11. Learn more about the causes of this problem and the 11 ways to fix it, as well as an easy way to migrate your system to an M.2 SSD.
By Yuka Updated on September 5, 2025
User case: Why is my SSD not detected in Windows 10?
“I have just built my brand new PC and installed 1 TB of Samsung Evo plus 970 SSD. into my motherboard. It Is detected in bios and is activated/initialized. The secure boot is off by the way (I tried both sb on and off). I load in and it says it can't recognize a driver. I have one other SSD that I could plug into my motherboard but I wanna do it with this one since that one is only 550 GB. PLEASE HELP.”
– Microsoft Community
Solid-state drives (SSDs) mainly use flash memory to provide excellent performance and durability. Compared with traditional hard disk drives (HDDs), SSDs have obvious advantages in read and write speed, power consumption, noise, etc.
The two most common cases are M.2 SSDs not showing up in the BIOS and M.2 SSDs not being detected in Disk Management. If you have similar troubles, please read the following content in detail to understand the reasons for these two situations and the corresponding solutions.
7 solutions for M.2 SSD not showing up in BIOS
- Method 1. Enable M.2 SSD in BIOS🔥
- Method 2. Reinstall M.2 SSD🔥
- Method 3. Check the M.2 setting in BIOS
- Method 4. Disable Secure Boot in BIOS
- Method 5. Disable Compatibility Support Module (for NVMe)
- Method 6. Reset the BIOS
- Method 7. Update the BIOS
4 solutions for M.2 SSD not detected in Disk Management
- Method 1. Update M.2 SSD driver🔥
- Method 2. Perform hardware and device troubleshooting🔥
- Method 3. Assigning drive letter
- Method 4. Initialize M.2 SSD
An easy way to migrate your system to a new hard drive🔥
Before we delve into the solutions of M.2 SSD not being detected in Windows 10/11, I want to bring up an all-in-one clone software. If you want to completely migrate your system to a new M.2 SSD without reinstalling the system, it is recommended to use AOMEI Backupper Professional for system cloning. This method saves time compared to reinstalling the system.
AOMEI Backupper Professional can provide you with professional system cloning services and support Windows 11/10/8.1/8/7. That is, with just a few clicks, you can clone all data from the source system partition containing the OS, software, and applications to the new M.2 SSD. This saves the time of reinstalling the Windows system and also preserves the original data of the system partition. Here are the detailed steps of system cloning, but before that, you need to make the following preparations.
◐ The software uses Intelligent Clone by default, which means you need to check the two disk storage spaces involved in system cloning. Make sure the destination disk is greater than or equal to the used space of the source disk, otherwise, cloning may fail.
◐ A System Clone overwrites the partitions of the target disk. If the target disk has multiple partitions, please use the Partition Backup function before system cloning to back up the important data needed to prevent data loss.
◐ Download and install the AOMEI Backupper Professional 30-day trial version.
Note✍: Please note that System Clone can only be demonstrated in the trial version, and cannot be performed. If you're satisfied after the demo, upgrade to the pro version before cloning the system.
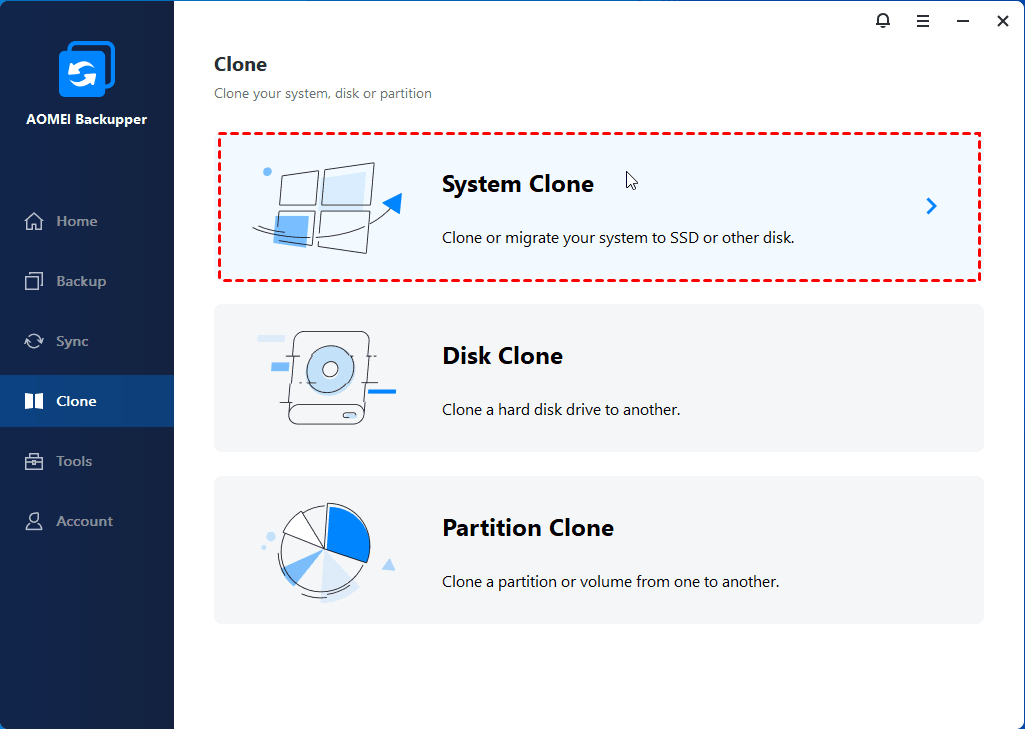
- Make sure your Windows system can check for the new M.2 SSD and run AOMEI Backupper Professional. Switch to the Clone tab in the left window and tap the System Clone button in the right window.
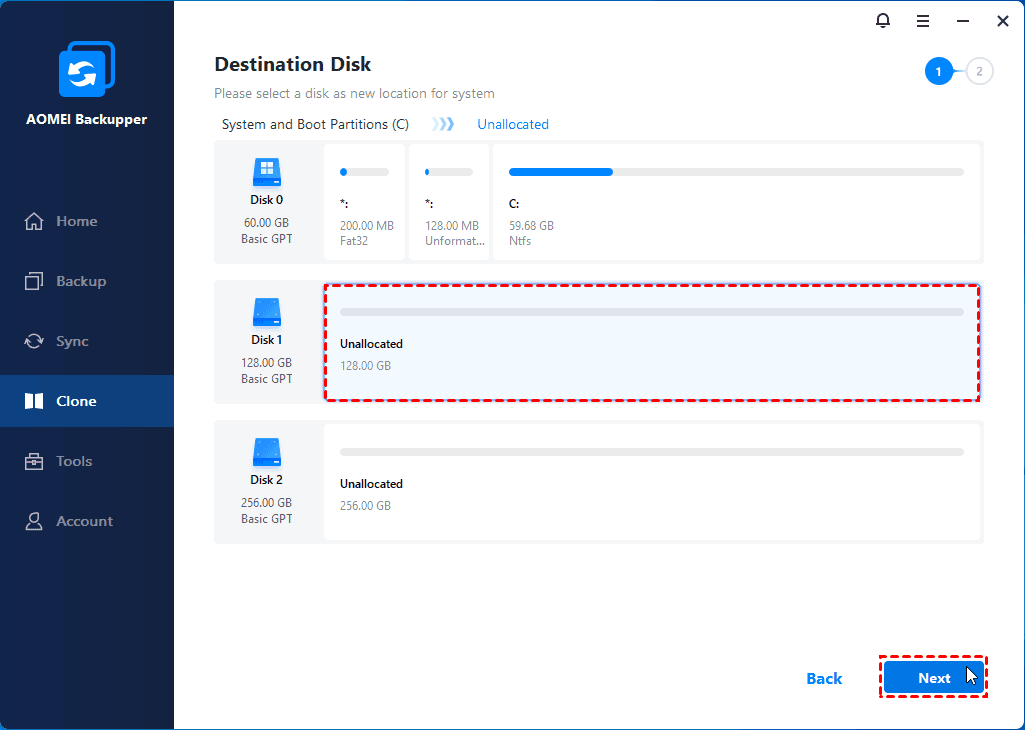
- In the destination partition interface, select the target disk for system migration (newly installed M.2 SSD) and tap Next.
- Since the selected target disk is an M.2 SSD, it is recommended to check the SSD Alignment checkbox and tap the Start Clone button in the bottom right corner after previewing the operation.
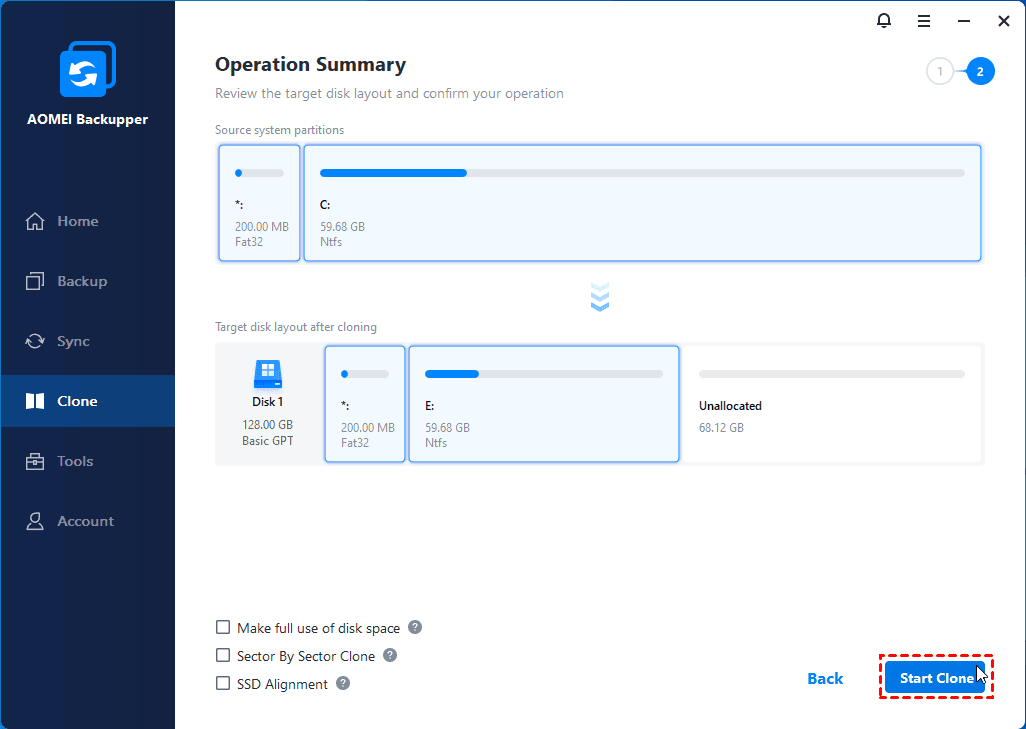
Note✍: If you want to make a complete copy of the entire sector, you can check the Sector By Sector Clone checkbox. This function needs to ensure that the storage space of the target disk is greater than or equal to the storage space of the source disk.
- After the system clone is complete, change the boot order in the BIOS to ensure that the computer will boot successfully in the new M.2 SSD.
Note✍: The different formats of the computer disk partition style will directly affect the System Clone. If it is an MBR disk, only the system partition and the system-reserved partition will be transferred. In the case of a GPT disk, the EFI system partition and the MSR partition will also be transferred to the new hard disk at the same time. It is worth mentioning that AOMEI Backupper Professional allows you to transfer the system between MBR and GPT disks without converting partition styles.
In addition to this, AOMEI Backupper Professional can provide you with other features that may be of interest.
- If you want to transfer your system without loading Windows, you can choose to create a bootable media and boot from it.
- AOMEI Backupper Professional only supports personal user versions of Windows systems, if you want to transfer the system to Windows Server 2025/2022/2019/2016/2012 R2/2008 R2, please use AOMEI Backupper Server.
- If data security is concerned, you can also use the Disk Clone function to completely copy and transfer all the data in the source hard disk to the new hard disk to further improve the computer data security.
- If you are a professional who needs to maintain multiple computers, it is recommended to upgrade to the Technician version to create a portable version and copy this tool to a removable device.
Reasons for M.2 SSD not showing up in BIOS
BIOS, the Basic Input/Output System, is used to initialize and test hardware components, load boot programs from mass storage devices (hard disks), and then load the operating system. Normally, after a fresh install of an M.2 SSD on the motherboard, you can see it in the BIOS. But in some cases, you may encounter the problem that the M.2 SSD not showing up in BIOS. So, how should this problem be solved? First, you need to understand the cause of the problem.
Usually, this problem is caused by a variety of reasons, the following are common.
- M.2 SSD not enabled in BIOS
- M.2 SSD is not properly connected to the computer
- Incorrect BIOS settings
7 solutions for M.2 SSD not showing up in BIOS
If you are at a loss for the problem of M.2 SSD not appearing in BIOS, please try the following 7 methods in order, I believe they can help you solve the problem.
Method 1. Enable M.2 SSD in BIOS
When you encounter the problem that Windows 10 does not recognize M.2 SSD, you should first check and confirm whether M.2 SSD is enabled in BIOS, it is a method worth trying.
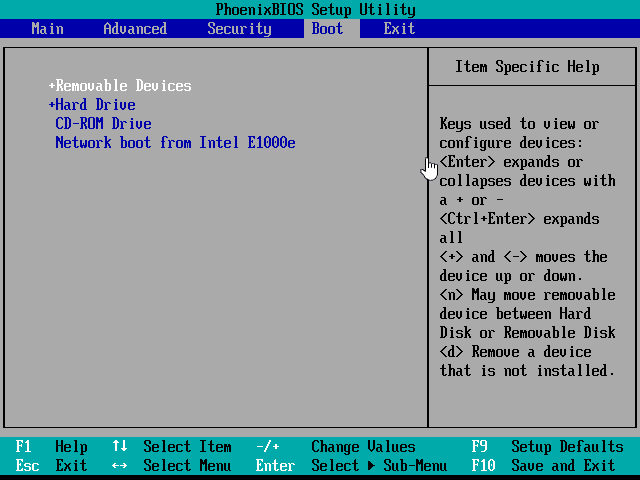
- Restart the computer and enter the BIOS by pressing the F2 or Del key during the boot process.
✍ Note: Please note that the keys for entering the BIOS are different for motherboards of different brands. Please check the motherboard manual or seek help from the motherboard manufacturer.
- In the BIOS main menu interface, tap and expand SATA Configuration.
- Tap to configure SATA to IDE mode and save the changes.
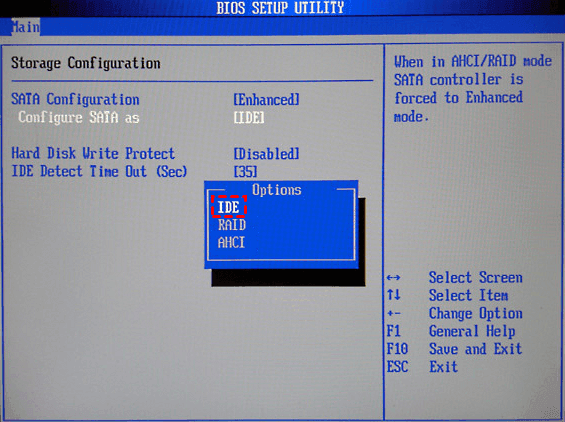
- Restart the computer and confirm if the M.2 SSD appears in the BIOS.
Method 2. Reinstall M.2 SSD
If you have not installed the M.2 SSD correctly, then you may also have the problem that the M.2 SSD does not appear in the BIOS. At this point, you can check and reinstall the M.2 SSD, which will help you solve the above problem.
Depending on the type of computer (desktop computer and laptop), the procedure will be different, please follow the steps below. If your motherboard has multiple M.2 slots, you can try to reinstall the M.2 SSD to another slot.
◉ Desktop computer reinstallation of M.2 SSD
- After completely shutting down the computer, remove the previously installed M.2 SSD.
- Open the computer case and confirm the location of the M.2 slot on the motherboard.
- Align the SSD interface with the motherboard slot and insert it into the M.2 slot at an angle of 20 degrees.
- Tighten the screws into the mounting holes on the motherboard and use a Phillips screwdriver to tighten the screws to secure the M.2 SSD.
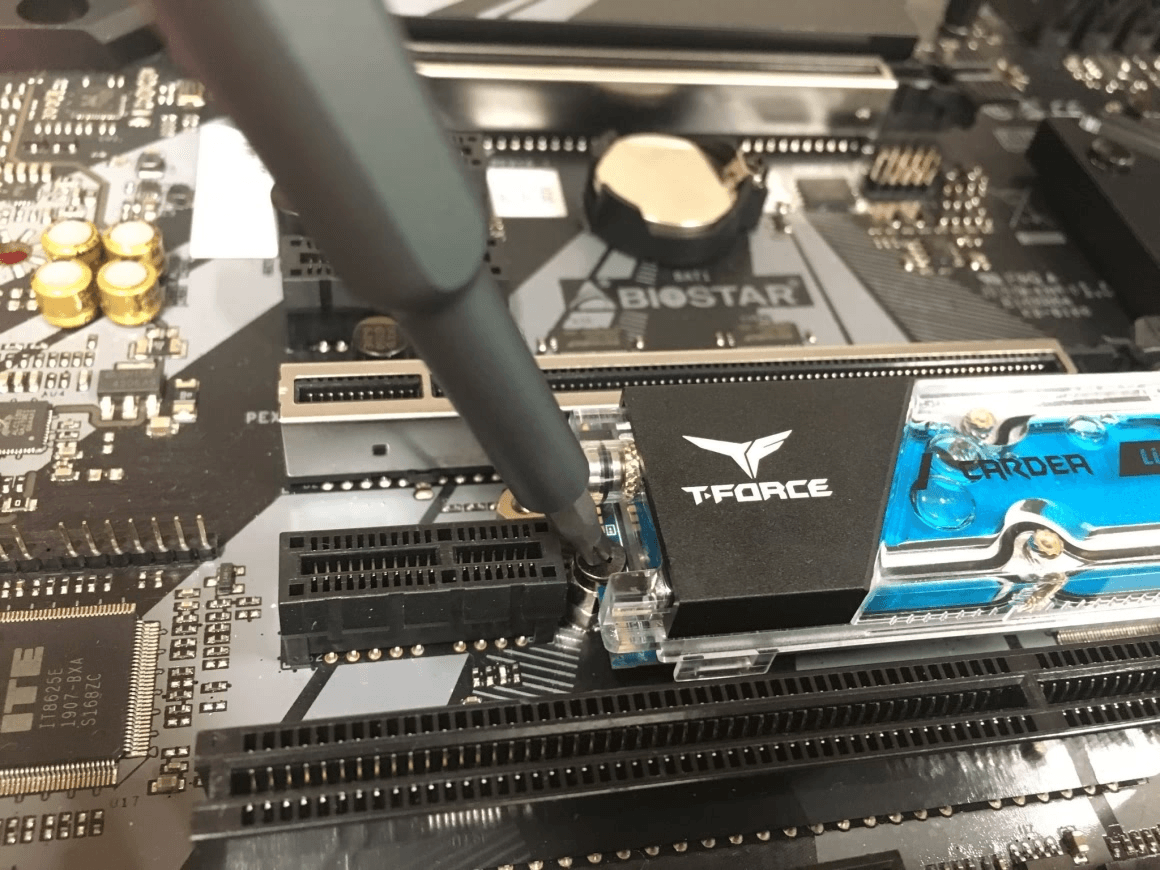
- Reassemble the computer, connect the power supply and start the computer.
◉ Laptop reinstallation of M.2 SSD
- Turn off the computer completely and remove the back cover of the hard disk area.
- Insert the M.2 SSD at an angle into the connector and gently press down according to the position of the M.2 SSD slot.
- Then fix the screws at the end of the M.2 SSD and reinstall the back cover.
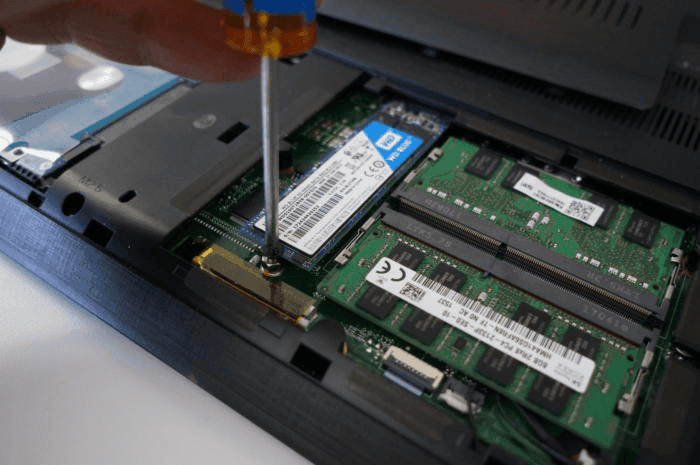
- Reconnect power to the computer, start the computer and confirm if the M.2 SSD appears in the BIOS.
Method 3. Check the M.2 setting in BIOS
The BIOS of some motherboards has an M.2 slot mode, which usually defaults to automatic mode. But in some cases, this setting will cause the M.2 SSD not to be detected and cause the M.2 SSD not to display. Therefore, you need to check the M.2 setting in the BIOS.
- Restart the computer and enter the BIOS by pressing the F2 or Del key during the boot process.
- Tap the Advanced settings tab, and then tap Onboard Devices Configuration.
- Tap on the menu next to PCI Express X4_3 Slot (Black) Bandwidth and select M.2 Mode.
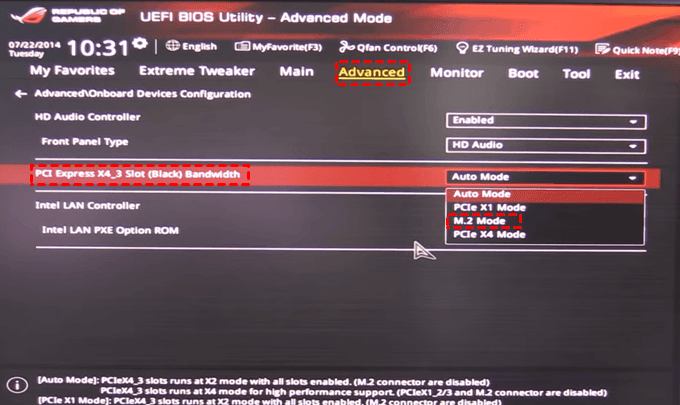
- After saving the changes, exit the BIOS. Reboot the computer and confirm if the M.2 SSD appears in the BIOS.
Method 4. Disable Secure Boot in BIOS
According to feedback from some users, disabling Secure Boot in BIOS will help solve the problem of M.2 SSD not showing up in BIOS.
- Restart the computer and enter the BIOS by pressing the F2 or Del key during the boot process.
- Go to the Security interface and select the Secure Boot option.
- Select the Secure Boot Control option and set it to Disabled.
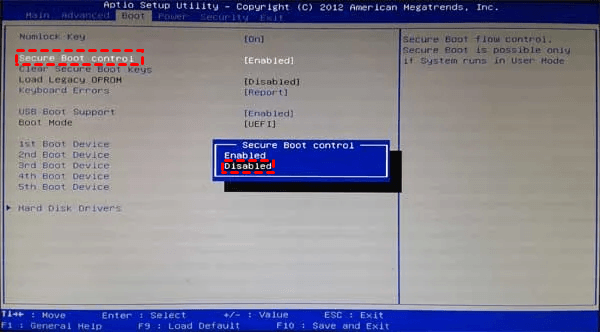
Note✍: Some motherboards only have Secure Boot but not Secure Boot Control, in this case, you just need to change the setting to Disabled in Secure Boot.
- Save the changes and exit BIOS. Reboot the computer and confirm if the M.2 SSD appears in the BIOS.
Method 5. Disable Compatibility Support Module (for NVMe)
The main function of the Compatibility Support Module (CSM) is to detect compatibility mode at boot time. If you are installing an NVMe M.2 SSD and want to boot from this drive, then you will need to disable CSM and enable the UEFI option. This will help resolve the issue of M.2 SSDs not appearing in the BIOS.
- Reboot your computer and press the F2 or Del key to enter the BIOS during the boot process.
- Find the Launch CSM option at the bottom of the Boot tab and set it to Disabled.
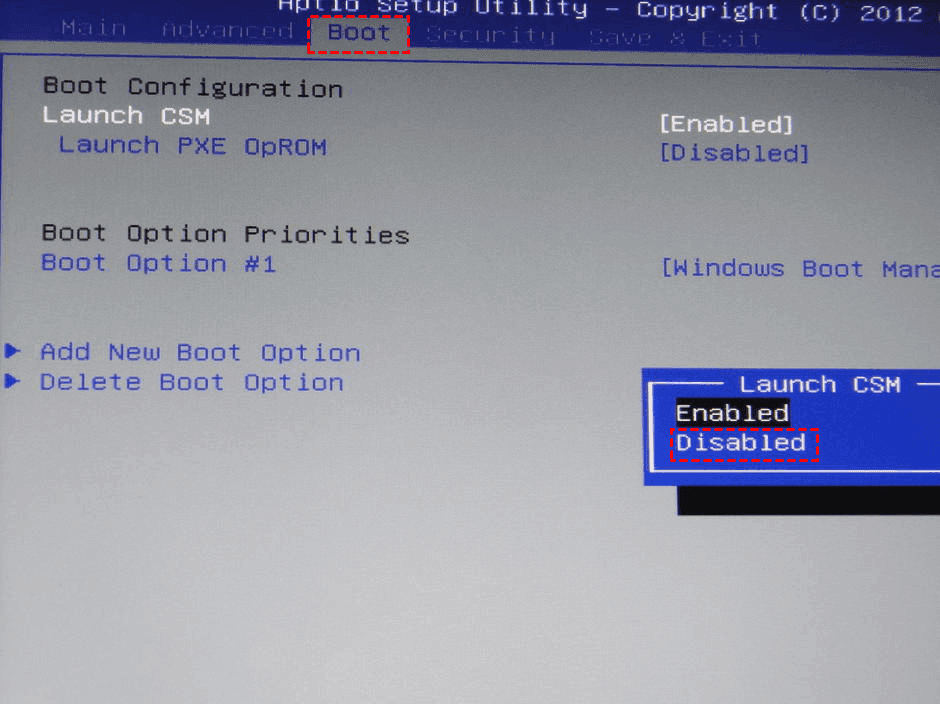
- Save the changes and exit BIOS. Reboot the computer and confirm if the M.2 SSD appears in the BIOS.
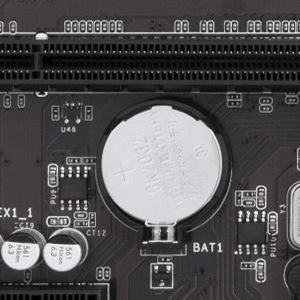
Method 6. Reset the BIOS
Resetting the BIOS can fix many problems. When you encounter the problem of M.2 SSD not showing up in the BIOS, you can try to reset the BIOS to solve it.
- Reboot your computer and press the F2 or Del key to enter the BIOS during the boot process.
- The method of resetting the BIOS varies on different computers. For example, you can choose Load defaults, or you can press F9 or Alt + F, and finally save the changes and exit the BIOS.
- Apart from that, you can also directly remove the CMOS battery on the motherboard, wait 1 minute before reinstalling it, which also resets the BIOS.
Method 7. Update the BIOS
An outdated BIOS version may also cause the M.2 SSD not showing up in the BIOS issue, at this point you can try to update the BIOS to fix the issue.
- Open your browser and visit the official website of your computer's motherboard manufacturer to find and download the BIOS update file.
- Copy the previously downloaded BIOS update file to a USB flash drive and reboot your computer.
- Press the corresponding button to enter the BIOS interface, select the Update BIOS From Drive option, then select the BIOS update file downloaded from the USB flash drive, confirm this operation and wait for the update to complete.
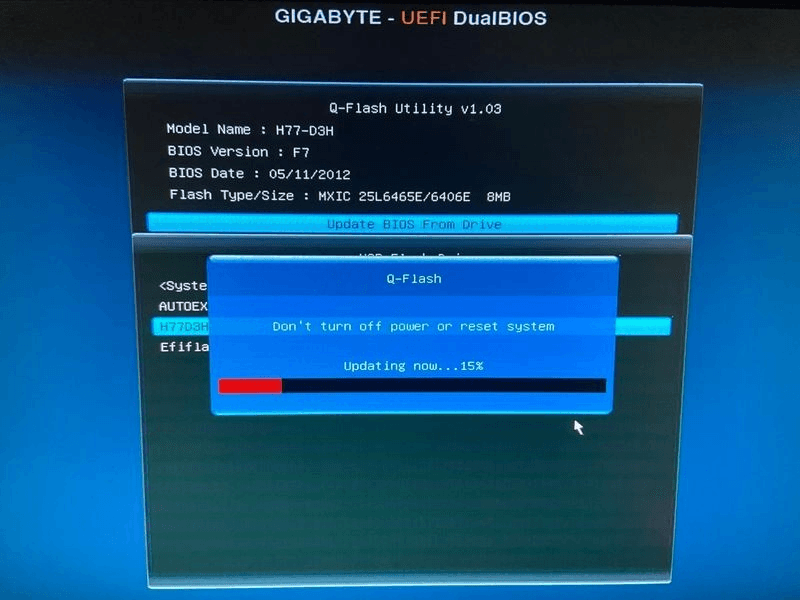
Note✍: During the BIOS update process, never power down or interrupt the update to avoid update failure and damage to the motherboard.
Reasons why M.2 SSDs are not detected in Disk Management
Disk Management is a system utility in Windows that allows you to perform advanced memory tasks. If you are troubled by the problem of M.2 SSD not being detected in Disk Management, please read the following in detail to try to solve this problem. But before that, you need to understand the cause of the problem.
Usually, this problem is caused by a variety of reasons, the following are common.
- M.2 SSD drivers are obsolete
- Missing or conflicting drive numbers
- M.2 SSD not initialized
- Windows systems are not compatible with the file system
4 solutions for M.2 SSD not detected in Disk Management
If you are at a loss for the problem of M.2 SSD not detected in Disk Management, please try the following 4 methods in order, I believe these methods can help you solve the problem.
Method 1. Update M.2 SSD driver
Outdated M.2 SSD drivers may cause problems with M.2 SSDs not being detected in Disk Management, so you can try updating the drivers to fix the problem.
- Right-click on the Start button and select Device Manager.
- Find and expand the Disk drives, right click on the M.2 SSD and select Update driver.
- Tap Search automatically for updated driver software and wait for the process to complete. If there are any updates available, tap the Update button and restart your computer.

- Reboot the computer and verify that the M.2 SSD is detected in Disk Management. If the M.2 SSD is still not detected, go to the next method.
Method 2. Perform hardware and device troubleshooting
Based on feedback from some users, performing hardware and device troubleshooting will help resolve the issue of M.2 SSD not being detected in Disk Management.
- Press Windows + I to open Windows Settings and tap Update & Security.
- Select the Troubleshoot tab in the left panel, select Hardware and Devices in the right panel, and tap Run the Troubleshooter.
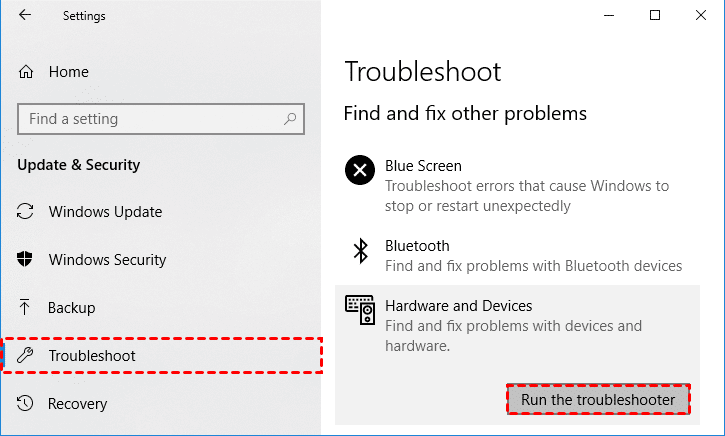
- Wait for the problem to be detected and fixed automatically. Reboot your computer and make sure the M.2 SSD is detected in Disk Management.
Method 3. Assigning drive letter
In some cases, your M.2 SSD is properly connected to the computer, but the M.2 SSD is not detected in Disk Management due to the missing drive letter. To fix this, assign a drive letter to your M.2SSD.
- Right-click the Start button and select Disk Management.
- Find the partition where the drive number is missing, right-click it and select the Change drive letter and paths option in the expanded menu.
- In the new window, tap the Add button.
- Select Assign the following drive letter and select a drive number in the list and tap OK to save the changes.

- Reboot the computer and verify that the M.2 SSD is detected in Disk Management. If the M.2 SSD is still not detected, go to the next method.
Method 4. Initialize M.2 SSD
In some cases, a brand new M.2 SSD is not initialized before being connected to the computer, resulting in the M.2 SSD not being detected in Disk Management. At this point, you need to initialize the M.2 SSD. Note that during initialization, you need to select an appropriate file system.
- Press Windows + R to open the Run window, type diskmgmt.msc and press Enter.
- In the Disk Management window, right-click on the M.2 SSD and select Initialize Disk.
- In the initialize disk window, select MBR or GPT according to the M.2 SSD capacity size, and tap the OK button.
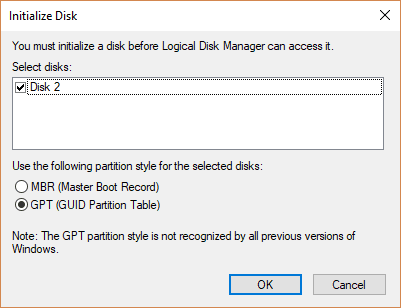
Note✍: MBR is an old specification that can only support up to 4 primary partitions and can only recognize hard drives with a maximum capacity of 2TB. GPT is a new version of the specification, which can support up to 18EB (1EB=1024TB=1048576GB) hard disk, and the number of partitions can be up to 128, but the motherboard must support UEFI.
- After initialization is complete, right-click the unallocated space on the M.2 SSD and select New Simple Volume.
- Set the partition size, drive number and format, and choose the appropriate file system according to the prompts of the New Simple Volume Wizard.

FAQs about SSD not detected
1. Is my SSD dead if it's not detected?
If your SSD is not detected by your computer, try connecting it to a different computer or using another SATA cable or port. If the SSD is still not recognized, it may indicate physical damage. In such cases, these methods won't help, and you'll need to seek assistance from a local disk repair center.
2. Can an SSD suddenly stop working?
Yes, although SSDs are generally reliable, they can occasionally fail. To maintain optimal performance and longevity, follow best practices such as avoiding power surges, ensuring proper ventilation, and regularly updating firmware. Compared to traditional hard drives, SSDs have advanced technologies like wear leveling that significantly extend their lifespan.
3. What are the main causes of SSD failure?
SSD failures can result from several factors, including bad sectors, virus damage, short circuits, and corrupt data. Faulty wiring is also a common cause of SSD failure. Regularly checking and maintaining your SSD can help prevent these issues.
Summary
The problem that M.2 SSD is not detected in Windows 10 tends to cause you a lot of trouble, please read the above in detail and then solve it according to two different practical situations to make sure the M.2 SSD can be put into use as soon as possible.
Many users are used to using M.2 SSDs to store Windows systems because of the enhanced performance they can provide. If you want to migrate your system to the new M.2 SSD completely or upgrade your M.2 SSD without reinstalling the system, then you can use AOMEI Backupper Professional for system cloning, which will save you the time of reinstalling the system.

