How Do I Backup Windows 11 to Synology NAS? (3 Easy Ways)
Wanna know how to backup Windows 11 to Synology NAS easily? This tutorial offers you the top 3 ways to enable the task to prevent your Windows 11 from system issues.
By Lily Updated on June 30, 2026
Why Need to Backup Windows 11 to Synology NAS?
Nowadays, with the increasing awareness of data security, more and more users are aware of the importance of backing up their data. They back up the operating system, folders, or the whole computer to prevent accidental data loss or system failure. Besides backing up to an external hard drive that will not be affected by the computer failure, backing up to a NAS has become a popular backup destination.
NAS stands for Network Attached Storage, which is a hard drive on your network. Data stored on a NAS can be shared by accessing the NAS device. There are several advantages to backing up your Windows 11 to Synology NAS.
1. The NAS is “always online”-you don't need to keep the physical device connected to your PC.
2. Synology NAS arrays also include multiple internal hard drives, which makes them more resilient and allows you to have no immediate data loss even if one of the drives fails.
3. In addition, your own NAS device is placed at home and is not carried around, which prevents data leakage and data theft.
Obviously, backing up Windows 11 to Synology NAS is both safe and reliable, so what exactly should you do? Read on for a more detailed tutorial.
🌟 To check more scenarios about backing up Windows to NAS, please refer to this complete guide: Backup Windows to NAS.
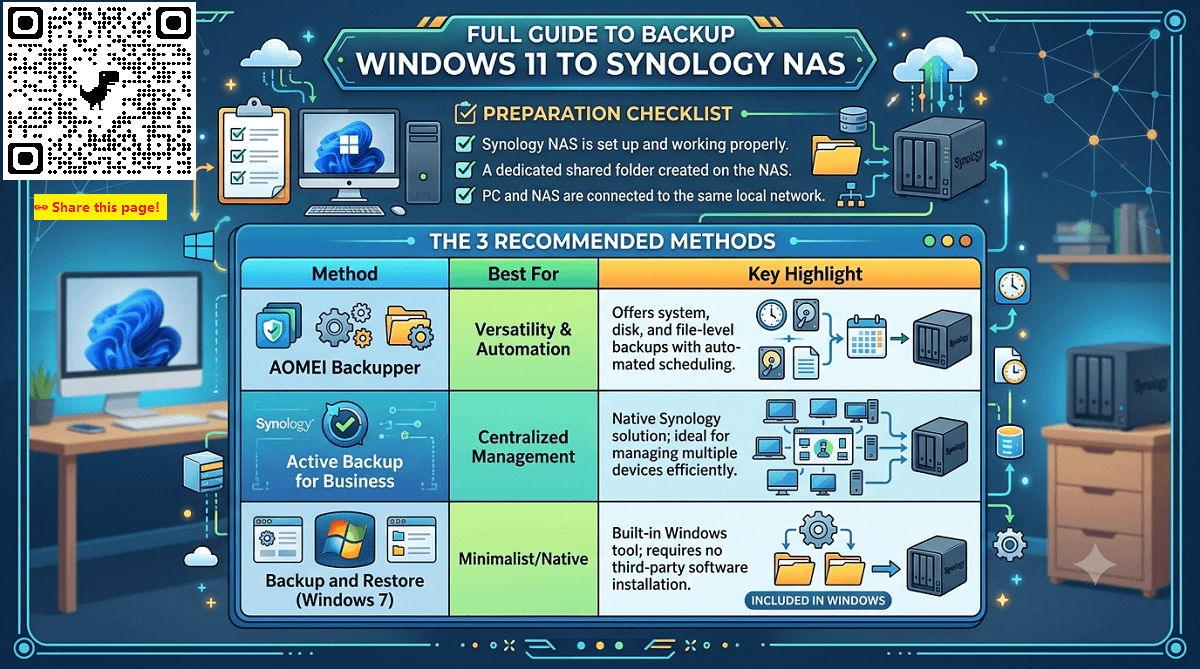
Top 3 Ways to Backup Windows 11 to Synology NAS
Three ways on Windows 11 backup to network drive can be listed as follows. Will you choose the Windows built-in tool Backup and Restore, or will you choose third-party reliable tools? Read on to choose the right method for your situation.
Before you do:
● Make sure your Synology NAS software and hardware are installed, and can work properly.
● Create a shared folder on the Synology NAS.
● Make sure your PC and the Synology NAS are in the same network.
Method 1: Backup Windows 11 to Synology NAS with AOMEI Backupper🔥
AOMEI Backupper Standard, the best backup software for Synology NAS, can help you perform Synology backup Windows 11 in simple steps. some of its main features can be listed as follows:

-
It provides system backup, disk backup, partition backup, and file/folder backup.
-
It allows you to use incremental or differential backup to optimize backup efficiency compared with Windows’ built-in tool. (differential backup is available in paid edition)
-
It supports backing up to various locations, including local disks, external hard drives, NAS devices and network share. Not only Synology NAS, you can also backup to QNAP NAS.
-
It allows you to automate your backup tasks on a daily, weekly, monthly, etc. basis.
-
It supports Windows PC operating systems such as Windows 11/10/8.1/8/7.
How to backup PC to Synology NAS:
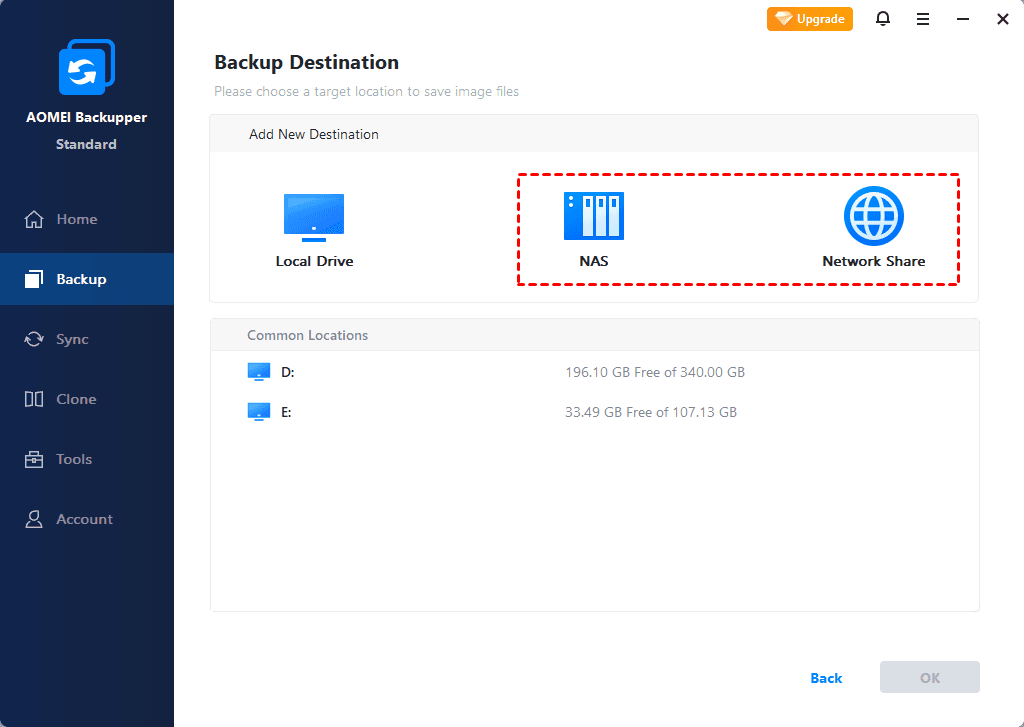
Step 1. Download, install and launch this freeware. Click “Backup” and select “System Backup”.

Step 2. The software will automatically choose the partitions to be backed up. Click the destination box and select NAS > Add NAS in the next window.
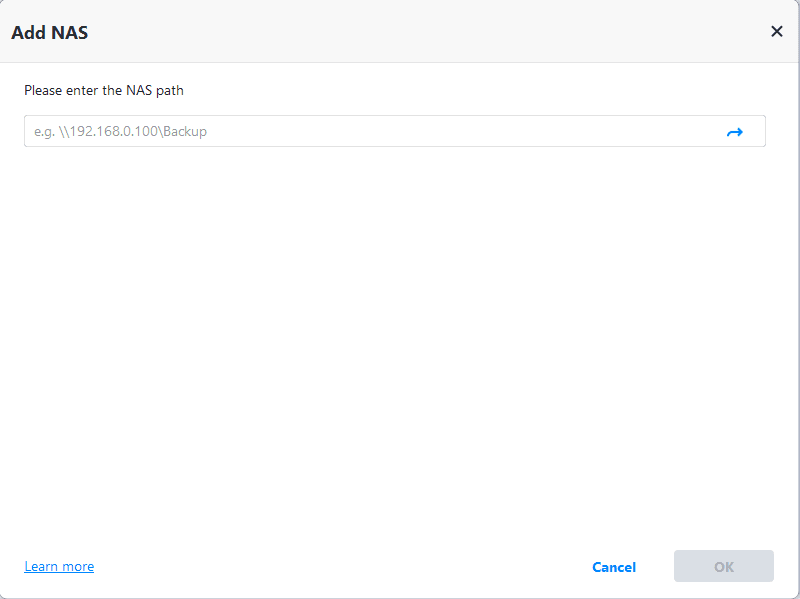
Step 3. On this screen, type your Synology NAS path and click the right arrow. Input username and password if it is required, then click "OK".
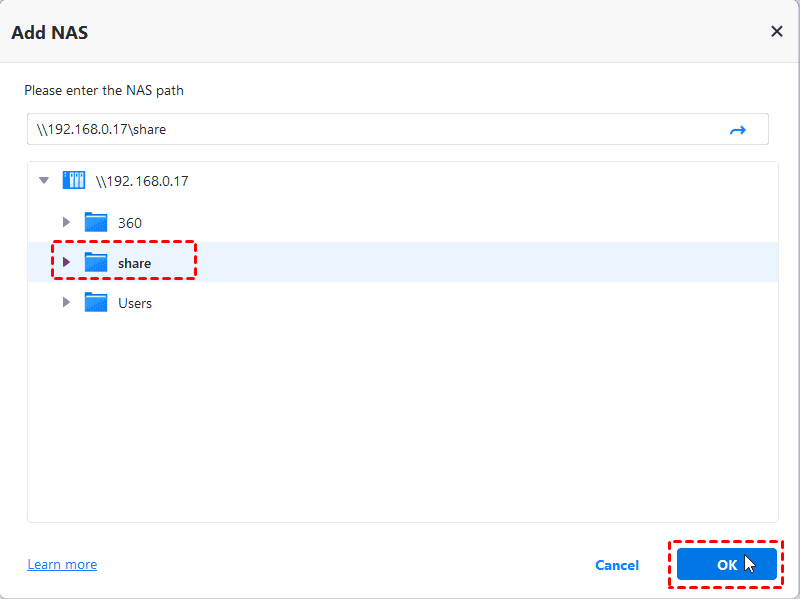
Step 4. Then, choose one folder on the Synology NAS as the destination path to store the backup image.
Step 5. Then, the software will backup your Windows 11 to Synology NAS after clicking “Start Backup”.
After this instruction, Windows 11 backup to Synology NAS is successfully completed.
💡 Notes:
- Options: You can write a note for your task to help you distinguish it from other backup tasks. In unattended operations, a notification can be emailed containing the result of each backup.
- Schedule: It allows you to automatically backup your files, and you can set the fixed frequencies such as Daily/Weekly/Monthly.
- Backup Scheme: It can help remove old backup images automatically to free up storage space. (available in the Professional edition)
Method 2: Backup Windows 11 to Synology NAS using Active Backup for Business
Active Backup for Business is a free data protection solution developed by Synology for managing centralized backups within a NAS environment. It allows users and IT administrators to back up multiple devices—including Windows PCs, Macs, and servers—to a Synology NAS efficiently. Follow the instructions below to backup Windows 11 to Synology with Active Backup for Business.
✅Requirements
● Active Backup for Business is installed on your Synology NAS.
● Active Backup for Business Agent is installed on your Windows 11 PC.
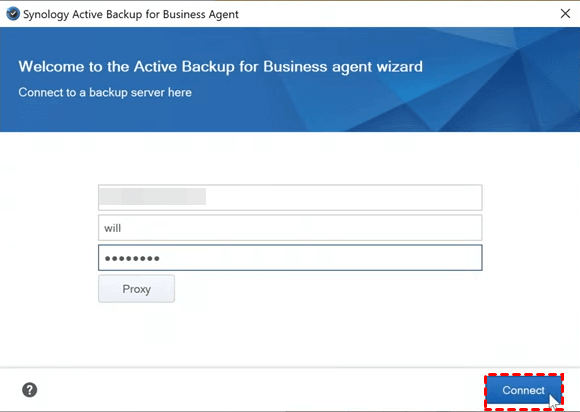
Step 1. Open Active Backup for Business Agent on your Windows PC. Enter the IP address and credentials of your Synology NAS and click Connect to connect to a backup server.
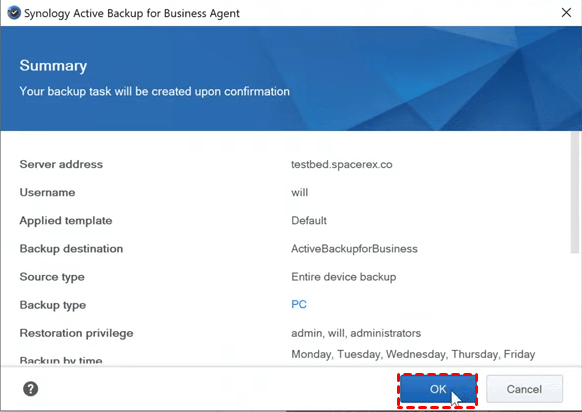
Step 2. Once the target computer is connected to the Synology NAS, a backup task will be created based on the matching template. Review the backup settings and click OK.
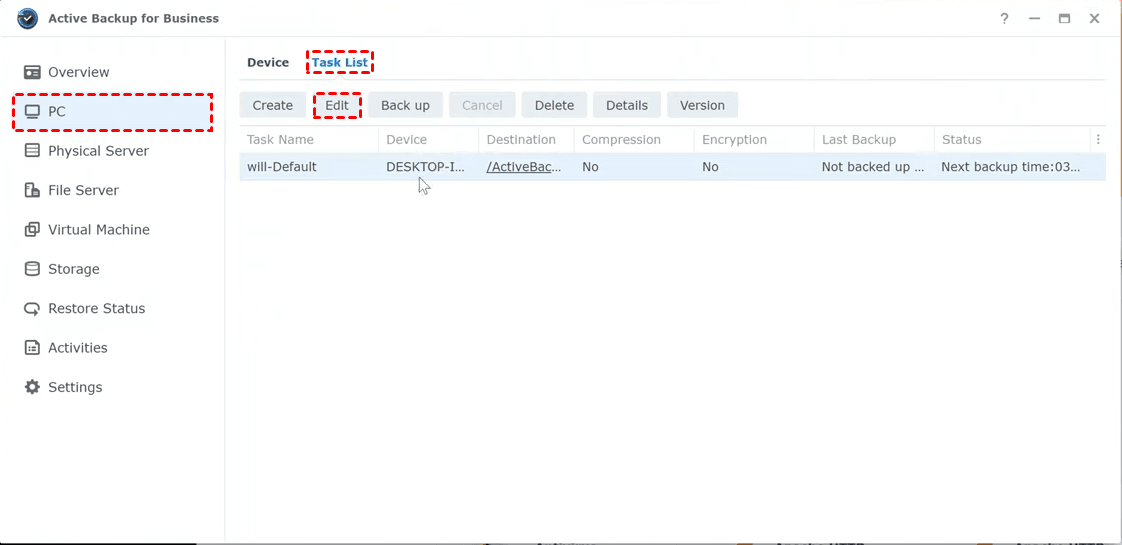
Step 3. Open Active Backup for Business in DSM and modify the backup settings as necessary.
- Go to PC > Task List. Select the backup task just created and click Edit.
- Under the General tab, you can edit what to backup on your PC and choose to enable data transfer compression/encryption or not.
- Choose your preferred backup frequency under the Schedule tab and change backup retention policy under the Retention tab.
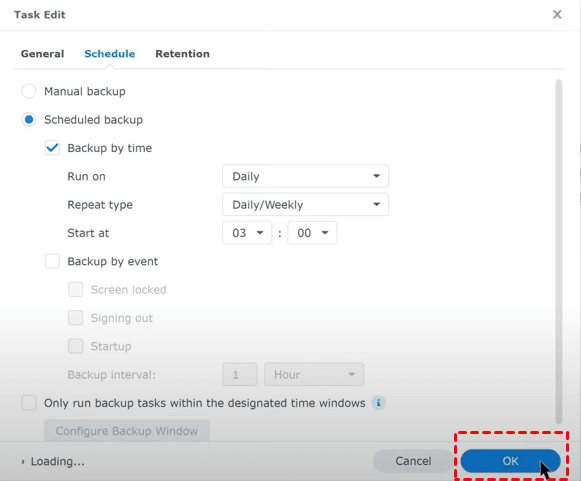
- Click OK to save all the changes.
Method 3: Backup Windows 11 to Synology NAS via Backup and Restore
Windows 11 has inherited the Backup and Restore tool from Windows 7. Detailed steps are listed below to realize Synology backup in Windows 11.
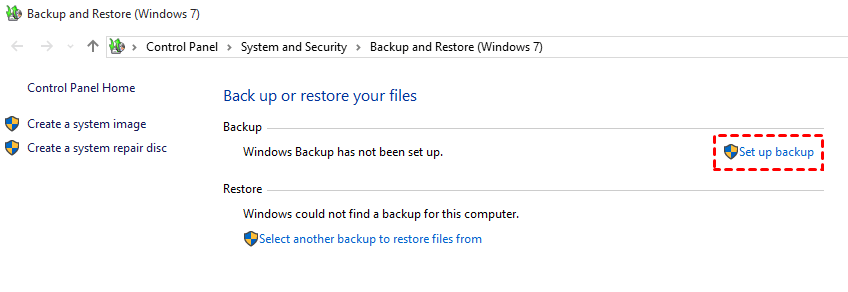
Step 1. Navigate to Control Panel -> System and Security -> Backup and Restore (Windows 7).
Step 2. Click the Set up backup option.
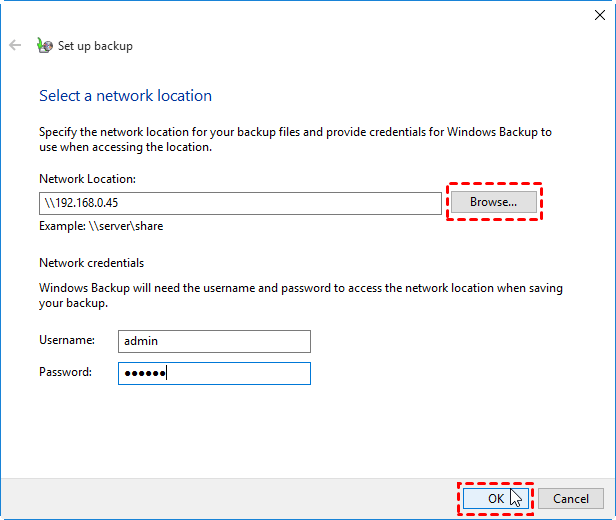
Step 3. Choose Save on a network.

Step 4. Input the Synology server name or IP address and click Browse to select a folder as the destination path. Then type username and password and click OK.
Step 5. Select the newly-added network location and click Next.
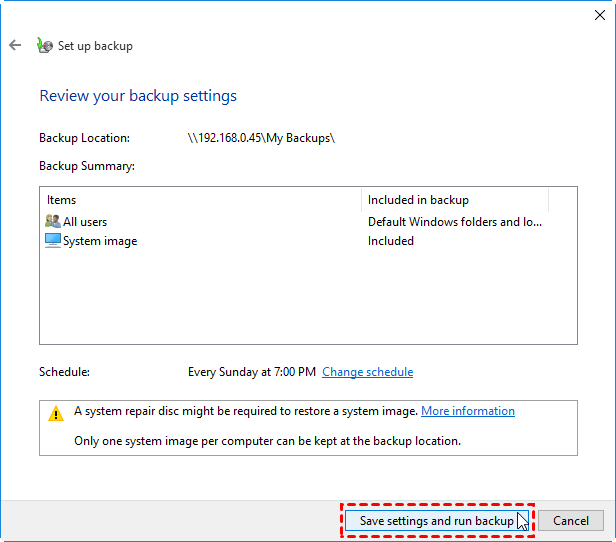
Step 6. Select Let Windows choose (recommended) so that Windows will select the files to be backed up for you. Click Next to continue.
Step 7. Click Save settings and run backup to backup Windows 11 to Synology NAS drive.
FAQs about Windows 11 Backup to Synology NAS
1. How secure is my data on Synology NAS?
Synology NAS provides robust security features, including:
- Encryption: Data encryption to protect your data both at rest and in transit.
- User Authentication: Secure login methods to ensure only authorized users can access your data.
- Backup Integrity Checks: Regular checks to ensure the integrity and completeness of your backups.
2. What backup options are available with Synology NAS for Windows 11?
Synology NAS offers several backup options for Windows 11, including:
- Synology Drive Client: Back up individual files and folders.
- Active Backup for Business: Create a full system image backup.
- Cloud Sync: Sync and back up files to cloud storage services.
- Hyper Backup: Back up NAS data to various destinations.
3. How much storage do I need for my backups?
The amount of storage needed depends on the size of the data you are backing up and the frequency of the backups. It's recommended to have at least twice the storage space of the data being backed up to accommodate for multiple backup versions and future data growth.
Wrapping Things up
Above are all about the three easy ways to backup Windows 11 to Synology NAS. Whether it is the Windows built-in tool that comes or the third-party free backup software, you need to choose the most suitable method according to your actual situation.
From my perspective, I personally recommend AOMEI Backupper software because it not only performs system backup, file and partition backup, but also has other comprehensive features such as synchronizing files, Windows 11 sync folders. If you want to explore more features, give it a try now!

