Fix 'The Version Does Not Support This Version of the File Format' Error
You will learn how to fix the backup error "The version does not support this version of the file format" in Windows Server 2012 with given solutions. Also, you could try a different backup software to backup system.
By Yuka Updated on November 1, 2022
-
An error occurs: The version does not support this version of the file format VHD
-
Causes for "The version does not support this version of the file format" error
-
How to fix "The version does not support this version of the file format" error
-
Backup system partition with powerful system backup software
An error occurs: The version does not support this version of the file format VHD
When backing up files or system state to a shared folder on Network Attached Storage (NAS) device, you may receive the following error. This error will appear in all windows systems, of which, it occurs most frequently in Windows Server 2012.
"The backup of volume xxx could not be completed, Error: the version does not support this version of the file format."
When backing up to a local disk, you may also encounter the error below.
"There was a failure in preparing the backup image of one of the volumes in the backup set (0x807800C5). Additional Information: the version does not support this version of the file format. "

Causes for "The version does not support this version of the file format" error
There are three main reasons why you encounter this error, please stay for a while and check the possible reasons carefully. Then, continue to see below and learn how to fix the problem of being unable to backup to NAS with given solutions.
First, the native VHD file is created as a spare file on NAS. Sparse files are universally used for taking backups, as it saves disk space and reduces time. When backing up data to NAS storage device, Windows Backup will create a mounted .VHD file, but the native VHD driver does not support the .VHD file created as a sparse file. Therefore, the backup failed.
Second, you use “include” or “exclude” parameter in the Wbadmin backup command. If you set an “include”, then it will backup everything in the “include” and ignore anything not in the “include”.
Third, the problem is caused by the existing old Windows backup files in the destination location. Therefore please delete or rename the old files.
How to fix "The version does not support this version of the file format" error
Solution 1: Check the VHD file on NAS device
This is the first solution, you could try to check the .VHD file on your NAS device and see if the file is a sparse file. If it is a sparse file, you can modify or add a thread, "strict allocate = yes", which will force it not to create sparse file. Detailed steps are below.
Step 1. Delete the existing files on the backup destination location to make sure Window backup will create a new backup file.
Step 2. Log in the NAS and open the smb.conf file (usually in the [global] section of /etc/samba/smb.conf, or /etc/config/smb.conf). You may not find the "strict allocate’ line or find the “strict allocate = no”
Step 3. Modify or add "strict allocate = yes" to the smb.conf file. Then save it and exit.
Step 4. Reboot your system to restart the service. Then you should be able to backup to NAS with Windows built-in backup tool. If you do not want to reboot system, log onto the NAS and run the following command:/etc/init.d/services restart.
Solution 2: Check Wbadmin backup command
This problem may be caused by “include” or “exclude” items in the wbadmin backup command, so please check the following syntax and remember not to add these items.
Syntax for Windows Vista and Windows Server 2008 shows as below:
wbadmin start backup [-backupTarget:{|}] [-include:] [-allCritical] [-noVerify] [-user:] [-password:] [-noinheritAcl] [-vssFull] [-quiet]
Syntax for Windows 7 and Windows Server 2008 R2 and later version: only changed [-vssFull] to [-vssFull | -vssCopy]
Solution 3: Rename or delete old Windows backup files
There is a possibility that the backup task can run normally after you rename or delete the old Windows backup files from “WindowsImageBackup” in the backup destination location. Therefore, you could try to rename or delete that folder.
Backup system partition with powerful system backup software
If you still get this error "the version does not support this version of the file format" after trying above solutions, you could consider using a different software to backup system.
Here I recommend you the professional backup software AOMEI Backupper Server to backup system to NAS or network drive. For IT technicians or small and medium-size companies, you could consider using AOMEI Backupper TechPlus.
- This software supports all the Windows systems, including Windows Server 2003/2008 (R2)/2012 (R2)/2016/2019/2022, SBS 2003/2008/2011 or Windows 11/10/8.1/8/7, so you can use it no matter what your operating system is.
- The System Backup feature will include everything on the system partition, including the operating system (OS), system reserved partition or EFI system partition (ESP), recovery partition, system drivers, installed programs and personal data (like photos, music, documents, etc).
- It allows you to backup important files via File Backup. You can also backup a whole disk or specific partitions via Disk Backup or Partition Backup.
- It has a clear and user-friendly interface, so even a computer novice can handle it without obstacles.
Please download this software to explore it yourself.
To backup system to a NAS device, you just need to input the display name, IP address, username and password when you add it for the first time. The detailed steps are listed below.
Step 1. Launch AOMEI Backupper, and you will see its deep-blue interface. Then, click "Backup" and "System Backup" in order.

Step 2. Modify the “Task Name” to distinguish it from other backup tasks. The program will select the system and boot partitions by default, so you just need to select the NAS device as destination path.

▶ To add NAS storage device, expand the drop-down menu of the second bar and select "Add Share or NAS Devices".
▶ Then, in the next window, type network path, username and password to add NAS.
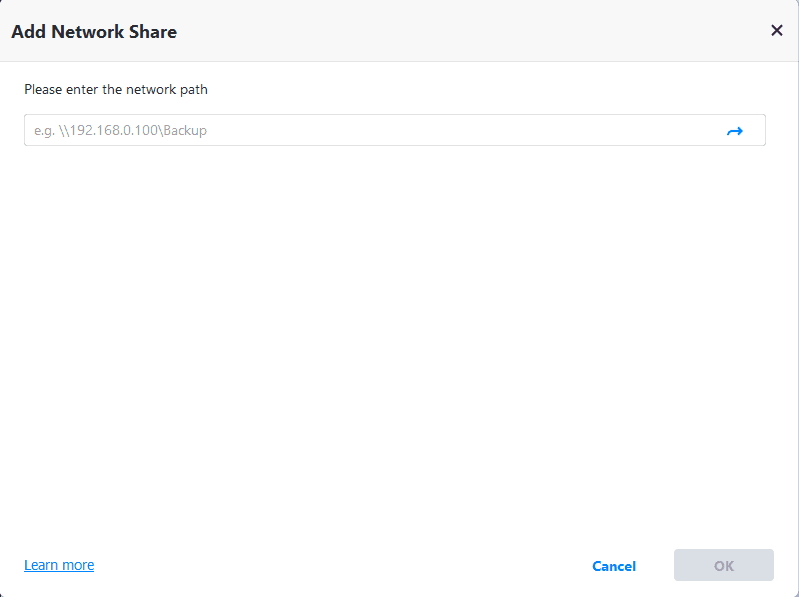
▶ After that, the storage device will be listed in the window. Select a folder on it to store backup image.

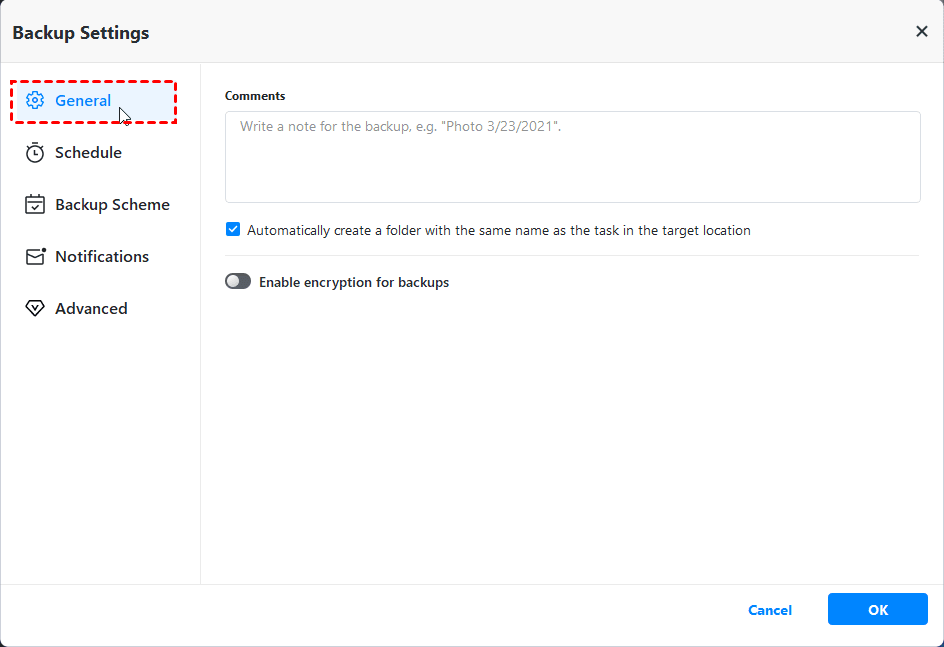
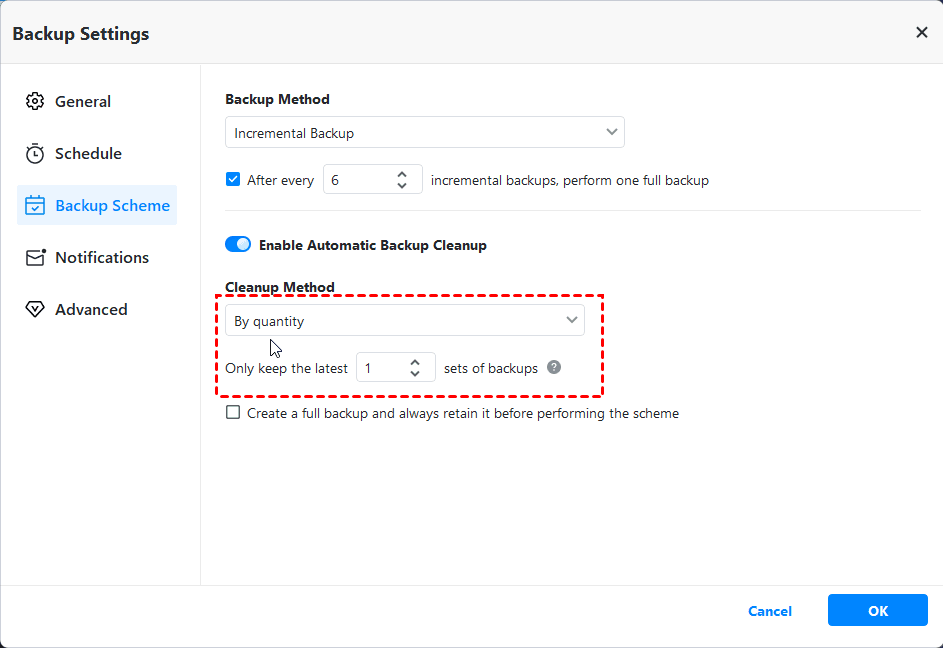
Step 3. Do more configuration for your backup.
💛 "Options": You are allowed to comment on the system backup to distinguish it from other backups, compress the system backup image file, encrypt backup image to protect sensitive data, enable email notification to get alert without delay, etc.
💛 "Schedule Backup": Here you can specify the backup intervals as daily, weekly, monthly, event triggers, USB plug in to continuously backup system and changes made on it.

💛 "Backup Scheme": Incremental Backup is the default option under Backup Method. You can change it to Differential Backup if you want. Also, you can enable Automatic Backup Cleanup to delete older backups automatically so that there is enough space on your backup location.
Step 4. Then, click "Start Backup" to backup system for your computer.
In addition, the operations of system backup will not interrupt your work. That is to say, you can do system backup while working on the computer. The time the system backup process will take is determined by the amount of valid data. More valid data will take more time for system backup.
Written in the end
That's all for the error "the version does not support this version of the file format". Here are three main reasons and you can fix this error by corresponding given solutions. The last resort is to use a different system backup software like AOMEI Backupper Standard to backup system to NAS or network drive.
This software is very easy to use, so all users even the novices can use it smoothly. Also, it has more advanced backup features to make this process simple and efficient, including daily backup, weekly backup, incremental & differential backup, 2 compression levels, email notification, etc. Just download it to have a try!

