How to Transfer Photos from iPhone to iPhone [Top 5 Ways]
Want to know how to transfer photos from iPhone to iPhone? Read this post to get 5 simple ways to transfer photos from iPhone to iPhone with cable or not.
By May / Updated on May 14, 2026
When you have a new iPhone 16 or other model, you'll need to transfer data from your old iPhone to your new one, especially your precious photos. The longer you use your old iPhone, the more photos you'll need to transfer. So, how to transfer photos from iPhone to iPhone? Luckily, this post will show you how to transfer pictures from iPhone to iPhone in 5 simple ways, choosing the one that works best for you.
Part 1. How to Transfer Photos from iPhone to iPhone with Cable on PC
If you want to transfer photos quickly, the wired transfer is the way to go. Two ways can help you transfer photos from iPhone to iPhone with cable on your PC. If you want to transfer selected photos without data erasing, Way 1 can be a good choice.
Way 1. The Easiest Way to Transfer Photos from iPhone to iPhone
FoneBackup is one professional iPhone transfer tool that can help you transfer data between iPhones, between iPhone and computer without effort. As for photos transfer, below are its outstanding features.
● It allows you to transfer all photos from iPhone to iPhone or selectively transfer photos from iPhone to iPhone.
● It can transfer photos from different albums, such as Cameral Roll, Photo Library, Photo Share, etc.
● It will not erase any existing pictures or any other data on the target device.
● It has a clear interface and user-friendly design, so, you can figure it out quickly even for the first time.
Download and install FoneBackup on a Windows PC. Then, follow this guide below to learn how to transfer only photos from iPhone to iPhone or how to transfer thousands of photos from iPhone to iPhone:
Part 1: Transfer Photos from Source iPhone to Computer
Step 1. Run FoneBackup > Connect your source iPhone to your computer with a USB cable > Your iPhone will be detected automatically and enter the passcode on your iPhone when asked.
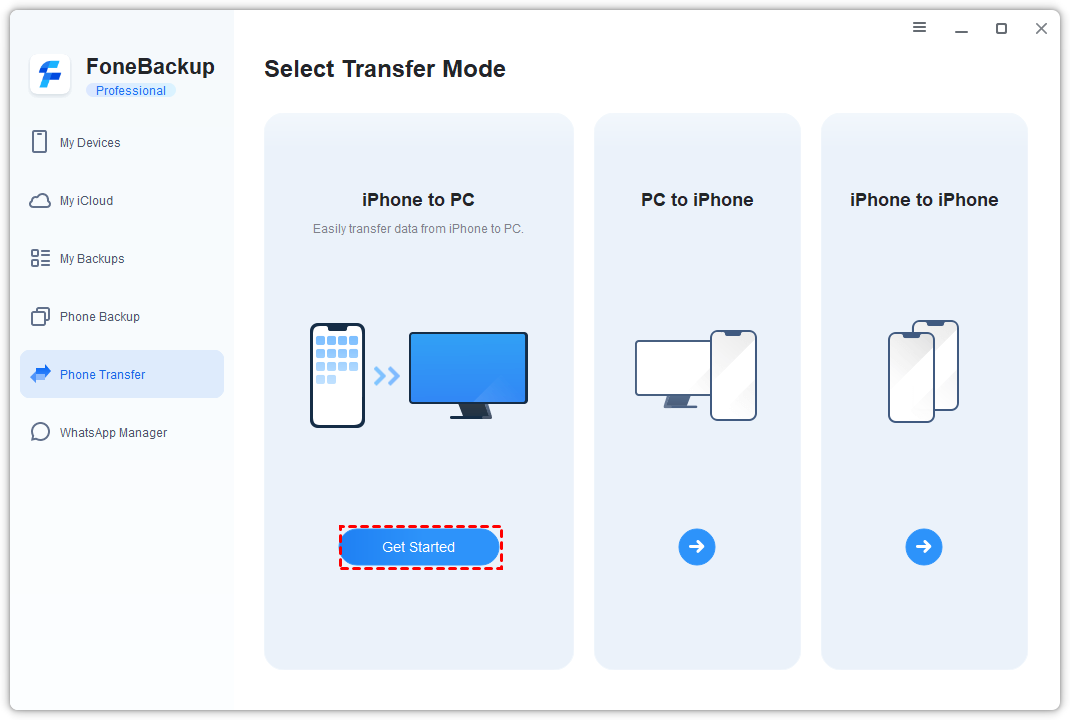
Step 2. Click the Phone Transfer option on the left pane. Move the mouse to iPhone to PC. Click Start Transfer.
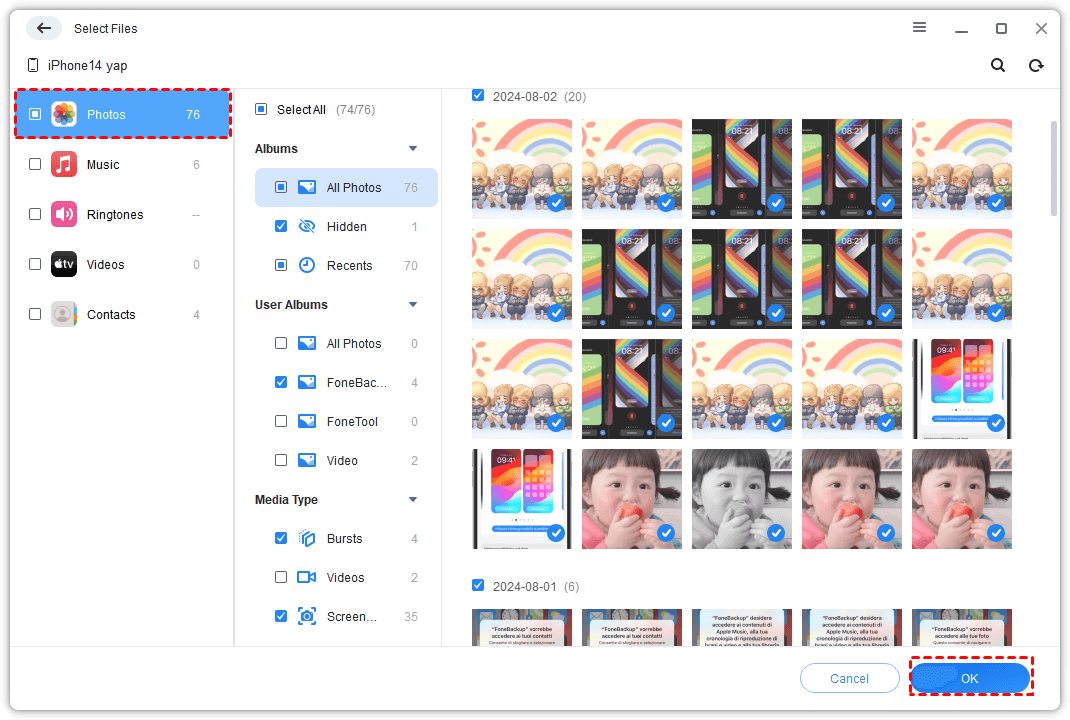
Step 3. Choose the Photos icon. You can select all photos or only choose specific photos to transfer in this window > Click OK to continue.
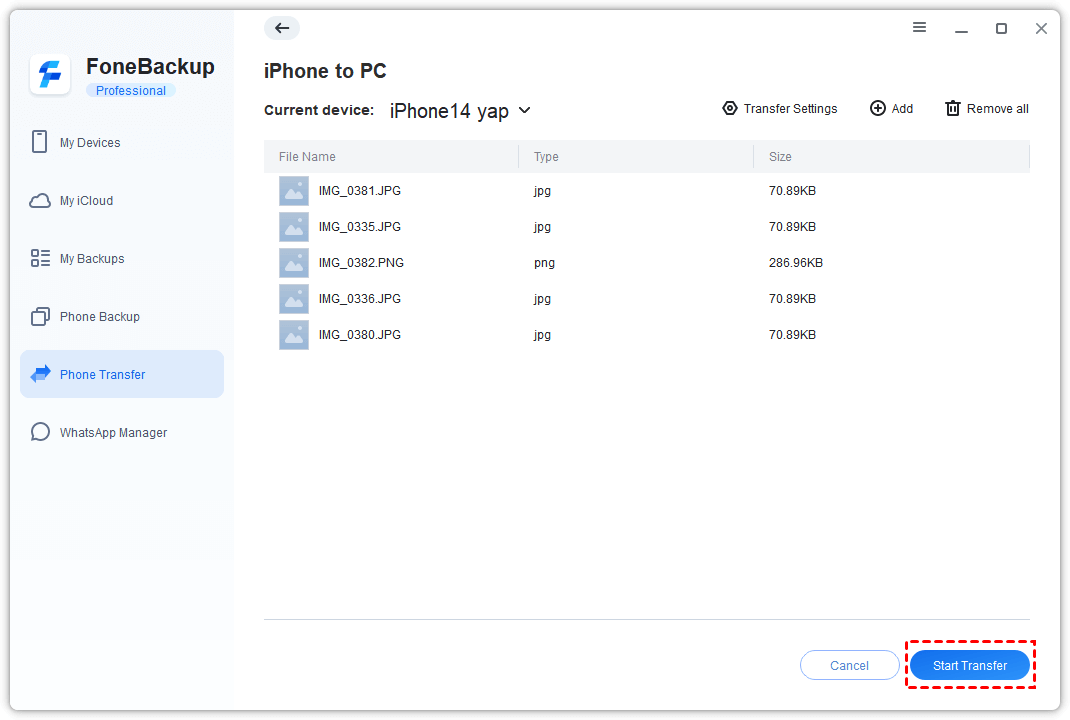
Step 4. Change the default location based on your needs on Transfer Settings. (You are allowed to save photos to local disks or external hard drives.) > Click Transfer.
Part 2: Transfer Photos from Computer to Target iPhone
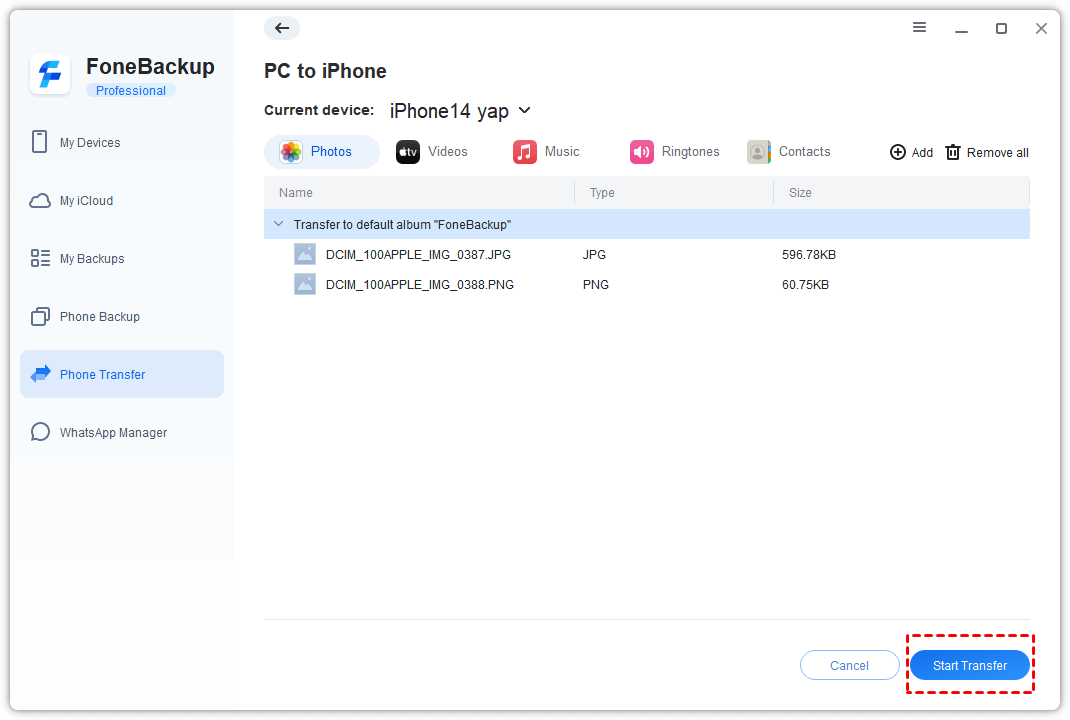
Step 1. Unplug the source iPhone and plug in the target iPhone > Click the PC to iPhone option > Select the photos you want to transfer.
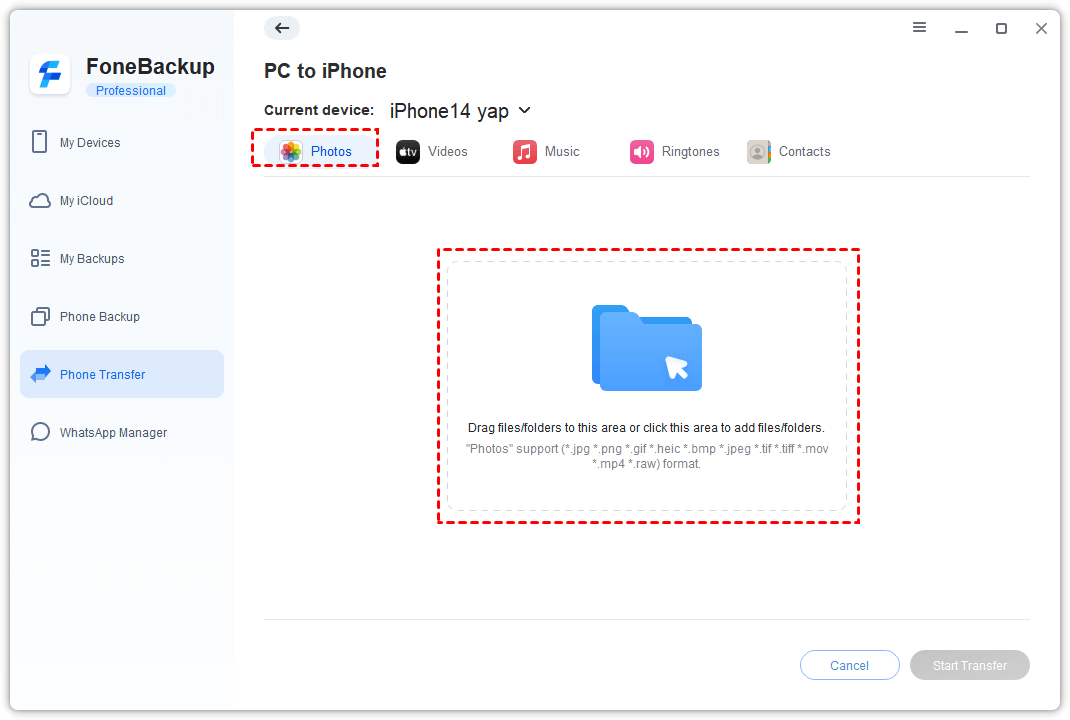
Step 2. If everything is OK, click Start Transfer to start.
● How to transfer photos from iPhone to iPhone for free? To save time and storage space, you can choose to first backup iPhone photos to computer and then restore that backup to the target iPhone.
● If you want to transfer photos as well as other data/settings with one click, you can let the iPhone to iPhone Transfer tool help you make it.
Way 2. Transfer Photos from iPhone to iPhone via iTunes
iTunes can help you transfer Camera Roll photos from iPhone to iPhone. First export photos from source iPhone to computer and then sync them to target iPhone.
Please note that syncing photos from iTunes can overwrite your current photo library on your new iPhone, so backup photos on the new iPhone if necessary. Now follow the steps below to sync photos via iTunes:
> Transfer Photos from Source iPhone to Computer
To transfer photos via iTunes, you need to turn off iCloud Photos first.
● Windows PC: Connect your old iPhone to PC or laptop with a USB cable --> In the AutoPlay popup, click Import Pictures and Videos --> Select a destination for the iPhone photos --> Click Import.
● Mac: Connect your iPhone to Mac with a USB cable --> Launch iPhoto --> Select the photos you wish to transfer --> Click Import or Import Selected.
> Sync Photos from Computer to Target iPhone
Step 1. Connect your new iPhone to your computer with a USB cable > Launch iTunes. Click the Device icon and then click the Photos option.
Step 2. Check Sync Photos and choose to copy photos from an application or a folder > Click Apply to start syncing photos from PC to your new iPhone.

Part 2. How to Transfer Photos from iPhone to iPhone without Computer
If you do not have a computer at hand, you can choose to transfer photos from iPhone to iPhone via Bluetooth or Wi-Fi.
Way 1. How to Sync Photos from iPhone to iPhone Using iCloud
Before you start, you should make sure that both iPhones are running iOS 8.3 or later and are signed in with the same Apple ID. Also, they should be connected to Wi-Fi. Then, follow the steps below:
> Upload Photos to iCloud on the Source iPhone
Step 1. Open Settings and select your name at the top. Then, tap iCloud.
Step 2. At the top of the iCloud menu, you’ll see a storage bar labeled iCloud. Check if your iCloud storage is enough for all of your photos.
Step 3. Tap Photo and toggle on iCloud Photos. It may take some time for all of your photos to transfer to the cloud.
> Download Photos from iCloud on the Target iPhone
Step 1. Access the iCloud menu as you do on the source iPhone.
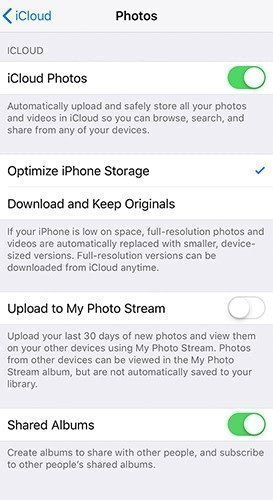
Step 2. Tap Photo and toggle on iCloud Photos.
Step 3. Select either Optimize iPhone Storage or Download and Keep Originals. The former option will store space-saving photos on your device while keep original, full-resolution versions in iCloud.
Step 4. After all your photos are downloaded, you can open your Photos app and select All Photos to view them.
Way 2. How to Transfer Photos from iPhone to iPhone with AirDrop
To transfer photos from one iPhone to another with AirDrop, the two iPhones need to be iPhone 5 or later running at least iOS 7. Detailed steps are shown below:
> Enable AirDrop on both iPhones
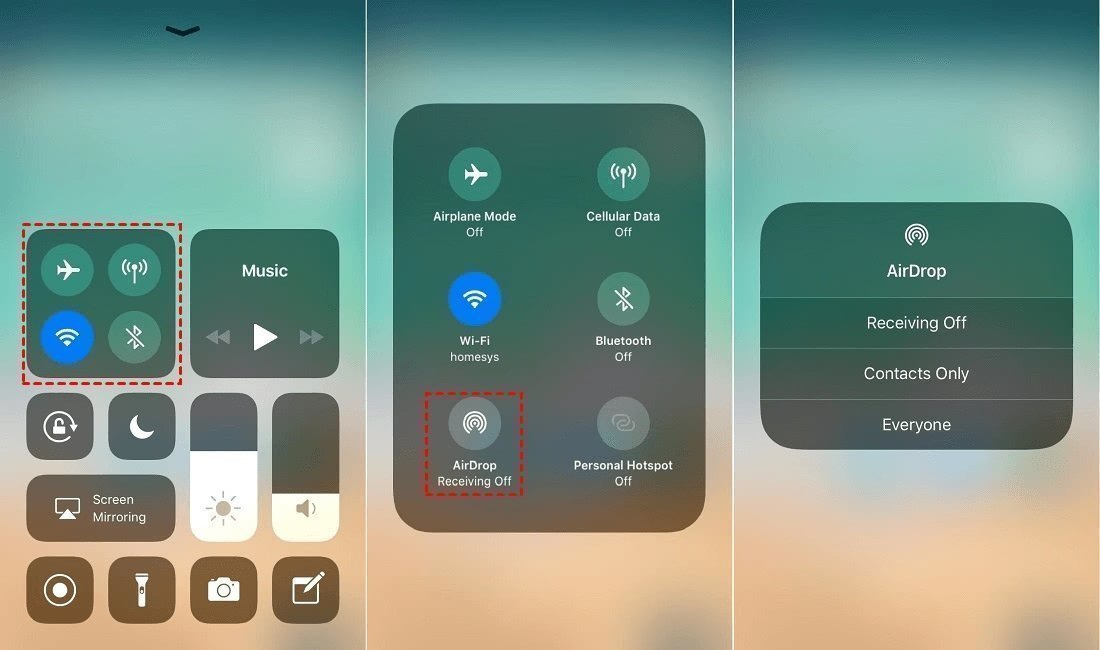
Step 1. Open Control Center. On iPhone X or later you may swipe down from the upper-right corner of the screen while on iPhone 8 or earlier you need to swipe up from the bottom of the screen.
Step 2. Press and hold the network settings block on the upper-left corner of the Control Center.
Step 3. Tap on AirDrop and select either Contacts Only or Everyone to send/receive AirDrops to/from you.
> Share Photos with AirDrop on the Source iPhone
Step 1. Open the Photos app and find the pictures you want to send to another iPhone.
Step 2. Tap the Share icon in the lower-left corner once you’ve selected the desired photos > Tap AirDrop. Then, tap the target iPhone’s name to share photos with it.
Step 3. Receive photos on your new iPhone by tapping “Accept” when you receive a message. The photos will be added to the Photos app on the new iPhone.
Way 3. Send Photos from iPhone to iPhone through Email
Email is also a good way to transfer photos between iPhones:
Install your favorite email client on both iPhones --> Write a new email on the source iPhone with all desired photos attached --> Send the email --> Open the email inbox on the target iPhone and download all the attachments.
Conclusion
That's all about how to transfer photos from iPhone to iPhone. If you prefer an easy, quick and safe to achieve the goal, FoneBackup is the best choice. It can help you transfer all kinds of photos as per your needs. In addition, it can not only help you transfer photos between iPhones, but also transfer music, videos, contacts, messages, etc. Download FoneBackup and discover more.