How to perform UEFI Restore on a GPT Disk
Free disk recovery software like AOMEI Backupper Standard helps to perform UEFI restore on a GPT disk, so you can boot from it successfully.
By Ivy Updated on June 13, 2024
About UEFI and BIOS
Both UEFI (Unified Extensible Firmware Interface) and BIOS are two models to handle the boot process. Either way, it will perform the POST test and check all the connected devices for the master boot record or UEFI bootloader, usually in the first sector of a disk, once done, it will start your computer from Kernel.
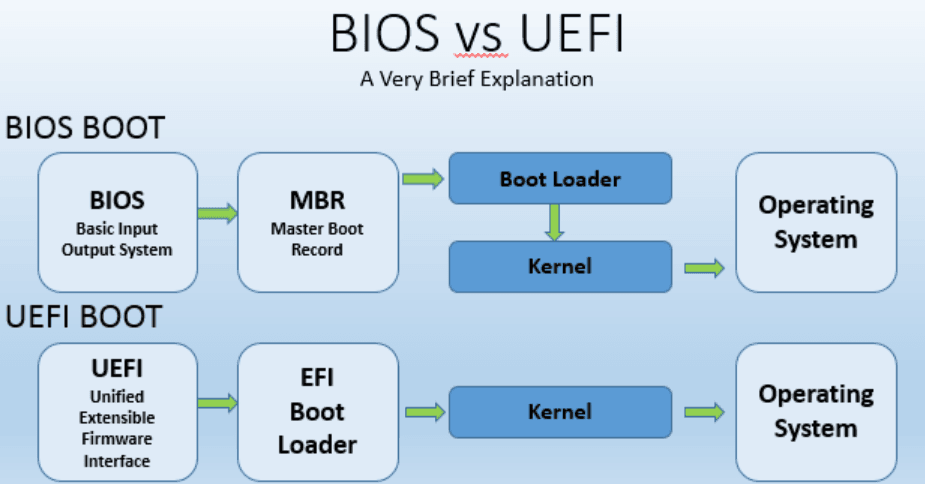
UEFI replace BIOS after 2011 which enhance computer security and support most existing BIOS systems with backward compatibility. To be specific:
- It is capable of creating 128 partitions on a GPT disk.
- It supports partition size up to 9.4 ZB (assuming 512-byte sectors).
- It also provides faster boot time.
- It adds secure boot and networking features.
- It is compatible with both 32-bit and 63 bit programs.
So many users want to use the GPT disk as a system disk and benefit from it.
Check If Your Disk Is GPT
The UEFI restore can only be executed on a GPT disk. Before starting the restore process, you need to check your disk. If it is a GPT disk, you can continue to restore backup image on it.
Step 1. Open Disk Management on your PC.
Open the Run dialog box with the shortcut Win + R, and type in "diskmgmt.msc" and press Enter. It will load the Disk Management window.

Step 2. Check the disk type of your system disk.
The easiest way is to right-click the disk, and select Properties > Volumes, you can then see GPT or MBR next to Partition Style.
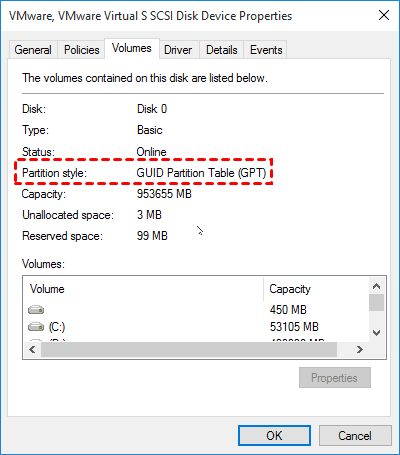
You can also right-click the disk and check if the "Convert to MBR Disk" option is available. If so, Windows has already been installed on the GPT disk and this computer supports UEFI Boot.
Two Different UEFI Recovery Situations
If your computer is a GPT disk, you are able to perform UEFI recovery easily in Windows 7, 8, 10, and 11 as long as you have a system image backup of it. You need to create it with Windows backup software.
AOMEI Backupper Standard is a good choice, which not only supports backing up system or disk, but also restores them corresponding. It also makes sure the GPT disk is bootable. Here are two situations for UEFI recovery:
- Directly restore image created on the GPT disk.
- Restore backup image created on the BIOS system to UEFI.
The first situation is very easy to operate, you just need to find the backup image and select it. But if you are in the second situation, this will involve boot issues. Because BIOS systems and UEFI systems use different boot modes and firmware.
To be sure it is bootable after recovery, you need to install all the necessary drivers for computers to start if the backup image is created on a BIOS system. The Universal Restore feature in the advanced edition of AOMEI Backupper supports doing so.
How to Run UEFI Restore on GPT System Disk
Here we will show you how to perform UEFI recovery in different situations. AOMEI Backupper Standard can handle the UEFI restore easily if it is created on a GPT disk. For images created on the BIOS system, please upgrade to AOMEI Backupper Professional or a higher edition.
Situation 1: Restore Windows Image Created on a GPT Disk
Please download AOMEI Backupper Standard, install and launch it. Windows 11, 10, 8, and 7 are supported. For server users, try AOMEI Backupper Server.
You also need to make preparations as follows:
- Prepare a GPT disk to receive the backup image. Initialize the disk if it is a new one.
- Backup files on this GPT disk if it has any important data. Otherwise, all the data will be deleted.
- Get a SATA cable if it is a laptop with only one slot.
Here take Windows 10 UEFI recovery as an example:
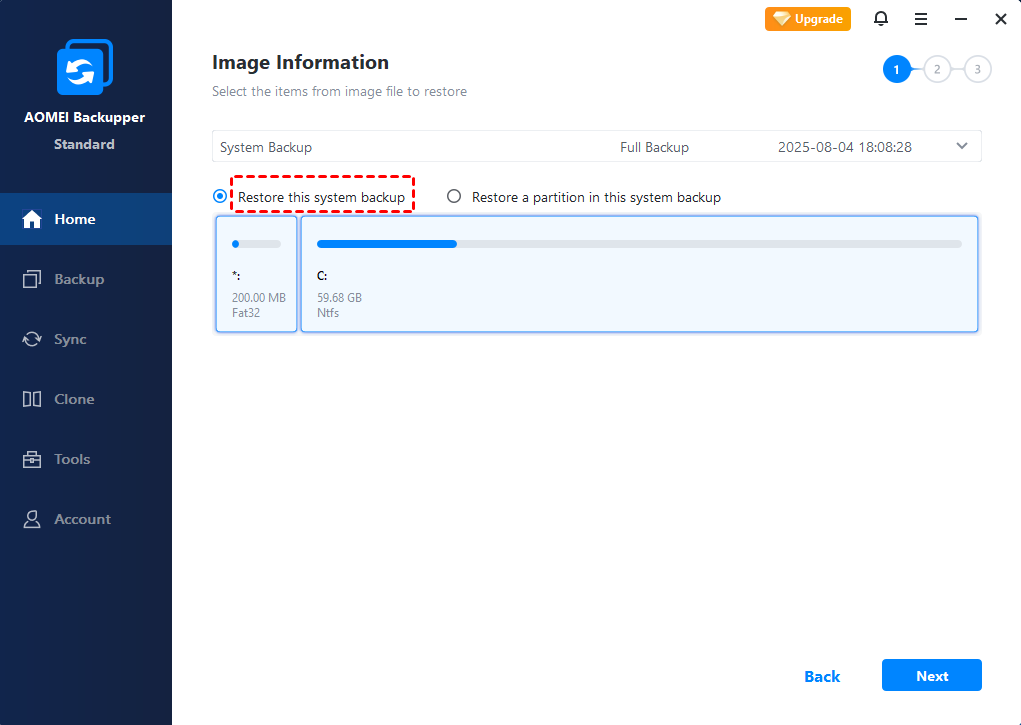
Step 1. Click the "Restore" and "Select Task" to choose a system backup task created before. Or you could directly locate it with the "Select Image File" option. It will be directed to Step 3 if you select the second option.

Step 2. All the backup images will be listed in the following window. Select the system image and click"Next".

Step 3. Select "Restore this system backup" and click "Next". To restore system to new hard drive, check "Restore system to other location" as well.
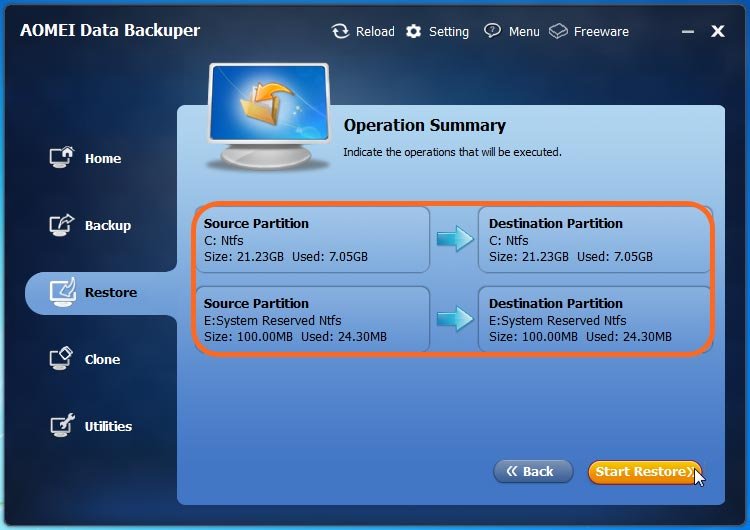
Step 4. All the operations will be listed. Just confirm the operations, and then click "Start Restore" if there isn't any mistake.
Situation 2: Restore BIOS Backup Image to UEFI PC
The preparations and steps are very similar. Please click the Upgrade Now button in AOMEI Backupper Standard to upgrade now and enjoy the Universal Restore feature.
Click the Restore tab and follow the on-screen instructions to run AOMEI Backupper until you are in the Operation Summary window. Please be sure the "Universal Restore" feature is checked. If not, please check it and then click Start Restore.
Note that the Univeral Restore feature only installs drivers required to start a computer. For other drivers like video or sound card drivers, display drivers, NIC drivers, etc will not be installed by default.
🔗 It also helps to transfer Windows 10 to new computer.
In addition, if you are the administrator of one company and need to perform UEFI restore on multiple computers, try AOMEI Backupper Technician or TechPlus edition. Its AOMEI Image Deploy feature can deploy system image to multiple computers simultaneously.
How to Perform UEFI Restore When Your PC won't Boot
If your computer is not bootable, to perform UEFI restore, you need to create a bootable disc first and then access AOMEI Backupper with it.
Step 1. Launch AOMEI Backupper. Go to "Tools" at the left side > "Create Bootable Media".

Step 2. At "Bootable Disc Type", select the "Windows PE" option. The created bootable media will support booting from both legacy/MBR and UEFI/GPT.

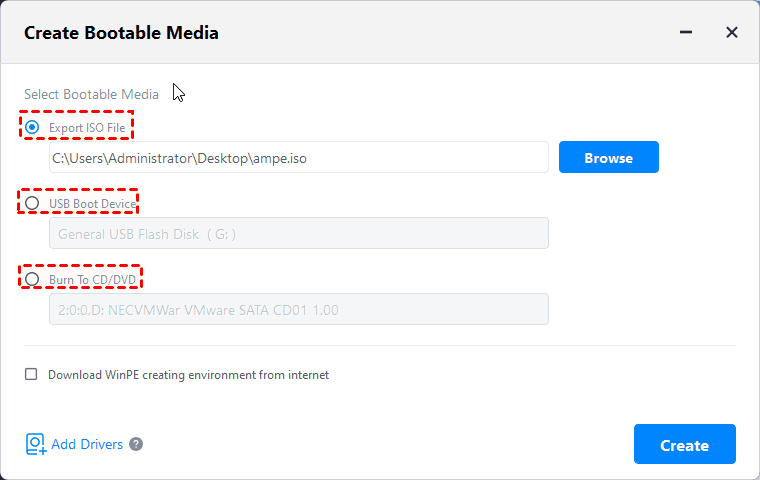
Step 3. At "Select Bootable Media", choose "USB Boot Device". Or, you can choose other types. Click "Next" to start the process. Wait for the process to complete, and then shut down your computer.
Step 4. Restart your PC and keep tapping Del (or F12 or F2) to enter BIOS. Then change boot priority to the bootable USB drive.
Step 5. You'll see a loaded AOMEI Backupper at the desktop. Click the "Restore" button and perform UEFI restore just like the steps in the previous part.
Summary
You can easily perform UEFI restore if your backup image is created on a GPT disk. But if it is created on a BIOS system, you need to use the Universal Restore feature on the advanced edition of AOMEI Backupper.
Please note all the restore processes are based on a valid backup image. If not, you cannot restore anything. So it is necessary to foster a habit of regular system backup and data backup with reliable backup software.
If you need to perform UEFI restore on Windows PCs, especially for system image created on a BIOS system, try powerful system restore software - AOMEI Backupper! It handles the boot issue well.

