Complete Guide for IBM or Lenovo ThinkPad Hard Drive Replacement
You will learn a complete guide (with screenshots) to do IBM/Lenovo ThinkPad hard drive replacement with everything on it and boot from it successfully.
By Ivy Updated on October 29, 2024
Why Perform IBM ThinkPad Hard Drive Replacement?
ThinkPad series laptops were originally IBM products until Lenovo acquired the brand and division in early 2005. Sometimes, you need to do IBM/Lenovo ThinkPad hard drive due to different reasons. Here we summarize some of them:
- Migrate the operating system, installed programs, data, settings, etc from one hard drive to another. Honestly, Lenovo Migration Assistant helps but it only migrates all the user files and the settings from old PC to new PC in Windows 7 and 10.
- Replace HDD with SSD to get better performance, such as shorter boot time.
Then, how to replace IBM ThinkPad hard drive including everything on the old disk? You need to clone IBM ThinkPad hard drive with reliable disk cloning software. Otherwise, your IBM ThinkPad will not boot from the new hard drive.
Reliable Hard Drive Cloning Software to Clone IBM ThinkPad including Everything
As the best disk cloning software, AOMEI Backupper Professional will do you a big favor to upgrade ThinkPad hard drive in Windows 11, 10, 8.1, 8, and 7, including 32-bit and 64-bit. And you can enjoy the following advantages:
- Clone hard drives with different sizes, even smaller drives. By default, it uses an intelligent clone method to clone a hard drive, which clones only used sectors. So you can even clone large drive to smaller drive or clone large HDD to smaller SSD and boot from it successfully.
- Clone and resize hard drives. This software offers users an Edit Partitions feature and 3 options to resize partition size on the destination disk and prevent unallocated space left after cloning.
- Align SSD disk for better performance. Since SSDs and HDDs have different structures, you need to align SSD using 4k technology while cloning hard drive to SSD, otherwise, their read and write speeds will be significantly slower.
Besides, it’s a powerful backup software that allows you to back up the IBM ThinkPad hard drive to an external hard drive, then restore it to the new hard drive. You may need to create a repair boot USB if your IBM Thinkpad is not bootable.
Please download the hard disk cloning software - AOMEI Backupper Professional 30-day free trial to have a try. (The Clone features in the free trial can only be demonstrated, please upgrade to enjoy)
In fact, there are two ways to upgrade ThinkPad hard drive and replace it later with the help of AOMEI Backupper Professional.
-
Disk Clone: You just need to download and install AOMEI Backupper on the IBM ThinkPad as well as prepare a new hard drive or SSD to store the Windows system, installed programs, settings, files, etc on the old disk. Also, prepare a SATA to USB enclosure for cloning.
-
Disk Backup and Disk Restore. Except for preparations in Disk Clone, you still need one more storage device to store backup images temporarily. If the IBM Thinkpad is not bootable, you still need a USB for bootable media creation.
After making preparations, select one of the methods below and follow the steps carefully.
Way 1: Clone IBM ThinkPad Hard Drive to New Hard Drive
1. Connect the new hard drive to your IBM/Lenovo ThinkPad using SATA to USB enclosure. Launch AOMEI Backupper, and choose Clone > Disk Clone.

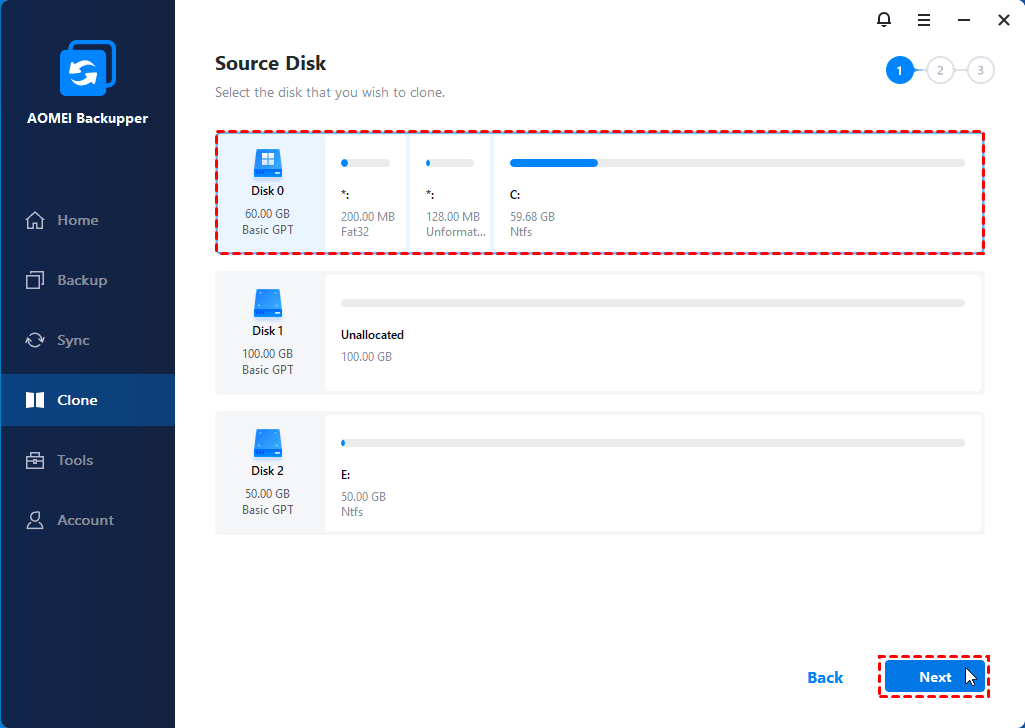
2. Select the IBM/Lenovo ThinkPad original smaller hard drive as the source disk, and hit Next.
3. Choose the new larger hard drive as the destination disk, and press Next.

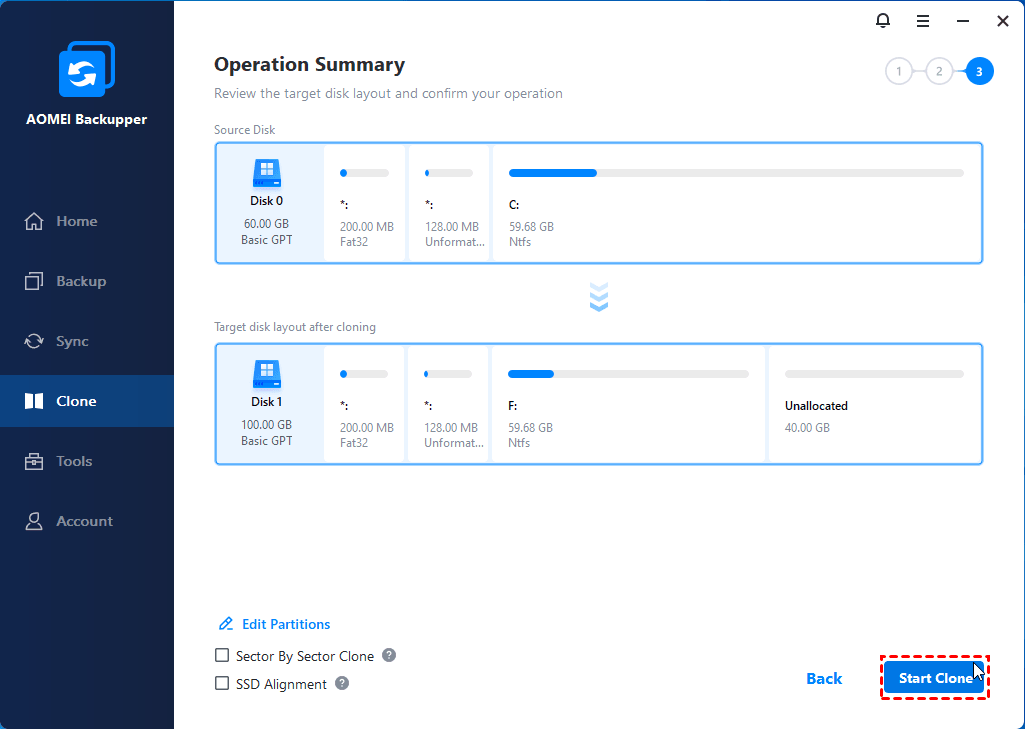
4. Press Start Clone >> to clone IBM/Lenovo ThinkPad hard drive for replacement. Check the SSD Alignment option to optimize for the overall performance of the SSD if your target disk is an SSD.
★ Tips:
✿ Edit Partitions allows you to modify the partition size on the destination disk to fully use the storage space which is especially useful while cloning disk to larger disk. And it also has the ability to convert disk type, from MBR to GPT or vice versa.
✿ Sector by sector clone will clone all sectors on the source hard drive, including used sectors, blank sectors, and bad sectors (if exist), and the time will be much longer. Uncheck this option helps to clone failing hard drive.
5. Replace IBM ThinkPad hard drive, set the new hard drive as the first boot option in BIOS, and boot from it. If you don't know to perform IBM ThinkPad hard drive replacement, scroll down to the next part and learn the instructions.
Way 2: Backup and Restore IBM ThinkPad Hard Drive for Replacement
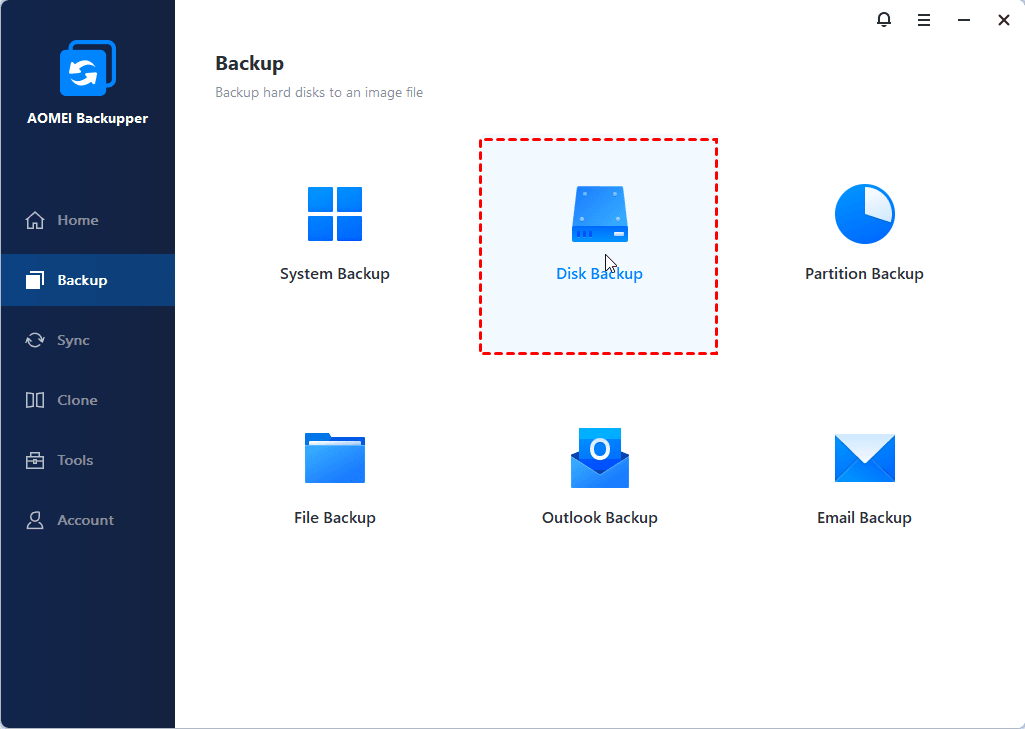
1. Connect the backup drive to your IBM/Lenovo ThinkPad using SATA to USB enclosure. Launch AOMEI Backupper Professional, Select Backup > Disk Backup in turn.
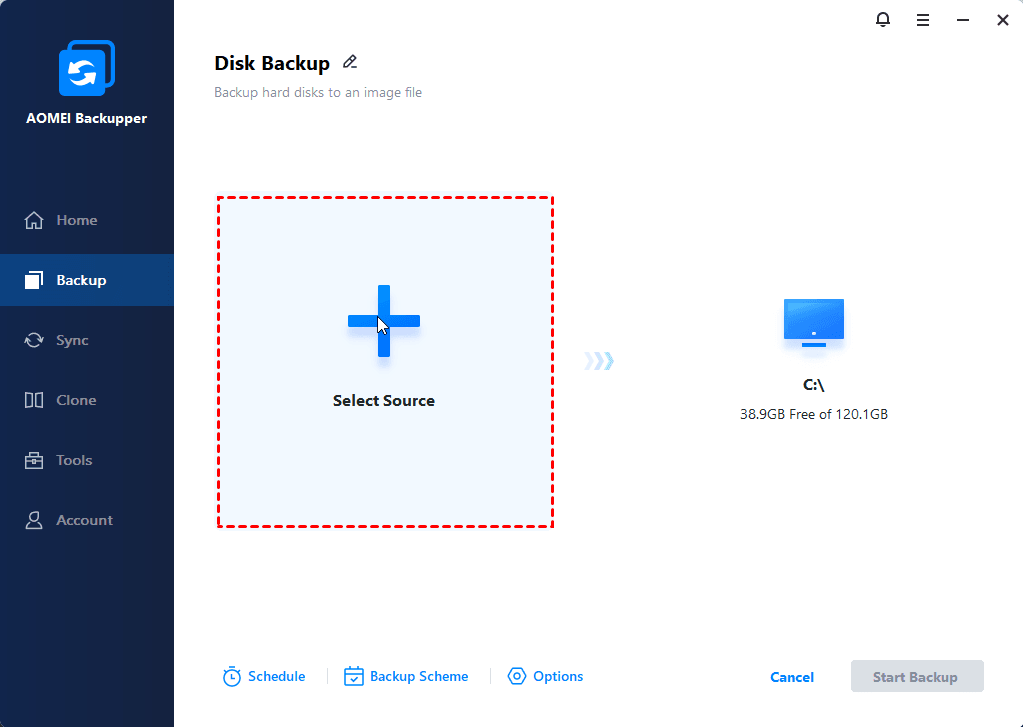
2. Select the original hard drive (HDD) in IBM/Lenovo ThinkPad as source disk. And then, choose the prepared backup driveto save the image file from IBM/Lenovo Thinkpad.
3. Press Start Backup to backup IBM/Lenovo Thinkpad hard drive. Wait until the process completes and replace IBM ThinkPad hard drive manually with instructions in the next part.
5. Go to the Restore tab, and choose Select Task or Select Image File to locate the disk image.
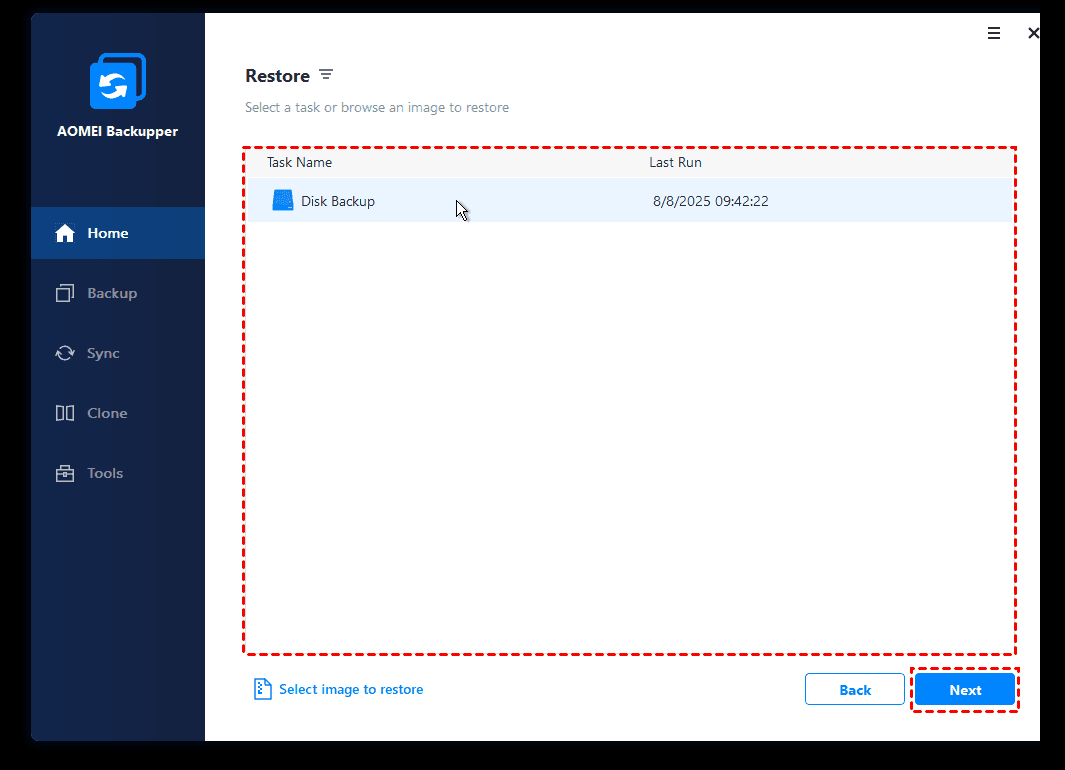
Note: If you choose Select Image File, you can directly go to step 6. If you choose Select Task instead, you need to select a backup image before that.
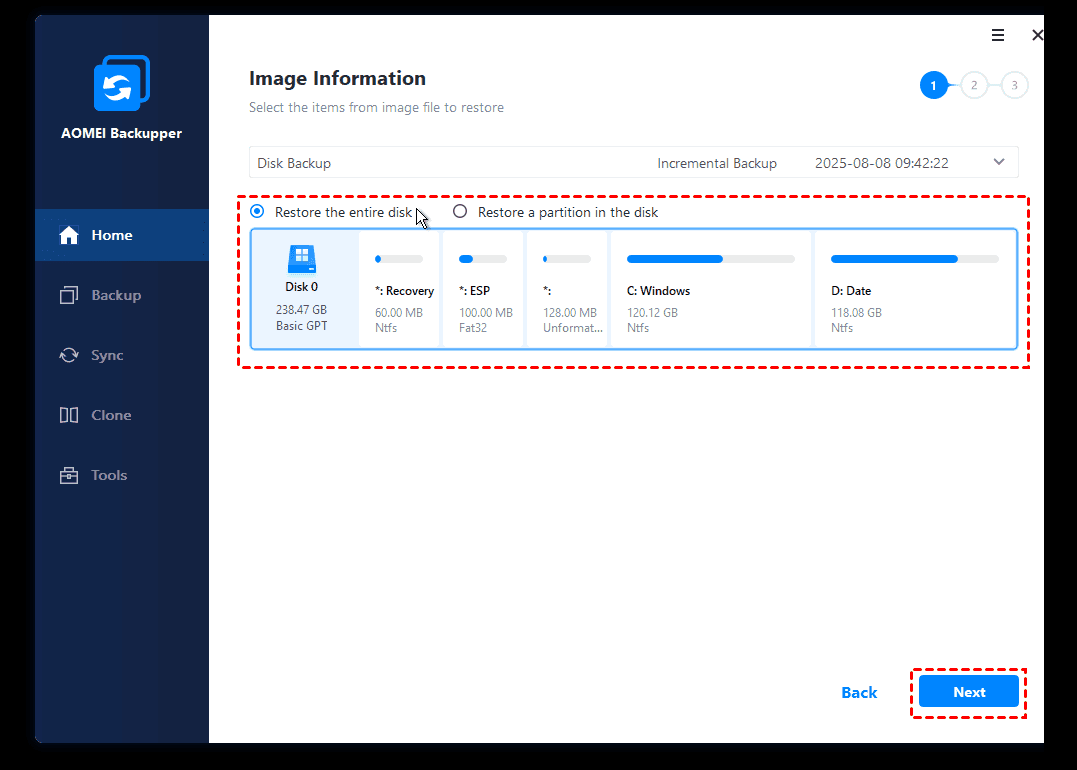
6. Tick Restore the entire disk, and click Next.
7. Select a new hard drive and then press Start Restore to restore IBM/Lenovo ThinkPad backup image to new hard drive.
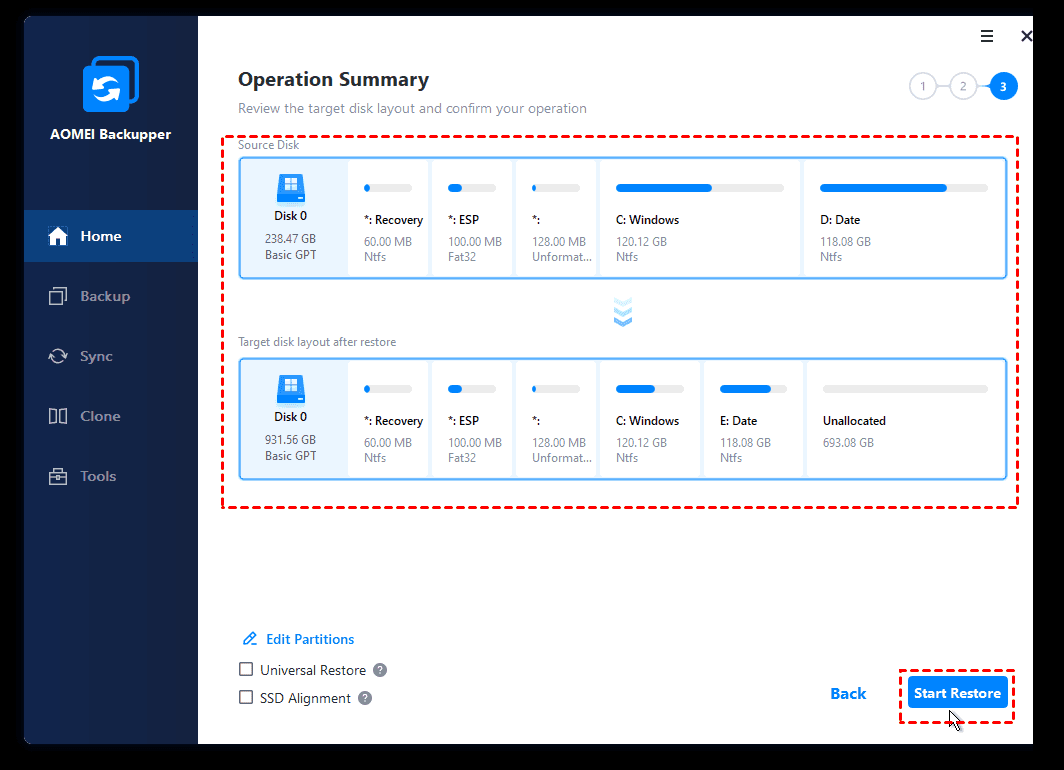
★ Tip: The Universal Restore feature allows you to restore image to dissimilar hardware computer and ensure its bootable without any issues.
8. After the restoration is finished, just restart your computer, and change the boot order to boot the new larger hard drive. That’s it.
How to Perform IBM ThinkPad Hard Drive Replacement
Before starting IBM ThinkPad Hard Drive Replacement, please make sure the laptop is off when you do this, sudden power outages can cause data corruption. Please note the steps may be a little different based on different laptop models, here take IMB ThinkPad R40 as an example:
1. Shut down your computer completely and flip the ThinkPad over so it is upside down.
2. Find out the location of the battery, and slide the battery lock lever right while gently pulling on the battery tab.

3. Find the screw holding the drive cage in place and remove it with a screwdriver, such as Phillips #1. Then, pull on the small rise in the plastic and carefully remove the drive cage.
4. Push on the plastic to take out the hard drive completely.
5. Remove the 4 screws holding the hard drive using Phillips #1.
6. Install the new hard drive with these instructions in reverse order.
Final Words
AOMEI Backupper Professional helps to clone hard drive with everything on it and perform IBM ThinkPad hard drive replacement without boot issues. In this software, you have two ways, honestly, the first method is easier and time-saving. And it takes care of secure boot even if you clone larger drive to smaller drive or SSD.
Of course, the backup and restore method still has its own advantages. It offers users some excellent features, such as schedule backup, to backup hard drive and data on it regularly. So you will not miss any change in it if your computer goes wrong. For advanced users, you could try the command line utility in this softwarethat takes up fewer resources

