Fixed: Cloned Hard Drive Unallocated Space Left on SSD/HDD
Do you encounter the issue “cloned hard drive unallocated space left” after cloning a smaller drive to a larger drive? Learn how to fix it via Disk Management and advanced disk clone software from this page.
By Lily Updated on May 28, 2025
The issue: cloned hard drive unallocated space left
Recently, disk clone have become more and more popular among computer users. It refers to the process of copying all the data from one hard drive to another, including the operating system, applications and user files, etc. What’s more, the cloned drive will keep the same partition style and file system as the original drive, so you can just use it as a replacement for the source drive. You may need to clone a disk in the following situations:
-
Upgrade a smaller drive to a larger drive when the current drive is running out of space.
-
Upgrade an HDD to an SSD to enjoy the benefits of SSDs such as faster speed, less noise, and less power consumption.
-
Get a spare disk that contains all the data you have on the current system disk, so you can use it in emergency.
However, some users find the cloned drive contains unallocated space after they clone a smaller drive to a larger drive. The unallocated space can’t be used to store data, which makes cloning to a larger disk no sense. The storage space isn’t enlarged at all! Here is a real case:
“Hi everyone,
I cloned my 256GB hard drive on a new 1TB hard drive. The cloning and physical install went smoothly but now I have almost 700 gigabytes on unallocated space. My C: drive is showing as if it is still near capacity so I need to figure out how to utilize my new disk space. Can I add this unallocated portion to my C: drive?”
How to deal with unallocated space after cloning via Disk Management
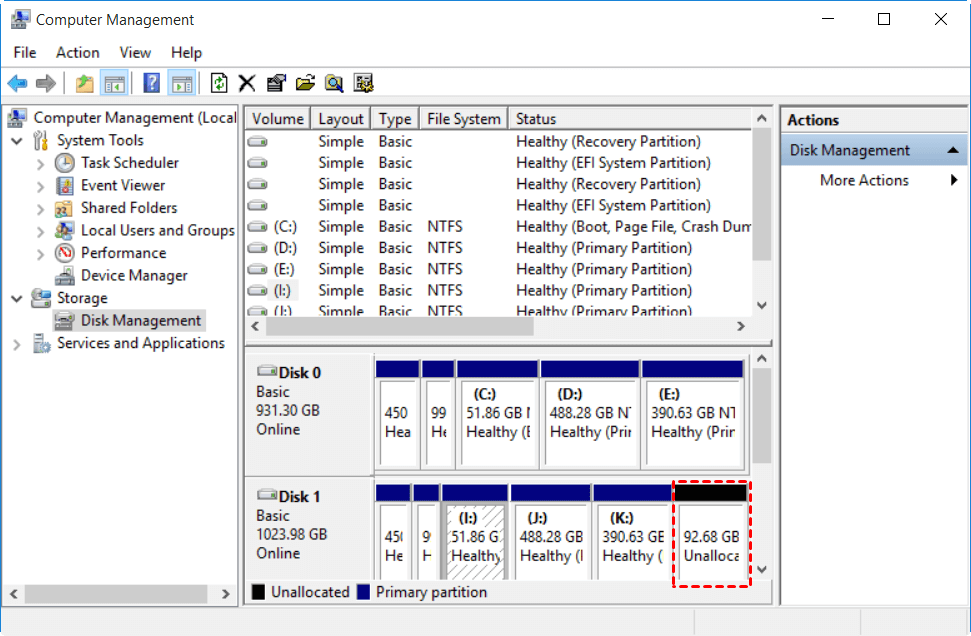
To deal with unallocated space after cloning a hard drive, you may take advantage of a Windows built-in tool—Disk Management. In my case, I have cloned disk 0 (931.30GB) to disk 1 (1023.98GB) and there is 92.68GB of unallocated space left.
Learn how to expand a hard drive partition after cloning in detail below:
If you want to clone hard drive without unallocated space left, try powerful cloning software.
1. Right-click on This PC and hit the Manage option. In the pop-up window, click Disk Management on the left panel.
2. Right-click on the partition you want to extend and select Extend Volume. Then, follow the Extend Volume Wizard to complete the process.
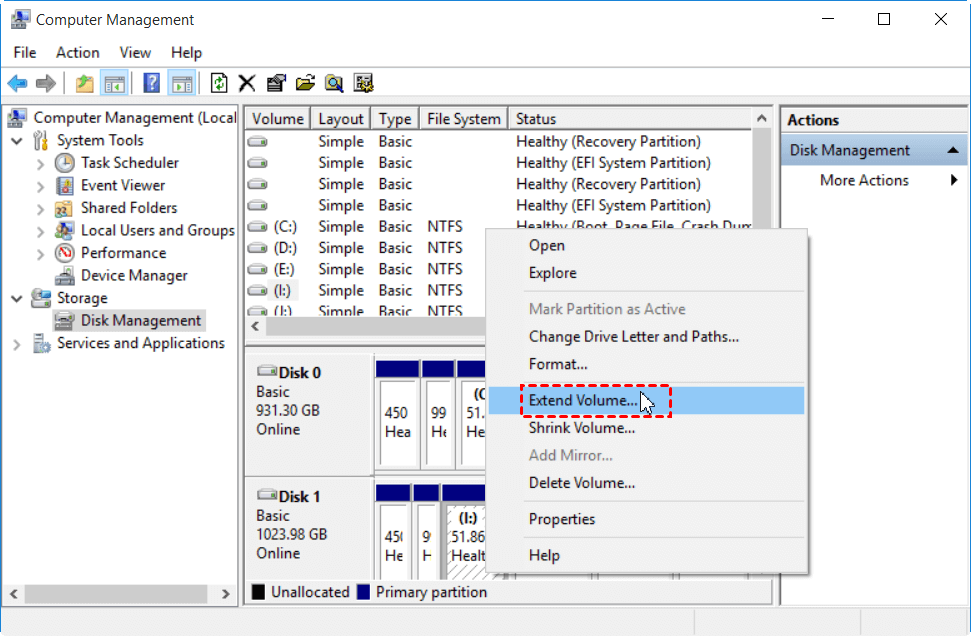
3. (Optional) You may be prompted to convert the selected basic disk to dynamic disk if you extend the partition into non-contiguous unallocated space. If you are not sure, learn more from “Should I convert to dynamic disk?”.

🎯Tip: For logical drives and boot or system volumes, you can extend the volume only into contiguous space and only if the disk can be upgraded to a dynamic disk. For other volumes, you can extend the volume into non-contiguous space, but you will be prompted to convert the disk to dynamic.
Potent cloning software to clone disks without unallocated space left
To solve the issue of “unallocated space on SSD/HDD after cloning”, you can also use a kind of disk cloning software that is able to deal with unallocated space during the cloning process. AOMEI Backupper is such a tool you can rely on.
★ With the inbuilt clone feature, you are allowed to clone only the operating system, an entire disk, or specific partitions.
★ If you are cloning hard drives with different sizes, you may edit the partition size on the destination disk during the cloning process.
★ If the two disks are in same size, you may use sector by sector clone to conduct 1:1 copy.
Learn how to use AOMEI Backupper to clone to a larger drive without unallocated space left as follows:
Step 1. Connect the target drive to your computer and make sure it is detected. Backup files on the target drive if necessary, because all data in the destination will be deleted in the cloning process.
Step 2. Download, install, and launch AOMEI Backupper. Click “Clone” on the left pane and select “Disk Clone”.

Step 3. Select the current hard drive as the source disk and click “Next”.

Step 4. Select the larger drive you have connected to your PC as the destination disk and click “Next”.

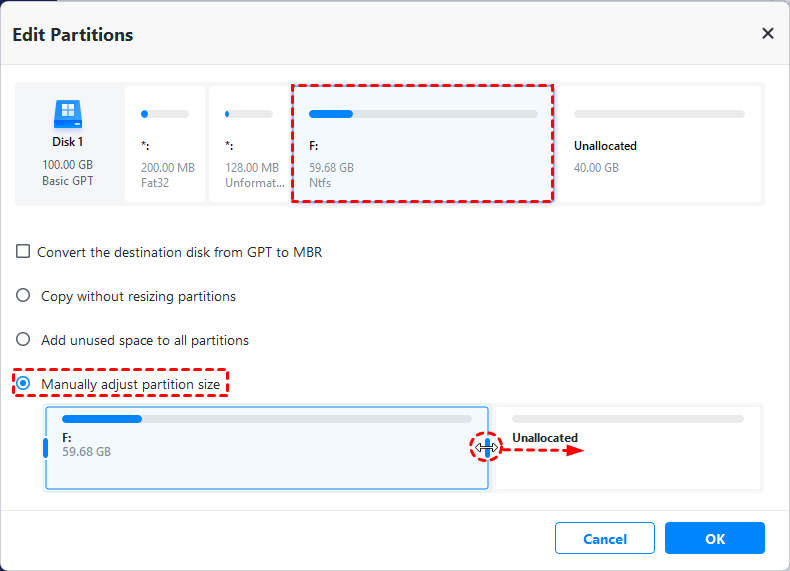
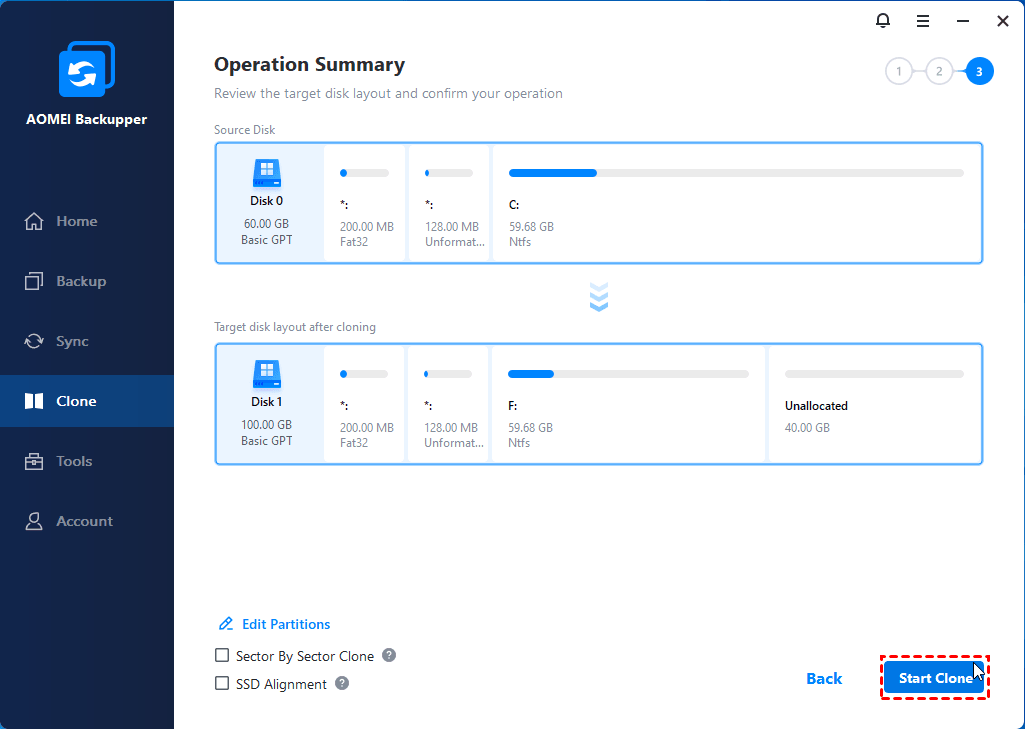
Step 5. In the Operation Summary page, click on “Edit partitions” and then choose from the two options below:
- Add unused space to all partitions: the program will automatically add unallocated space to all existing partitions.
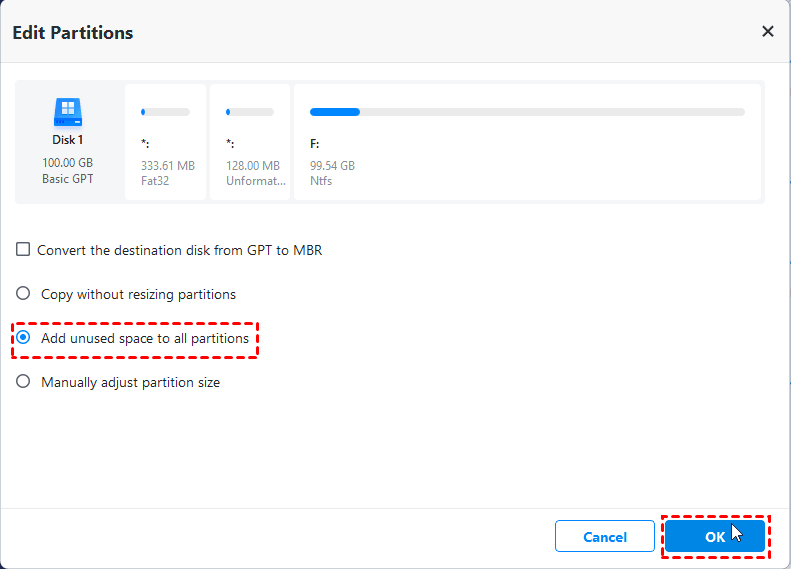
- Manually adjust partition size: you can click on each partition and resize it by dragging the side bar.
🎯Tip: If you are cloning a disk to another disk with a different partition style, such as clone GPT disk to MBR, check Convert the destination disk from MBR to GPT to make the partition style of two disks coincide.
Step 6. Click on “Start Clone” to execute the operation.
✍️Notes:
-
To boot from the cloned drive after cloning, you may change boot order in BIOS or just replace the original drive with the target drive. If the two drives are in different partition types (one MBR, one GPT), you may change the boot mode in BIOS to boot from the cloned drive.
-
If you are cloning disk to an SSD, you can tick the option “SSD Alignment” before you click “Start Clone”, thus improving the reading and writing speed on the destination SSD.
Conclusion
Now you know how to fix the issue of “cloned hard drive unallocated space left”. You can either use Disk Management to extend volumes with unallocated space or use advanced disk cloning software to clone hard drives.
With AOMEI Backupper, you won’t need to worry about unallocated space after cloning. You can handle it easily during the cloning process.
In addition, AOMEI Backupper can be used as backup & restore software. You can backup multiple drives at once and restore Windows backup to another computer. Try it now to discover more!

