Clone SATA to NVMe Won't Boot: Fix It in 5 Ways
This page covers 5 fixes to "clone SATA to NVMe won't boot" issue. Also, there is a reliable disk cloning software for cloning SATA to NVMe bootable.
By Jonna Updated on March 20, 2025
User Case: Won't Boot from Cloned NVMe Drive
I cloned from my 250GB SATA SSD to my new 2TB NVMe SSD. The cloning went fine, but my system won't boot after cloning. I am wondering how I can get past this.
Here's a comprehensive list of potential reasons for cloned SATA to NVMe won't boot. If you encounter any of these issues, remain here and follow the provided solutions to swiftly resolve the error:
- The SSD is connected as an external disk.
- Corrupted or interrupted cloning process.
- Incomplete clones, missing boot partitions, or boot components.
- GPT/MBR conflict, causing the cloned SSD won't boot on Windows 11/10/8/7.
- The cloned SSD is not set as your boot disk.
- Incompatible BIOS boot mode.
How to Fix Clone SATA to NVMe Won't Boot in 5 Methods
The following solutions are provided to resolve NVMe won't boot after clone. Follow the step-by-step guides to make your cloned SSD bootable properly. Before that, please make sure your cloned NVMe SSD is connected to your device properly and recognizable.
Way 1. Change Boot Order in BIOS
Certainly, if the cloned NVMe SSD is not set as the primary boot option in the BIOS, your computer won't boot from it. To rectify this, follow these steps to access the BIOS and change the boot order, designating the NVMe SSD as the boot drive:
Step 1. Restart your computer. As the startup screen appears, press the designated hotkey to access the BIOS settings menu. (F2, F8, F12, or Del are the most common hotkeys. It’s depending on the computer model and manufacturer)
Step 2. After entering BIOS, use the arrow keys to navigate to the Boot tab, and select the NVMe SSD as the first boot option.
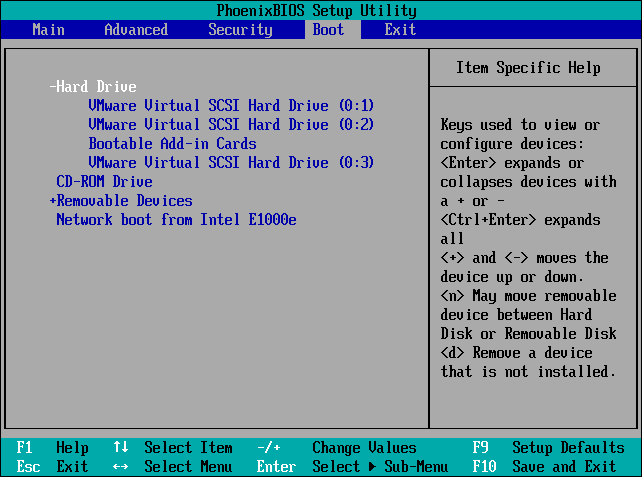
Step 3. To save the changes you've made to the boot order, press the F10 key. After that, restart your computer.
Way 2. Setting BIOS to Boot from UEFI or Legacy
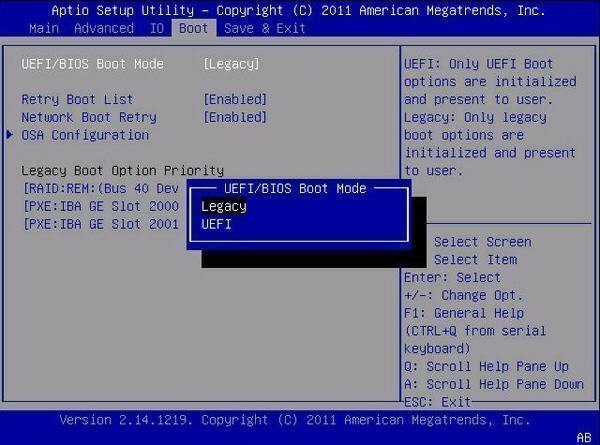
Indeed, MBR and GPT are two distinct partition styles, and they align with different startup modes. MBR typically corresponds with the Legacy startup mode, while GPT is compatible with the UEFI mode. If the partition style and boot mode are incompatible, it is possible that you can’t boot from NVMe. To address this, you need to enter the BIOS and adjust the boot mode according to the partition style you've selected. Here are the steps:
Step 1. Access the BIOS utility following the same procedure as previously described.
Step 2. Select UEFI/ BIOS Boot Mode from the Boot tap.
Step 3. Depending on your chosen partition style, select either Legacy or UEFI as the boot mode. Then, save the change and restart your computer.
Way 3. Set System Partition as Active Partition
Indeed, setting the active partition is crucial, as it's typically the primary partition where the operating system's boot files are stored. If your Windows 10 computer won't boot after cloning from SATA to NVMe due to the system partition not being designated as active, you can use Command Prompt to make the necessary adjustments. Here's a detailed guide:
- Notes:
- To set the system partition as active, you'll need to boot Windows from USB flash drive or other bootbale disk with a Windows installation first, then enter Command Prompt and use some command lines to set the system partition as active. Or, you can boot from the old disk, as the cloned SSD won't boot.
Here we take booting from old disk to show you detailed guide:
Step 1. Boot your computer from the old hard drive. Place the SSD into a hard drive enclosure and connect it to your PC.
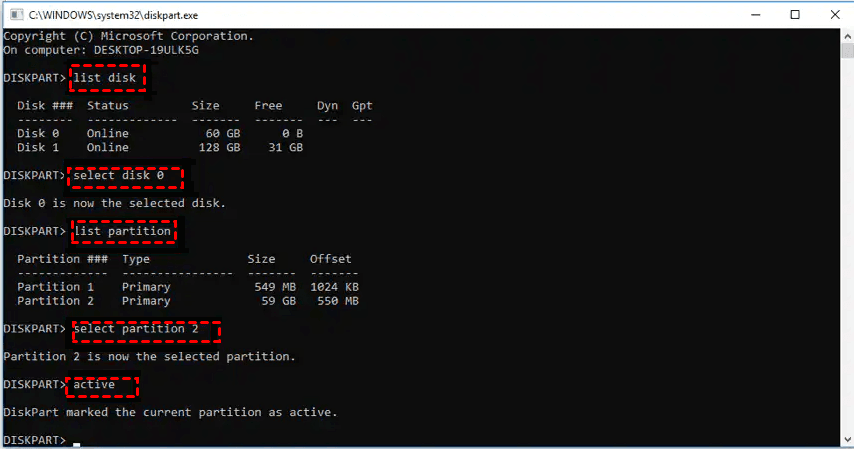
Step 2. Once you're booted from the old hard drive, press Win + R to open the Run box. Type diskpart into the Run box and hit Enter.
Step 3. In the Command Prompt, type the following commands one by one and press Enter after each command:
- diskpart
- list disk
- select disk 0 (the disk contains your system partition)
- list partition
- select partition 0 (the system partition)
- active
- exit
Step 4. Then, reboot your computer, set the PC to boot from the cloned SSD, reboot PC again to see if the NVMe not booting after clone issue is solved.
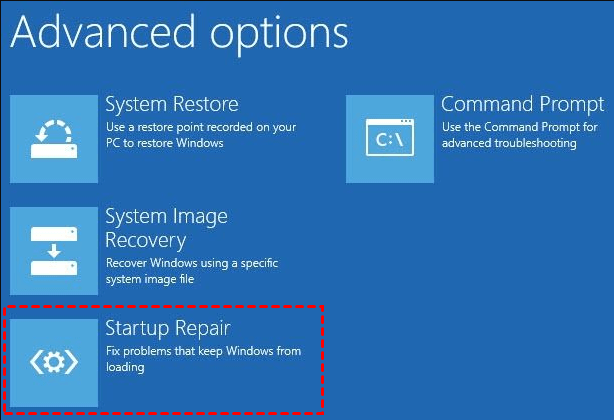
Way 4. Repair Windows Startup from Windows RE
When you encounter issues with a cloned SSD not booting on Windows 10 or 11, the Windows Recovery Environment (Windows RE) can be a valuable resource for repairing the Windows startup. The Windows Startup Repair tool is designed to rectify various issues like cloned SSD won't boot with black screen and assist in successful booting. Here are the steps to utilize it:
Step 1. Boot your computer from the Windows installation disc or a bootable USB drive.
Step 2. When prompted, select Repair your computer.
Step 3. Upon reaching the Choose an option screen, choose Troubleshoot -> Advanced Options -> Startup Repair (Windows 11/10/8). The tool will then initiate the repair process to address the startup problem.
Way 5. Run Bootrec.exe Tool
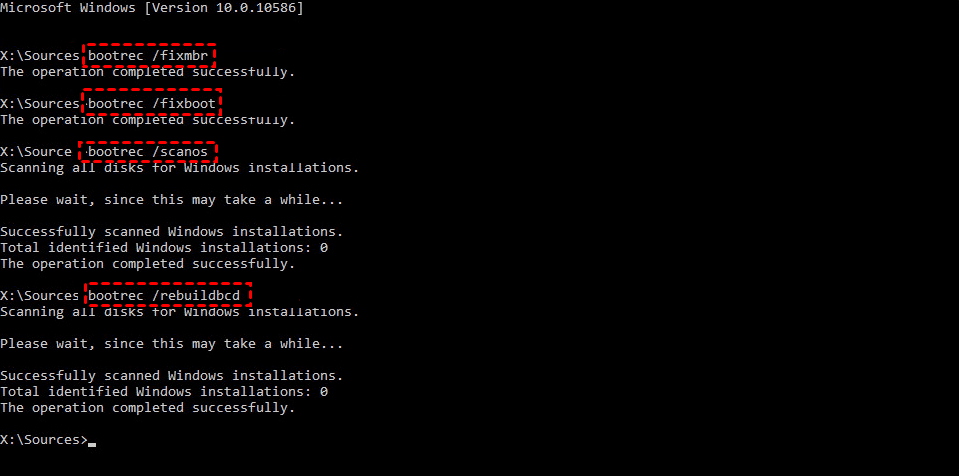
If the Windows Startup Repair tool fails to resolve cloned SSD won't boot in Windows 11/10/8/7, you can try using Bootrec.exe to fix the problem. Here are the steps to follow:
Step 1. Begin by starting your computer from the Windows installation disk or a bootable USB drive.
Step 2. Select Troubleshoot -> Advanced Options -> Command Prompt from the Troubleshoot menu. Type bootrec.exe in the pop-up command prompt type the following Bootrec.exe commands to address the Windows 10/11/8/7 booting issue:
- bootrec.exe /fixmbr: This command fixes the Master Boot Record (MBR).
- bootrec.exe /fixboot: It repairs the boot sector.
- bootrec.exe /scanos: This command scans for installed operating systems.
- bootrec.exe /rebuildbcd: It rebuilds the Boot Configuration Data (BCD) store.
Better Way to Clone SATA to NVMe without Booting Issues
Incomplete cloning or clone failures can indeed lead to the problem of the cloned SSD not booting. Moreover, if you fail to clone the boot partition, the cloned hard drive may not be able to boot either.
Utilizing reliable disk cloning software like AOMEI Backupper can ensure a seamless and error-free disk cloning process, guaranteeing that the cloned hard disk is bootable.
▶It includes a Disk Clone feature that can clone system disks from GPT to GPT or MBR to GPT without the need for conversion. If you specifically wish to only clone Windows to NVMe from SATA, you can use the System Clone feature.
▶By default, the software operates in an intelligent clone mode, copying only used sectors. This allows you to clone larger SSD to smaller SSD or clone larger HDD to smaller SSD. Additionally, for the target NVMe SSD, the software offers SSD Alignment to enhance its read and write speeds.
▶It has a user-friendly GUI and supports a wide range of disk types, including SATA/IDE/PCIe disk, M.2 drive, NVMe SSD, etc.
For how to clone from SATA to NVMe, you can follow the guide below.
Step 1. Launch the cloning software, go to the Clone tab, and choose Disk Clone.

- Note:
- If you only want to clone Windows operating system, you can also utilize the System Clone feature.
Step 2. Select the SATA hard drive or SSD as the source disk, and click Next.

Step 3. Then, choose the NVMe SSD as the destination disk, and hit Next.

Step 4. Check SSD Alignment to optimize the performance of the NVMe SSD, and then click Start Clone to execute the cloning operation.

>> Sector By Sector Clone: This feature allows you to clone all the sectors, including the blank and logically bad sectors. It's particularly useful when the target NVMe SSD is larger than the source drive.
>> Wipe source drive: If you intend to repurpose the SATA SSD/HDD as secondary storage or wish to securely erase its data before disposal, you can use the Disk Wipe feature to wipe the hard drive.
Can You Clone SATA to NVMe?
SATA and NVMe are two distinct interface technologies for solid-state drives (SSDs) when it comes to communication with a computer. They have distinct characteristics and performance differences.
♦SATA (Serial ATA): SATA stands as the older and more commonly used interface for linking storage devices, for both SSDs and HDDs. It employs a 7-pin data connector with a 15-pin power connector. SATA SSDs connect to standard SATA ports on motherboards.
♦NVMe (Non-Volatile Memory Express): NVMe, in contrast, is a newer interface designed specifically for SSDs to take full advantage of their speed. It typically employs the M.2 or U.2 form factor, connecting directly to the motherboard via PCIe slots.
Generally speaking, NVMe outperforms SATA in terms of performance. It is possible to clone SATA to NVMe using professional cloning software. However, there are chances you may encounter cloning SATA to NVMe won't boot or NVMe inaccessible boot device after cloning. Try AOMEI Backupper instead.
Summary
That’s all solutions to fix cloned SATA to NVMe won't boot. Hope one of these methods can help you get out of trouble. Or, if you are looking for the best SATA to NVMe cloning software, you can give AOMEI Backupper a try.
With this tool, you can clone SATA to NVMe, clone NVMe to NVMe, clone PCIe SSD, clone M.2 SSD, and more. Additionally, it offers various cloning options such as System Clone for cloning only the system, Disk Clone for cloning the entire disk, and Partition Clone for cloning specific partitions. And it ensures your computer can boot from the cloned SSD successfully. You could download it and try it by yourself.

