ASUS TUF Gaming F17 SSD Upgrade: Full Guide
You can refer to the full guide to enable the ASUS TUF Gaming F17 SSD upgrade. In addition you will be able to get ideas on still retain the source data after upgrading!
By Miya Updated on September 5, 2025
Is ASUS TUF F17 Upgradable?
Do you want to upgrade ASUSTUFF17? Yes, the ASUS TUF Gaming F17 is generally upgradeable, although the extent of upgradability may vary depending on the specific model and configuration. Here are some common components that can be upgraded in the ASUS TUF Gaming F17:
- Storage (SSD/HDD): The laptop typically has a dedicated compartment or bay for storage drives, allowing you to upgrade or add additional SSDs or HDDs for increased storage capacity or faster performance.
- RAM: Many models of the ASUS TUF Gaming F17 come with upgradable RAM slots, allowing you to increase the memory capacity by replacing or adding RAM modules.
- Wi-Fi Card: In some cases, you may be able to upgrade the Wi-Fi card to a newer standard or a model with improved performance.
- Battery: If the battery is easily accessible, it may be replaceable, allowing you to upgrade to a higher-capacity battery if desired.
In this article, we will focus on the ASUS TUF Gaming F17 SSD upgrade, and here is the procedure below. Please read carefully.
How to Perform ASUS TUF Gaming F17 SSD Upgrade
To perform an SSD upgrade on the ASUS TUF Gaming F17, you'll need to follow these general steps (this method is also applied to ASUS TUF Gaming F17 2022 SSD upgrade):
Preparations:
◉Prepare the necessary tools: You'll need a compatible SSD, a screwdriver set, and an antistatic wrist strap (optional but recommended).
◉Back up your data: Before making any hardware changes, it's essential to back up your important files and data via best free SSD backup software to ensure you don't lose anything during the upgrade process.
Step 1. Power off and unplug the laptop: Shut down the laptop completely and disconnect it from any power source.
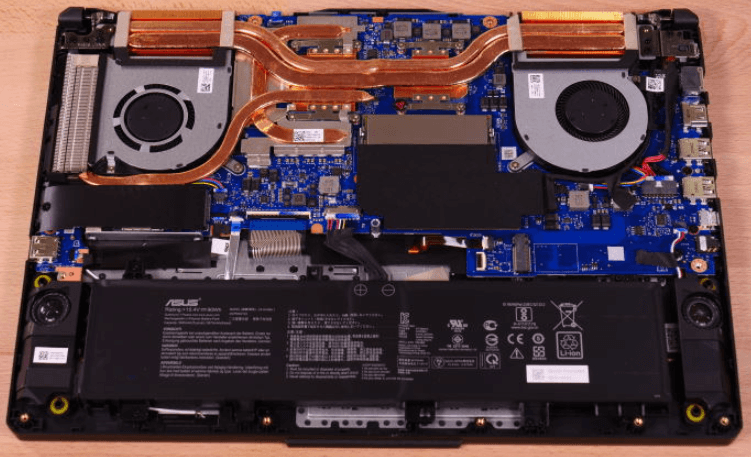
Step 2. Locate the SSD compartment: The ASUS TUF Gaming F17 usually has a dedicated compartment or bay for the storage drives. Refer to the laptop's user manual or manufacturer's website to find the specific location of the SSD compartment.
Step 3. Remove the bottom cover: Use a screwdriver to remove the screws that secure the bottom cover of the laptop. Keep the screws in a safe place as you'll need them later.
Step 4. Ground yourself: To prevent any static electricity damage, it's recommended to wear an antistatic wrist strap or touch a grounded metal surface before handling the internal components.
Step 5. Locate the existing SSD: Once the bottom cover is removed, locate the existing SSD. It is usually a small rectangular board connected to the motherboard.
Step 6. Disconnect the cables: Gently disconnect the cables that are attached to the existing SSD. Pay attention to any retaining clips or screws that may be holding the SSD in place.
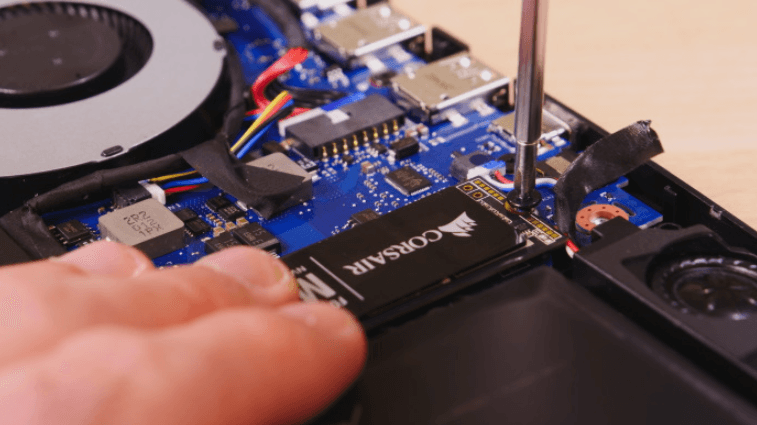
Step 7. Remove the existing SSD: Carefully remove the existing SSD from its slot. Take note of its orientation and the way it is installed.
Step 8. Install the new SSD: Take your new SSD and align it correctly in the slot. Insert it firmly but gently until it is fully seated. Make sure the connectors are properly aligned.
Step 9. Reconnect the cables: Attach the cables that were previously connected to the old SSD to the new SSD. Ensure they are securely connected.
Step 10. Replace the bottom cover: Place the bottom cover back onto the laptop and secure it using the screws you removed earlier.
Step 11. Power on the laptop: Once the SSD is installed and the bottom cover is securely in place, plug in your laptop and power it on.
Step 12. Initialize and format the new SSD: Depending on the operating system, you may need to initialize and format the new SSD before you can start using it. Refer to the operating system's documentation for instructions on how to do this.
This is all about performing ASUS TUF F17 SSDupgrade, so how do you still retain the previous data after the upgrade? Please read on.
Clone SSD to New SSD via An Safe Way to Perserve Data
Performing ASUS TUF Gaming F17SSD upgrade is a popular choice among Windows users seeking improved operating system performance. If you're planning to upgrade the SSD while preserving your original data, you have the option to clone it instead of simply copying and pasting files.
Cloning involves migrating all data from the old SSD to the new one, making it bootable. Since Windows itself lacks built-in disk cloning functionality, it's recommended to use reliable software like AOMEI Backupper Professional for an efficient and straightforward process. Here are some reasons why it's a good choice:
✉It offers intelligent clone capabilities, allowing you to clone larger drives to smaller ones or create an exact copy using sector-by-sector cloning.
✉It optimizes SSD performance by ensuring that all partitions on the new SSD are appropriately aligned with the "SSD Alignment" feature.
✉The software boasts a user-friendly interface, making it suitable for both novice and experienced users.
✉It supports a wide range of SSD brands and models, including Samsung, Crucial, WD, SATA, M.2 NVMe, and more.
✉Compatibility is not an issue as it supports various Windows operating systems, including Windows 11, Windows 10, Windows 8/8.1, and Windows 7.
Feel free to download this SSD cloning software and give it a try for a seamless upgrade experience.
To begin, establish a connection between your computer and the new SSD. The subsequent instructions will guide you through the process of utilizing AOMEI Backupper to copy your SSD to the new one.
Before proceeding, please note the following:
• Install the new SSD. If your computer has only one slot available, consider using an adapter or SSD enclosure to establish a connection.
• Initialize the new SSD. It is advisable to ensure that the partition style (MBR/GPT) of the new SSD matches that of the source disk. This way, you won't need to modify the boot mode after the cloning process.
• If you have already saved important files on the target SSD, it is recommended to create a backup using AOMEI Backupper before proceeding.
Step 1. Begin by installing and launching AOMEI Backupper on your computer. Then, click on Clone and select Disk Clone.

Step 2. Choose the original SSD as the source disk.

Step 3. Specify the new SSD as the destination path.

Step 4. It is highly recommended to enable the SSD Alignment option, especially when cloning to an SSD. This will enhance read and write speeds and contribute to the longevity of the SSD. Once selected, click on Start Clone to initiate the SSD-to-SSD cloning process.

In order to boot your PC from the new SSD after the cloning process, ensure that you either modify the boot sequence in the BIOS settings or manually replace the old SSD with the new SSD.
Helpful Tips:
◉ By default, this operation will clone only the used portion of the old SSD. If you require a sector-by-sector clone, be sure to select the "Sector by sector clone" option.
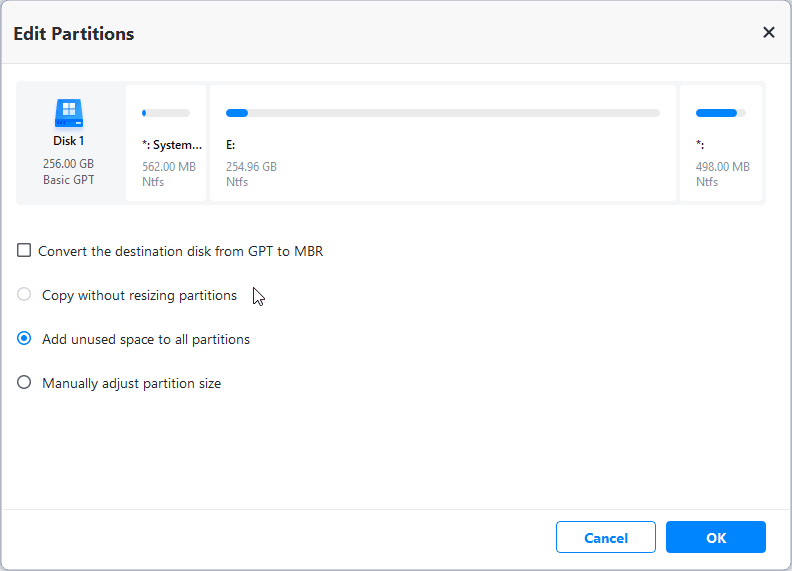
◉ Clicking on "Edit partitions" will provide you with four sub-options to choose from. These options assist in adjusting partition sizes and converting disk types.
1. Copy without resizing partitions: This option maintains the original partition sizes.
2. Add unused space to all partitions: It reallocates unallocated space to each partition on the target disk, which is suitable for disks of varying sizes.
3. Manually adjust partition size: This option allows you to extend unallocated space to any desired partition on the destination disk.
4. Convert the destination disk from MBR (GPT) to GPT (MBR): This option facilitates converting the partition style of the destination disk if it differs from the source disk.
◉If you're aiming for increased storage capacity, you have the option to clone a smaller SSD to a larger one. However, for optimal performance, it is recommended to clone Windows 10 to an NVMe SSD due to its significantly faster transfer speeds.
◉This software also serves as an M.2 SSD cloner, allowing you to migrate Windows 10 to an M.2 SSD, clone one M.2 SSD to another, and perform similar operations.
Summary
That concludes our guide on completing the ASUS TUF Gaming F17 SSD upgrade. By following the aforementioned steps, you can effortlessly enhance your laptop and experience the advantages of a faster computer. This upgrade will significantly improve your laptop's performance and provide ample storage space for your games and files. Now, feel free to download and enjoy all your favorite games and applications after the upgrade.
In addition to transferring data from the old SSD to the new one, it offers a range of other useful features. You can leverage its advanced capabilities to transfer large files between PCs, create portable Windows 10 USB drives, and more. As you can see, it's definitely worth giving AOMEI Backupper a try, as it provides valuable functionalities for various needs.

