How to Do Robocopy Incremental Backup [Switch & Example]
Many people use Robocopy for data copy due to its simplicity and convenience. But how to do Robocopy incremental backup especially when you want to run it on schedule? Here’s a simple guide of Robocopy with frequently used switches. If you find it error-prone or hard to meet your needs, use an alternative instead.
By Lily Updated on August 28, 2025
Can You Use Robocopy to Do Incremental Backup/Copy?
Robocopy (Robust File Copy) is a command-line for file replication since Windows Vista and Windows Server 2008. It functionally replaces Xcopy with more options, like mirroring, monitoring, retry when error occurs, etc.
Many users may wonder: is Robocopy incremental? Robocopy creates an intact copy at the first time, and sync only changed files to the target directory from the 2nd time. So yes, you can use Robocopy for incremental backup.
With some parameters or the help of Windows Task Scheduler, you could even perform Robocopy incremental copy automatically with a schedule.

- It cannot copy open files or live operating system volume;
- The operation is not intuitive enough for users who are used to GUI software;
- Most of all, Robocopy won’t keep different versions of the source data nor provide image recovery.
That is to say, if you accidentally delete or modify something and run the backup unknowingly, these mistakes will be synchronized to the target directory, and you cannot retrieve any of the older copies.
If you don’t mind about it, keep reading and follow the steps to do incremental backup with Robocopy.
To avoid Robocopy's drawbacks, you may use an incremental backup tool with recovery options.
How to Create Robocopy Incremental Backup
You can use Robocopy to perform incremental copy automatically.
To explain it clearly, I’ll give an example to backup files from C:\test to D:\test.
Step 1. Open CMD
Press the Win+R key to open the “Run” window. Enter “CMD” and hit OK.
Step 2. Input the command for incremental copy
The basic command of robocopy is: robocopy [source] [destination]
The files in source folder will be copied to the destination folder.
Here's an example:
robocopy C:\test D:\test
Check the target directory, you’ll find the files have been backed up successfully. If you add or modify files in source directory later and run Robocopy again, the changed and newly added files will be synchronized to the destination.

Step 3. Add useful switches to customize the backup
You could enrich your Robocopy incremental backup script with practical switches.
*If you want to copy all the changes & deletions in the source directory as well, add /mir after the command. It also backs up all the subdirectories even empty folders.
*You could also use /xo to exclude older files. During copying the source directory, it will skip the files that already have the same or newer copies in destination directory. For example, if you first modify a file in folder A, and then the same file in folder B, the default incremental backup will copy A to overwrite B, while the /xo mode will skip the change because the file in folder B is newer.
*You can use other parameters, like /s (include subdirectories), /z (copy files in restartable mode), /np (don't display percentage of copied files) and so on. You could combine Robocopy incremental backup with switches you need.
For example, the command could be like:
robocopy C:\test D:\test /s /xo /z /np
Step 4. Automate the incremental copy with Robocopy
To create an incremental backup task using Robocopy on regular basis, you can either add parameters or use Windows Task Scheduler.
👉By parameters:
/MON:n will monitor the source directory and execute incremental backup when "n" or more changes are detected.
/MOT:m will execute another incremental backup if changes are detected in "m" minutes'.
/RH:hhmm-hhmm makes Robocopy to copy files between "hhmm" and "hhmm", e.g. “/RH:1700-1800”.
In my case, I use the command below to back up changed files every 10 minutes.
robocopy C:\test D:\test /mot:10
This way, you can use Robocopy to incremental copy files at the frequency you set.

*If you want to terminate the task, you could open another CMD window and enter “taskkill /f /im robocopy.exe”.
👉By Windows Task Scheduler:
You can also create an incremental batch file with Robocopy, and then use Task Scheduler to automate it.
Open notepad, input the Robocopy backup script you want to implement. Here I want to incremental copy all the subdirectories, so add the parameter /s as well.
Click File > Save As. Then give it a name you like, Robocopy incremental backup, for example. Change the extension from .txt to .bat. and click Save.

Search for Task Scheduler in Windows or in Control Pane. Open it, choose to Create Basic Task.

Enter the task name and description, then choose when or what to trigger the task. Here I choose Daily and specify the time point in the next page.

Choose Start a program as the action to perform the task.

Then click Browse to select the Robocopy backup script (the .bat file) you just created.

Confirm the information and click Finish to complete the process. Then you can find the scheduled task in Task Scheduler Library and execute or delete it anytime you like.
More copy options to optimize your Robocopy incremental backup script
If you have further needs, there are some common switches you could use to optimize your Robocopy incremental backup script. Click here to view the full edition of Robocopy syntax.
👉Copy options
/s Copies subdirectories and excludes empty directories.
/e Copies subdirectories and includes empty directories.
/z Copies files in restartable mode.
/b Copies files in Backup mode.
/purge Deletes destination files and directories that no longer exist in the source.
/mir Mirrors a directory tree (equivalent to /e plus /purge).
/mov Moves files, and deletes them from the source after they are copied.
/move Moves files and directories, and deletes them from the source after they are copied.
/mon: Monitors the source, and runs again when more than n changes are detected.
/mot: Monitors the source, and runs again in m minutes, if changes are detected.
/rh:hhmm-hhmm Specifies run times when new copies may be started.
👉File selection options
/a Copies only files for which the Archive attribute is set.
/m Copies only files for which the Archive attribute is set, and resets the Archive attribute.
/xc Excludes changed files.
/xn Excludes newer files.
/xo Excludes older files.
/is Includes the same files.
/it Includes modified files.
/maxage: Specifies the maximum file age (to exclude files older than n days or date).
/minage: Specifies the minimum file age (exclude files newer than n days or date).
👉Others
/r: Specifies the number of retries on failed copies. The default value of n is 1,000,000 (one million retries).
/w: Specifies the wait time between retries, in seconds. The default value of n is 30 (wait time 30 seconds).
/l Specifies that files are to be listed only (and not copied, deleted, or time stamped).
/x Reports all extra files, not just those that are selected.
How to Do Scheduled Incremental Backup with Recovery Option
As stated before, it’s risky to back up important data with Robocopy, because there’s no rollback option for the mistaken changes and deletions that have been copied to target directory. If you want to manage incremental backup more safely and intuitively, backup software like AOMEI Backupper Standard could serve you better.
▪ Compatibility - It’s a backup & sync tool supporting all Windows OS and enables you to do full or incremental backup between various devices (internal/external hard drive, USB, network share, NAS, cloud).
▪ Image Backup - You could set up a scheduled task to run incremental backup automatically. Thus only changed files will be captured and you can easily roll back to any earlier version.
▪ File Sync - In addition to recoverable image backup, you can also copy files with original formats using Sync feature, which is more similar to Robocopy incremental copy but with GUI. Schedule options are also available.
*The free Standard edition could already meet most of incremental backup needs. If you upgrade to higher editions like Professional, there are more advanced features: real-time sync, two-way sync, differential backup, etc.
Now, I’ll introduce the operation to perform incremental backup with the Robocopy alternative. You could download and install the freeware to get started.
Step 1. Launch the tool to get started
Navigate to Backup > File Backup. You could also choose Partition Backup, Disk Backup, or System Backup accordingly.

Step 2. Specify the source folders or files
Click Select Source > Add Folder or Add File to select the source data.

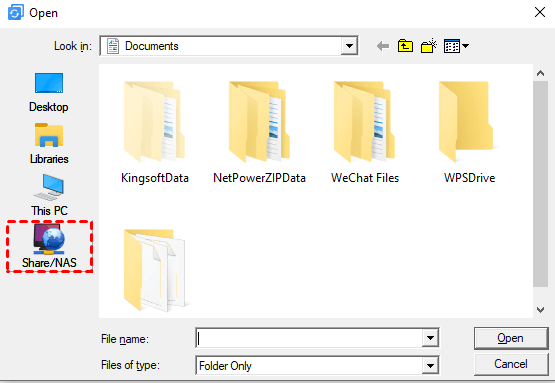
If you want to add files from network locations, click Share/NAS in the pop-up window and then Add NAS or Add Network Share to specify the path.
In higher editions, you could also click Options > Filter to include or exclude files with specific extensions.
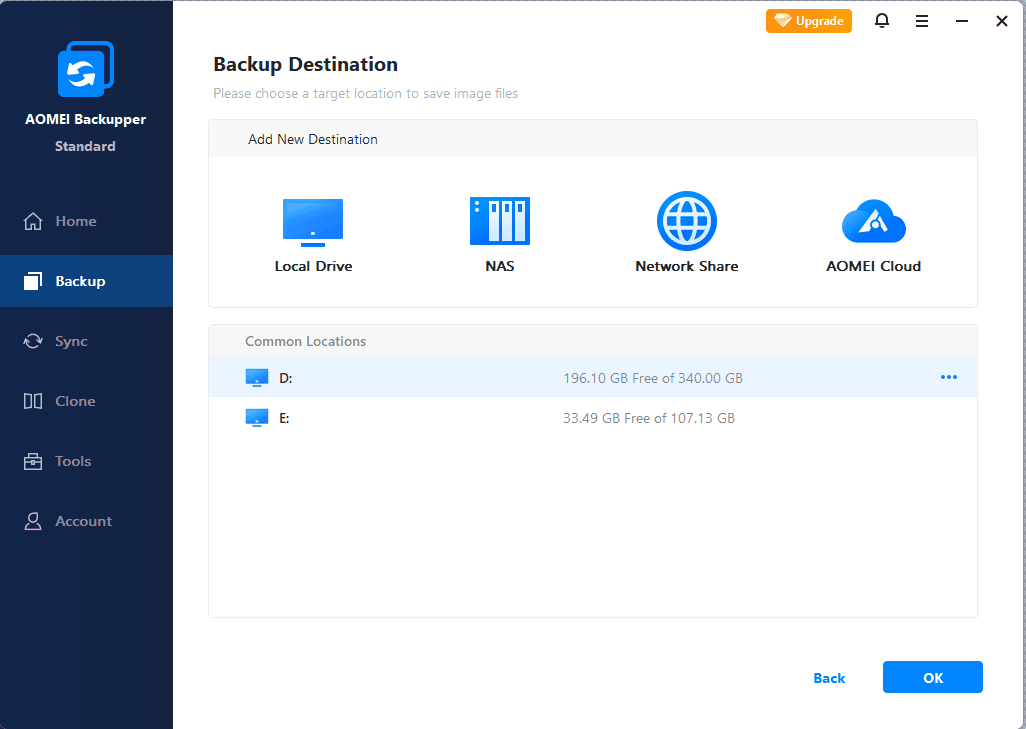
Step 3. Select the target path that you want to copy files to
Choose the backup destination. In addition to local folders or connected removable devices, you could click NAS, Network Share or AOMEI Cloud to backup to network location or cloud as you like.
Step 4. Schedule the incremental backup task
Click Schedule to create an automatic backup. It’s run in incremental mode by default. Optionally, you could manage more backup Options or set up Backup Scheme.
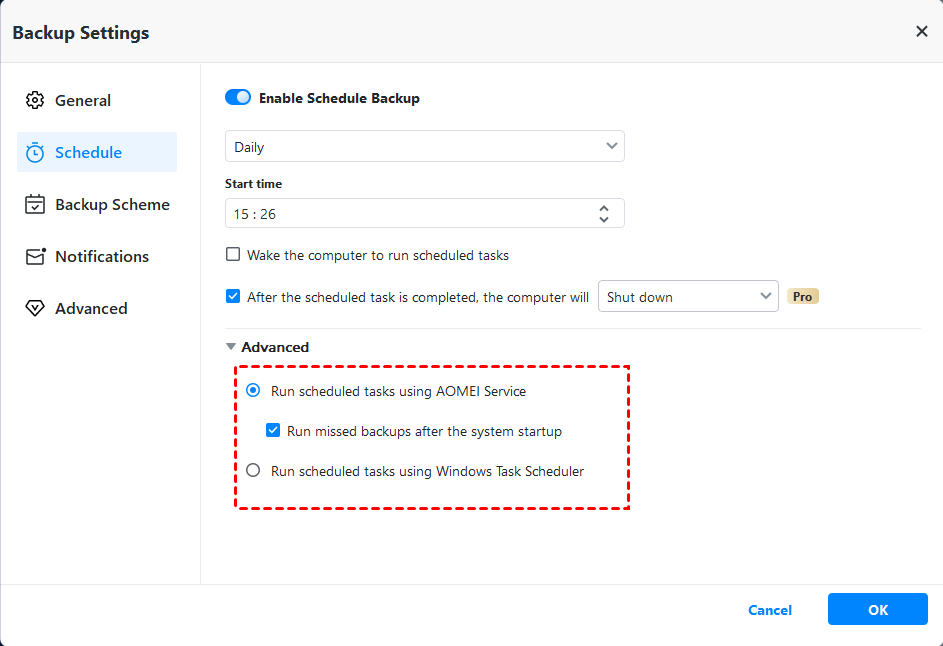
Schedule options include One Time/Daily/Weekly/Monthly/Event triggers, etc.
Options enables you to manage compression level, image splitting, comments, email notifications, etc.
Backup Scheme helps you to perform the scheduled differential backup and delete older backups automatically according to the rule you set up. Available in advanced editions.
Then, click Start Backup to execute the task.
Related information about backup and sync
>> Incremental and differential backup will back up only changed files and therefore save your time and space. But incremental backup is based on the last backup, full or incremental, and incremental backup is based on the last full backup.
When it comes to restoration, incremental requires the last full backup plus all the subsequent incremental backups in order, while incremental needs only the last full backup and the latest differential backup. As a result, incremental backup is faster in backup, and differential backup is faster in recovery.
>> Image backup and sync are both considered as backup in a broad sense. But the former will create a recoverable image file, and the latter will create an exact copy for direct access and use. If you want to save different versions of the source data, image backup in incremental mode is obviously the better choice.
Centrally perform incremental backup for multiple computers
If you have multiple computers that need backing up, especially if you are an enterprise user and need business backup software, AOMEI Cyber Backup is the best choice for you. It is a robust backup solution that allows users to backup multiple Windows physical machines from an easy-to-use console.
Also, it supports automated backup. Set up your backup scheduled once, it can automatically run backups (full backup/incremental backup/differential backup) daily, weekly, and monthly.
And it supports role-based management, which is helpful for enterprises. With an admin account, you can create more sub-accounts with different permissions for teamwork.
Now you can click the download button for a 30-day free trial without limits. Then we will guide you how to use this tool.
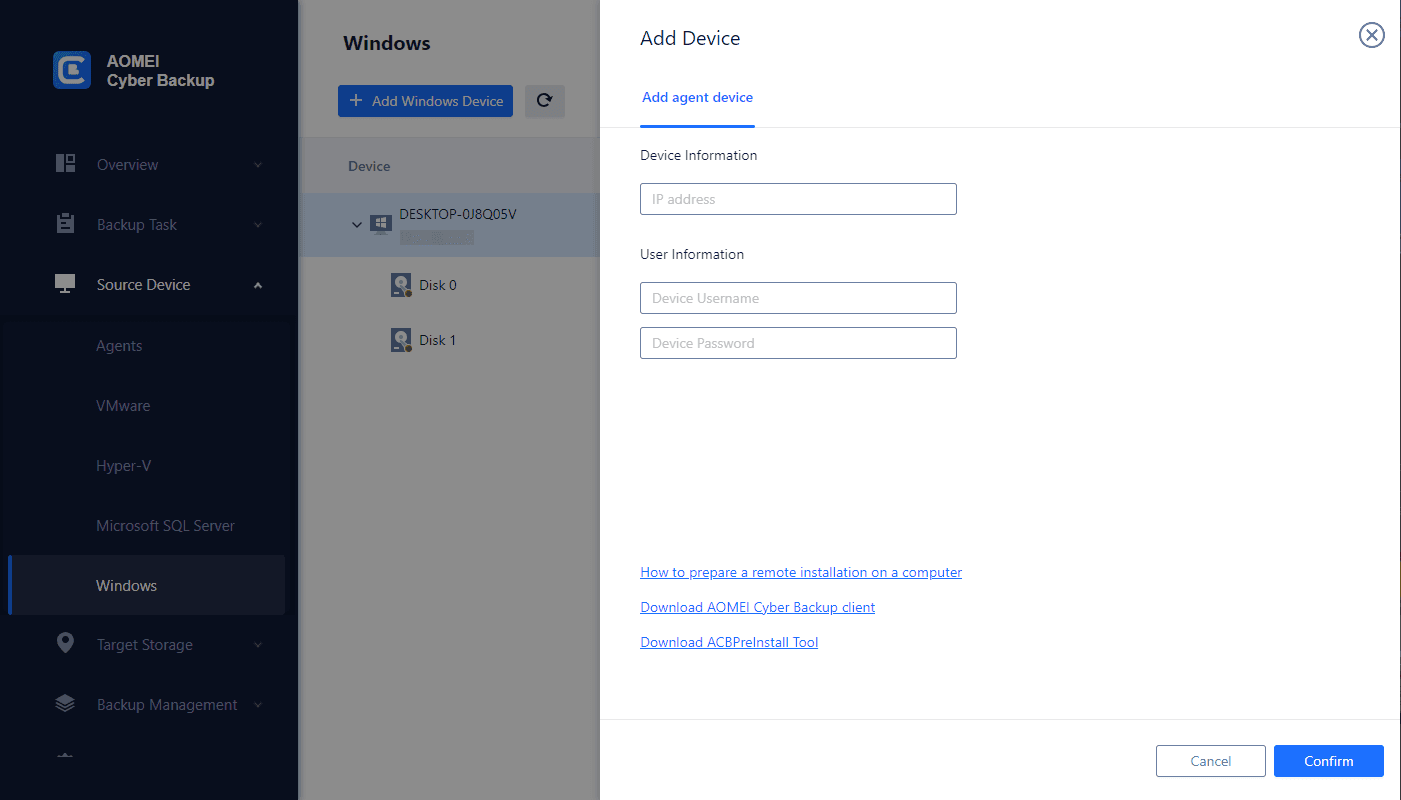
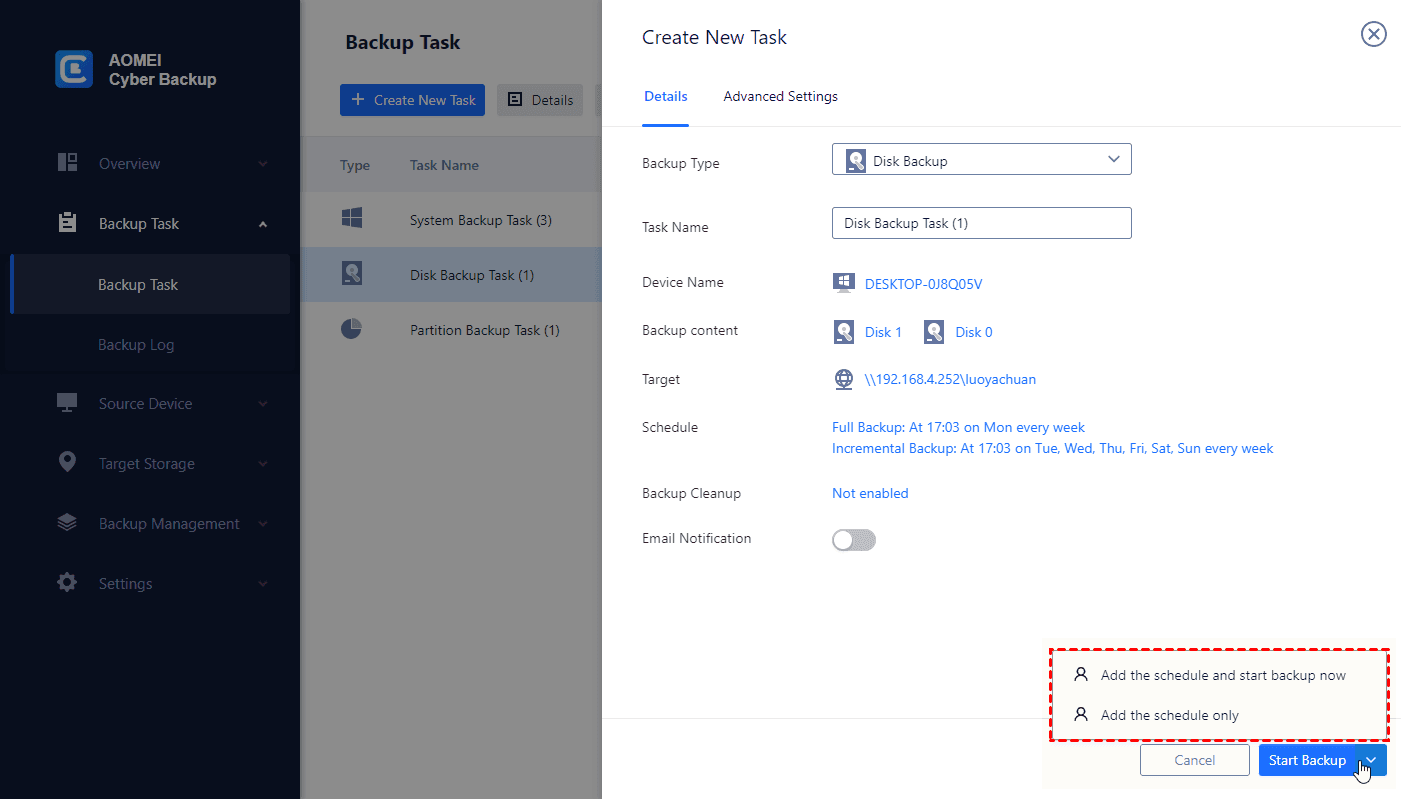
Step 1. Install AOMEI Cyer Backup Agent. Install and run AOMEI Cyber Backup on a computer. You can input "admin" as the username and password and log in. Click "Source Device" > "Windows" > "Add Windows Device". input IP address and user information to add a Windows computers.
Step 2. Click "Backup Task" > "Create New Task". Choose a Backup type. Give a device name, and choose content. And set up your backup schedule.
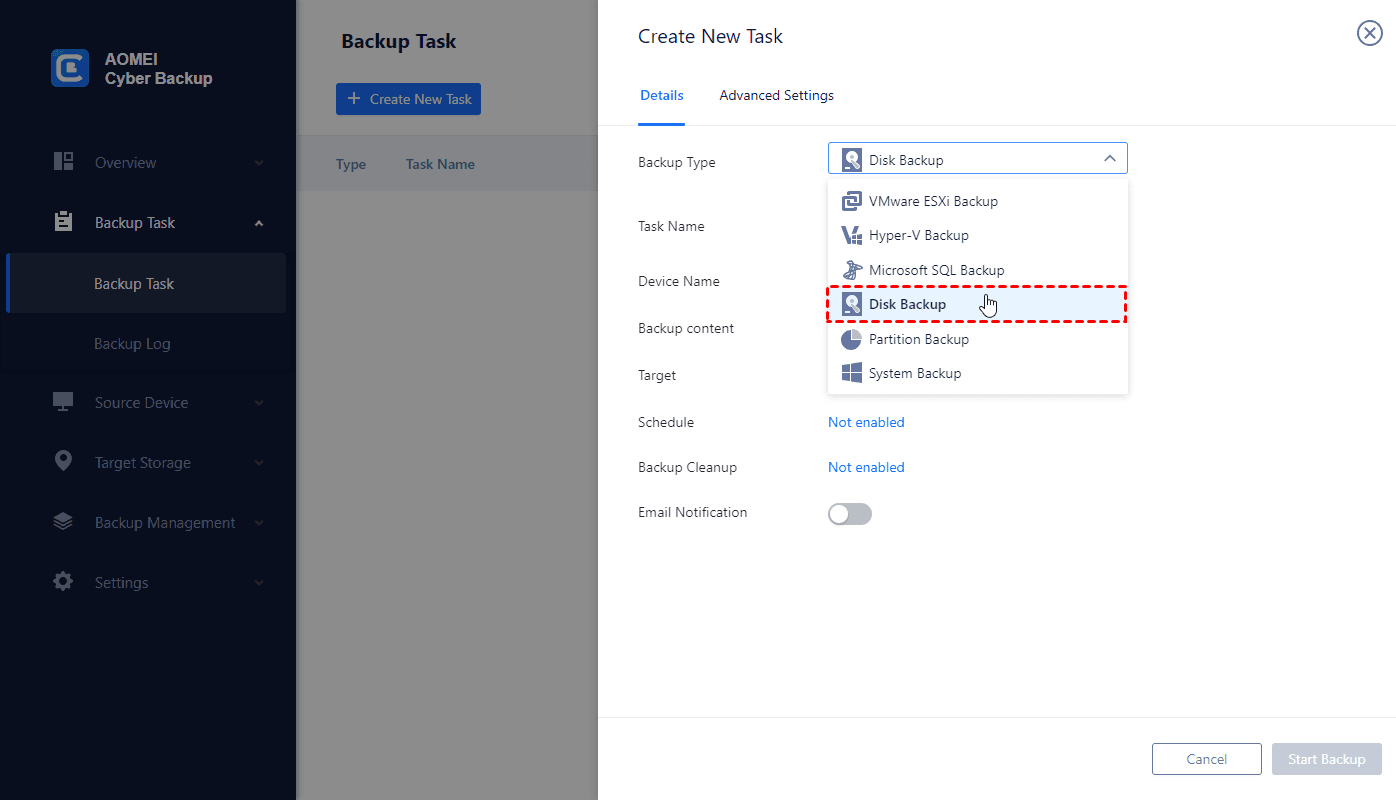
Step 3. Click the "Start Backup" button to execute. You can choose "Add the schedule and start backup now" or "Add the schedule only".
Conclusion
Robocopy performs incremental backup by default to copy only changed or newly added files. You can schedule it by additional parameters or Windows Task Scheduler. However, Robocopy doesn’t have recovery options to retrieve any of the older versions. If you don’t want to mess up the data nor lose some files irreversibly, it may be more reasonable to do an incremental backup with specialist software.
As an alternative, AOMEI Backupper could help you set up incremental or even differential backup with schedule. All your copies at different time points will be saved for future recovery. And if you want to do it in Windows Server, don’t worry, there’s also specialized Server edition.
FAQs about Robocopy Incremental Backup
1. How do I ensure Robocopy skips unchanged files?
2. What is the difference between /XO and /MIR in Robocopy?
/XO (exclude older) will skip files in the destination that are newer or the same as those in the source, copying only files that have been updated or are new in the source.
/MIR (mirror) not only copies new or changed files but also deletes any files from the destination that no longer exist in the source, ensuring an exact mirror of the source.
3. Does Robocopy support copying file permissions during an incremental backup?
4. How do I verify that an incremental backup with Robocopy was successful?
Robocopy provides a detailed log in the command output. You can use the /LOG or /LOG+ switch to save the log to a file:
robocopy C:\Source D:\Backup /E /XO /LOG:C:\BackupLog.txt
Review the log file to ensure that all expected files were copied and that no errors occurred during the process.

