How to Create a Seagate Cloud Backup Efficiently | Two Ways
Cloud storage services are becoming more and more popular, and creating a Seagate cloud backup has become an exclusive home cloud solution for many users. You can learn two ways to create Seagate cloud backup from this article.
By Yuka Updated on November 1, 2022
Overview of Seagate Personal Cloud
Seagate Personal Cloud home media storage allows you to create your own cloud that is accessible outside the home. You can organize all your family’s photos, videos, music and important documents in one secure central location on your home network. Meanwhile, you can back up not only all your PCs and Macs, but your cloud services as well.
If going out, users can also safely retrieve and share the content stored in the Seagate Personal Cloud through the Seagate Media app, Users can directly browse and use the content in the personal cloud in the same way as they do at home.
Why Need Seagate Cloud Backup?
According to the 3-2-1 backup strategy, we know that it’s better to keep at least 3 copies of your data, 2 for different storage devices, and 1 for offsite. Offsite means backing up data to a remote location such as a cloud drive or NAS.
Cloud storage services are becoming more and more popular, it can load and store your favorite music, movies and everything you want to back up. In the age of information, transmission speed, data security and privacy issues have also been raised to a new level. Many users want to have their own dedicated cloud data storage. Seagate Personal Cloud has become the choice of many people. It has many pre-loaded tools that can help people back up their data, such Seagate Dashboard, Backup Manager, etc.
So why need we back up to Seagate Personal Cloud? Here I list some reasons:
▶ Personal Cloud can automatically and continuously back up every PC in the home wirelessly.
▶ After creating a Seagate cloud backup, you can download Seagate Media app on your phone, then you can manage the files stored on the hard disk outside of your home, such as downloading, deleting, copying, moving, sharing, etc.
▶ Personal cloud data does not need to be attached to the server, and users will not be unable to use the data because the server is shut down. The cost is much lower than the use of server storage, but the efficiency is much higher than the latter.
Way 1: How to Create a Cloud Backup Using Seagate Dashboard
Seagate Dashboard is a free automatic backup software that can be pre-loaded on every Seagate Backup Plus and Seagate Central hard drive. You can protect, share and save files, software, and backup systems as needed. Here I will show you how to create a cloud backup of your PC using Seagate Dashboard.
Notes✍:
◉ Before backing up the contents of your computer to your Personal Cloud, it is recommended that you connect your computer directly to the router instead of using a Wi-Fi connection. Wi-Fi speed is not suitable for copying a large number of files. After you create the first backup, you can back up subsequent changes via Wi-Fi.
◉ If you choose to backup more data than the capacity in the cloud account, the backup will fail.
Step 1. Connect your Seagate Personal Cloud to your computer.
Step 2. Launch Seagate Dashboard. Click on the PC backup button.
.png)
Step 3. Press New Backup Plan button.

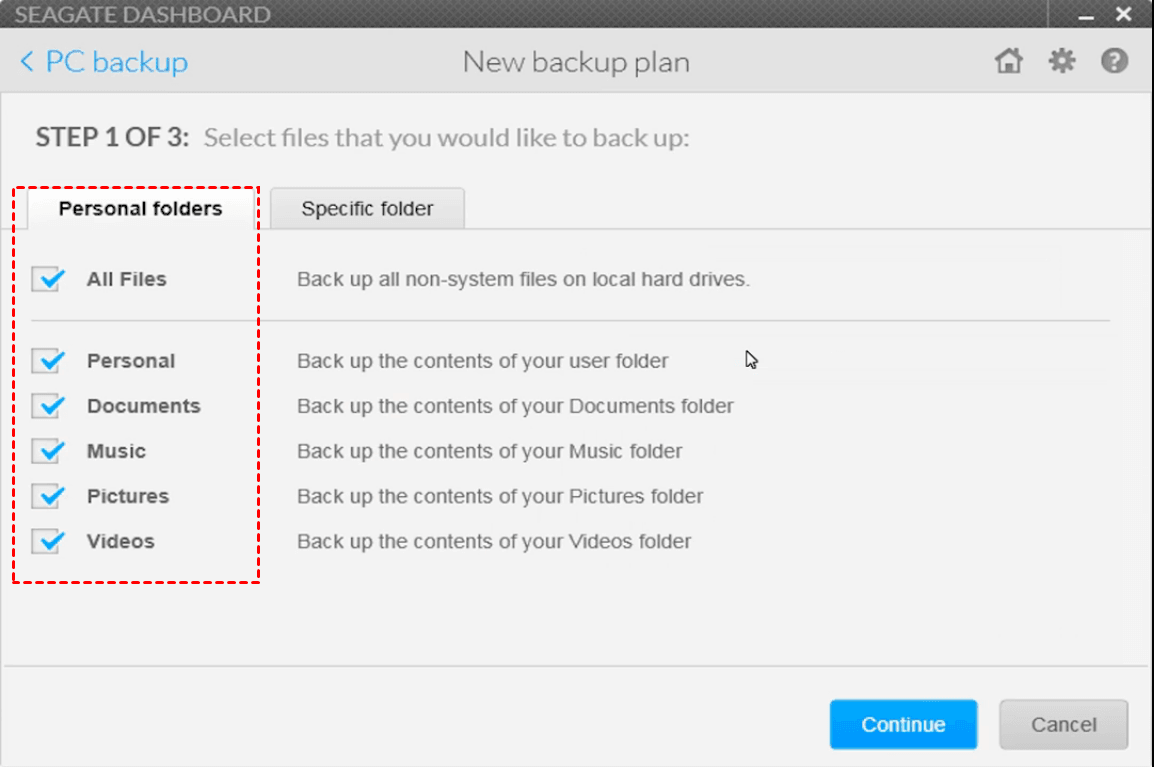
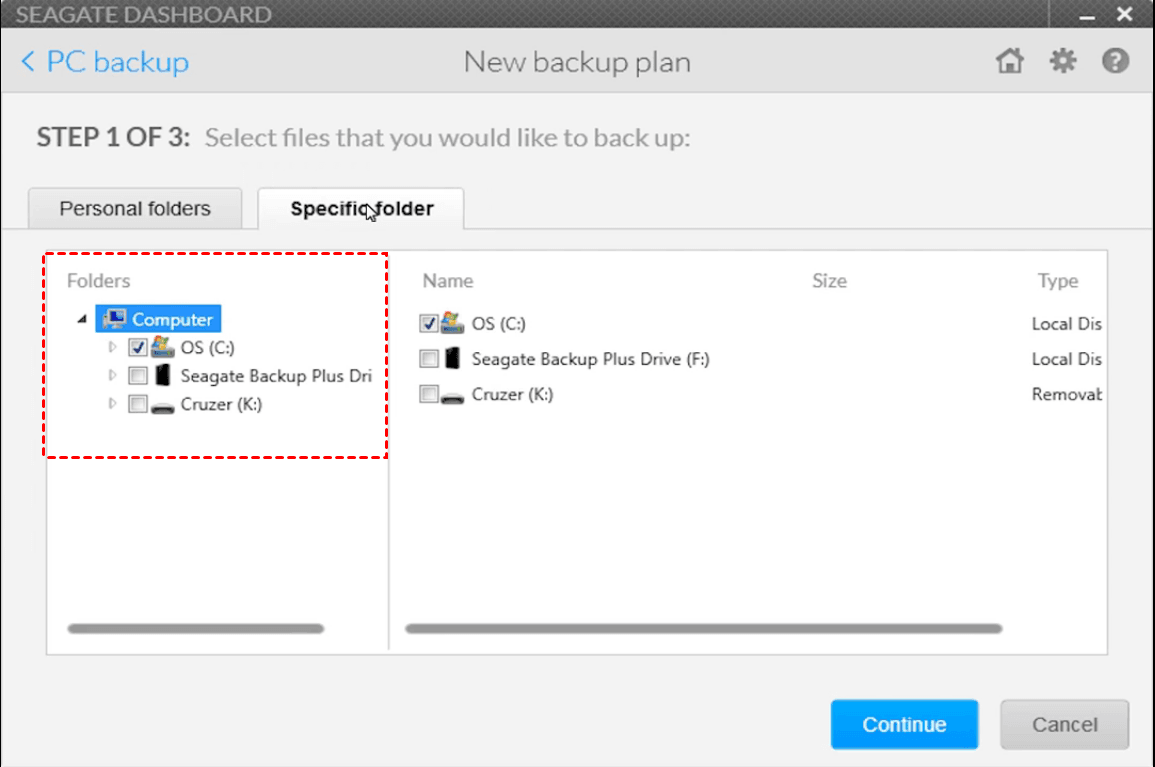
Step 4. Select files that you would like to back up. Under Personal folders, you can back up all non-system files on local hard drives. If you want to select an individual folder or a sub-folder, click Specific Folder.
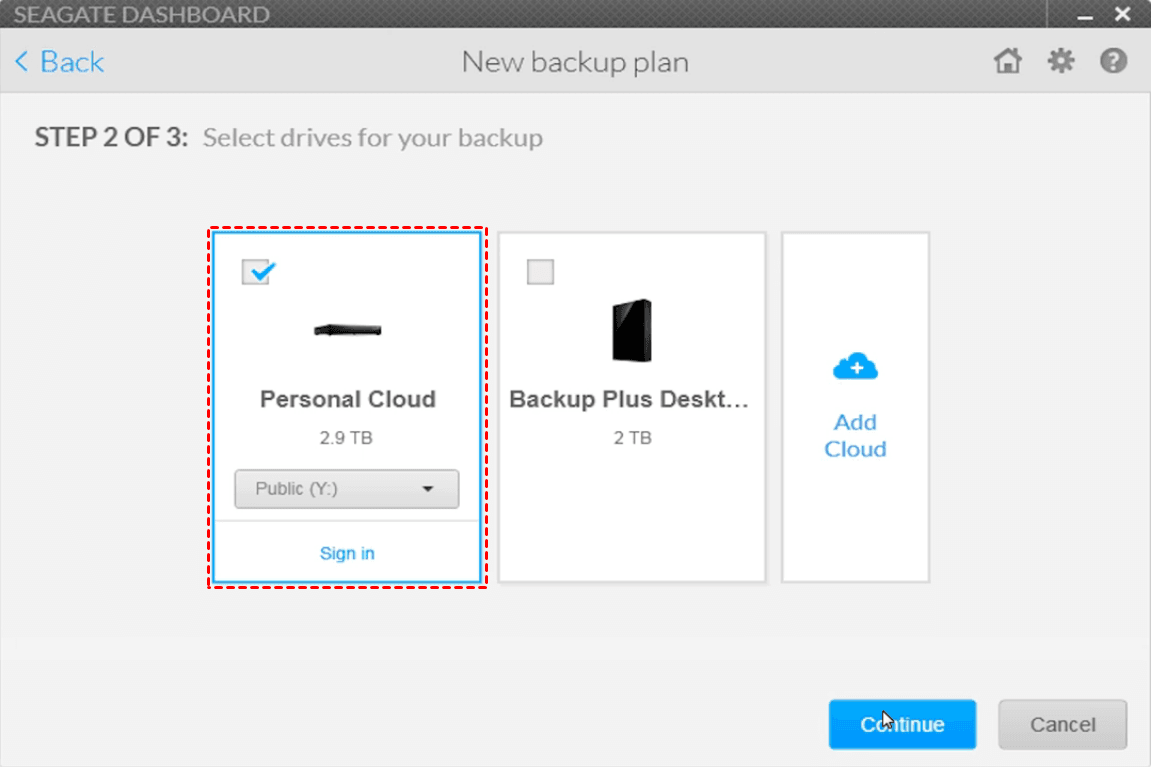
Step 5. Select destination for your backup. By default, the Personal Cloud will store your backup to Public folder. If you want to select a Private folder, please sign in to the folder. Then click the Continue button.
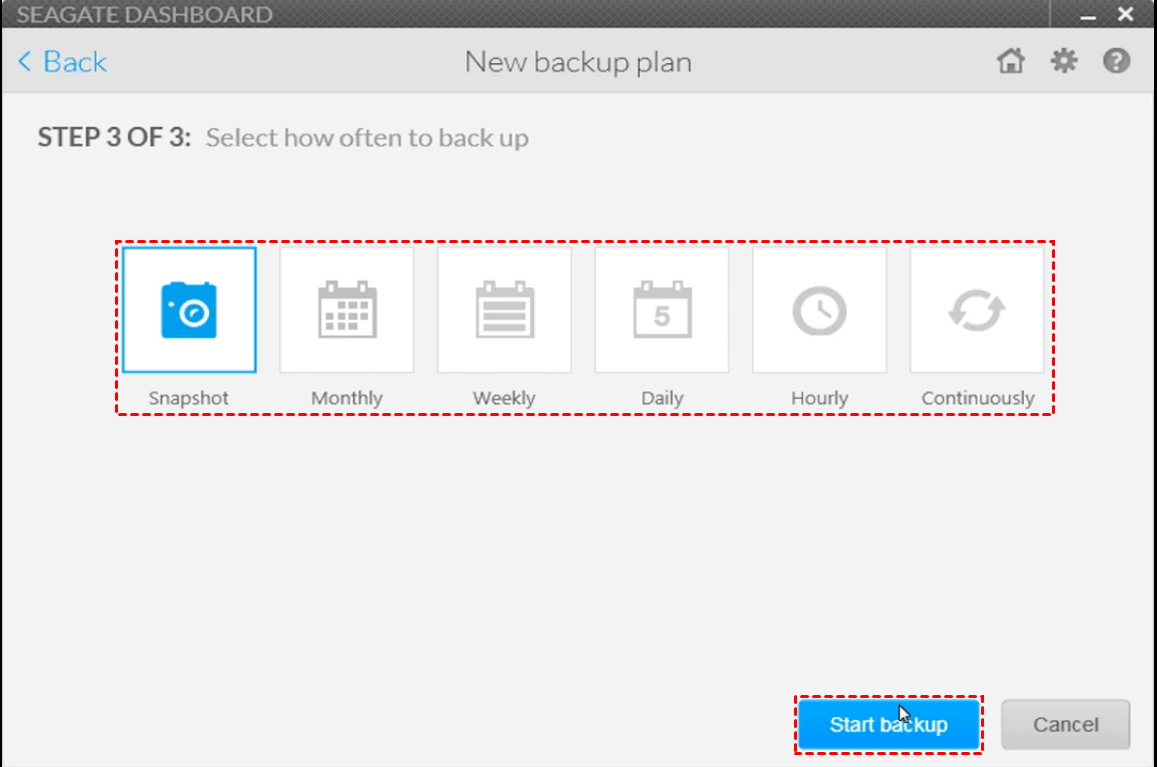
Step 6. Select the frequency you plan to run. You can choose Snapshot, Monthly, Weekly, Daily, Hourly or Continuously. Then click Start Backup.
Helpful Tips:
✯ Snapshot: one time backup of all your selected files and is very useful if you want to manage the scheduling of your backups manually.
✯ Continuously: any time a file is changed or added to your computer it will be automatically back up to your destination drive.
Way 2: Reliable Seagate Cloud Backup Software—AOMEI Backupper
Although you can use the pre-installed software to complete the backup to the Personal Cloud, there are some Seagate Dashboard not working problems that you might encounter when you are using Dashboard. And the software itself has some inherent limitations. For instance, you cannot use the Seagate Dashboard to configure which drives or folders are included in the backup. When you delete old backups using Seagate Dashboard, it will delete all of your backups and will not keep one for you.
The easier way to solve these problems is to find a free alternative—AOMEI Backupper. It is professional Windows backup and restore software that comes with many powerful features, including Backup, Sync, Restore, Clone, etc. With its Sync feature, you can perform Basic Sync to synchronize PC files/folders to other locations, such as an external hard drive, NAS, or removable USB flash drive, etc.
Here I will show you how to create a Seagate cloud backup using this reliable software. First of all, download and launch AOMEI Backupper.
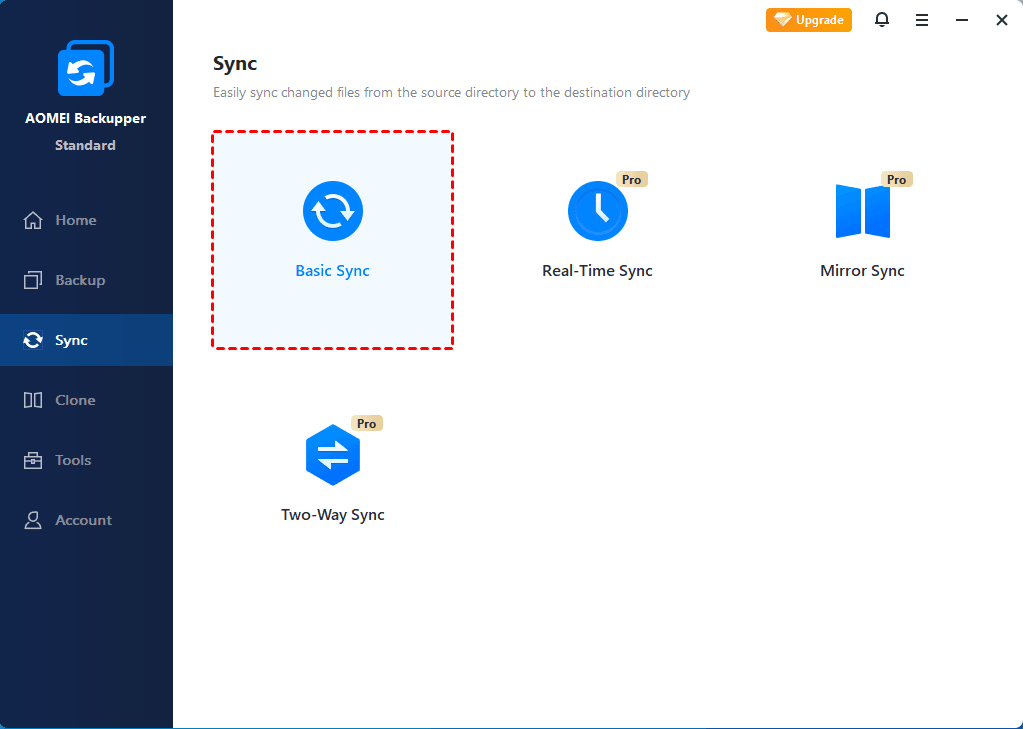
Step 1. Click the "Sync" tab on the left sides and then select "Basic Sync".
Tips✍:
There are 3 different sync solutions after you upgrade to advanced version you may be interested in. If they fit your needs more, please consider upgrading to Profession Version.
Real-Time Sync: it allows you to automatically real-time monitor the source directory needing sync. If there’s any change happens to any files or folder in source directory, the program will sync them immediately and real-time backup your data.
Mirror Sync: this type of synchronization always maintains the files in the same between the source and destination directory. Any changed files in destination will be removed.
Two-Way Sync: simply put, any changes in the source or destination directory will be synced with each other when you run the Two-Way Sync task.
Step 2. Click "Add Folder" to select the folder which you want to synchronize.

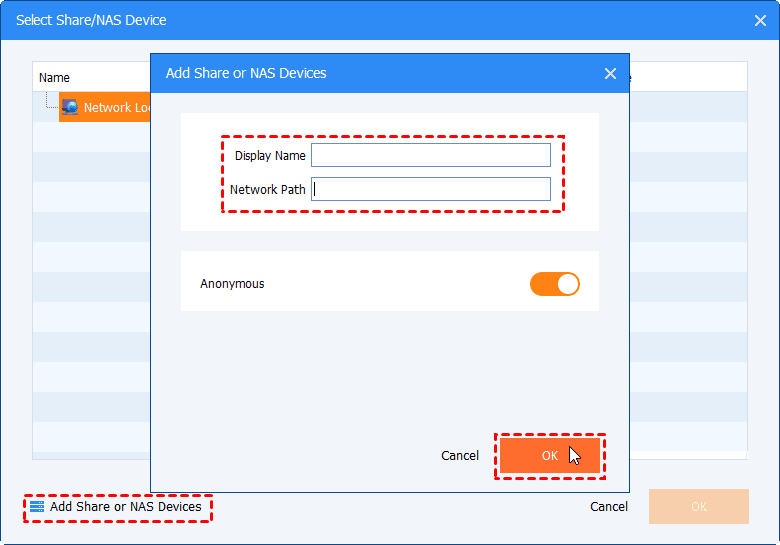
Step 3. Click the inverted triangle icon at the second bar > Select a network location > Add Share or NAS Devices > input the IP address of the NAS drive (Network Path) and click OK to select the NAS.
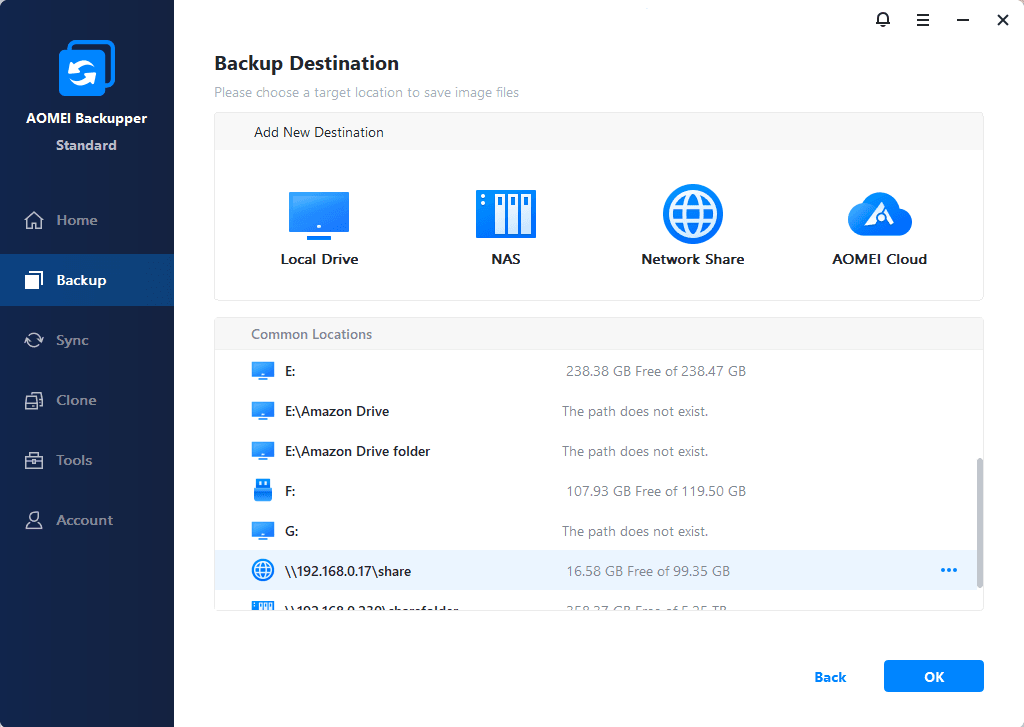
Step 4. Click the network path of your Seagate Personal Cloud, and all the shared folders will be listed in the box. Select one folder as the destination folder and click OK.
Step 5. If you want to sync folders automatically, here you need to click Schedule in the bottom. You can set the sync frequency here, including daily, weekly, or monthly. If you want to sync folders based on event triggers, or USB plug in, please upgrade to Professional version.

Step 6. After setting up a schedule, click Start Sync.
Note: By default, Basic Sync option only sync newly added files and changed files of this task to destination directory. If you want to sync the deleted files automatically, please enable the option "sync deletions in source directory to destination".
Conclusion
Although backup was once expensive and complicated, the cost and difficulty of backup have been greatly reduced. Creating a Seagate cloud backup seems to be one of the best solutions to prevent files from being damaged because of unexpected accidents.
You can learn two ways to back up your data to Personal Cloud by two ways from this article, one is through Seagate Dashboard backup feature, the other is through the synchronization function of AOMEI Backupper with ease. After creating a cloud backup, you can browse your files by downloading Seagate Media app on your phone.
More powerful functions are waiting for you to discover in the reliable AOMEI Backupper software, such as Synology file recovery, all brands of disks clone. Try it at once!

