How to Migrate DHCP Server from 2012 to 2022 | Full Guide
If you are looking for a way to migrate DHCP from 2012 to 2022, read this article to get the answer.
By Lily Updated on August 28, 2025
User case: How to move DHCP from 2012 to 2022
"Hi,
In my organization we are planning to migrate DHCP servers from Windows Server 2012 to 2022. In few domains DHCP server configured HA and few domains only one DHCP server. Could you please assist the best way and steps to migrate DHCP servers from 2012 to 2022? Thanks in advance!"
– Microsoft Community
It is a common case that your organization wants to upgrade server hardware or operating systems. During server migration, DHCP migration plays an important role. How to migrate DHCP server easily and securely? Please move on.
If you are looking for how to upgrade Windows Server 2012 R2 to 2022, please continue to read this article to get a complete guide. Read more>>
How to migrate DHCP from 2012 to 2022 easily
In this part, I'll show you the detailed steps to migrate DHCP server from 2012 to 2022. You can also follow these steps to migrate DHCP from 2012 to 2019, 2012 R2 Standard to 2022, etc.
👉 Before migration
👉 DHCP migration 2012 to 2022🔥
👉 After migration
👉 Troubleshooting common DHCP migration issues
👉 Recommend: Backup Windows Server with best Server backup software🔥
Before migration
Before migration, you need to export DHCP configuration from Server 2012 and install the DHCP role on Server 2022. Follow the instructions below:
★ Export DHCP configuration
1. Log in with an administrator account to Windows Server 2012.
2. Open Powershell and then type in the following command:
Export-DhcpServer -File [string] -Leases -Force -ComputerName [servername.domainname.com] -Verbose
E.g.:
Export-DhcpServer -File C:\DHCPdata.xml -Leases -Force -ComputerName server2012.lab.com -Verbose
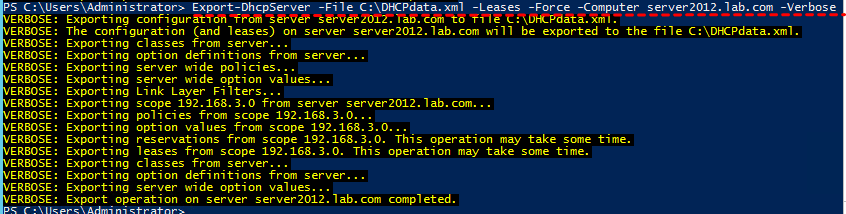
3. Copy the file C:\DHCPdata.xml to Windows Server 2022.
★ Install DHCP role
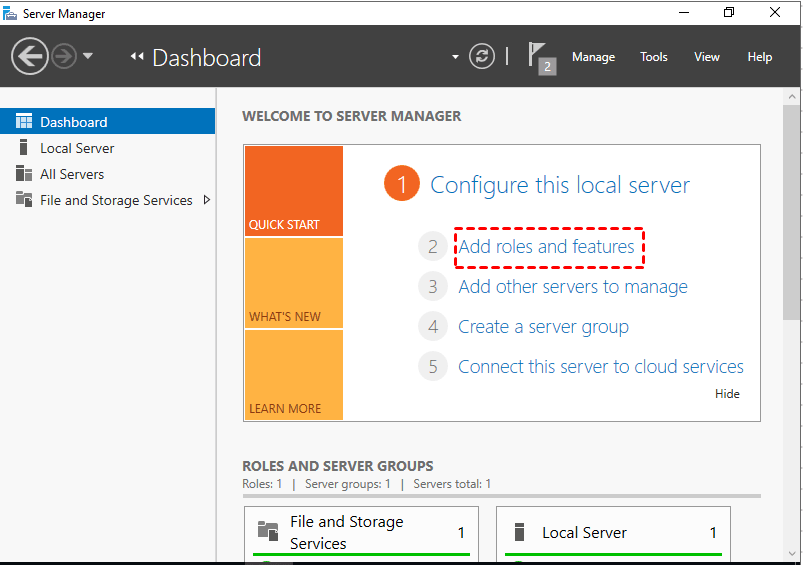
1. On Server 2022, open Server Manager, then choose Add Roles and Features.
2. When the Add Roles and Features wizard opens, click Next.
3. Select Role-based or feature-based installation and click Next.
4. Select a Host to which you'd like to add services and click Next.
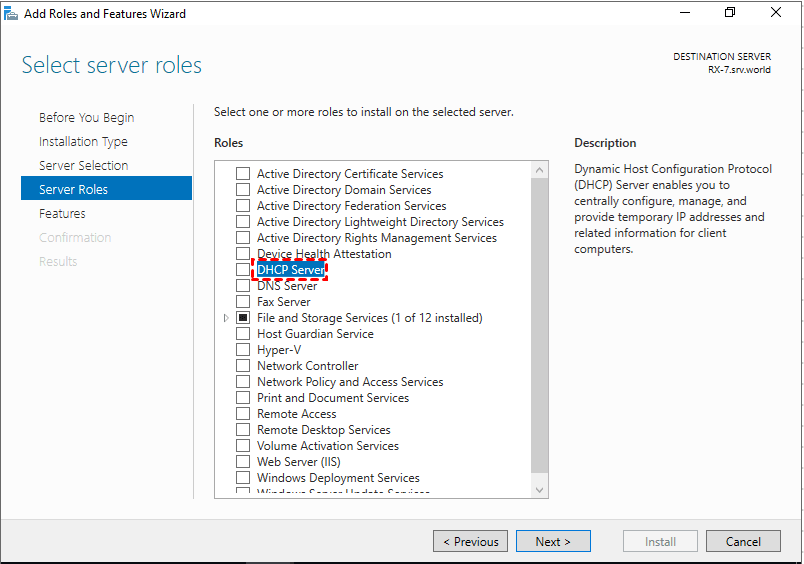
5. Select the DHCP Server role for installation. In the pop-up window, click Add Features to add required features to manage DHCP server properly. Click on Next.
6. On the Features console, just click Next.
7. On the DHCP Server console, read brief information about DHCP server and click Next to continue.
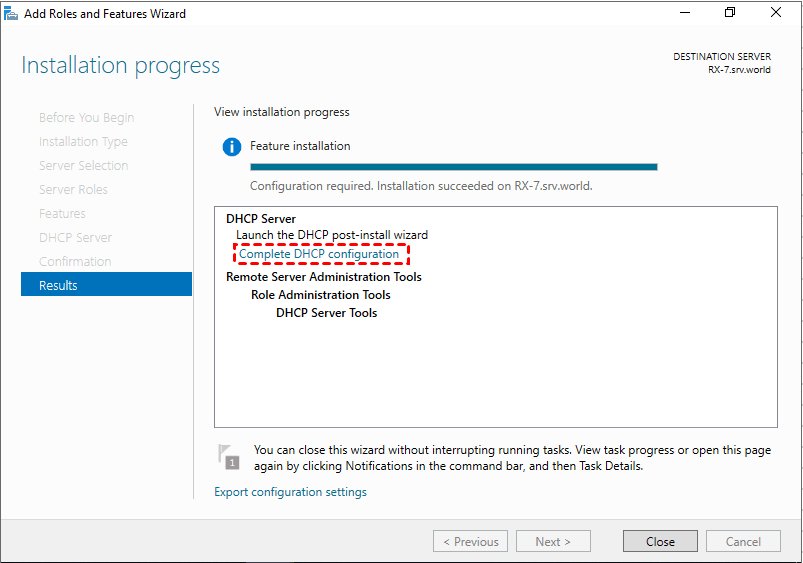
8. Click on Install to start the installation process.
9. Once installation completes, click on Complete DHCP configuration link to start the DHCP Post-Install wizard.
10. On the Description screen, click Next.
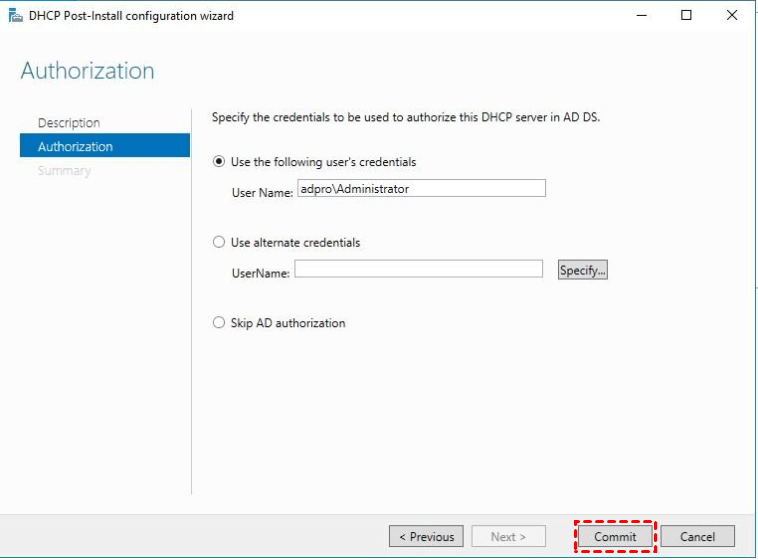
11. On the Authorization page, use AD credentials if the server is joined to the domain. Choose Skip AD authorization if the DHCP server is standalone and not joined to the domain. Then click Commit.
12. On the Summary page, click Close.
DHCP migration 2012 to 2022
Now you can import DHCP configuration on Server 2022 using the following steps:
1. Start the DHCP service on Server 2022 by navigating to Start > Administrative Tools > Services > DHCP Server.
2. Open Powershell and then type in the following command:
Import-DhcpServer -File [string] -BackupPath [string] -Leases -ScopeOverwrite -Force -ComputerName [servername.domainname.com] -Verbose
E.g.:
Import-DhcpServer -File C:\DHCPdata.xml -BackupPath C:\DHCP\ -Leases -ScopeOverwrite -Force -ComputerName server2022.lab.com -Verbose

3. Restart the DHCP service.
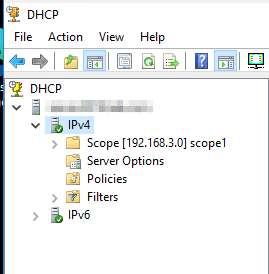
4. Verify your DHCP scope, IP leases, reservations, etc and they should match with DHCP Server 2012.
Note: To migrate DHCP to new server with the same IP, you just need to re-IP the older DHCP server and then re-IP the new DHCP server to have the original IP when the migration is ready. It is recommended to reboot the new server to avoid SPN issues when connecting to the new server.
After migration
Go back and stop the DHCP services on the old server once you have authorized your new DHCP server. For testing, you can reboot a few workstations and examine the updated lease information to ensure that they are receiving DHCP information from the new server.
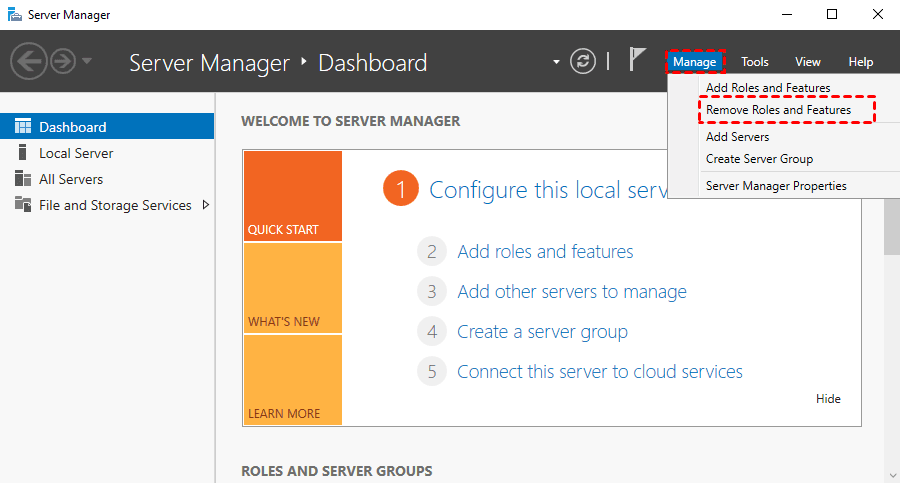
You are able to remove the role from the previous server once you have verified that devices are successfully receiving leases from your new DHCP server. Select Manage in the upper right corner of Server Manager, then select Remove Roles and Features. The DHCP role will be removed from the server if you uncheck it.
Troubleshooting common DHCP migration issues
Migrating a DHCP server from Windows Server 2012 to 2022 can be a seamless process. In case you encounter some issues during the migration process, follow the practical steps here to troubleshoot them.
Missing DHCP Scopes After Migration❓
One of the most frequent issues is that some or all DHCP scopes might not appear after importing the database into Windows Server 2022. This can happen if the export process from Windows Server 2012 wasn’t completed properly or if there were errors during the import.
🎯 Solution:
- Redo the Export and Import Operation: Check if the export file has been corrupted. If so, re-export DHCP configuration from Server 2012 and import it on Server 2022 again.
- Manual Scope Creation: If certain scopes are still missing, you may need to manually recreate them using the DHCP Manager interface or PowerShell commands to ensure all scopes are migrated correctly.
Permission and Authorization Problems❓
After the migration, you might encounter issues where the new DHCP server is not authorized to issue IP addresses. This often happens if the DHCP server isn’t properly authorized in Active Directory or if there are permission conflicts.
🎯 Solution:
- Authorize the DHCP Server: Ensure that the new DHCP server running Windows Server 2022 is authorized in Active Directory. You can do this by:
- Opening DHCP Manager.
- Right-clicking on the DHCP server name and selecting Authorize.
- Verifying that the server is authorized by checking the status in the DHCP Manager console.
- Check Active Directory Permissions: The DHCP server needs sufficient permissions to operate within the network. Verify that the service account running DHCP has appropriate permissions in Active Directory.
- Verify Scope and Lease Permissions: Ensure that permissions to manage specific scopes and leases have been properly assigned during the migration. If permissions are missing, reconfigure them in the DHCP Manager interface.
Recommend: Backup Windows Server with best Server backup software
Windows Servers are frequently used to store data, applications, configurations, and settings that are necessary for business operations. By regularly backing up your data, you can protect it from ransomware attacks, accidental deletion, hardware failure, software corruption, and other disasters. Then, how to backup Windows Server? Reliable backup tools are needed.
1. AOMEI Backupper Server
The best server backup software for Windows Server 2025/2022/2019/2016/2012 (R2), AOMEI Backupper Server, provides complete backup solutions:

- Backup source: You can backup files on Windows Server, as well as backup server OS, disks, or partitions, as per your need.
- Backup destination: Various backup devices are supported, including local disk, external hard drive, network share or NAS device, etc.
- Automatic backup: You are able to schedule automatic backup in Daily (By Interval), Daily, Weekly, Monthly (By Week), Monthly (By Date), One Time, and Event triggers mode.
- Backup retention policy: You can have old backups deleted automatically following the selected cleanup rule.
Don’t hesitate to download AOMEI Backupper and install it on your server system. Then learn how to backup server OS using AOMEI Backupper below.
Step 1. Run this program, click Backup and then choose System Backup.

Step 2. The required system partitions are selected by default. You just need to select a destination path to store the backup image.

Step 3. Review your operation and then click Start Backup to begin creating a system image in Server 2022/2019/2016/2012.

2. AOMEI Cyber Backup
AOMEI Cyber Backup, the best enterprise backup software, provides a convenient and reliable solution for centralized backup management of all Windows operating systems.
- It enables you to create system/disk/partition backup for client PCs and Servers, supporting Windows 11/10/8.1/8/7 and Windows Server 2022/2019/2016/2012 (R2)/2008 (R2).
- You are allowed to save backup images on a local disk, external hard drive, network share or NAS device, etc.
- You can schedule a backup task to run daily/weekly/monthly using the full/incremental/differential backup method.
Don’t hesitate to download it to have a try!
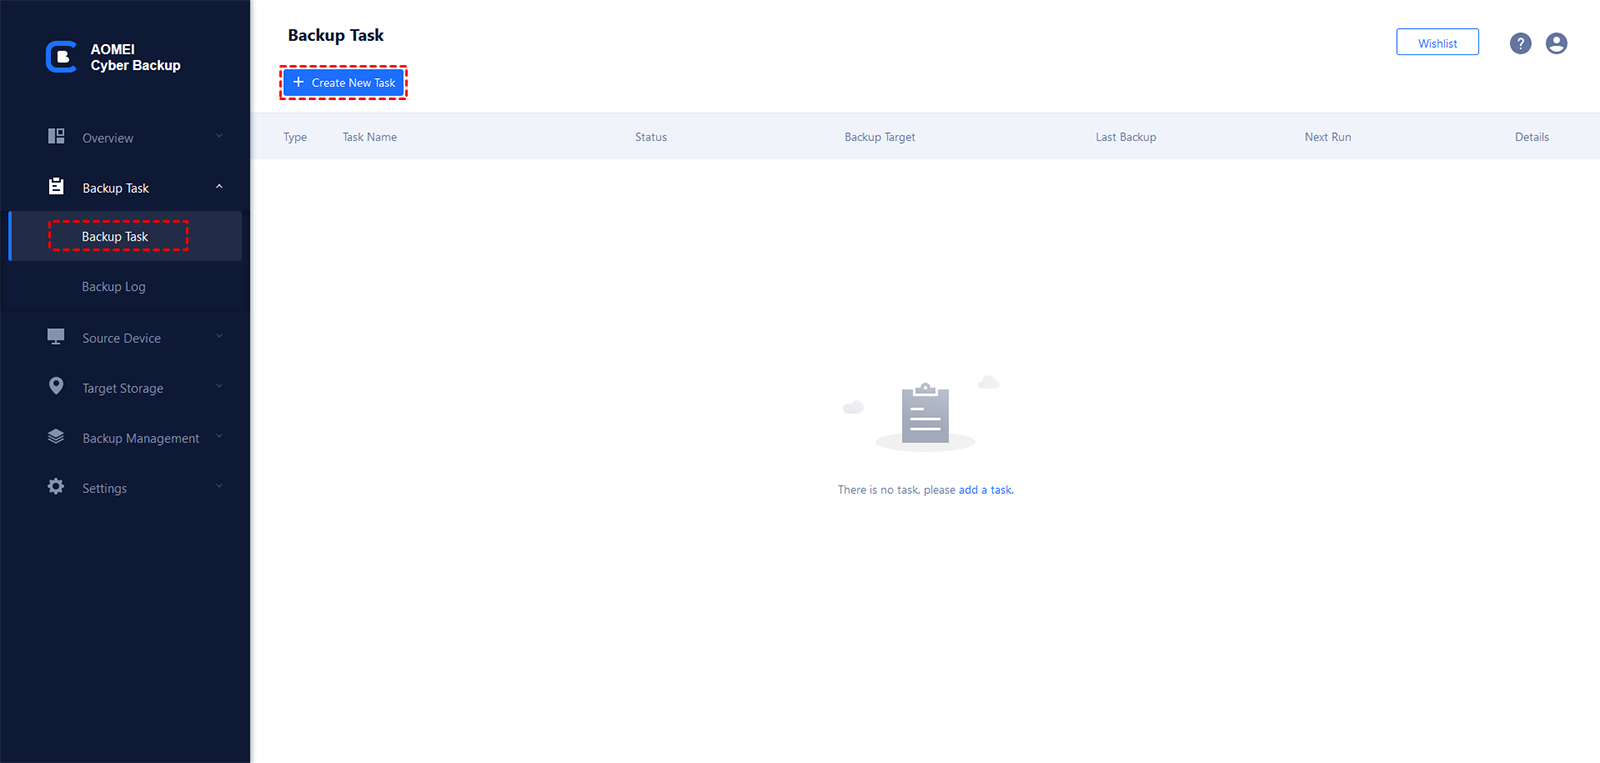
To make backups for client computers, just log in AOMEI Cyber Backup, and add the Windows Server device that you want to backup. Then click Backup Task on the left menu bar and select Backup Task > Create New Task.
Note: AOMEI Cyber Backup can not only help you backup physical machines but also virtual machines. It enables you to backup VMware and Hyper-V easily.
🔥 Hot: Windows Server 2025 now available
Windows Server 2025 was officially released on November 1, 2024, bringing several exciting updates. Here are some of the key highlights:
-
Desktop Shell: The first time you sign in, the desktop shell adopts the sleek look and feel of Windows 11, offering a modern and familiar user interface.
-
Bluetooth Support: Windows Server 2025 now includes Bluetooth functionality, making it easy to connect and pair devices like mice, keyboards, headsets, and audio devices.
-
DTrace Integration: DTrace is now a native tool in Windows Server 2025, providing a powerful command-line utility for real-time system performance monitoring and troubleshooting.
-
Email & Accounts: You can now manage Microsoft Entra ID, Microsoft accounts, and Work or School accounts directly in Windows Settings under Accounts > Email & Accounts. However, note that domain joining remains necessary for most configurations.
If you'd like to experience all these wonderful features, you may make a Windows Server 2025 Media Creation Tool to install Server 2025 on a compatible device.
Verdict
You have learned a full guide of how to migrate DHCP server from 2012 to 2022. There are four main parts involved: export DHCP configuration, install DHCP role, import DHCP configuration and clean up. It is recommended that you perform a backup of your server using AOMEI Backupper in order to safeguard the valuable business data on Windows Servers. It has everything you need for backup. In addition, it is a potent cloning program that lets you clone C drive in Server 2019. Simply give it a try!
FAQs about DHCP Server Migration
#1. Can you in place upgrade a DHCP server?
Yes, it is possible to perform an in-place upgrade of a DHCP (Dynamic Host Configuration Protocol) server. The process may vary slightly depending on the specific operating system and DHCP server software you are using, mainly includes: backup configuration > check system requirements > download and install new version > perform an upgrade.
#2. What precautions should I take before starting the migration process?
Backup the DHCP configuration on the source server and ensure you have a rollback plan in case of issues during migration.
#3. Can I roll back the migration if something goes wrong?
Yes, if you encounter major issues during migration, you can roll back to the old Windows Server 2012 machine by re-enabling the DHCP role on it and disabling the role on Windows Server 2022. Make sure to have a backup of the DHCP database in case you need to restore settings.
#4. Do I need to update client settings after migration?
No, clients should not require any reconfiguration after the migration, as long as the DHCP scopes and IP ranges remain the same. Clients will automatically obtain IP addresses from the new server once the migration is complete.

