How to Reimage Your Computer in Windows 7/8/10
This article is written for users like you who want to reimage your computer in Windows 7/8/10. Scroll down to learn detailed steps.
by Lily Updated on April 7, 2024
When do you need to reimage your computer Windows 7/8/10?
Reimaging computer means deleting all the data on the computer, similar to restoring computer to factory settings. When you have the following situations, you can reimage your computer Windows 7/8/10.
1. When you feel your computer is extremely tardy or it is not running well as it should be.
2. When there is something wrong with your Operating System, you cannot even load Windows.
As mentioned above, reimaging a drive can be done quite simply and quickly, but it is a very serious and destructive process to any data on the computer. When reimaging a hard drive, everything will be overwritten on the hard drive. All personal data and programs will be gone with nothing saved. Personal data should be backed up in advance in case that there is any problem occurs when you reimage your computer in Windows 7/8/10.
👉 Backup files before reimaging Windows 7/8/10👍
👉 Reimage your computer in Windows 7
👉 Reimage your computer in Windows 8/10
Backup files before reimaging Windows 7/8/10
To backup files, it is recommended to use AOMEI Backupper Standard. It is a freeware which allows you to create backups with more options. It supports to create system backup, disk backup, partition backup, file backup. You can create backup to external hard drive, cloud drive, NAS, etc. Unlike Windows built-in backup tool, this software supports any File System detected by Windows instead of only NTFS.
To backup files, download AOMEI Backupper Standard, click Backup and select File Backup on the main page, then follow the wizard to complete the process. If you want to backup files to AOMEI Cloud, choose Cloud Backup here.

When the backup is complete, you can also create a bootable rescue media using CD or USB drive in order to protect your computer from boot errors.

Reimage your computer in Windows 7
To reimage windows 7 is different from that of Windows 10/8, because there is no option for you to reset or refresh this PC. You should resort to installation disc. Download Windows 7 ISO to create one. You can create it either on a USB drive or a CD. If you do not want to use CD, you can create it on USB drive.
After preparing the backup and installation USB drive, you can get started. Let’s see how to reimage a computer without disc.
1. Connect the installation USB drive and change boot order to allow your computer to boot from the installation media.
2. After Windows Setup is loaded, press the F8 key to accept the Windows license agreement.
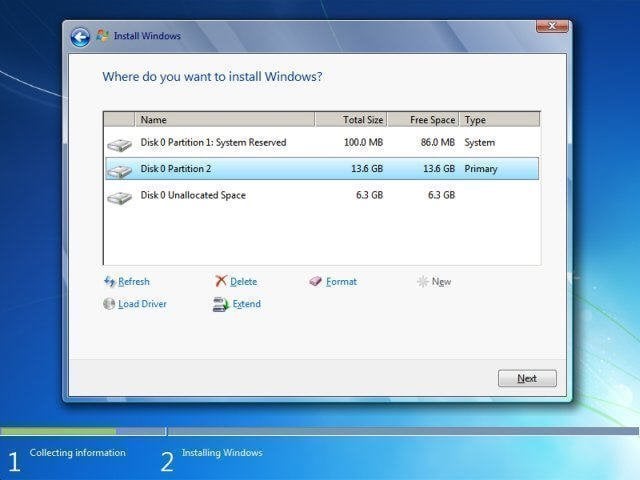
3. At the “Where do you want to install Windows” screen, click the hard drive partition that you want to reimage and then click the Delete button.
Tip: You can also press Shift + F10 key combination to use Diskpart to clean hard drive. Type the following command:
-
Diskpart
-
list disk
-
select disk [disk number]
-
clean all
-
exit
4. The hard drive will be shown as unallocated, and then you can click Next to start reinstalling Windows. You can also create partitions before installing Windows.
Usually, it will take about half an hour to reimage your computer. After that, you will need to install all the software you like to use and restore your files back to your hard drive.
Reimage your computer in Windows 8/10
1. Click the Windows logo in the bottom-left corner of the screen. Select Settings, then Update & Security. Click the Recovery tab, then click Get started below “Rest this PC”.
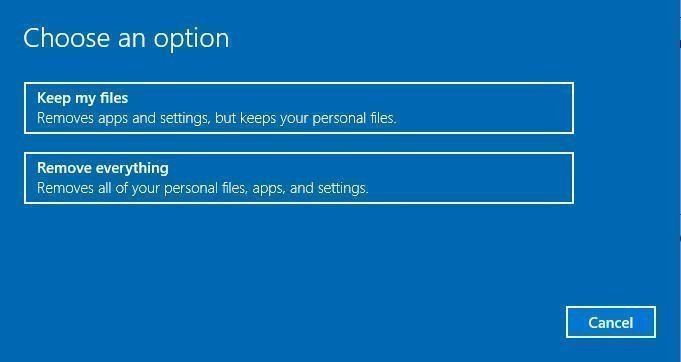
2. When a new window prompts, click Remove everything.
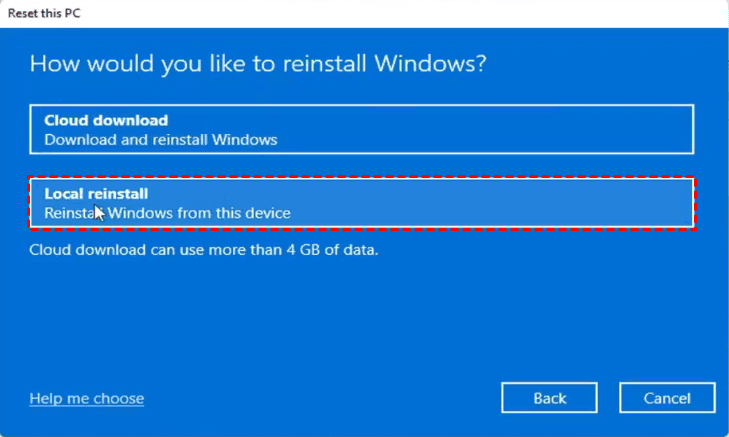
3. Click Local reinstall.
4. At the new prompt window, click Change settings. To completely erase your computer's hard drive and then reinstall Windows on it, please toggle on the button under "Clean data?". If you have more than one drive, you can toggle on the button under "Delete files from all drives?" to clear data on each drive.
5. Click Next when you see the summary of current settings.
6. Click Reset when prompted. Your computer will begin resetting itself.
Conclusion
No matter reimage your computer Windows 7/8/10 or reinstall your Windows and restore your computer to factory settings, it is recommended to backup your computer in advance in case there is data loss.
After reimaging your computer, you can also use AOMEI Backupper to make an image backup of the new system. With the image backup created, you can easily restore to the previous good state even when your computer is unable to boot.
If you want to protect unlimited computers within your company, you can pick AOMEI Backupper Technician. With the inbuilt AOMEI Image Deploy tool, you are also allowed to deploy/restore system image file on server-side computer to multiple client-side computers over network.

