How to Easily Disable Bitlocker Encryption in Windows 11 (8 Ways)
You can learn what is Bitlocker encryption and how to disable Bitlocker encryption in Windows 11 as well as a better way to password your file. Please read on.
By Clytze Updated on July 30, 2024
Need to Disable Bitlocker Encryption in Windows 11
BitLocker encryption is a means of protecting sensitive data on a drive using an encryption key in Windows. After encryption, the data on the drive can only be unlocked or decrypted and then accessed with a Bitlocker password or Bitlocker recovery key. It is a native security feature built into most versions of Windows PCs. For Windows 11, BitLocker encryption is only available for Windows 11 Professional, Enterprise, and Education editions.
To install Windows 11, enabling Secure Boot may have some unintended consequences - you may find that Bitlocker is automatically turned on and it will start encrypting your drive without your explicit permission. Many users will have questions like “can I disable BitLocker drive encryption”, “Can I cancel Bitlocker encryption”, etc? The answer is yes.
How to Disable Bitlocker Encryption in Windows 11
If you no longer need BitLocker, you can easily turn it off. Doing so will not delete or modify the data in your drive. But before you disable BitLocker, you need to unlock the encrypted drive first. Next, this article will introduce 8 ways to disable BitLocker encryption in Windows 11 in turn. Please read on.
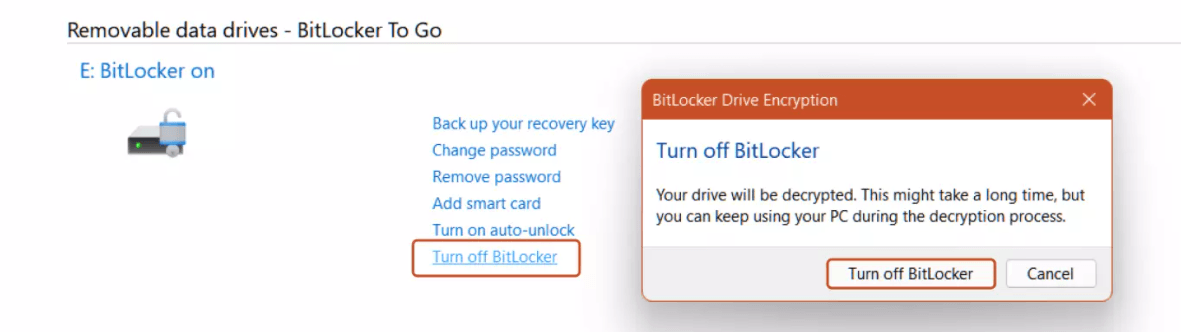
Way 1. Disable BitLocker Encryption by Control Panel
Step 1. Open the Control Panel from the Start menu.
Step 2. Click System and Security > BitLocker Drive Encryption Button.
Step 3. Click the Turn off BitLocker button.
Way 2. Disable BitLocker Encryption by Windows Services
Step 1. Press Win+R together to open the Run window, type services.msc and press the OK button.
Step 2. Scroll and double-click the BitLocker Drive Encryption Service option.
Step 3. To disable BitLocker encryption, set the startup type to Disabled and press the Apply button.

Step 4. Restart your computer to make changes take effect.
Way 3. Disable BitLocker Encryption by “This PC”
Step 1: Open the "This PC" app on your computer.
Step 2: Right-click the drive for which you want to disable BitLocker and select the Manage BitLocker option.
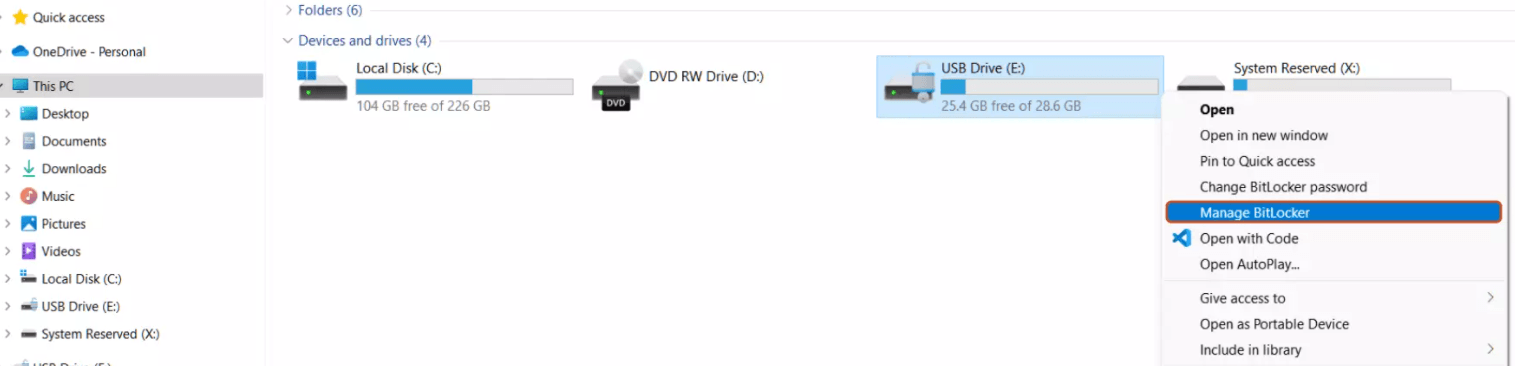
Step 3: Click the Turn off BitLocker button.
Way 4. Disable BitLocker Encryption by System Configuration
Step 1. Open the Run window, input msconfig, and hit the enter key.
Step 2. Select the Services tab from the top bar, uncheck the BitLocker Drive Encryption Service and click the Apply button.

Step 3. Restart your computer and the next time, the BitLocker Encryption Service will be disabled.
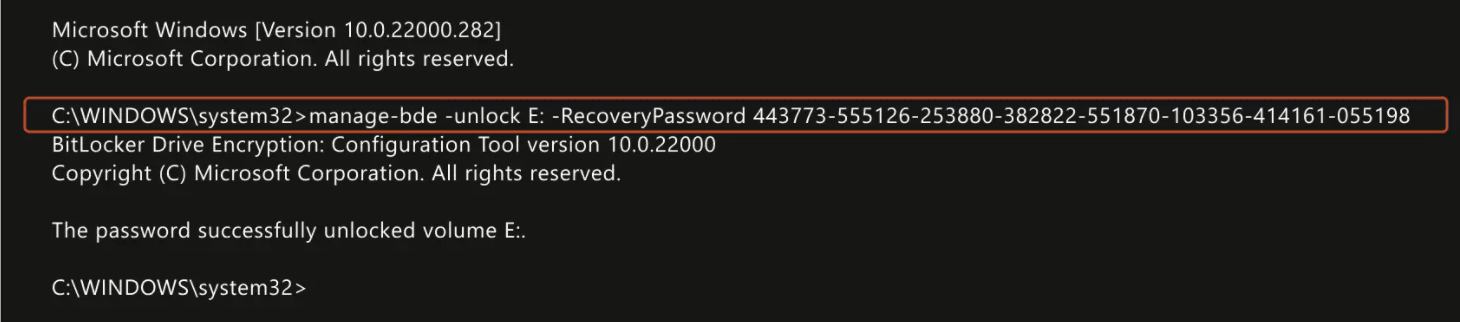
Way 5. Disable BitLocker Encryption by Command Prompt
Step 1. Press Win+S and input cmd to search the Command Prompt, select Run as an administrator.
Step 2. To unlock the BitLocker Encrypted Drive, type the command:
manage-bde -unlock Drive-Name: -RecoveryPassword Recovery-Code
Step 3. To disable BitLocker using CMD, type the command:
manage-bde -off Drive-Name:
Note: Replace the Drive-Name with the Drive Letter of BitLocker Encrypted Drive and Recovery-Code with the actual recovery key allotted while encrypting the drive.
Way 6. Disable BitLocker Encryption by Registry Editor
Step 1. Open the Registry Editor from the Start menu.
Step 2. In the Registry Editor, navigate to the following path:
Computer\HKEY_LOCAL_MACHINE\SYSTEM\CurrentControlSet\Control\BitLocker.
Step 3. Right-click the empty area on the right pane, add a new DWORD (32-bit) value, and name it as PreventDeviceEncryption.
Step 4. Open the DWORD value and set the value data from 0 to 1 in hexadecimal format and click the OK button.
![]()
Way 7. Disable BitLocker Encryption by PowerShell
Step 1. Run the PowerShell as an administrator from the Start menu.
Step 2. To disable BitLocker using PowerShell, type the command:
Disable-BitLocker -MountPoint Drive_Name:

Note: Replace the Drive_Name with the Drive Letter of BitLocker encrypted drive.
Way 8. Disable BitLocker Encryption by Group Policy Editor
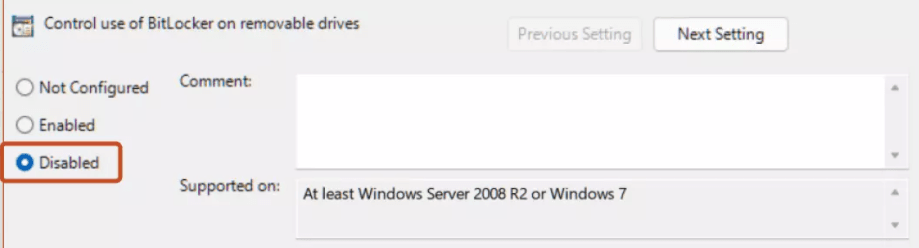
Step 1. In the Start menu, type Group Policy Editor and hit the enter key.
Step 2. Navigate to the following path:
Computer Configuration > Administrative Templates > Windows Components > BitLocker Drive Encryption > Removable Data Drives and double-click the Control use of BitLocker on removable drives option.

Step 3. Select the Disabled option and click the OK button.
Better Way to Password Protect Files on USB Drive in Windows 11
If you want to disable BitLocker encryption to prevent it from automatically encrypting your drive in Windows 11, but you still want to encrypt your important files, you can try the secure backup software AOEMI Backupper Professional.
It can directly backup files and encrypt them on USB. In this way, you only need to enter the password when restoring the encrypted files, instead of entering it every time you open the USB as BitLocker encryption does when it encrypts the USB drive.
Besides, it supports all versions of Windows 11 as well as many other Windows systems such as Windows 10/8.1/8/7/XP/Vista, etc. Then you can follow the graphic tutorial below to password protect your important files in Windows 11.
You can download the trial version to try it free for 30 days, and if you want to continue using it after that, you can upgrade to the official version.
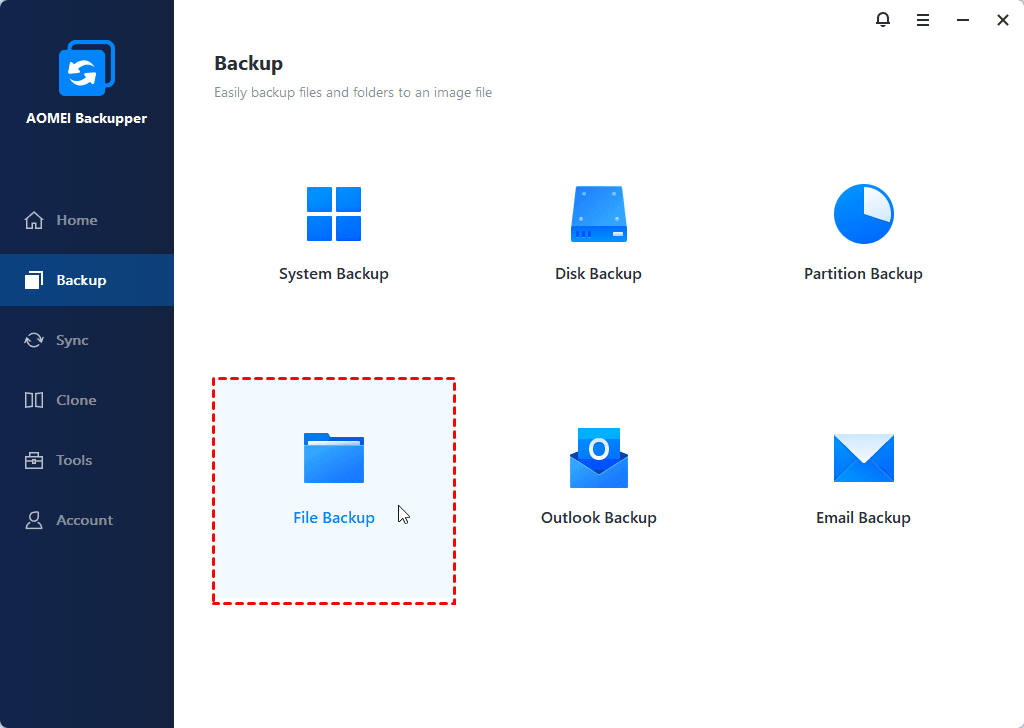
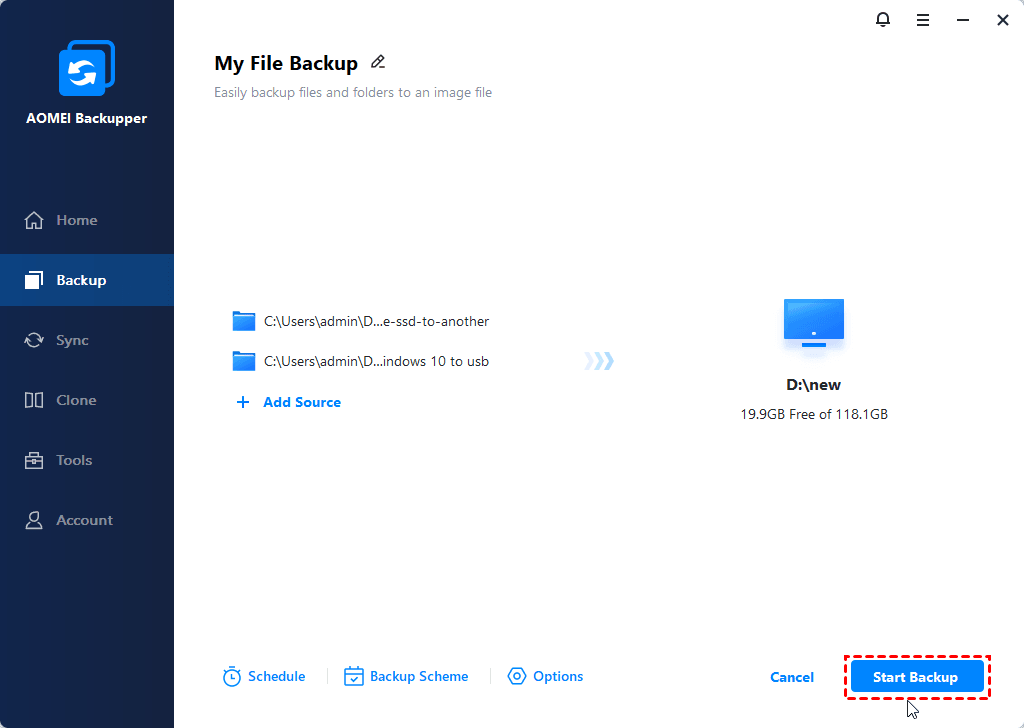
Step 1. Download AOMEI Backupper Professional, install, and open it. Then click Backup > File Backup.
Tip: If you are a Windows Server user, you can pick AOMEI Backupper Server.
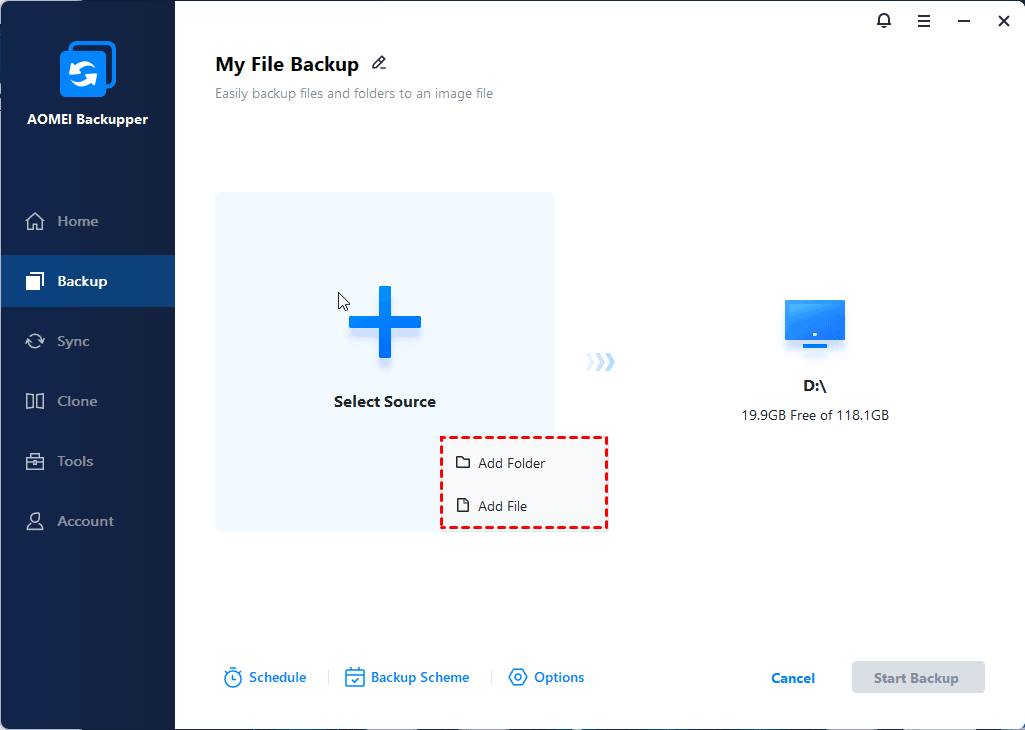
Step 2. Click Add File or Add Folder to select the files or folders you want to backup.
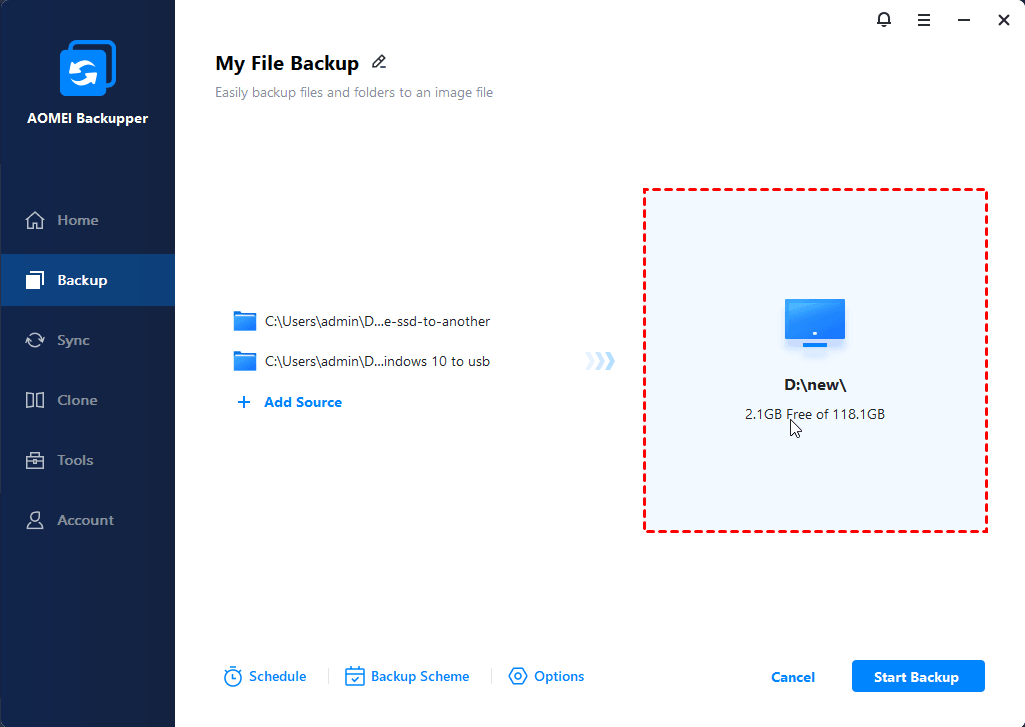
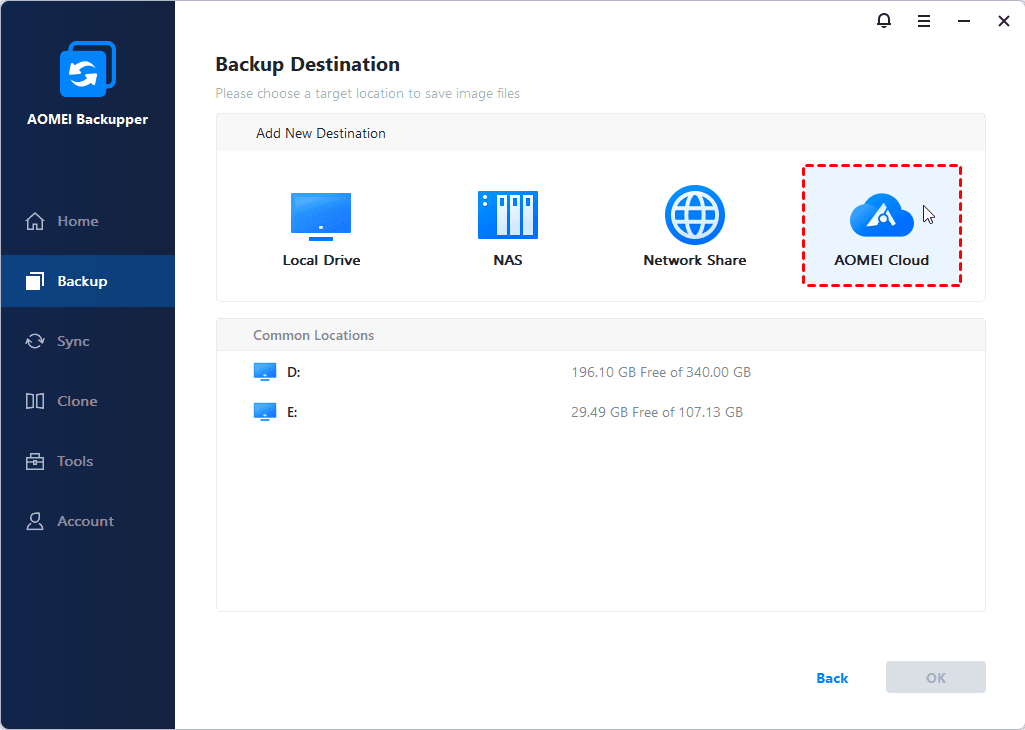
Step 3. Choose the USB drive as your destination.
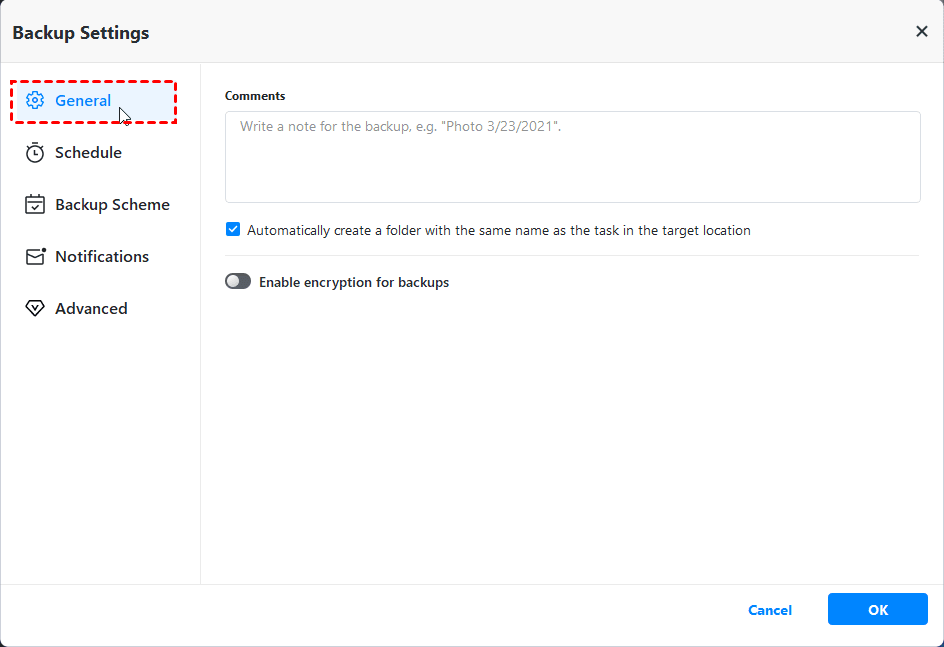
Step 4. To password protect the specific file on the USB drive, just click Options at the bottom, and click General > Enable encryption for backups. Then, you can type the password > confirm the password > click OK.
Step 5. Confirm all your operations and click Start Backup to password protect the files on USB drive in Windows 11.
Notes:
- Schedule Backup: To better protect your data, you can run scheduled backups. It allows you to set a fixed frequency to backup your files regularly, such as Daily, Weekly, Monthly, Event trigger and USB plug in.
- Backup Scheme: You can choose different backup methods (Full/Incremental/Differential backup) and enable automatically backup cleanup feature to save your disk space.
💛 How to backup files to AOMEI Cloud
There is a growing trend to backup files to cloud storage. Compared to a USB drive, cloud is a safer place to keep your important files because it is less subject to getting lost or infected. You can backup files to AOMEI Cloud if you have an AOMEI account. You'll get 1TB free storage for 15 days after you sign up for an AOMEI account.
Summary
This article shows you 8 methods to disable BitLocker encryption in Windows 11 to prevent it from automatically encrypting USB drives. If you want to encrypt your files better, you can choose the safe and secure backup software AOMEI Backupper Professional to help you achieve the goal.
It allows you to backup your files directly and encrypt them in the USB, and you only need to enter the password when you restore the encrypted files instead of entering it every time you open the USB. It also has no version restrictions, so it supports all versions of Windows 11 as well as other Windows systems.
Moreover, it is also an excellent cloning software, you can easily clone Bitlocker encryption disk in Windows 11/10/8.1/8/7, etc. After cloning, you can boot from the cloned disk successfully.