Burn Windows 11 ISO to USB with Top 3 Media Creators
Wanna know the best free ways to burn Windows 11 ISO to USB and make it bootable? From this article, you can figure this task out effortlessly with recommended 3 methods.
By Jonna Updated on January 24, 2024
User case: Need Windows 11 burn ISO to USB
I want to install Windows 11 ISO into a 32GB USB flash drive so in case I have to do a reinstall of Windows 11 pro on my Dell XPS 15 9520 laptop, I will have the flash drive with me.
Can someone post a link to the best tutorial for this? How long will this process take? I want to have this USB flash drive with me in case I have to do a clean reinstall of Windows 11 Pro. Any idea would be appreciated.

Burning Windows 11 ISO to USB is useful to perform an upgrade or clean install your OS. If you are looking to create a Windows 11 bootable USB, you are in the right place. In this article, I will introduce you to the simple and free ISO burners for Windows 11 to accomplish this task, and present a detailed illustration of the bootable USB creation process. If you are in urgent need, please continue reading the following contents carefully.
What is the best way to burn ISO to USB on Windows 11?
The Windows system does not provide a tool to burn ISO files to USB. Although you can use the DiskPart command line to accomplish this task, this is a complicated process that requires specialized computer knowledge. Typing a wrong command will probably bring your computer to a halt, so it is not suitable for novice computer users.
Among the Windows 11 media creation tools, Windows Media Creation Tool, Rufus, and AOMEI Backupper Standard are outstanding representatives. They are all free and easy to use. In the following, I will give you details on how to use these 3 simple tools to burn Windows 11 ISO to USB in a few steps.
How to burn Windows 11 ISO to USB in 3 ways
You will learn the specific steps here to make Windows 11 ISO write to USB with AOMEI Backupper Standard, Rufus, and Windows Media Creation Tool. Please make sure that your USB flash drive is at least 8 GB or larger in size.
👉 #1. Make Windows 11 burn ISO to USB with AOMEI Backupper Standard🔥
👉 #2. Let Windows 11 ISO write to USB with Rufus🔥
👉 #3. Burn ISO to USB on Windows 11 via Media Creation Tool
👉 How to install Windows ISO file from USB
#1. Make Windows 11 burn ISO to USB with AOMEI Backupper Standard
Speaking of the best free media creation tool for Windows 11 burning ISO to USB, AOMEI Backupper Standard is a go-to option, which owns an intuitive interface and no technical support required. It has the following benefits:
💿 It supports 2 boot modes: both UEFI/GPT and Legacy BIOS/MBR. If your computer supports Unified Extensible Firmware Interface (UEFI), you should format the USB flash drive as FAT32 instead of NTFS in advance.
💿 You don't need to prepare an ISO file in advance, because this software will take care of the bootable media creation process.
💿 It helps you create image backup for the system, disk, partition, or file. Then when something bad occurs on your PC, you can restore Windows 11 to previous date that works well and recover important data as soon as possible.
💿 This freeware is compatible with all Windows systems (Windows 11/10/8/7). And you can try AOMEI Backupper Server if you are using Windows Server 2022, 2019, 2016, 2012 (R2), 2008 (R2), 2003, etc.
Here is the stepwise tutorial for you to create Windows 11 bootable USB with AOMEI Backupper Standard. Download and install it on your PC to have a try.
Tip: You should be aware of that the process will completely overwrite the data on the USB. So backup your USB if there are important files on it.
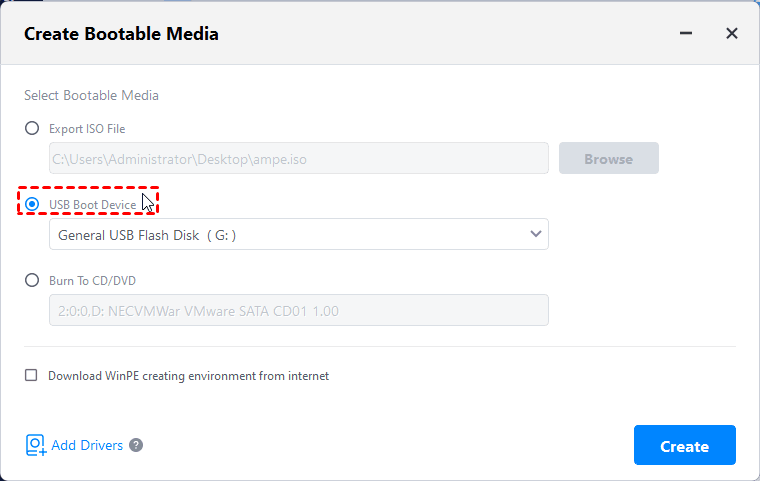
1. Launch this freeware, click Tools then select Create Bootable Media.

2. Select bootable disc type from Linux based or Windows PE based. It's recommended to select Windows PE. This option is suitable for everyone and offers you more operations than Linux. Click Next to continue.

3. Choose USB Boot Device and then click Next to move on. Wait for the process to complete and click Finish.
Notes:
🔍 If you want to restore system to different hardware, you can upgrade to Professional edition to enjoy the Universal Restore feature.
🔍 You can also create Windows recovery environment that can be accessed from the Windows boot menu, so you do not need to create bootable device to boot a failed system. (Paid feature).
#2. Let Windows 11 ISO write to USB with Rufus
You can also choose to burn Windows 11 iso to USB via Rufus. Follow the steps below:
1. Go to Microsoft's official website to download the Windows 11 ISO file. Then download the Rufus app on your PC and launch it.
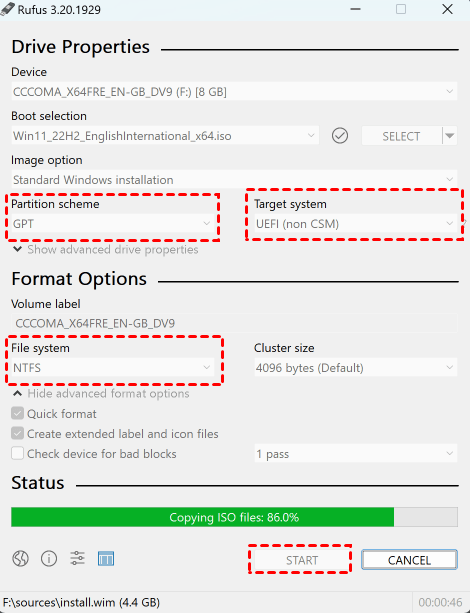
2. Under Device Properties section, select your USB flash drive in Device. Click the Select button to select the Windows 11 ISO file you downloaded in step 1. For Image Option, set the dropdown to Standard Windows Installation. Set Partition Scheme to MBR/BIOS or GPT/UEFI according to your disk style.
3. Under Format Options, set the Volume Label to type in a name for the drive. For the rest of the options, keep them as the original set.
4. When the warning comes up that all data on the flash drive will be wiped, click the OK button.
5. Confirm your settings, click the Start button, and wait for the USB to create. You will see a progress bar under the Status section while it’s made.
#3. Burn ISO to USB on Windows 11 via Media Creation Tool
Using the Microsoft official Media Creation Tool to make a Windows 11 bootable USB is also a popular option. Here is what to do:
1. After downloading this tool, open it. You'll need to be an administrator to run this tool. If you agree to the license terms, select Accept.
2. On the What do you want to do? page, select Create installation media for another PC, and then select Next.
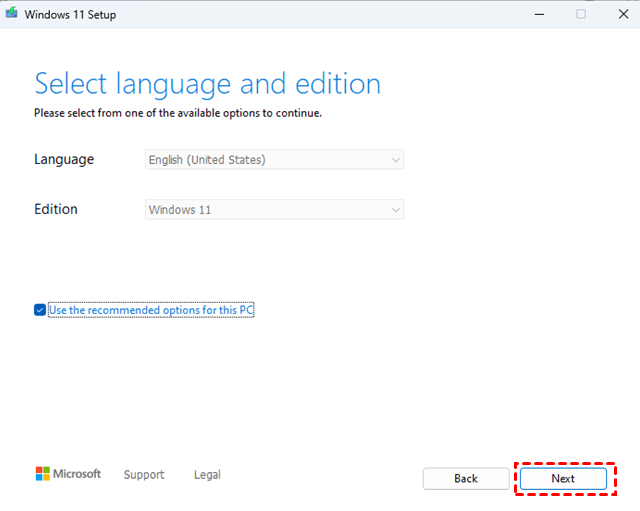
3. Select the language and edition for Windows 11.
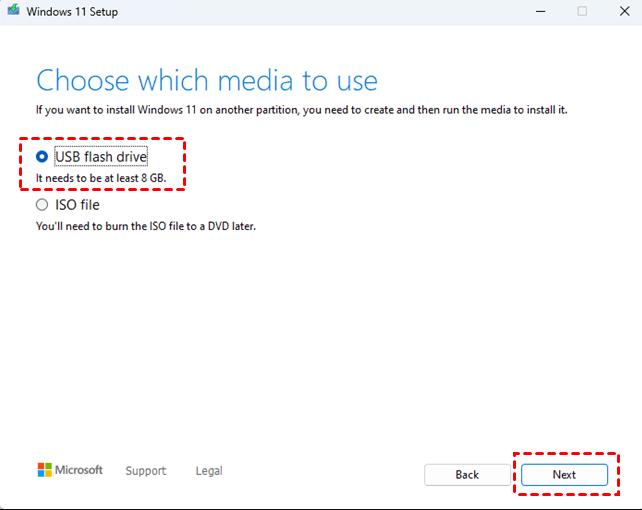
4. Choose which media you want to use: click on USB flash drive.
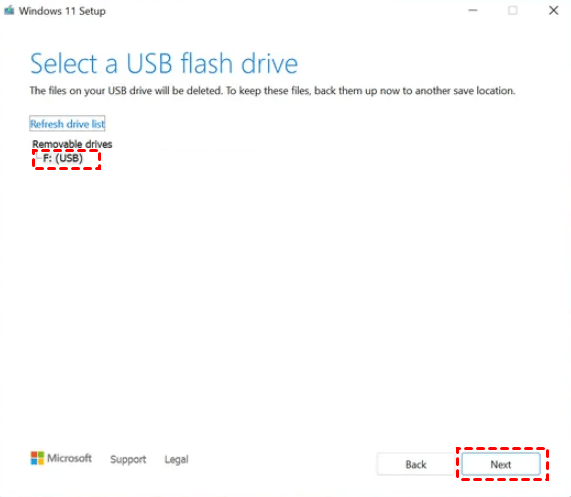
5. Select the connected blank USB drive from the list, and click Next.
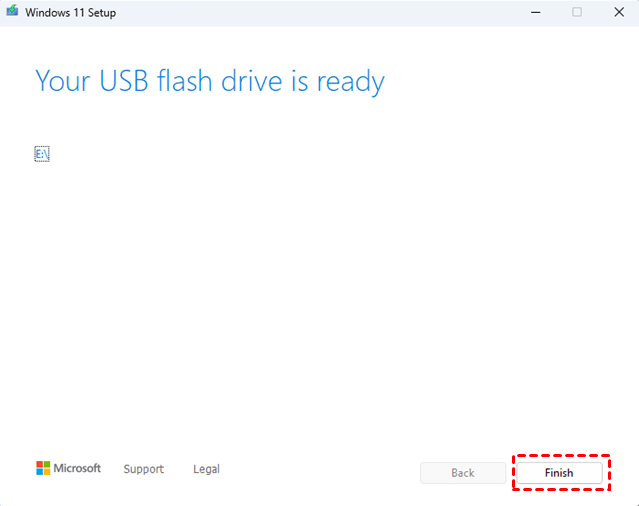
6. Wait for the process to complete. Once it is done, you will have a Windows bootable USB in hand.
How to install Windows ISO file from USB
Once you have a Windows 11 bootable USB in hand, you can perform clean install Windows 11 on the same or another PC, or you can reinstall OS in case of major unforeseen system problems, like Windows 11 not booting up. Here are the steps on how to do it.
1. Connect the USB flash drive you have created before to a new PC.
2. Turn on the PC and press the key that opens the boot-device selection menu for the computer, such as the Esc/F10/F12 keys (according to the manufacturer and computer brands). Select the option that boots the PC from the USB flash drive.
3. When the Windows Setup appears, follow the instructions to install Windows ISO files from USB.

4. Once your Windows boots up correctly, remove the USB flash drive.
Conclusion
Now it’s your turn to choose which tool to help you burn Windows 11 ISO to USB. Once you create a portable installation USB, you can clean install Windows 11 on the same or another PC, or you can reinstall OS in case of any unexpected system problems.
Sincerely, it is highly recommended that you give the best free media creation tool - AOMEI Backupper Standard a chance, for it not only supports you to make a bootable USB with no file system limitation but offers you various outstanding features. As the best alternative to SyncToy on Windows 11, you can also use it to sync files and folders to other locations such as external hard drives, USB devices, clouds, or NAS devices. Why not give it a try now?

