Top 8 Ways to Fix 100% Disk Usage in Windows 11
Is your computer also running at a snail’s pace due to 100% disk storage? You should read this post to find out what causes this issue and what’s the most effective way to solve this problem.
By Maggie Updated on January 26, 2024
User case
100% disk usage on Windows 11 after updating
Hello, recently Windows offered free update from Windows 10 to Windows 11. Since completing this update, I have been having the issue whereby task manager shows that 100% disk being used on a constant basis. Laptop runs at a snail's pace now and it's only 3 months old. Could you please assist?
- Question from Microsoft Community
As you can see in the above case, when disk usage is high or has reached 100%, your computer will run at a snail’s pace or even the whole system will get stuck. If you want your PC to be smooth again, you need to find an effective solution to solve the system 100% disk usage problem. However, before that, let’s figure out something below:
What is 100% disk usage?
In Windows 11, when your computer shows 100% disk usage, it means your hard drive is working at full capacity and can't handle any more tasks or data. This makes your system really slow, with delays in responding to mouse clicks and keystrokes, and it might even crash.
100% Disk usage V.S. CPU usage
While both reaching 100% disk usage and running out of memory can cause system performance degradation, they are two different problems with different root causes and solutions:
- Reaching 100% disk usage usually means that the disk is reading or writing data at its maximum speed, which can be caused by background processes, malware, hardware issues or driver problems. This can lead to slower system response as other processes may not be able to access the disk in time.
- Insufficient memory is when the computer's random access memory (RAM) is insufficient to support the programs and operations that are currently running, causing the system to start using virtual memory (swap files) on the disk to expand the available memory. This causes the system to become very slow because the disk speed is much lower than the RAM speed.
Why is my disk at 100 all the time on Windows 11?
Here are the common reasons why disk usage shows 100%:
❖ Too many programs launch at startup
❖ Outdated device drivers
❖ Incorrect Windows services
❖ Corrupt or lost system files
❖ Disk drive errors
❖ Conflict with anti-virus software
❖ Windows version is outdated
❖ Too many temporary files
❖ Virus or malware attack
❖ Incorrect virtual memory
How to fix 100 disk usage
Here are 8 ways to perform Windows 11 disk 100% usage fix for the purpose of releasing Window 11 disk usage and making your computer run smoothly. You can try each of them to solve your problem, and if you already know the cause, refer to the specific solution from the content menu.
✍✍Before you troubleshoot the 100 disk usage Windows 11 issue with the below methods, it's always suggest to protect your disk data in case of any misoperation:
👉Back up your disk to prevent data loss
Method 1. Stop (SysMain) SuperFetch service
SuperFetch, known as SysMain in Windows 11, works to preload applications into memory before you boot, which helps reduce boot time and loads applications more efficiently. While this is a useful feature that can improve performance, it can lead to high disk usage. If you are experiencing system 100% disk usage problems, you should stop this service.
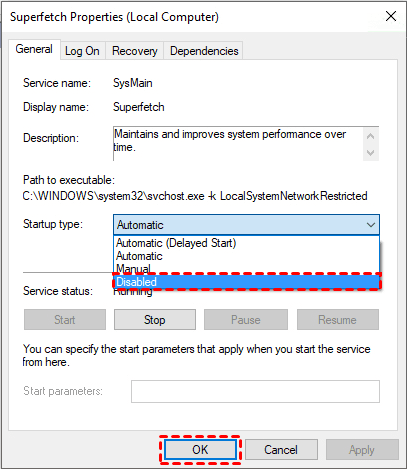
1. Press Windows+R to invoke the Run dialog, type services.msc and press Enter to open the Services window, and then double-click to open SuperFetch.
2. In the SuperFetch Properties window, click the dropdown menu next to Startup type and set it to Disabled and click on Stop to terminate the service. Then tap OK.
Method 2. Update your device drivers
The device drivers may also cause your Windows 11 disk usage 100% problem. If the steps above did not solve this issue, you should update your drivers.
1. Press Win+X to open a dialog box and select Device Manager.
2. Find the device with yellow triangle icon, right-click these devices and click Update Driver.
3. In the new window, tap Search automatically for drivers to let Windows install the necessary updates.

Method 3. Reset virtual memory
Virtual memory, which is an extension of the computer’s physical memory, combines RAM and a portion of the hard disk. When there is no room in RAM, Windows stores files in virtual memory. However, in some cases, PCs can take up major disk space, which can significantly increase disk usage. To avoid this situation, we can reset the virtual memory.
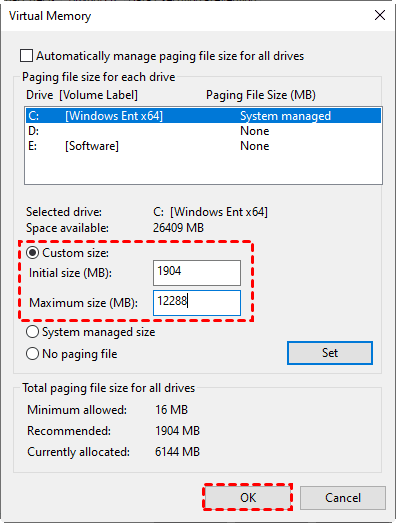
1. Press Windows+R, then type “sysdm.cpl” and hit Enter to open the “System Properties” window.
2. In this page, move to the “Advanced” tab and click on “Settings” under Performance.
3. Under the “Performance Options” window, move to the “Advanced” tab and click on “Change”.
4. Untick the Automatically manage paging file size for all drivers checkbox and choose “Custom size” and enter Initial size and Maximum size. Then tap OK.
Now, restart your PC, and the disk usage should be significantly reduced.
Method 4. Change power options to high performance
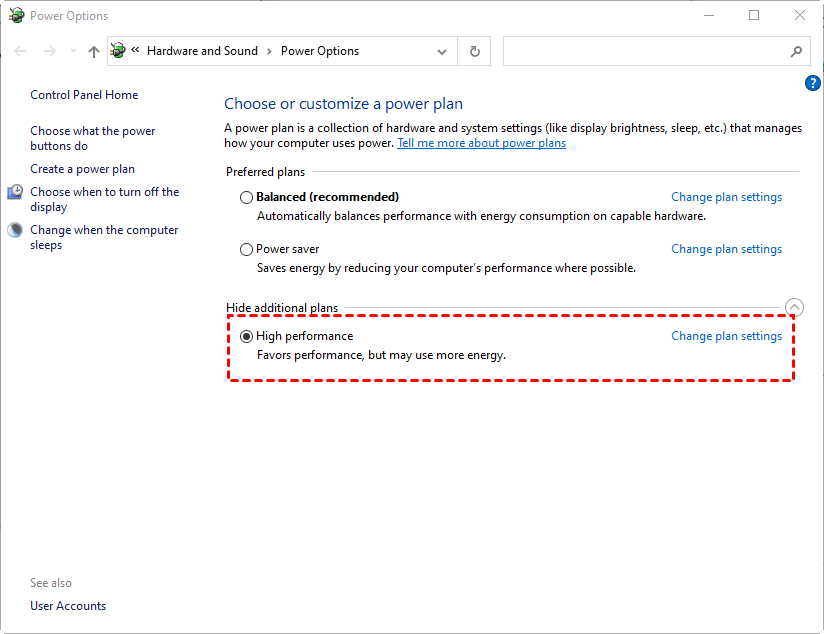
The default power option in Windows 11 is Balanced, you can try changing it to high performance to solve the problem of 100% disk usage.
1. Right-click on the Start button and select Power Options>Power & sleep>Additional power settings.
2. In the Choose or customize a power plan window, select High performance.
Method 5. Disable antivirus software temporarily
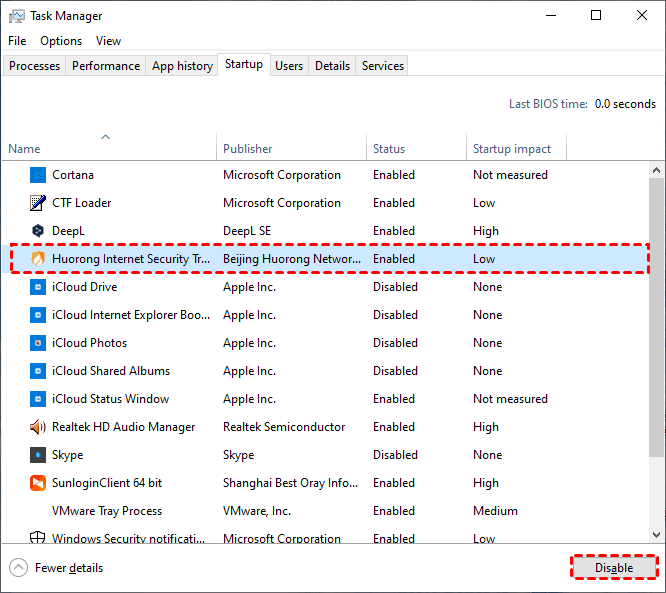
Usually, Windows 11 built-in Windows Defender is sufficient for anti-virus needs. Therefore, there is no need to install additional third-party antivirus software, which may conflict with the system and cause Windows 11 system high disk usage. Therefore, you need to disable them temporarily.
Under the Task Manager, switch to Startup, find the third-party anti-virus software, select it and click the Disable button below.
Method 6. Disable scheduled defragmentation
Windows 11 defragments the hard disk periodically to improve performance. However, during this process, it increases Windows 11 disk usage to 100%, making the system sluggish and unresponsive. Therefore, it’s necessary to disable scheduled defragmentation for Windows 11.
1. Tap Start and search for Defragment. Now, open Defragment and Optimize Drives.
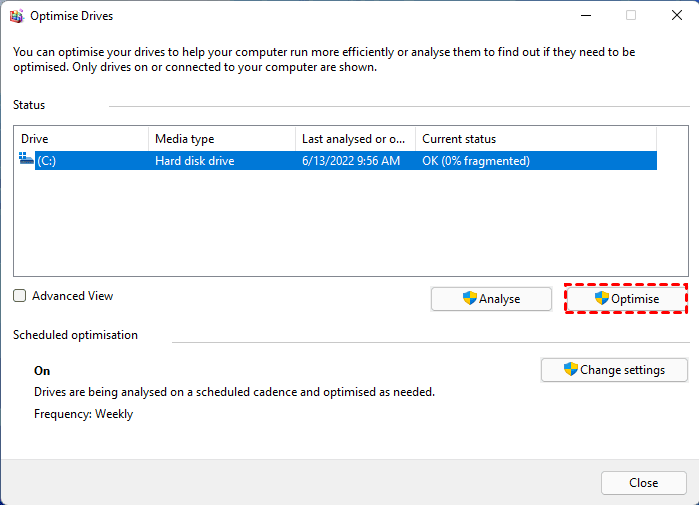
2. Next, click on Change settings. On the Optimize Drives window, untick the Run on a schedule (recommended) checkbox and click on OK.
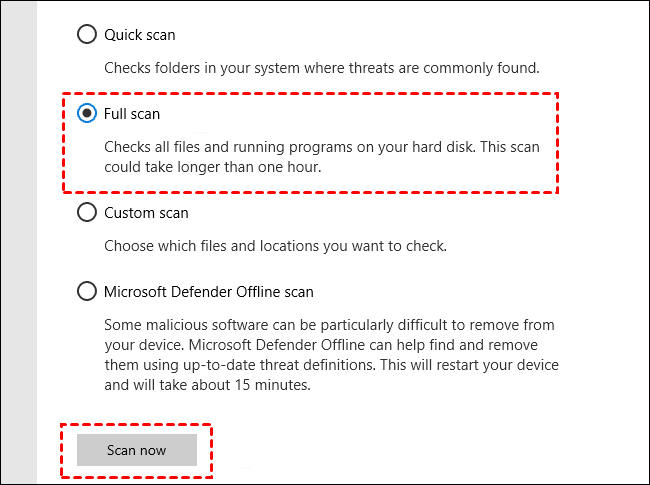
Method 7. Run a viruses or malware scan
1. Open the start menu, Type Windows Security into the search field and hit Enter.
2. Click on the Virus & threat protection option.
3. Choose to perform a Full scan, and click Scan now to begin the process. If any viruses or malware are scanned, please remove them promptly.
Method 8. Run SFC and DISM scans
1. Press Start and open the search box, type “cmd”, and select Run as administrator.
2. In the Command Prompt window, type sfc /scannow and press Enter.
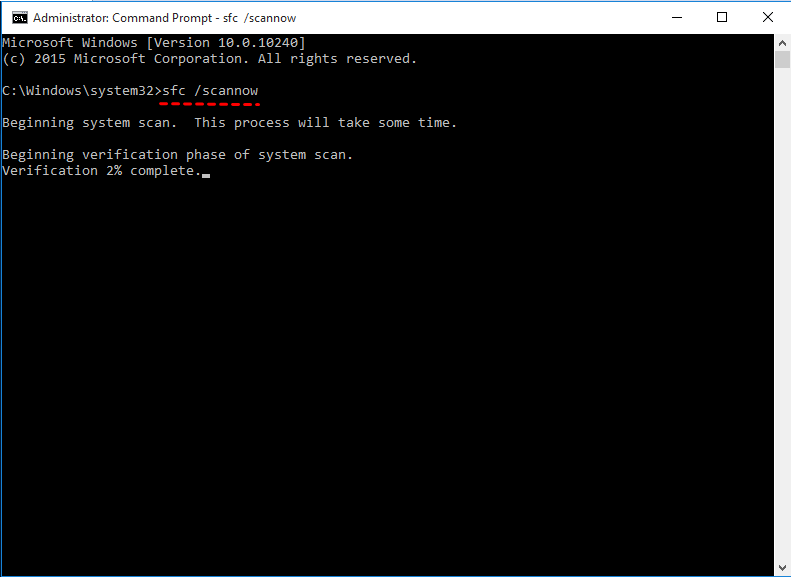
3. Type the following three commands one at a time and hit Enter after each:
◈ Dism /Online /Cleanup-Image /ScanHealth
◈ Dism /Online /Cleanup-Image /CheckHealth
◈ Dism /Online /Cleanup-Image /RestoreHealth
Tip: Wait for the scan to complete, which may take some time. It may report that Windows Resource Protection did not find any integrity violations, or that it found corrupted files, but was unable to repair some of them. If there are no errors, you can now close the console.
Back up your disk to prevent data loss
Now you’ve familiar with the 8 responses on how to fix 100% disk usage on Windows 11, you can try these provided methods to make your computer stop running slow and improve your computer performance. Nonetheless, the above-mentioned problems may pose a threat to the security of the data therein due to disk failure.
√ Therefore, in order to be free from data loss risks, it is recommended that you can backup your disk data regularly, so that you can restore easily and securely when you face accidental data loss. Now, you urgently need a full-featured disk backup software---AOMEI Backupper Standard.
√ With this free and professional disk backup software, you can easily backup your disk to various locations, such as USB drives, NAS devices, external hard drives, etc. In addition, it enables you to backup files/system/disk/partition.
Now let’s get the graphical instructions to backup your disk with AOMEI Backupper. Firstly, download and install AOMEI Backupper on your computer.
Then, launch AOMEI Backupper Standard, select Backup in the left menu, and then tap Disk Backup > Add Disk > choose a destination path > Start Backup.

Further tip: how to avoid 100% disk usage
As you’ve already learned from this post, there are a number of reasons why your computer’s hard drive is at 100% usage: Too many programs running at the same time, a defective hard drive, or even malware running in the background. So how to prevent the same trouble in the further and boot your PC performance?
# 1. Update your drivers
If your laptop or PC's drivers are outdated, it can really mess with your computer's performance. Your programs might not work right, and your whole system could run really slow.
# 2. Install antivirus software
Like we said, malware can really ramp up your disk usage. So, make sure you scan your computer regularly for viruses, Trojans, and other nasty stuff that could be causing your disk to max out.
# 3. Disable start-up programs
A lot of times, when we turn on our computers, there are a bunch of programs that start up automatically, even though we don't really need them right away. This just adds to the disk usage problem. Here's a tip: Disable the programs you don't need right when you start using your computer.
It's pretty simple: Just press Ctrl, Alt, and Del at the same time, then open Task Manager. Go to the Startup apps tab, and you'll see all the programs listed there that start up when your computer does. Just right-click on the ones you don't need and select "Disable" from the menu.
# 4. Make sure there are no hard disk errors
If your hard disk is acting up, it can also lead to 100% disk usage. So, it's a good idea to check it often. Just press the Windows and R keys together, then type in "chkdsk C: /f /r" in the box that pops up.
If you're using Avira System Speedup Pro, you've got another option called Disk Doctor. It helps you check for hard disk errors more easily, so you can see if that's what's causing the high disk usage.
Wrapping things up
That’s all about the top 8 ways on how to fix 100% disk usage in Windows 11, to ensure your computer runs at normal speed again. Additionally, this post also recommends one best free disk backup software for you to backup your important data, so that you don’t have to worry about the data loss any more.
AOMEI Backupper owns an easy and clear interface, which allows you to perform needed tasks with just a few clicks. Furthermore, if you are stuck with other tough issues such as how to clone Windows 11 to another hard drive, clone SSD, or blue screen on Windows 11. This software can meet all your computer operation needs, why don’t you try it now?

